• This community needs YOUR help today. We rely 100% on Supporting Memberships to fund our efforts. With the ever increasing fees of everything, we need help. We need more Supporting Members, today. Please invest back into this community. I will ship a few decals too in addition to all the account perks you get.


    Sign up here: https://www.muzzleloadingforum.com/account/upgrades
  • Friends, our 2nd Amendment rights are always under attack and the NRA has been a constant for decades in helping fight that fight.

    We have partnered with the NRA to offer you a discount on membership and Muzzleloading Forum gets a small percentage too of each membership, so you are supporting both the NRA and us.

    Use this link to sign up please; https://membership.nra.org/recruiters/join/XR045103

Turning a Pedersoli Bess into a Dublin Castle Short Land Musket

Muzzleloading Forum

Help Support Muzzleloading Forum:

This site may earn a commission from merchant affiliate links, including eBay, Amazon, and others.
Hi,
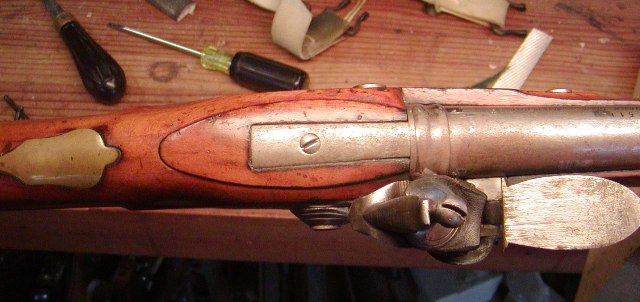
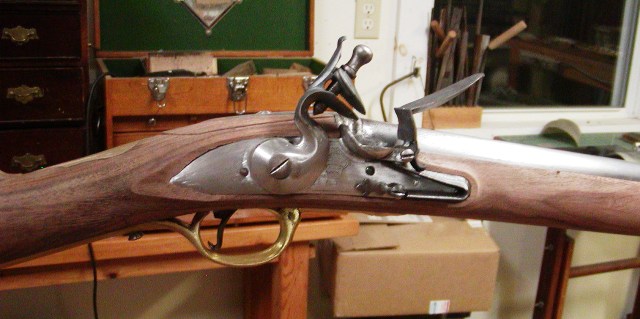
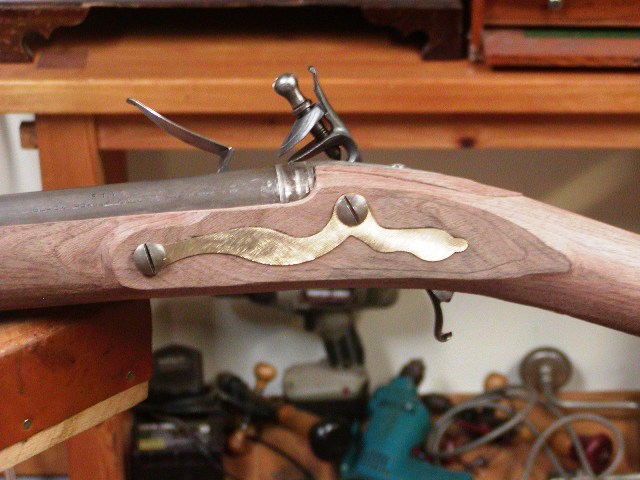
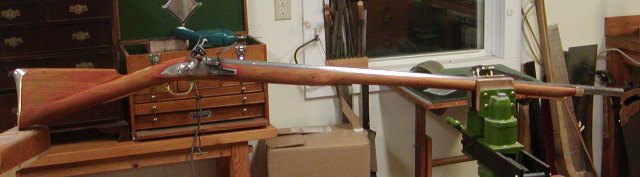
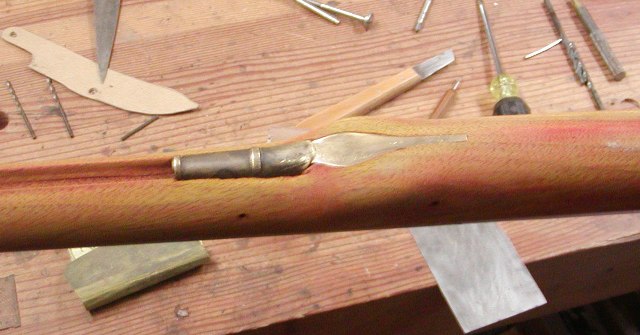
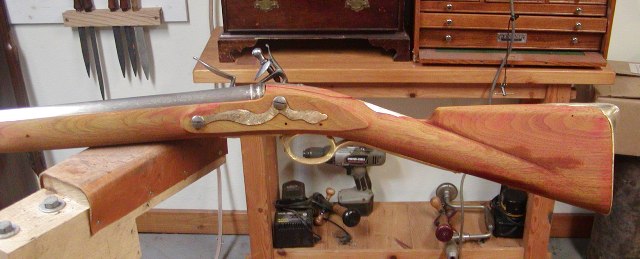
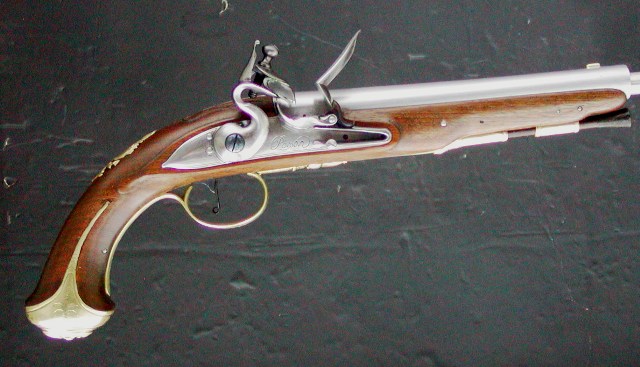
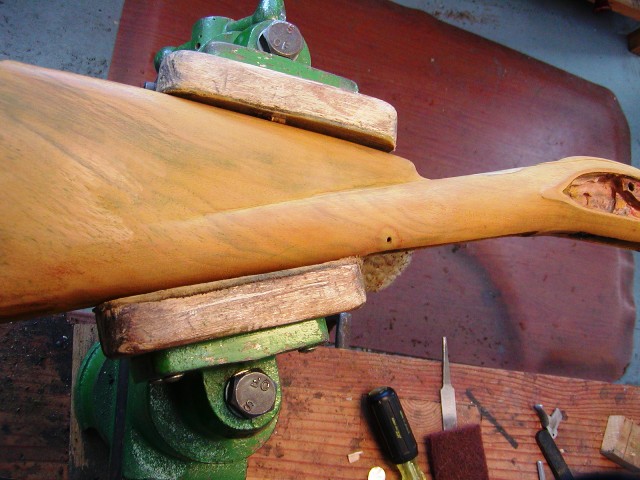
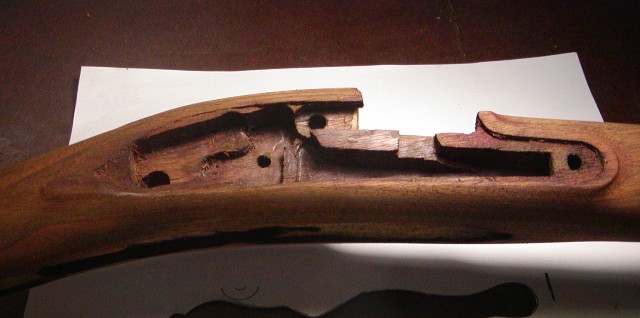
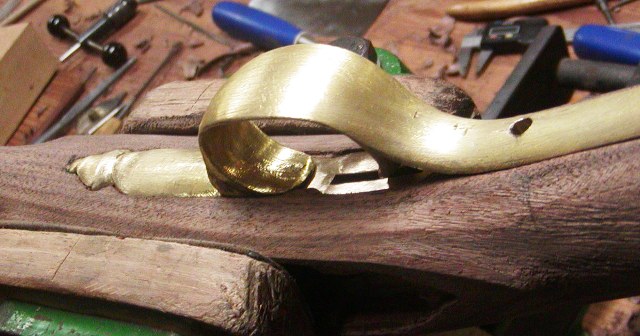
I refined the stock a bit more and inlet the trigger guard. When inletting these long guards, install the front first, pin it and then cut the mortise for the rear of the guard working backward. As the guard is set in, the rear will migrate forward so you have to plan for that. Fortunately, a Bess guard is very shallowly inlet so that forward movement is reduced a lot.
xzLxdll.jpg

The forward part of the bow should sit down on the trigger plate with no gap. The forward part of the trigger plate is inlet a little lower than the surface of the wood so the guard can sit down into its mortise.
f1bHxTQ.jpg

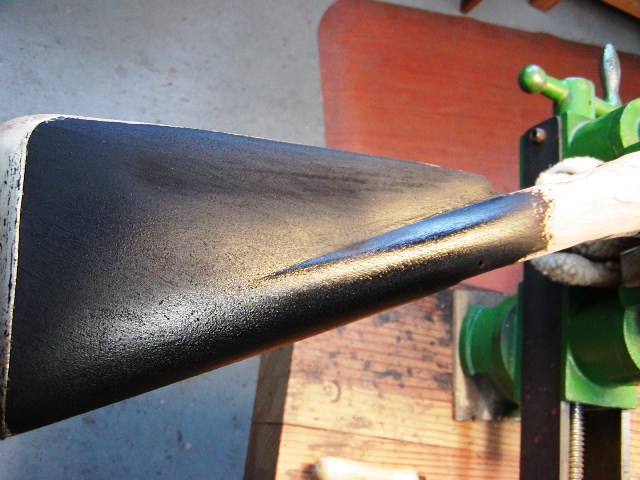
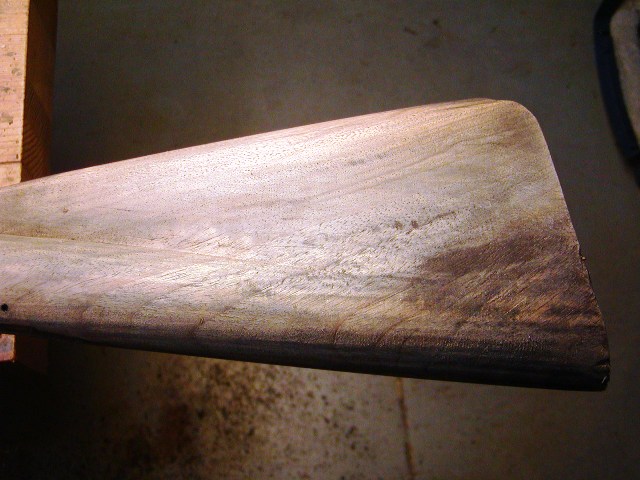
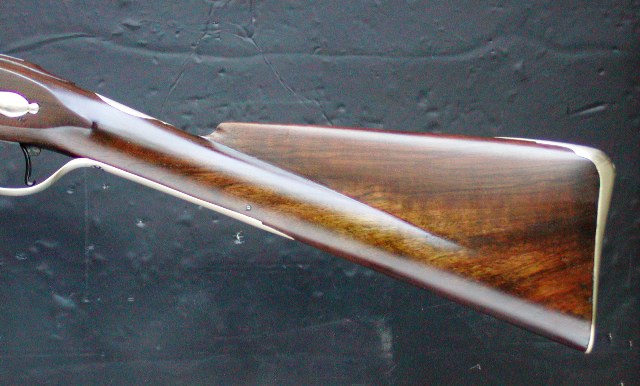
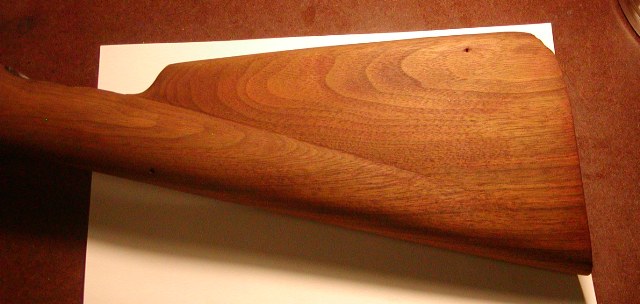
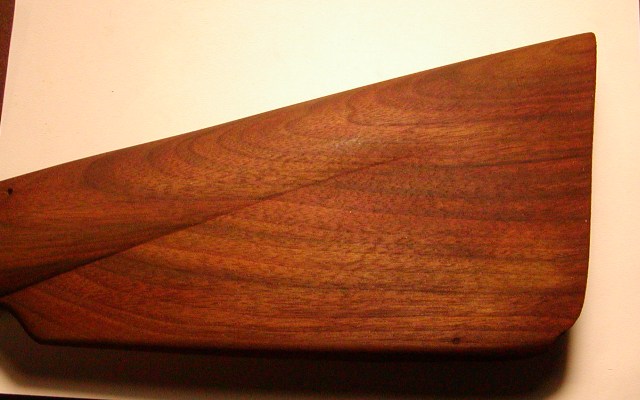
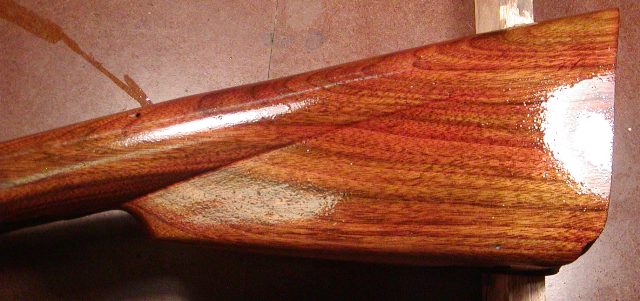
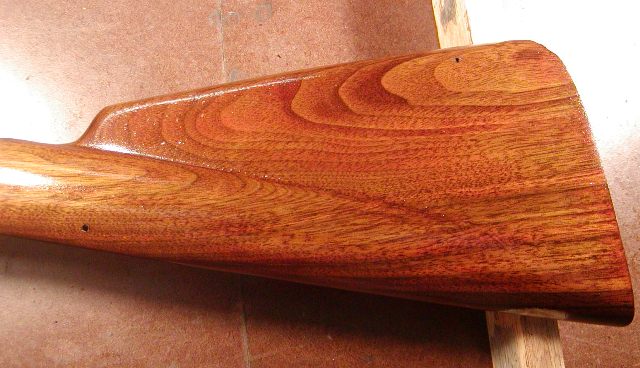
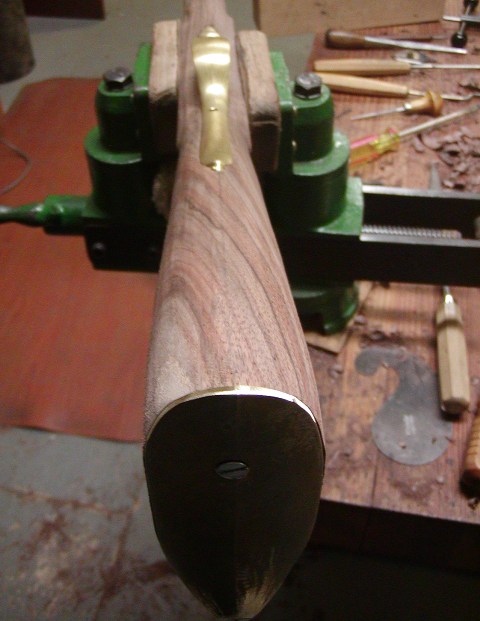
After installing the guard, I rounded the bottom of the stock. More wood will be removed from the sides thining the butt stock a bit.
O2ex7wj.jpg


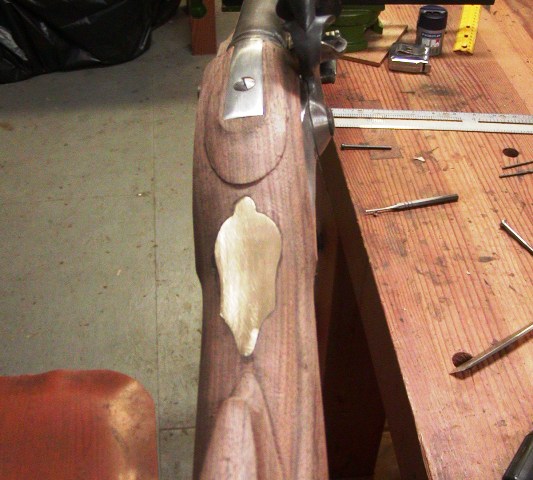
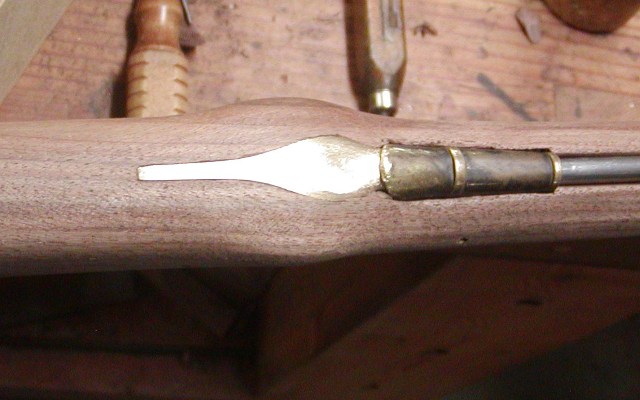
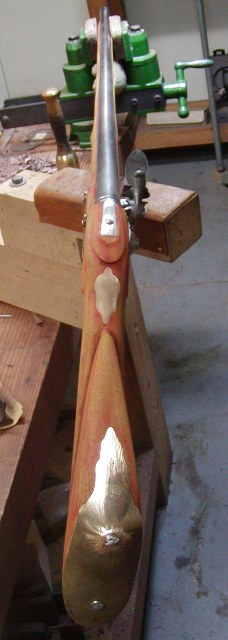
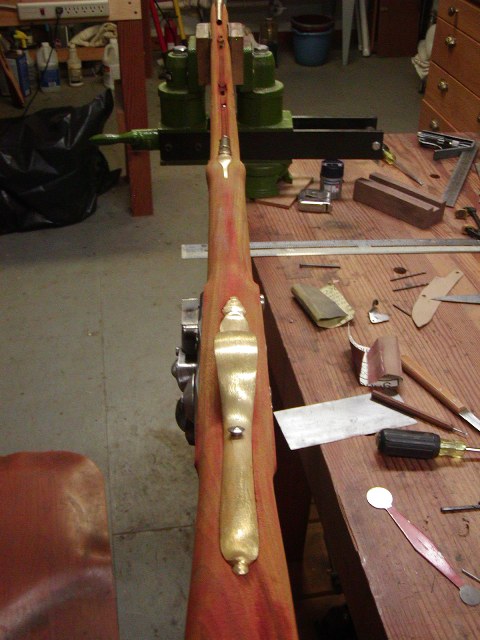
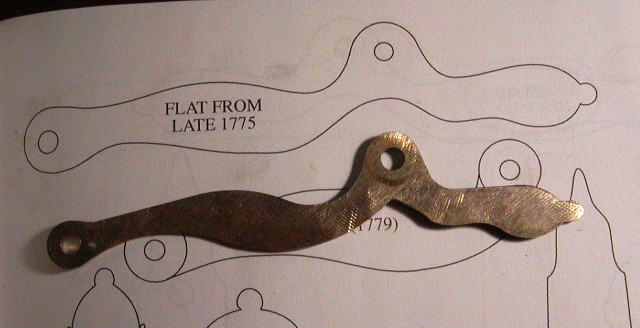
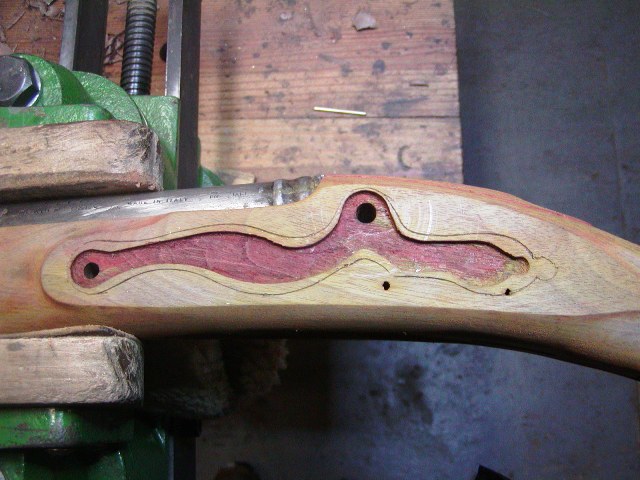
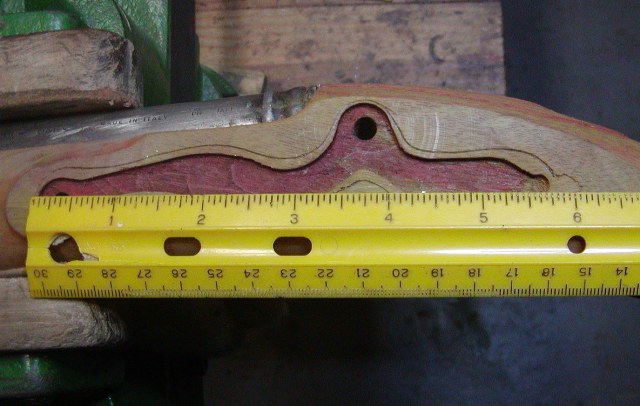
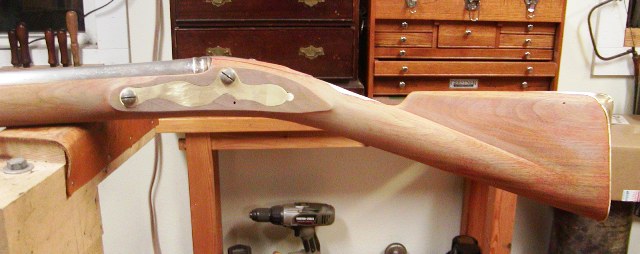
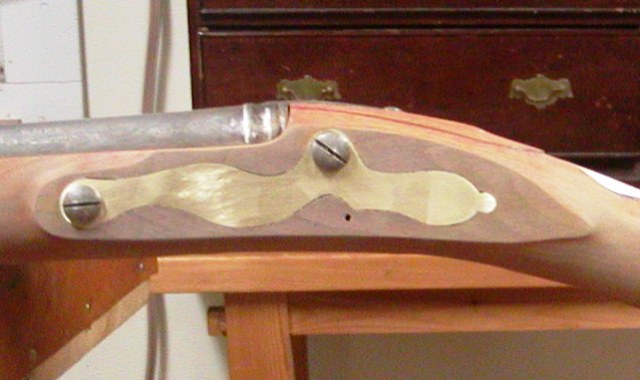
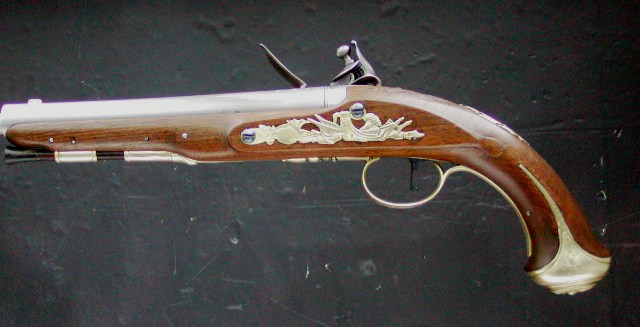
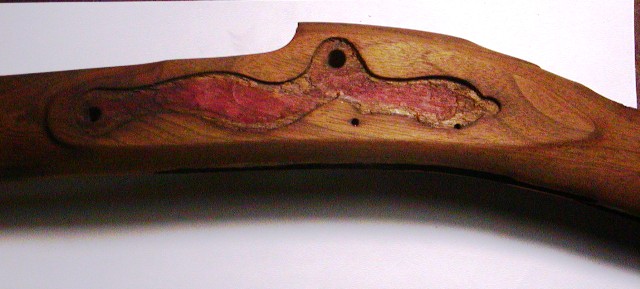
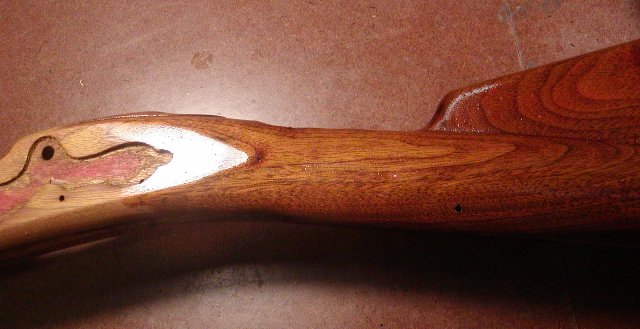
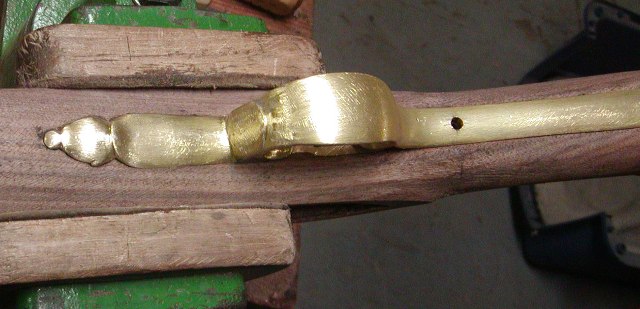
I began installing the thumb plate. First, I lined out the assembly using my drawings such that the bolt going through the wrist and attaching the thumb plate also anchors the trigger guard behind the bow and the rear of the trigger plate. The I marked the hole on the trigger guard, drilled through it and the trigger plate but only partially through through the stock. Then I located where I wanted the hole to end up on the top of the wrist, drilled down from that point until I met the other hole. Then I used a larger clearance drill sized for a 10-32 bolt to drill through the entire thickness from the trigger guard side. Finally, I drilled a hole large enough to fit the boss under the thumb plate a short way into the wrist from the top. Next I place the thumb plate down into the hole on top and remove wood from the center of the mortise.
mDGUwod.jpg

P5vuE8Y.jpg

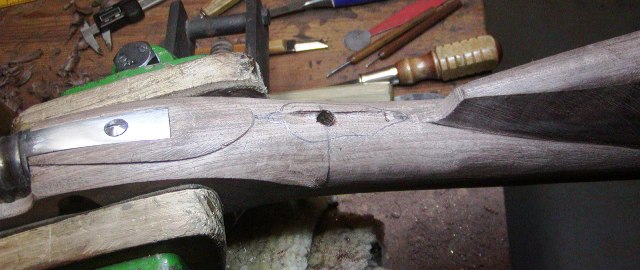
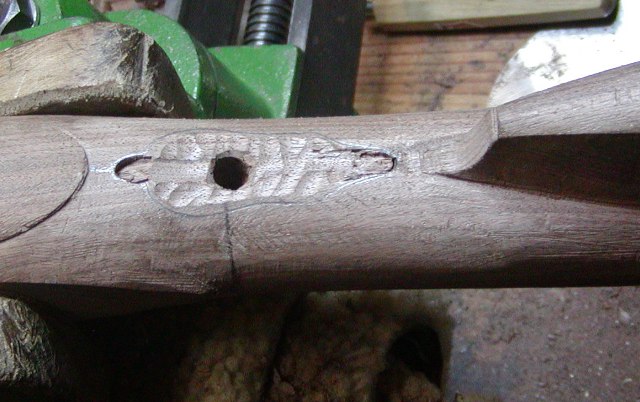
This allows the plate to sit down on the stock enabling me to outline it accurately. I'll post photos of the finished plate later.

dave
 
Hi,
Well, I am almost ready for finishing. The thumb plate went is nicely and I made a proper bolt for the guard and plate.
3DOm1ii.jpg

Notice how much closer the top of the plate is to the carved apron and the bottom is to the nose of the comb. Compare that with the Pedersoli stock.
qvdjx1g.jpg

The wrist on the Pedersoli is too long.
I refined the stock all over and here is where I am at. I still have more wood to remove and details to finalize but I am getting very close to done.
Notice the thin lock moldings so far. They will get smaller but I am getting close. I still have the bring the edges down to be flush with the plate in a few spots.
DMzORz8.jpg

The panel tails still need to be finished but compare my gun with an India-made pattern 1769 sold by Loyalist Arms.
28SM842.jpg

No need to cut that ugly notch for the flint cock if you shape the lock moldings correctly. Of course no pattern 1769s ever had those big "beaver tails".
cQepURl.jpg

rvWO2g8.jpg

The swell at the rear pipe is mostly done. It is not very big on the short land pattern Besses.
loxl5Pi.jpg

kI3BbNO.jpg

Tomorrow, I'll refine most of the remaining details and then finish the stock mostly fine files and scrapers. I won't use sandpaper too much to preserve a vintage look.

dave
 
Maybe I missed it but why was the design meant to have the swell in the stock at the rear entry pipe. Sorry, but I've always thought it ugly
 
Maybe I missed it but why was the design meant to have the swell in the stock at the rear entry pipe. Sorry, but I've always thought it ugly
I have always thought of it as a hand hold , maybe to position the hand correctly . I do know the British army had trouble with new troops, who, in trying to balance the firearm held the fore end too closely and as a result they fired their volleys too high .
 
I have always thought of it as a hand hold , maybe to position the hand correctly . I do know the British army had trouble with new troops, who, in trying to balance the firearm held the fore end too closely and as a result they fired their volleys too high .

I think there were many reasons for the swell, as you said a hand hold position for bayonet drilling. I think it was also a common characteristic of many Dutch and German period muskets, you see it on some Jaeger Rifles, Dutch and Prussian muskets too. On my long land 1742 Bess, its a beneficial feature, with such a long heavy robust musket. When teh order to stand and shoulder, you slap the swell area with your right hand, the swell, you hit the swell directly at many points in the drill.
 
Hi,
Most authors write the swell was to give a better hand grip. Some write that the swell was for a better grip when using the bayonet and others just better grip. I think Nick has a good suggestion as well. It may have helped the soldier position his left hand during drills with the musket. Ordnance must of thought it important because they retained it throughout the period the Bess was used. It makes building the stock a bit more complicated and time consuming so with all the cost cutting measures adopted for the musket during its service life, they retained the swell.

dave
 
Hi,
Well, I am almost ready for finishing. The thumb plate went is nicely and I made a proper bolt for the guard and plate.
3DOm1ii.jpg

Notice how much closer the top of the plate is to the carved apron and the bottom is to the nose of the comb. Compare that with the Pedersoli stock.
qvdjx1g.jpg

The wrist on the Pedersoli is too long.
I refined the stock all over and here is where I am at. I still have more wood to remove and details to finalize but I am getting very close to done.
Notice the thin lock moldings so far. They will get smaller but I am getting close. I still have the bring the edges down to be flush with the plate in a few spots.
DMzORz8.jpg

The panel tails still need to be finished but compare my gun with an India-made pattern 1769 sold by Loyalist Arms.
28SM842.jpg

No need to cut that ugly notch for the flint cock if you shape the lock moldings correctly. Of course no pattern 1769s ever had those big "beaver tails".
cQepURl.jpg

rvWO2g8.jpg

The swell at the rear pipe is mostly done. It is not very big on the short land pattern Besses.
loxl5Pi.jpg

kI3BbNO.jpg

Tomorrow, I'll refine most of the remaining details and then finish the stock mostly fine files and scrapers. I won't use sandpaper too much to preserve a vintage look.

dave

Dave, why was the barrel tang carving stepped down with a semi circular carving into the larger carving? The convex shape ?
 
Hi Nick,
I am sure the flat area bordering the tang was to maintain more strength of wood around the tang. The concave apron was probably just fashion or tradition. It varied a lot from gun to gun with some very concave and others where the apron was mostly a flat surface. There are a lot of things about the Bess that seem to be perpetuated by tradition rather than logic, which is what makes the gun unique among its foreign competitors. The long baluster wrist extending into the butt is a good example. Why do that? Round the wrist and quickly blend it into the butt without the long "hand rail". That would be just as strong and much more quickly made. Even fashion among sporting guns was moving toward shortening the baluster greatly by the 1770s. Nonetheless, ordnance kept it and many other features that make the musket unique. All the authors and historians describe changes in the Bess as mainly cost cutting measures, particularly the brass mounts. I suspect there might have been more to it than simple cost cutting, particularly during military expansions and war. I think copper alloys became much more expensive because the demand may have gone through the roof. During the 1770s and 1780s, the British navy expanded rapidly needing all those bronze guns as well as the new copper sheathing for the hulls. It could take 15-20 tons of copper plate to sheath a war ship and they eventually had to replace all the hull nails with a copper alloy as well to eliminate the galvanic corrosion of the copper on the ship's planking nails. I think a lot of factors interacted to affect the designs and building of Brown Besses over almost 100 years and tradition was probably a key one.

dave
 
Hi Lads,
I love this part, staining wood. I like playing with color and this black walnut stock really needs help. Knowing many Irish Besses had orangey tones to the stock, I figured I had to be creative to get this stock on the road to that goal. I usually stain stocks with dilute aniline dyes when I start the whiskering process because the color show up rough spots and scratches. I started with a dilute black stain to embed black color in the open pores of the walnut. That will eventually create a mellow old look to the stock. The black is scraped off the surface, whiskering the stock and then I applied a pure scarlet red stain. I scraped and sanded that off and finally applied a pure yellow stain. That completed the whiskering process but I still have to scrape some areas where the red is concentrated.
YflI7IE.jpg

lDfoXax.jpg

grWWMFF.jpg

reW8UwP.jpg

1l59tIW.jpg

I also will go over the stock and round over some of the sharp edges around the lock moldings. The edges of the tails in particular need to be rounded down otherwise they look too much like those found on late flint era British sporting guns. Unfortunately, I discovered a major error after applying stain. I probably over looked it until the coloring highlighted the details of the stock. The flat side plate is much too small and short. It is the plate that came on the Pedersoli and has the correct hole spacing for the Pedersoli lock, which is why I used it. I assumed it was correct given it fit the lock, which is not a bad copy of the originals. I should have checked it against my pattern book by Bailey. It is almost 1/2" too short leaving way too much open wood behind it on the side plate panel. It just does not look right compared with the originals.
R3aJadj.jpg

So I have to design and make a new side plate with the same hole spacing, which is a little shorter than the originals but expands and lengthens the tail to better fill the side plate panel. It also has to be larger than the inlet in all dimensions so I don't create gaps. A challenge but one I think I can meet.

dave
 
Last edited:
Hi Lads,
I love this part, staining wood. I like playing with color and this black walnut stock really needs help. Knowing many Irish Besses had orangey tones to the stock, I figured I had to be creative to get this stock on the road to that goal. I usually stain stocks with dilute aniline dyes when I start the whiskering process because the color show up rough spots and scratches. I started with a dilute black stain to embed black color in the open pores of the walnut. That will eventually create a mellow old look to the stock. The black is scraped off the surface, whiskering the stock and then I applied a pure scarlet red stain. I scraped and sanded that off and finally applied a pure yellow stain. That completed the whiskering process but I still have to scrape some areas where the red is concentrated.
YflI7IE.jpg

lDfoXax.jpg

grWWMFF.jpg

reW8UwP.jpg

1l59tIW.jpg

I also will go over the stock and round over some of the sharp edges around the lock moldings. The edges of the tails in particular need to be rounded down otherwise they look too much like those found on late flint era British sporting guns. Unfortunately, I discovered a major error after applying stain. I probably over looked it until the coloring highlighted the details of the stock. The flat side plate is much too small and short. It is the plate that came on the Pedersoli and has the correct hole spacing for the Pedersoli lock, which is why I used it. I assumed it was correct given it fit the lock, which is not a bad copy of the originals. I should have checked it against my pattern book by Bailey. It is almost 1/2" too short leaving way too much open wood behind it on the side plate panel. It just does not look right compared with the originals.
R3aJadj.jpg

So I have to design and make a new side plate with the same hole spacing, which is a little shorter than the originals but expands and lengthens the tail to better fill the side plate panel. It also has to be larger than the inlet in all dimensions so I don't create gaps. A challenge but one I think I can meet.

dave
Wow, what a difference. Gone is that cold purple color, almost reminded me of dead cold flesh. 🥶
 
Beautiful work Dave!!

Others may agree with you about the side plate being too short, but 98% of us aren't going to see the difference unless we have a real shortland bess to compare it to. Who knew that Pedersoli changed the side plate too? I have a Pedersoli that I never finished & have been following your build with great anticipation too hoping that you can show us how it's done - well you have & then some! So thanks.

Anyway here's a photo of your side plate installation & one of an Irish Short Land side plate so folks will now what you are talking about:
86.jpg

04.jpg


Thanks for all your hard work, Mike
 
I am enjoying this topic. Especially the staining regiment. I will have a similar task when I get to staining an American Walnut stock in a month or so. I will be picking your brain Dave!
 
Hi,
DD832, thank you for that excellent photo. It shows what I was discussing better than anything I could post.

So I made a new side plate. First, I consulted Bailey's "Pattern Dates of British Small Arms" and compared the Pedersoli plate with his diagrams.
DPJ0J9A.jpg

Doesn't take a genius to tell the difference between the short and emaciated Pedersoli plate and the real thing, I needed a bigger new plate that filled the space better but it had to keep the hole spacing of the Pedersoli lock. I had to lengthen the tail by 3/8" and the width of the plate but keep he same distance between the bolt holes and not have it look awkward. I took a piece of 1/16" thick brass sheet, coated it with Dykem Blue and had at it with a scribe. I like the result.
dy3rABI.jpg

The scribed outline of the new plate really shows the difference from the Pedersoli plate.
dy3rABI.jpg

My new plate is just 1/8" short of the the originals, which is just fine because it fills up the space much better.
CYKnwfs.jpg

CYtBGvu.jpg

VnJek9l.jpg


dave
 
Hi Folks,
As you can tell, I am very keen on historical details and getting those right for many of the guns I make (not all). My goal for my historical guns is that if you aged them, they would look indistinguishable along side examples in museums and collections. However, my intent by posting these threads is not to force anyone to follow suit. I am just giving you many of the details and you pick and choose. If you want to build a really historically correct looking gun, I provide you with many and probably most of the details to do so. If that is not your objective, fine, choose the parts that you want and go from there but you at least have the details from which to base your project. I am a bit obsessive with the details of British military and sporting guns because I so greatly respect and admire the British workmen who produced them. Our modern commercial reproductions do not do those men justice and we forget how skilled they were even when working for pennies. They are my heroes and if I could go back in time I would not want to hob nob with great figures in history but the simple workman in the Tower, Minories, and Birmingham.

dave
 
Hi,
Most authors write the swell was to give a better hand grip. Some write that the swell was for a better grip when using the bayonet and others just better grip. I think Nick has a good suggestion as well. It may have helped the soldier position his left hand during drills with the musket. Ordnance must of thought it important because they retained it throughout the period the Bess was used. It makes building the stock a bit more complicated and time consuming so with all the cost cutting measures adopted for the musket during its service life, they retained the swell.

dave

From my personal experience as a Rev War Reenactor, that swelll is a life-saver (well, hand saver) when you have been firing your musket over and over in battle scenarios. The barrel becomes too hot to touch and that swell makes it possible to continue to handle the gun in various positions.
 
Hi,
Your black dye may be much too concentrated and not fully scraped off. If I use black on walnut, which I do sometimes, I scrape it back until there is no black color on the surface. There is just black dye embedded in the open pores. Then on goes the yellow. However, I only add black to walnut if I am trying to get an old mellow look. Most often, I just apply yellow. Try just using yellow and don't scrape it off. Here is an example with just yellow:
0KdXIRq.jpg

YR7wZHE.jpg

9xZGnLv.jpg

HG7gEvz.jpg

Here is an example with black, scraping, and then yellow:
JimGHuj.jpg

FMbhNhS.jpg

BTx2stD.jpg

K0l5O2G.jpg

bqPMKvL.jpg

sFw1tcs.jpg

In the photo of the rear ramrod pipe, you can see the black dye embedded in the pores of the wood but not contributing to the final color of the surface.
dave
That's the look I'd love to emulate on my Bess build. So, correct me if I'm wrong and please finish the sequence. Black dye, scrape, yellow dye, scrape, and then what??? Also, what brand of dye is that?
 
Hi,
Great day! It is always a milestone when the first coat of finish is applied. Then the truth is revealed.

Chris in SE PA, I'll describe my sequence but keep in mind I adjust it all to the wood in hand. The color of this black walnut stock was especially cold and dead. It had the classic cold purple-brown of American black walnut. Dublin Castle made Besses tended to have orangey colored stocks so I had my work cut out for me. The one good feature of this piece of walnut is that it had some streaks of magenta and red that I could work with. So first, I made a dilute black stain using Brownell's black aniline dye dissolved in water. The purpose of the black is to embed black dye into the open pores of the walnut, which will make the rays very distinct and give the finish an old mellow look. However, I did not want any black on the surface and it was scraped and sanded off completely during the whiskering process. Moreover, I let the black dry after whiskering for a full 48 hours. I didn't want any residual dye reacting with the other colors that follow. Next I wanted to enhance the reddish streaks in the wood so I made a dilute reddish stain using scarlet aniline dye from Brownells dissolved in water. Don't ask me concentrations because I just add a pinch here and a pinch there of dye, kind of like your grandmother making pie crust or scones. After the red stain dried, I scraped and sanded most of it off in the second whiskering process.. Then I added yellow stain made from Brownells' yellow aniline dye dissolved in water. This stain was fairly concentrated and applied twice. The first coat was scraped and sanded off as the final whiskering process. The second coat was left untouched. Here are the results. The first photos show the stock with the first sealer coat of Sutherland-Welles polymerized tung oil mixed 50/50 with mineral spirits. This acts as a nice sealer and all of it soaks into the wood.
XM4WIrR.jpg

hBpDUmE.jpg

jCVQcir.jpg

zvvjkzF.jpg

You can see the rainbow of color hidden in the wood. The photo of the side plate mortise clearly shows the red stain. Also note the extremely thin flats around the lock and the shallow mortise. Those are features many modern Bess builders get terribly wrong.
Finally, here is the stock with a new coat of finish showing what the final appearance of the stock will look like.
vbTToml.jpg

b09lDLZ.jpg

npb3pXm.jpg


Doesn't look very much like black walnut anymore.

dave
 
Last edited:
Back
Top