Start a new topic (thread) on your gun problem, please.Friends-
Been gawking & passing this thread and others you all have written on defarbing Brown Besses to my friends for several years!!!!
And then, it happened. My son wanted a Bess & I got a very nice defarbed one.
A Miroku.
But the defarbing included a white lightning vent…. And a main spring which was bubba’ed.
The main spring is excellent, but was filed down at point of contact with tumbler so that anything beyond a flick of the trigger disengages the spring from the tumbler.
Any thoughts as to remedy?
Thanks!
Dave Barno
-
This community needs YOUR help today. We rely 100% on Supporting Memberships to fund our efforts. With the ever increasing fees of everything, we need help. We need more Supporting Members, today. Please invest back into this community. I will ship a few decals too in addition to all the account perks you get.

Sign up here: https://www.muzzleloadingforum.com/account/upgrades -
Friends, our 2nd Amendment rights are always under attack and the NRA has been a constant for decades in helping fight that fight.
We have partnered with the NRA to offer you a discount on membership and Muzzleloading Forum gets a small percentage too of each membership, so you are supporting both the NRA and us.
Use this link to sign up please; https://membership.nra.org/recruiters/join/XR045103
You are using an out of date browser. It may not display this or other websites correctly.
You should upgrade or use an alternative browser.
You should upgrade or use an alternative browser.
Building the King's Muskets and a Bit More
- Thread starter dave_person
- Start date


Help Support Muzzleloading Forum:
This site may earn a commission from merchant affiliate
links, including eBay, Amazon, and others.
- Joined
- Nov 26, 2005
- Messages
- 5,018
- Reaction score
- 9,972
Hi,Hey Gus, I'm just curious (not in any way questioning or challenging anything here) in these two replies as well as past discussions of period muskets, the Bess in particular, you've often stated certain makers/places "being known for ____". Or that you and others who have handled originals notice different levels of quality between the different sources of these muskets.
Are you, or @dave_person aware of any original period texts available where commanders or troops speak to this? Any "letters home," or officer's notes complaining about certain muskets?
It is hard to pin point features specific to individual contractors because variation was the norm during the days of everything hand made. Moreover, the lock maker named on the lock plate was not the rough stocker or setter upper. "Setter upper" is actually the designation of the man who fitted and assembled the musket from the component parts. In the civilian gun trade they were called "screwer togethers" or "screwer uppers"
 . It is hard to examine enough early Besses to detect those differences because they are very scarce and the most common survivng guns are those made after ordnance stopped putting names and dates on locks during 1764. You have to disassemble the gun to find the contractor stamps. However, there are differences between guns assembled by the Tower and those by Dublin Castle, Those differences usually are pretty obvious. The Irish stocks tend to be lighter color, often a little slimmer, and their brass hardware is a bit cruder and heavier. Generally, the Tower guns are higher quality but not always during war production. I examined a Dublin Castle pattern 1769 that was made better than a Tower musket that was likely war production. A book you should buy is Goldstein and Mowbray's "Brown Besss". They describe much of what Gus and I have written. There are primary sources such as letters mentioning some of those issues. Bailey's book "Small Arms Used By British Forces in America" has citations for primary sources that discuss some of the issues you mention. There were periods in which contractors had monopolies on components and production. James Hirst set up almost all the Tower muskets from the 1760s-mid 1770s. One contractor supplied almost all the rough stocks during those same years. You may find this interesting but the foundry that supplied almost all the brass through the Rev War was owned and run by a woman, Jane Mayor.
dave
Brokennock
Cannon
Thank you.Hi,
It is hard to pin point features specific to individual contractors because variation was the norm during the days of everything hand made. Moreover, the lock maker named on the lock plate was not the rough stocker or setter upper. "Setter upper" is actually the designation of the man who fitted and assembled the musket from the component parts. In the civilian gun trade they were called "screwer togethers" or "screwer uppers"
dave
- Joined
- May 6, 2014
- Messages
- 16,892
- Reaction score
- 15,309
- Joined
- May 6, 2014
- Messages
- 16,892
- Reaction score
- 15,309
Wow, a widow perhaps?Hi,
You may find this interesting but the foundry that supplied almost all the brass through the Rev War was owned and run by a woman, Jane Mayor.
dave
Now that was one heck of a tease. OK, I just HAVE to know where her foundry/foundries were located. Grin. My SWAG would be Birmingham, but that is only a SWAG on my part because of the fact Birmingham was known for making "toys."
Gus
- Joined
- May 6, 2014
- Messages
- 16,892
- Reaction score
- 15,309
Hi Nock,Hey Gus, I'm just curious (not in any way questioning or challenging anything here) in these two replies as well as past discussions of period muskets, the Bess in particular, you've often stated certain makers/places "being known for ____". Or that you and others who have handled originals notice different levels of quality between the different sources of these muskets.
Are you, or @dave_person aware of any original period texts available where commanders or troops speak to this? Any "letters home," or officer's notes complaining about certain muskets?
In addition to what Dave mentioned, I would add the rather extensive inspections Cuthbertson highly recommends before accepting new arms for a Regiment. Though arms were damaged in shipment then as now, it strongly suggest problems Cuthbertson and others had to deal with in earlier initial issues of arms. You can read them here under Chapter XIII:
https://www.google.com/books/edition/_/1SxEAAAAYAAJ?hl=en&gbpv=1
Cuthbertson also advised getting an at least somewhat ready trained Artificer for every Battalion that would have been more than normally found with the Regimental Artificers.
"On logistical support – Regiments being frequently so situated as not to be able to get their Arms mended at any rate, and often in an indifferent manner, it would be a real benefit and saving if every Battalion was to furnish itself with a small portable Forge, and all the necessary tools for keeping the Arms in repair; and that a skillful gunsmith and stock-maker (to be enlisted at Birmingham, for Soldiers) were employed upon the Regiment’s work, under proper regulations for their labour: by this method, every Captain must be enabled to keep his Company’s Arms in a constant serviceable state, whether in Quarters, Cantonments; or the Field. In the field, one horse with a small cart will carry all these implements in the same manner as the Forges of the Cavalry"
Sometimes you find tidbits in many sources and once you connect the dots, it can be very useful information on more specific things, even if as it often happens to me, you trip over tidbits unexpectantly when looking up other things.
Gus
- Joined
- Nov 26, 2005
- Messages
- 5,018
- Reaction score
- 9,972
Hi Gus,
Virtually all barrels and locks were made in Birmingham so there are very few if any totally London made Brown Besses. Essentially, contractors making the iron and steel stuff were in Birmingham and the brass foundry and stock suppliers were in London. The Mayor family were founders throughout most of the 18th century and Jane Mayor inherited the business as the widow of Thomas Mayor in 1770. She ran it is for a long time both before and after the Rev War period.
dave
Thanks for this thread Dave! As always, your stuff is the best.Hi Gus,
Virtually all barrels and locks were made in Birmingham so there are very few if any totally London made Brown Besses. Essentially, contractors making the iron and steel stuff were in Birmingham and the brass foundry and stock suppliers were in London. The Mayor family were founders throughout most of the 18th century and Jane Mayor inherited the business as the widow of Thomas Mayor in 1770. She ran it is for a long time both before and after the Rev War period.
dave
- Joined
- May 6, 2014
- Messages
- 16,892
- Reaction score
- 15,309
Thanks Dave,Hi Gus,
Virtually all barrels and locks were made in Birmingham so there are very few if any totally London made Brown Besses. Essentially, contractors making the iron and steel stuff were in Birmingham and the brass foundry and stock suppliers were in London. The Mayor family were founders throughout most of the 18th century and Jane Mayor inherited the business as the widow of Thomas Mayor in 1770. She ran it is for a long time both before and after the Rev War period.
dave
Again, very interesting.
Gus
- Joined
- Jun 17, 2019
- Messages
- 6,833
- Reaction score
- 7,753
The handsomeness of the Besses was a factor in my enlisting in Rev War enacting back in the Bi-Centennial!
- Joined
- Nov 26, 2005
- Messages
- 5,018
- Reaction score
- 9,972
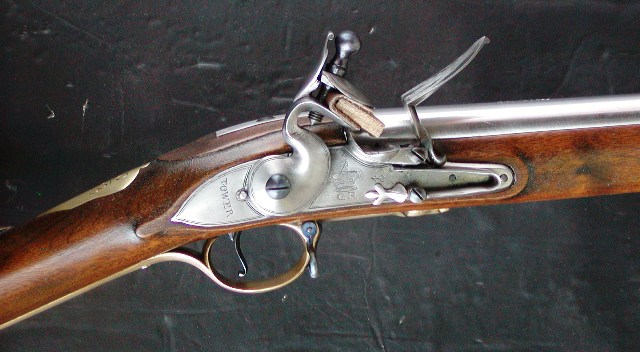
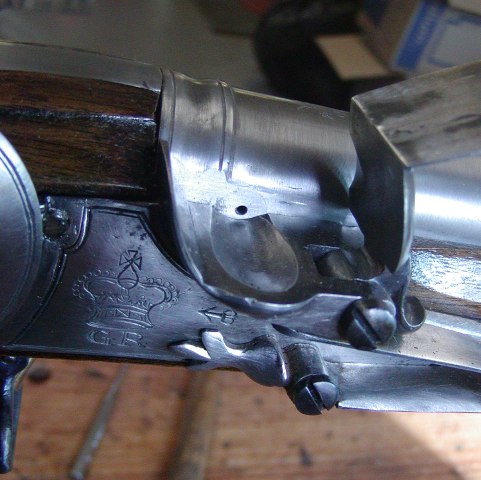
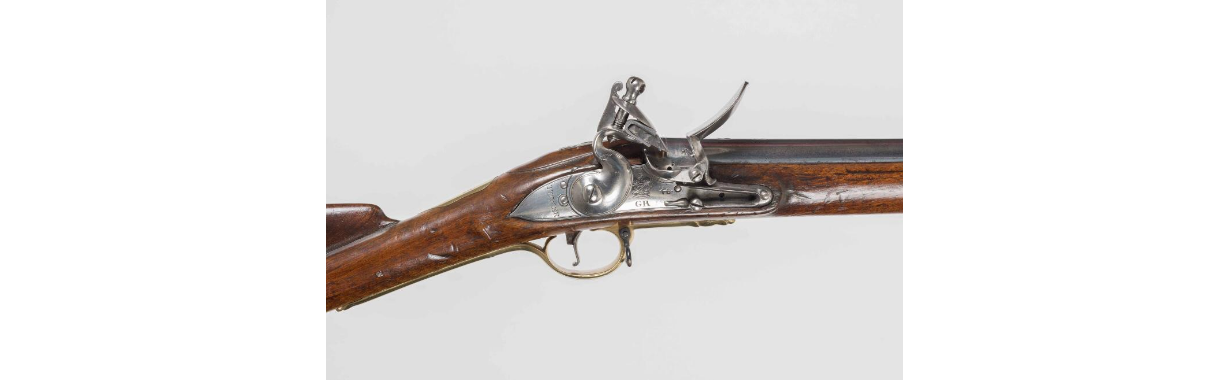
Hi, and thank you all for the kind comments and encouragement. I appreciate it. I worked over the lock today getting ready for case hardening tomorrow. In the process of cleaning and polishing a lot of the cast in engraving was virtually wiped out. On the lock plate, the crown over GR and much of the thick and thin border was reduced to vague snippets. So I had to re-engrave it all. That is actually fun for me. There are challenges because the cast in engraving is so uneven. But that is part of the fun. Here is the lock plate. I redid the crown over GR, "TOWER", and all the borders.
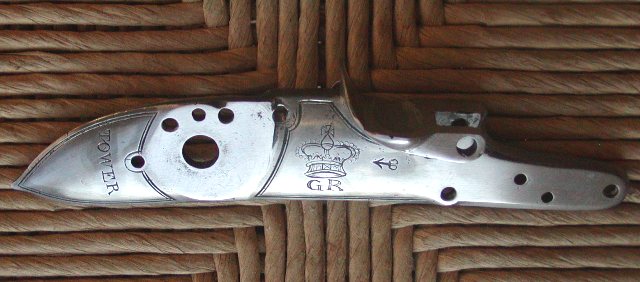
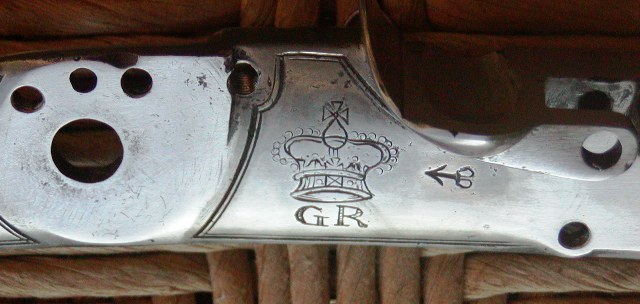
It looks like the real thing. Remember this is not for a high end fowler so the engraving is fast and somewhat crude. I love this stuff. The stock is drying as I build up coats of finish. The setter uppers would have simply painted the stock with a thick varnish such that it builds up on the surface. I am producing a bit better finish but in the end it will appear to be a layer on the surface and a bit glossy.
dave
- Joined
- Nov 26, 2005
- Messages
- 5,018
- Reaction score
- 9,972
Hi,
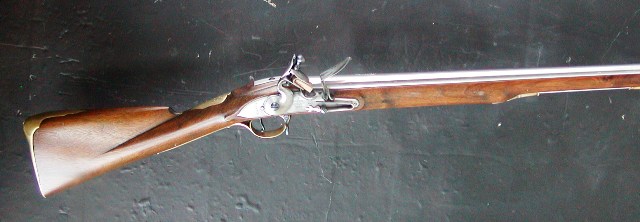
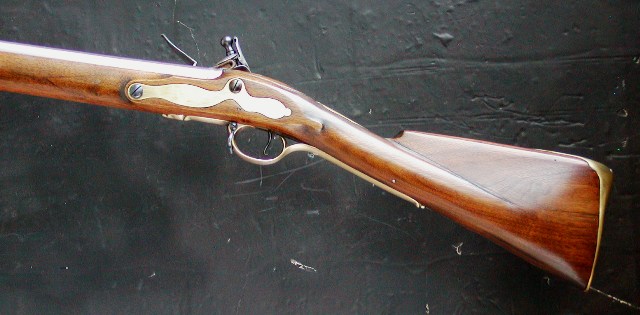
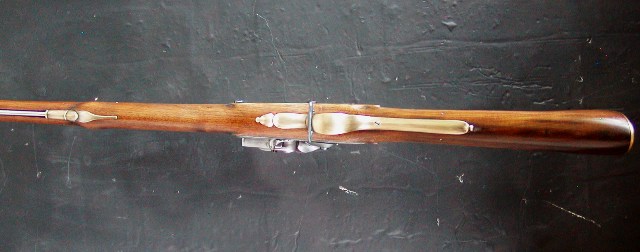
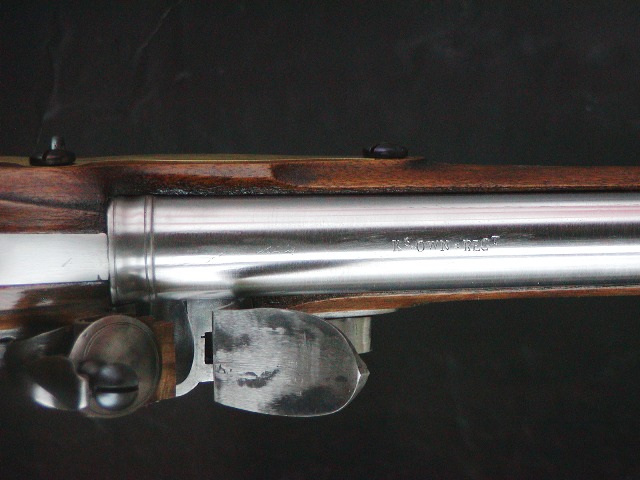
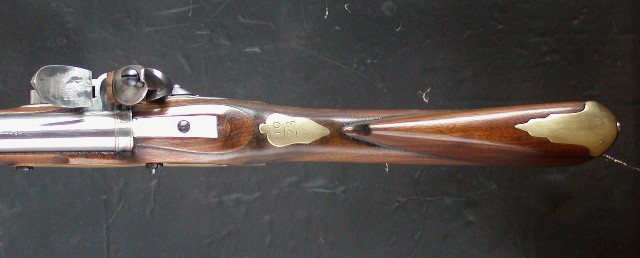
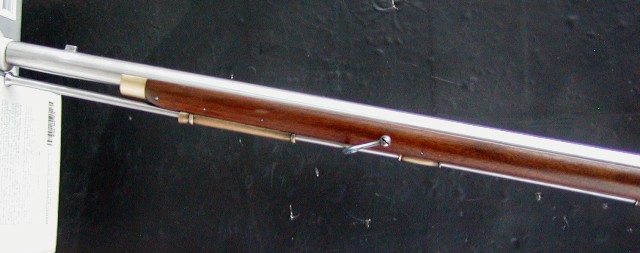
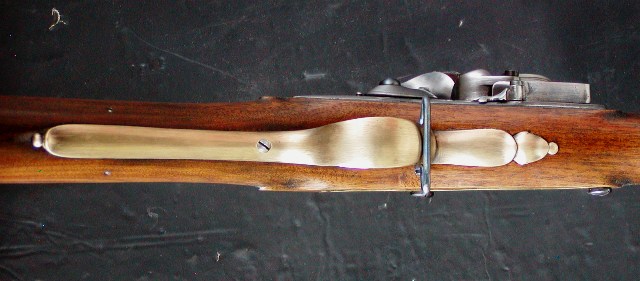
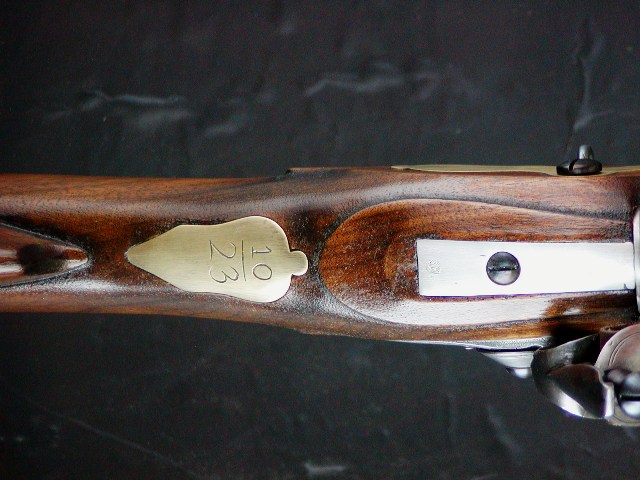
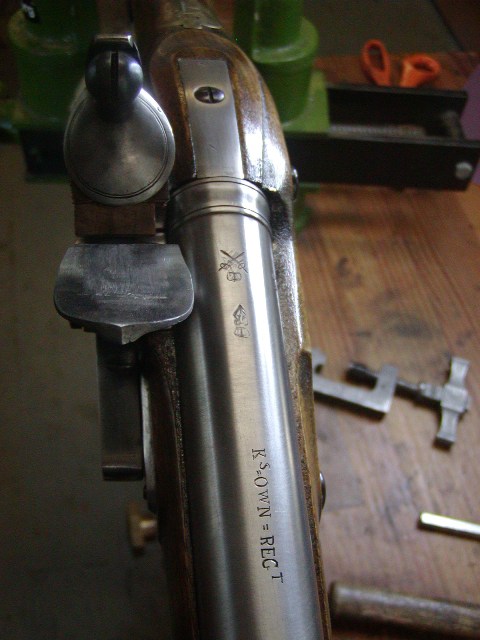
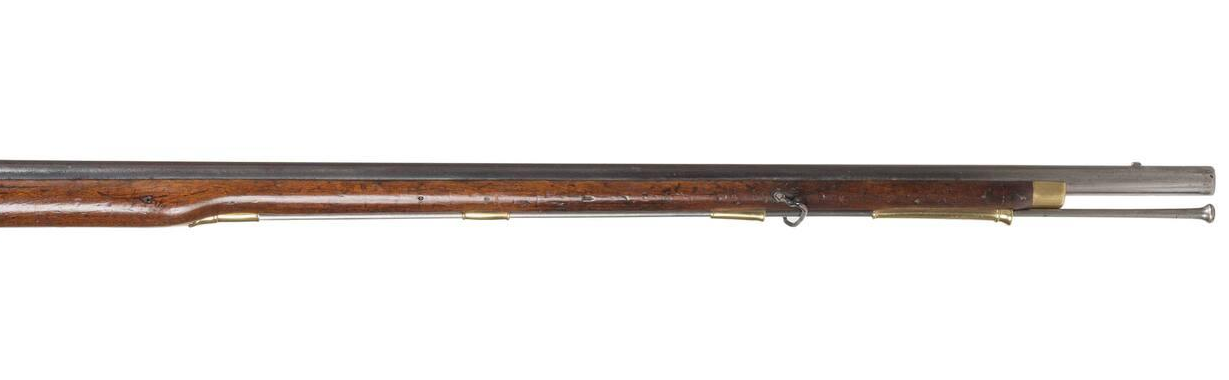
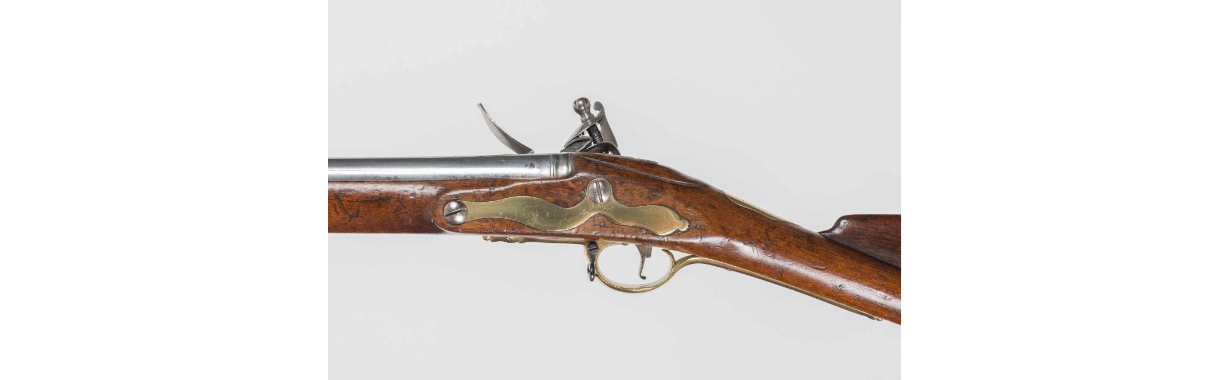
The first short land musket is done. I still have to tarnish the barrel but I am not sure if if I can stamp the British proof marks. The Pedersoli steel barrel is very tough and I may not be able to stamp the marks, so I am waiting before I tarnish it. I have a plan but as yet I've not implemented it. I still have to stamp the store keeper's mark on the stock and some inspection marks. But everything else is done. It came out very well and looks like the originals. This is not a high end fowler so the stock was finished with scraping and 120 grit sand paper, nothing finer. It looks right. The owner wanted a short land musket that might have been captured from the British during "Battle Road" or Bunker Hill. It has Tower marks, which suggests isssue to several light infantry companies, whereas the rank and file were issued long land muskets. In diving into this, I discovered that the light "Bobs" of the 4th regiment of foot, the King's Own Regiment, were active in both engagements and could easily be the souurce of this captured musket. Therefore, I engraved "K's Own Reg't" on the barrel and engraved 10/23 on the wrist plate. Regiments had 8 battalion companies and 1 grenadier and 1 light infantry company. The light company was added in 1771 so it might be the 10th company and then I assigned the gun to the 23rd soldier in that 10th company. Enjoy the photos.

dave
The first short land musket is done. I still have to tarnish the barrel but I am not sure if if I can stamp the British proof marks. The Pedersoli steel barrel is very tough and I may not be able to stamp the marks, so I am waiting before I tarnish it. I have a plan but as yet I've not implemented it. I still have to stamp the store keeper's mark on the stock and some inspection marks. But everything else is done. It came out very well and looks like the originals. This is not a high end fowler so the stock was finished with scraping and 120 grit sand paper, nothing finer. It looks right. The owner wanted a short land musket that might have been captured from the British during "Battle Road" or Bunker Hill. It has Tower marks, which suggests isssue to several light infantry companies, whereas the rank and file were issued long land muskets. In diving into this, I discovered that the light "Bobs" of the 4th regiment of foot, the King's Own Regiment, were active in both engagements and could easily be the souurce of this captured musket. Therefore, I engraved "K's Own Reg't" on the barrel and engraved 10/23 on the wrist plate. Regiments had 8 battalion companies and 1 grenadier and 1 light infantry company. The light company was added in 1771 so it might be the 10th company and then I assigned the gun to the 23rd soldier in that 10th company. Enjoy the photos.
dave
- Joined
- Nov 26, 2005
- Messages
- 5,018
- Reaction score
- 9,972
Hi,
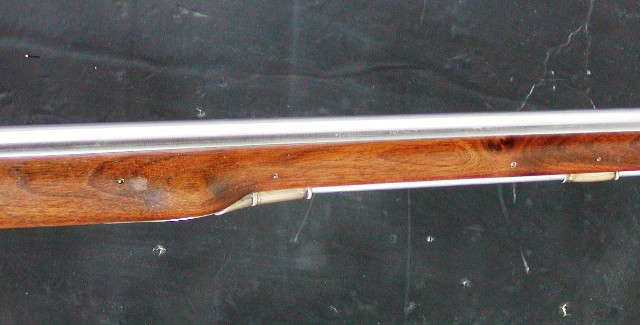
Thanks for looking guys. I tarnished the barrel and added a "white lightning" vent liner. I install the liner on all these muskets because reliable ignition is a safety feature even during reenactments using only powder. With live firing ball, it is critical for safety. I don't expect the owner to do much live firing but his gun will be safe and reliable if he does. In this case, I bought liners made of carbon steel from Barbie Chambers rather than stainless steel. That way it disappears in the barrel and will tarnish with it.
I drilled out the hole to 5/64", which works really well with these big musket barrels. I've developed a way to stamp ordnance and maker's marks on these barrels. The steel in Pedersoli and Miroku barrels is really tough and difficult to stamp. I have the appropriate stamps. So I pressed the stamps into an ink pad and stamped paper. I then scanned those stamped images and brought them into Powerpoint so I can reverse them and print them on to transparency sheet. Then using Tom White's "Transfer Magic" solution, I transferred the marks to the barrel and engraved them. The engraving is not hard. Finally, I used the engravings to lock the stamps into position on the barrel, and hammered the stamps with a ball peen hammer. It worked.
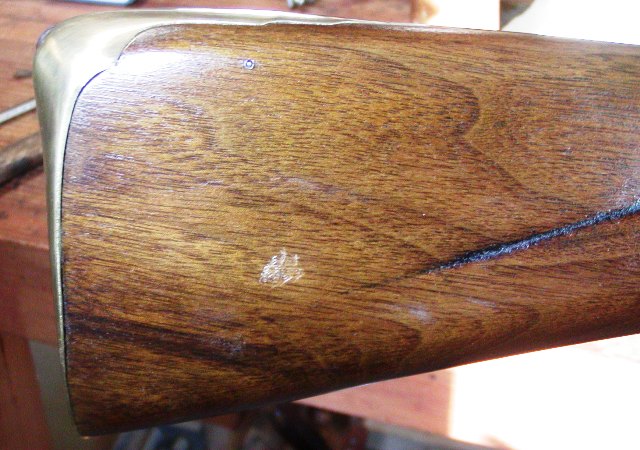
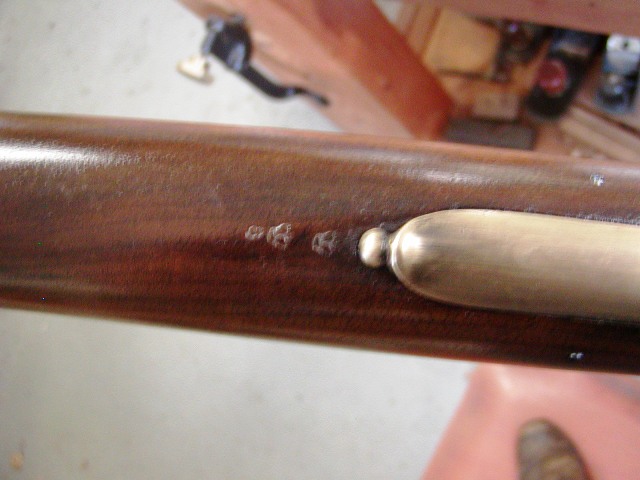
Next, I added the store keeper's mark on the butt stock.
Then the crown and crown over inspector's number behind the trigger guard.
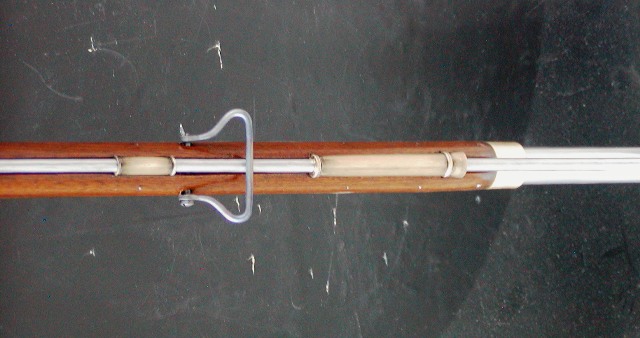
Finally, I turned the Pedersoli ramrod tip, which is an incorrectly shaped flat button, into the proper rounded button shape.

I also added production marks on the stock and parts. The bottom of the barrel is stamped "DP" for me and "MG" for Maria and then I engraved "Braintree Hill".
I will test fire the musket this week. Now I have to go and finish writing the owner's manual, which explains the context of the gun, how it was made, how to shoot and clean it,
dave
Thanks for looking guys. I tarnished the barrel and added a "white lightning" vent liner. I install the liner on all these muskets because reliable ignition is a safety feature even during reenactments using only powder. With live firing ball, it is critical for safety. I don't expect the owner to do much live firing but his gun will be safe and reliable if he does. In this case, I bought liners made of carbon steel from Barbie Chambers rather than stainless steel. That way it disappears in the barrel and will tarnish with it.
I drilled out the hole to 5/64", which works really well with these big musket barrels. I've developed a way to stamp ordnance and maker's marks on these barrels. The steel in Pedersoli and Miroku barrels is really tough and difficult to stamp. I have the appropriate stamps. So I pressed the stamps into an ink pad and stamped paper. I then scanned those stamped images and brought them into Powerpoint so I can reverse them and print them on to transparency sheet. Then using Tom White's "Transfer Magic" solution, I transferred the marks to the barrel and engraved them. The engraving is not hard. Finally, I used the engravings to lock the stamps into position on the barrel, and hammered the stamps with a ball peen hammer. It worked.
Next, I added the store keeper's mark on the butt stock.
Then the crown and crown over inspector's number behind the trigger guard.
Finally, I turned the Pedersoli ramrod tip, which is an incorrectly shaped flat button, into the proper rounded button shape.
I also added production marks on the stock and parts. The bottom of the barrel is stamped "DP" for me and "MG" for Maria and then I engraved "Braintree Hill".
I will test fire the musket this week. Now I have to go and finish writing the owner's manual, which explains the context of the gun, how it was made, how to shoot and clean it,
dave
Last edited:
- Joined
- Jun 17, 2019
- Messages
- 6,833
- Reaction score
- 7,753
So handsome!Hi Folks,
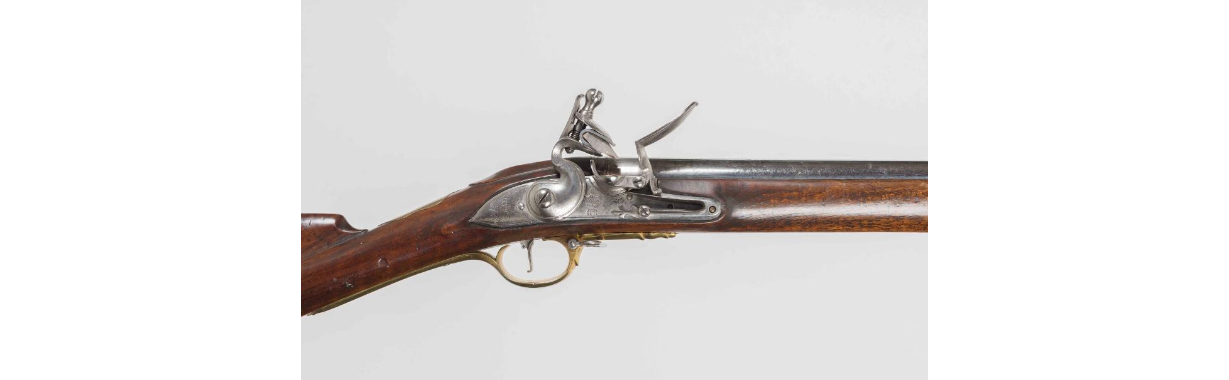
Today Maria and I will start our thread on building copies of the British "King's Pattern" (Brown Bess) musket and making them as historically accurate as our circumstances permit. I hope you will find this thread entertaining and useful. I apologize up front for the amount of text and some of you may think me pretentious posting this thread but so be it. I believe in education and think this forum is an ideal venue for disseminating information that I know some will value. I gave a seminar at the Kempton's Gunmakers Fair about the Brown Bess and this thread is a follow up to that talk.
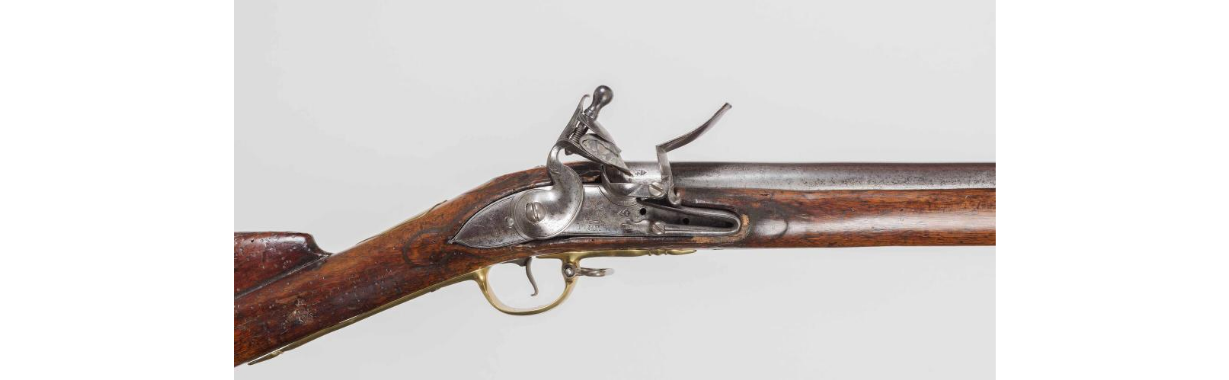
Maria and I are making 2 short land and a long land British musket, as well as an Elliot light dragoon carbine. We will focus first on the 2 short land muskets. Here is an example:


It is a pattern 1769 short land musket probably issued during the time of our Revolutionary War. These muskets have shorter 42" barrels differentiating them from the long land muskets with 46" barrels. They and their later variants were the primary British muskets during the latter period of the war (late 1777 - 1783). Early in the war, older pattern long land muskets predominated but not exclusively. I describe the muskets as long or short land and by dated patterns. Let me spend a little time explaining those details. The "land" designation differentiated the guns from those designed and issued for "sea" service. The patterns refer to research by DeWitt Bailey who created a viable taxonomy for British muskets based dated warrants specifying guns as patterns. Previously, collectors and historians focused on "models" of the muskets, something never adopted by British Ordnance. It was simply a convenience for collectors and it glossed over many details. George Moller complicated things by referring to different types within models adding further confusion and adding nothing to the discussion. Bailey cleared it all up by linking dated British government warrant specifications to the various muskets, revealing the different patterns associated with specific dates. Moreover, the British never referred to the musket by models or types. It was always the old King's pattern and the new King's pattern. Here is a sample of the patterns that were used in North America during the 18th century up to and during the Rev War.
Pattern 1730 Long Land First Official King's Musket
Most were upgraded with a newer lock with pan bridle, stronger trigger guard, and often a brass nose band when issued for service in America.
Pattern 1742 Long Land, the workhorse during the French & Indian War

All the lock moldings were gone, the gun simplified but made more massive. Many were converted to steel rammers and fitted with brass nose bands.
Pattern 1756 Long Land Musket, last of the long lands.
New lock with straighter lock plate, designed for steel rammer, long trumpet front ramrod pipe, cast brass nose cap. These muskets were not issued to troops in America during the F&I war. They were the primary muskets issued to British troops during the first 3 years of the Revolution.
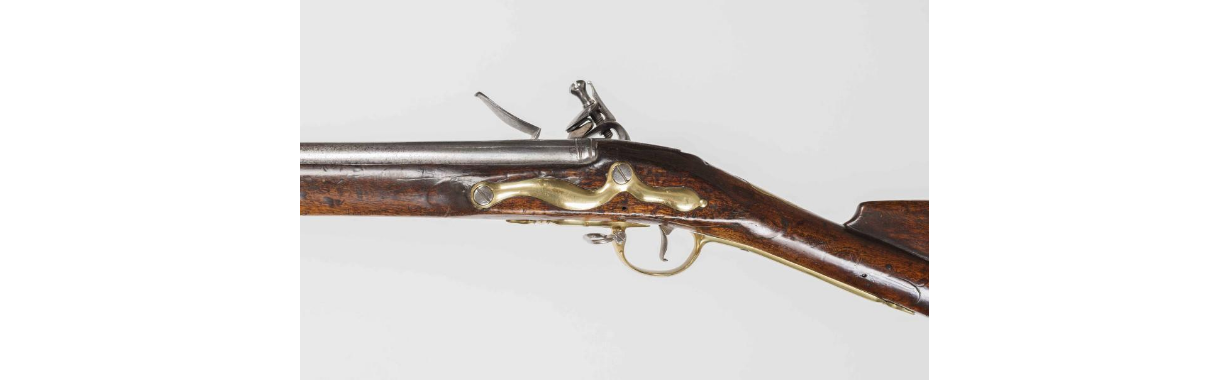
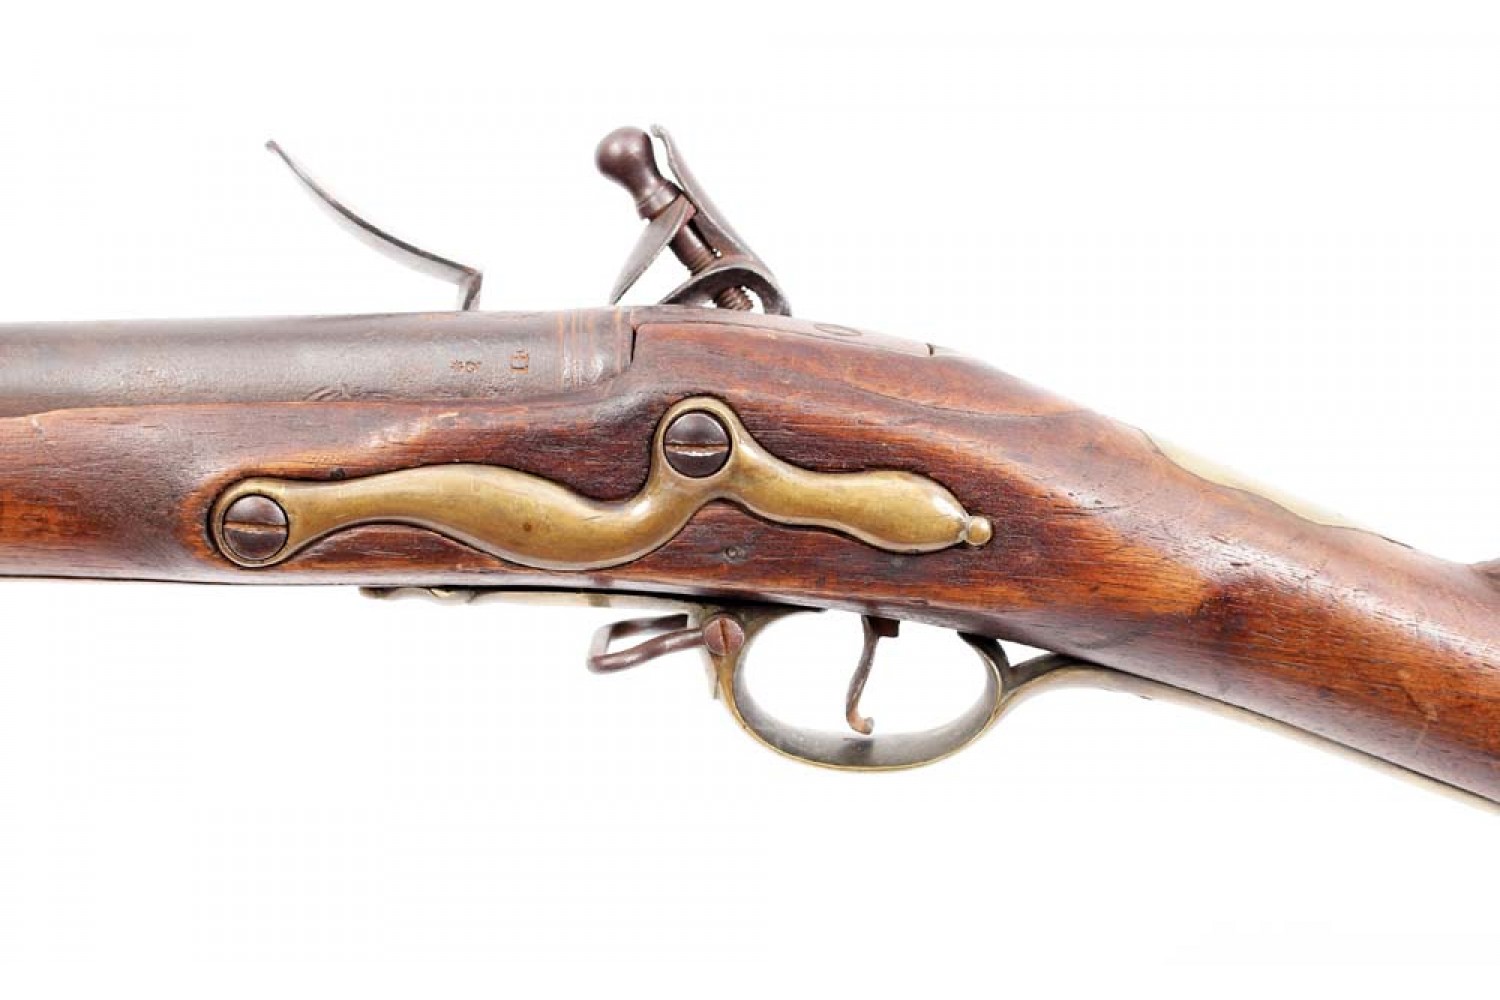
Pattern 1769 Short Land Musket.
Same lock as pattern 1756, shorter 42" barrel, simplified buttplate, and flat side plate. The first of these muskets arrived in America with troops supported by the Irish establishment. Hence, they were marked "Dublin Castle" . By the 1776 New York campaign, many "Tower" marked short lands made their way to America. After about 1777, an updated variant of the pattern 1769 began to show up with British troops. This was the pattern 1777.
It had a new simplified lock showing 2 screws behind the flint cock because it used a short sear spring, the finial on the feather spring was simplified, and so was the flintcock. The top jaw screw was given a hole for a tightening bar. Additionally, the mouth of the second ramrod pipe was flared allowing easier entry of the ramrod.
There are other variants, but these are the major ones aasociated with American history.
dave
No detail is missed. Dave, you could probably build one of the King’s muskets blind and have it come out great.
Lucky is the owner of this fine firelock.
Lucky is the owner of this fine firelock.
- Joined
- May 6, 2014
- Messages
- 16,892
- Reaction score
- 15,309
Dave,
As I'm sure you know, original Iron/Steel rammers were actually made of two pieces. The "rod" of the rammer was made out of steel so it could be hardened/tempered and spring back when bent during the loading or cleaning process. The Button was made of Dead Soft Iron, both to save money, but more importantly to lessen wear of what a Steel Button would do to the interior of a Dead Soft Iron Barrel. So, I guess my first question is; Was the Dead Soft Iron button originally welded to the Rod section of the Rammer? Or did they initially use a soft solder to hold the Buttons in place?
I don't know, but I strongly suspect at least Pedersoli made all or at least many of their Rammers out of two pieces as well. The ones that I've seen with loose Buttons or Buttons that actually came off, seem to have been joined just by an interference fit where the Button was heated to expand just enough to accept the turned down area of the rod that went inside it. I don't think I've ever seen a Button brazed onto an original rod when new, but since they did a lot of brazing to repair parts, I used somewhat low temp silver solder to get the small "Brass Colored" ring of simulating brazing to solder the two parts back together permanently and make it a more authentic looking field repair.
What I don't remember is if the Miroku Rammers and other repro rammers were/are also made of two pieces. Do you know Dave?
Oh, we had a string of Rammer Buttons coming loose in our Unit, so after an event one time, I just took them from some Unit Members and silver soldered the Buttons on, just so it wouldn't happen during a reenactment or live shoot. After three reenactments and taking some unmodified rammers each time to solder, most all of our Unit's Rammers sported "brazed" on buttons.
Gus
- Joined
- Nov 26, 2005
- Messages
- 5,018
- Reaction score
- 9,972
Hi,
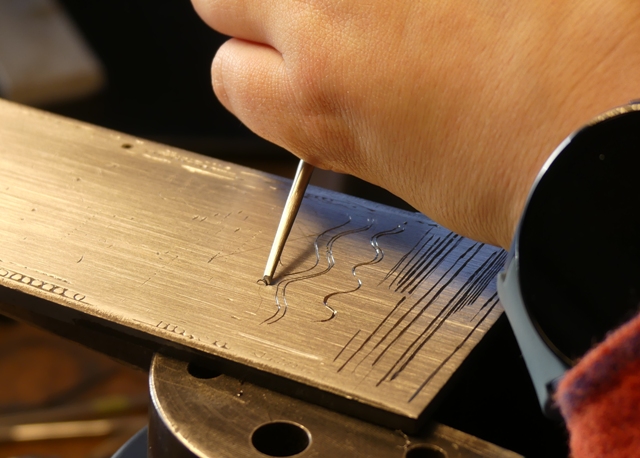
My apprentice, Maria, is back in the shop for the holiday break and is working almost everyday. We are going to have several batches of muskets from British and American recreated regiments arrive this winter for repair and engraving regimental markings. Maria needed to begin her training in engraving to help with the work load. I began teaching her both to use the hammer and chisel and to use the Lindsay AirGraver. She generally prefers the hammer and chisel feeling she has more control over her tapping with the hammer than her foot pressure on the AirGraver pedal. There is absolutely nothing wrong with that.
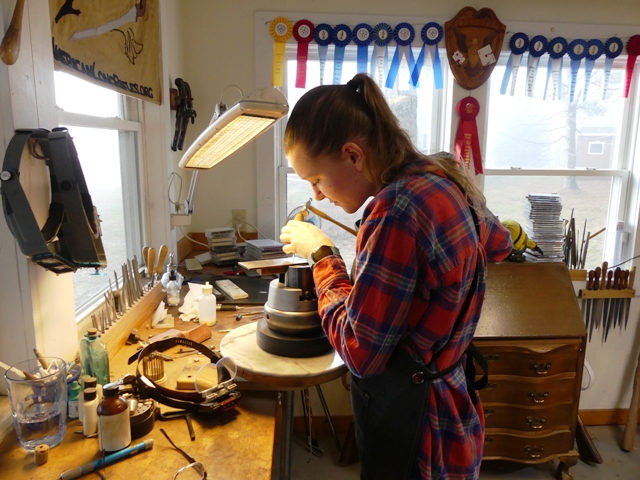
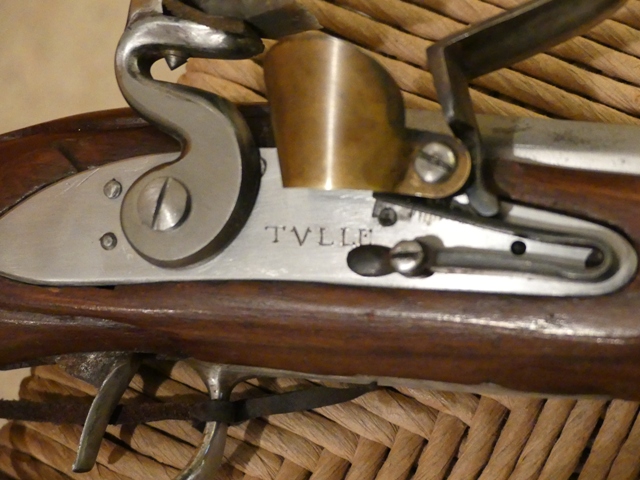
Many folks trying to learn to engrave want to jump right in cutting scrolls, flowers, leaves, etc. The most important first step is to learn how to sharpen your gravers. If you do not know how to do that, every further step will be a failure. Once you mastered sharpening, the next step is to learn how to control the graver and make it do what the eye sees. IMO, the best way to do that is to first cut straight even lines and layout those line along a border of something that you have to stay even with. That teaches tool control and discipline. Then cut parallel lines. Again you have to learn hand coordination and tool control. Then cut wavy lines and parallel wavy lines. Forget the flowers and scrolls. Until you can cut a clean border or parallel wavy lines, your flowers will look pretty bad and your shading awful. One of Maria's first jobs is to cut the name "TVLLE" into a lock plate on an India-made fusil ordinaire that we worked over for the owner. So she had to learn to cut smooth lines but then block letters. The TULLE engraving is pretty crude on the originals so she had some leeway. So Maria cut straight borders, parallel borders, wavy lines, parallel wavy lines, and ovals. She did so with hammer and chisel as well as the Air Graver. She did very well. Then I had her cut "VERNON" in Roman letters. It is mostly straight lines but has an "R" and and "O" . Often I have new engravers cut "TELL A TALL TALE" as an intro to block letters because all are composed of straight lines. Maria seemed to be advancing pretty fast so I went with "VERNON" so she could try curved letters. She did well.
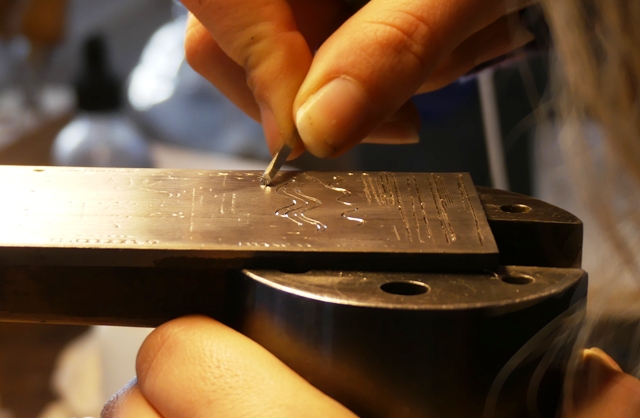
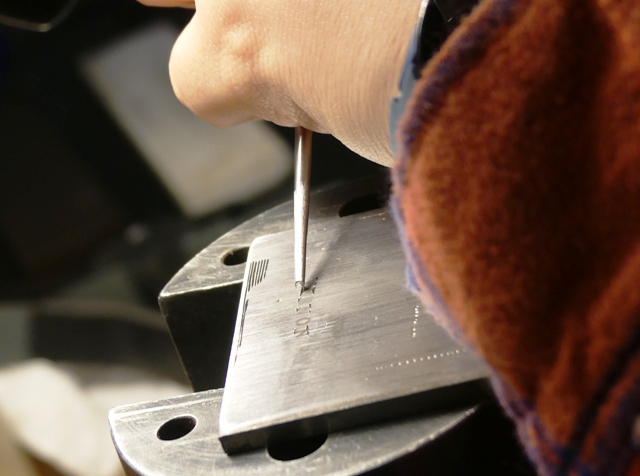
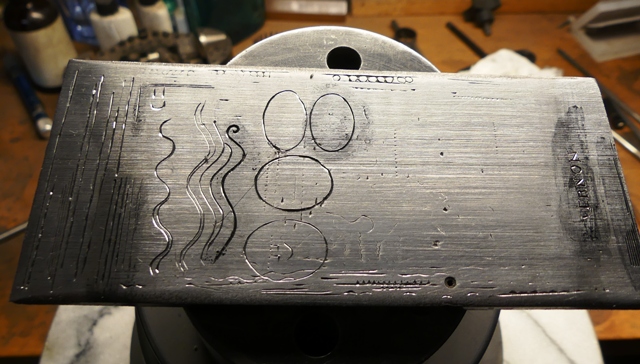
Then she did the "TVLLE" on the lock plate. It looks very much like the originals.
She still has a long way to go but she is making good progress.
dave
My apprentice, Maria, is back in the shop for the holiday break and is working almost everyday. We are going to have several batches of muskets from British and American recreated regiments arrive this winter for repair and engraving regimental markings. Maria needed to begin her training in engraving to help with the work load. I began teaching her both to use the hammer and chisel and to use the Lindsay AirGraver. She generally prefers the hammer and chisel feeling she has more control over her tapping with the hammer than her foot pressure on the AirGraver pedal. There is absolutely nothing wrong with that.
Many folks trying to learn to engrave want to jump right in cutting scrolls, flowers, leaves, etc. The most important first step is to learn how to sharpen your gravers. If you do not know how to do that, every further step will be a failure. Once you mastered sharpening, the next step is to learn how to control the graver and make it do what the eye sees. IMO, the best way to do that is to first cut straight even lines and layout those line along a border of something that you have to stay even with. That teaches tool control and discipline. Then cut parallel lines. Again you have to learn hand coordination and tool control. Then cut wavy lines and parallel wavy lines. Forget the flowers and scrolls. Until you can cut a clean border or parallel wavy lines, your flowers will look pretty bad and your shading awful. One of Maria's first jobs is to cut the name "TVLLE" into a lock plate on an India-made fusil ordinaire that we worked over for the owner. So she had to learn to cut smooth lines but then block letters. The TULLE engraving is pretty crude on the originals so she had some leeway. So Maria cut straight borders, parallel borders, wavy lines, parallel wavy lines, and ovals. She did so with hammer and chisel as well as the Air Graver. She did very well. Then I had her cut "VERNON" in Roman letters. It is mostly straight lines but has an "R" and and "O" . Often I have new engravers cut "TELL A TALL TALE" as an intro to block letters because all are composed of straight lines. Maria seemed to be advancing pretty fast so I went with "VERNON" so she could try curved letters. She did well.
Then she did the "TVLLE" on the lock plate. It looks very much like the originals.
She still has a long way to go but she is making good progress.
dave
- Joined
- Nov 1, 2018
- Messages
- 3,224
- Reaction score
- 2,285
Hi,
My apprentice, Maria, is back in the shop for the holiday break and is working almost everyday. We are going to have several batches of muskets from British and American recreated regiments arrive this winter for repair and engraving regimental markings. Maria needed to begin her training in engraving to help with the work load. I began teaching her both to use the hammer and chisel and to use the Lindsay AirGraver. She generally prefers the hammer and chisel feeling she has more control over her tapping with the hammer than her foot pressure on the AirGraver pedal. There is absolutely nothing wrong with that.
Many folks trying to learn to engrave want to jump right in cutting scrolls, flowers, leaves, etc. The most important first step is to learn how to sharpen your gravers. If you do not know how to do that, every further step will be a failure. Once you mastered sharpening, the next step is to learn how to control the graver and make it do what the eye sees. IMO, the best way to do that is to first cut straight even lines and layout those line along a border of something that you have to stay even with. That teaches tool control and discipline. Then cut parallel lines. Again you have to learn hand coordination and tool control. Then cut wavy lines and parallel wavy lines. Forget the flowers and scrolls. Until you can cut a clean border or parallel wavy lines, your flowers will look pretty bad and your shading awful. One of Maria's first jobs is to cut the name "TVLLE" into a lock plate on an India-made fusil ordinaire that we worked over for the owner. So she had to learn to cut smooth lines but then block letters. The TULLE engraving is pretty crude on the originals so she had some leeway. So Maria cut straight borders, parallel borders, wavy lines, parallel wavy lines, and ovals. She did so with hammer and chisel as well as the Air Graver. She did very well. Then I had her cut "VERNON" in Roman letters. It is mostly straight lines but has an "R" and and "O" . Often I have new engravers cut "TELL A TALL TALE" as an intro to block letters because all are composed of straight lines. Maria seemed to be advancing pretty fast so I went with "VERNON" so she could try curved letters. She did well.
Then she did the "TVLLE" on the lock plate. It looks very much like the originals.
She still has a long way to go but she is making good progress.
dave
Great Job Maria !
Similar threads
- Replies
- 77
- Views
- 4K
- Replies
- 4
- Views
- 300
- Replies
- 24
- Views
- 4K

Latest posts
-

-
-

-

-

-
1st Experiment with various forms of Tinder Fungus to fire Snap Locks
- Latest: Pukka Bundook
-

-

-
-
