• This community needs YOUR help today. We rely 100% on Supporting Memberships to fund our efforts. With the ever increasing fees of everything, we need help. We need more Supporting Members, today. Please invest back into this community. I will ship a few decals too in addition to all the account perks you get.


    Sign up here: https://www.muzzleloadingforum.com/account/upgrades
  • Friends, our 2nd Amendment rights are always under attack and the NRA has been a constant for decades in helping fight that fight.

    We have partnered with the NRA to offer you a discount on membership and Muzzleloading Forum gets a small percentage too of each membership, so you are supporting both the NRA and us.

    Use this link to sign up please; https://membership.nra.org/recruiters/join/XR045103

Turning a Pedersoli Bess into a Dublin Castle Short Land Musket

Muzzleloading Forum

Help Support Muzzleloading Forum:

This site may earn a commission from merchant affiliate links, including eBay, Amazon, and others.
Dave,
I love following your builds!! So much good info!! I finished up the Hawkins American walnut stock that I was asking you about! I was very pleased!!! Thank you for all your help in this post and others!!
 

Attachments

  • 8861742A-C4A9-4682-9F38-AB514A32FF4C.jpeg
    8861742A-C4A9-4682-9F38-AB514A32FF4C.jpeg
    312.1 KB · Views: 65
  • 7FE23661-E840-469D-9D69-BACB1F8148D2.jpeg
    7FE23661-E840-469D-9D69-BACB1F8148D2.jpeg
    323.9 KB · Views: 61
Dave,
Why do you prefer to use the aniline dye dissolved in water instead of alcohol. Do you use the dye lightly as only a wash to show where you have whiskered then a stronger mix for a final coat? I would think that each application, even following with whiskering, will deepen the color more each time making the color darker than you want by the time it comes to the last coat of dye before the finish is applied.
 
Last edited:
Hi 1861Colt,
I don't like alcohol stains because they dry too fast for me plus they would be useless as a whiskering process. The red and yellow don't darken the wood. On this gun, the red was quite dilute, just a hint and the yellow lightens, not darkens the wood and is the only stain I eventually leave on without scraping. I will put oil on a piece of walnut scrap from the stock without any stain today so you guys can appreciate the difference.

The finishing is going great and the stock won't require more than a few more coats. I've added a little bone black glazing to add age. I am working over the lock and getting ready to engrave it. I'll show that soon.

dave
 
Hi,
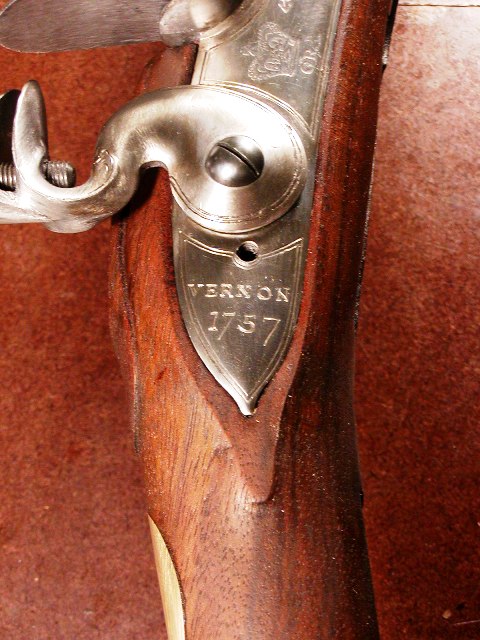
DD832, thank you for that excellent photo. It shows what I was discussing better than anything I could post.

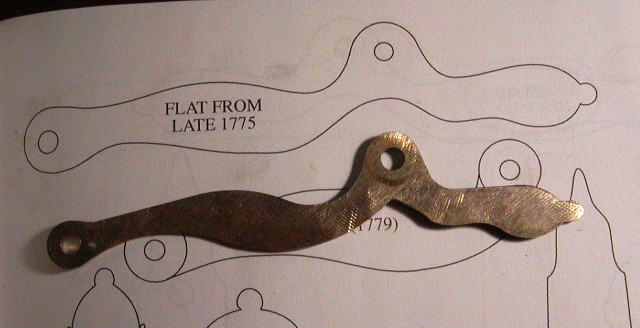
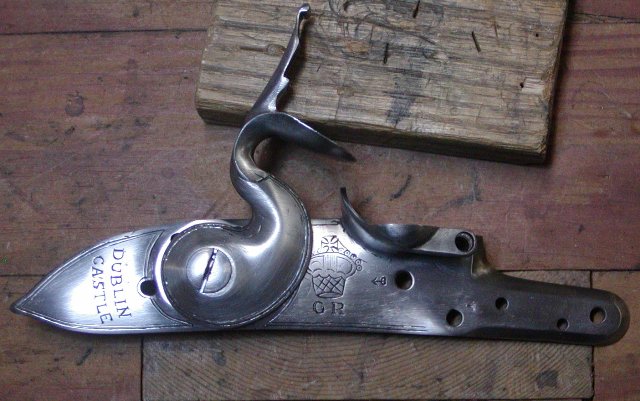
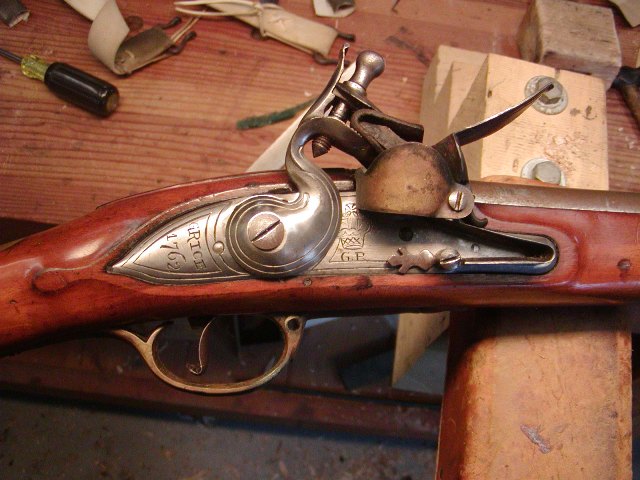
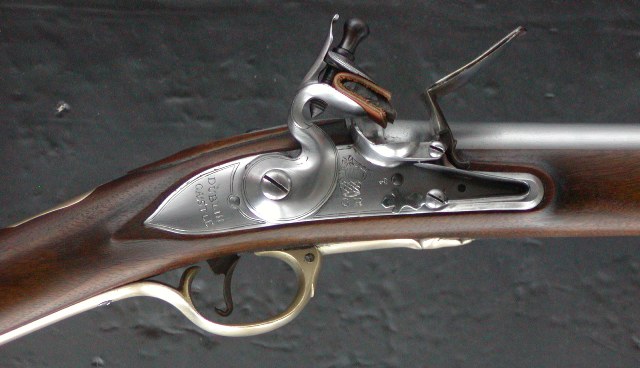
So I made a new side plate. First, I consulted Bailey's "Pattern Dates of British Small Arms" and compared the Pedersoli plate with his diagrams.
DPJ0J9A.jpg

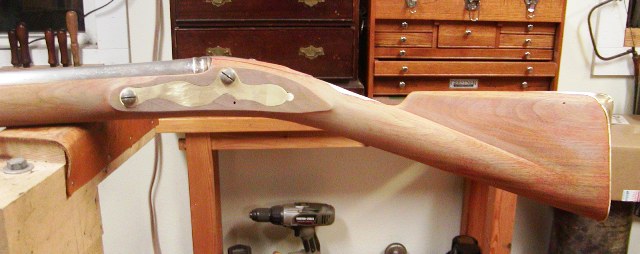
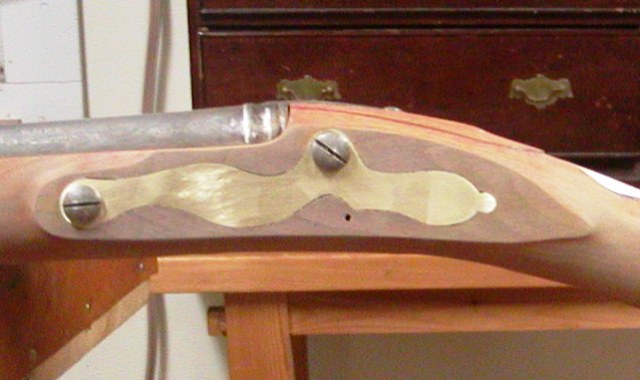
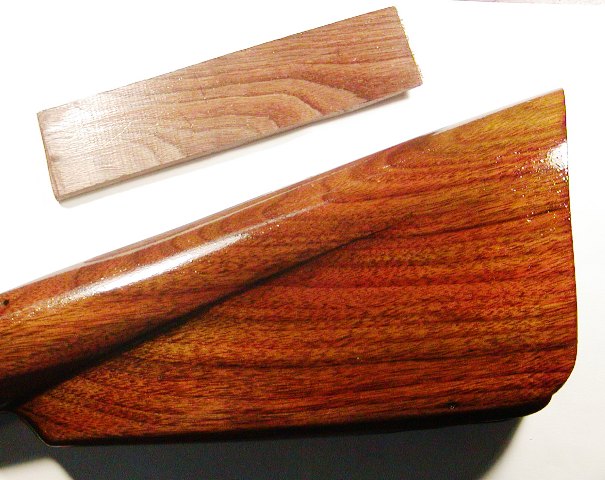
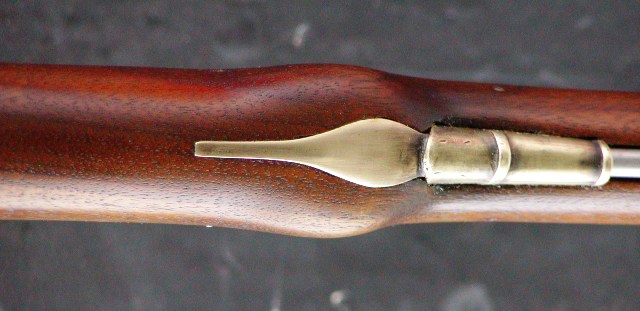
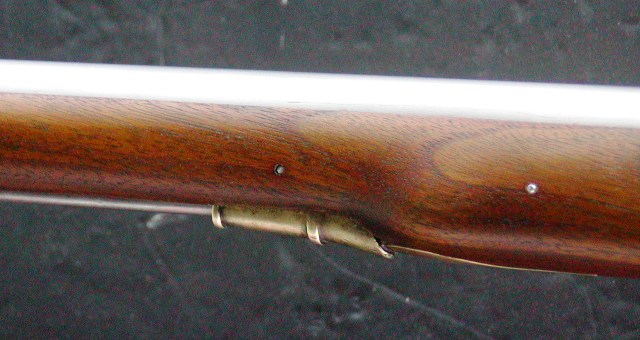
Doesn't take a genius to tell the difference between the short and emaciated Pedersoli plate and the real thing, I needed a bigger new plate that filled the space better but it had to keep the hole spacing of the Pedersoli lock. I had to lengthen the tail by 3/8" and the width of the plate but keep he same distance between the bolt holes and not have it look awkward. I took a piece of 1/16" thick brass sheet, coated it with Dykem Blue and had at it with a scribe. I like the result.
dy3rABI.jpg

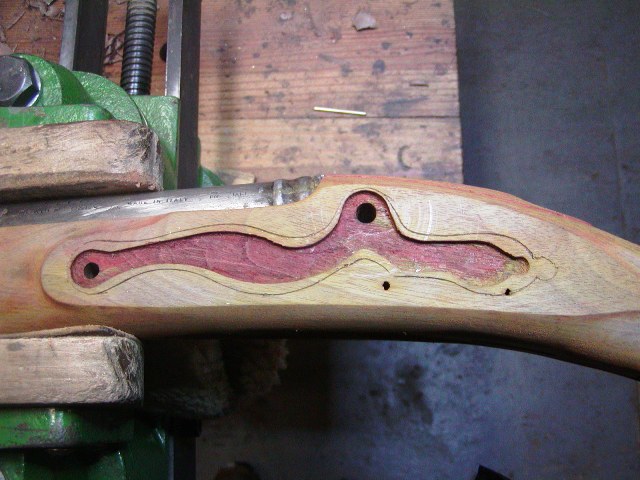
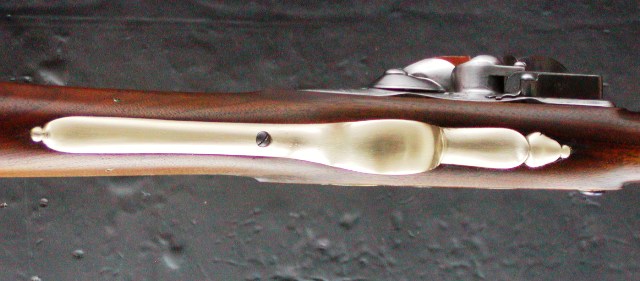
The scribed outline of the new plate really shows the difference from the Pedersoli plate.
dy3rABI.jpg

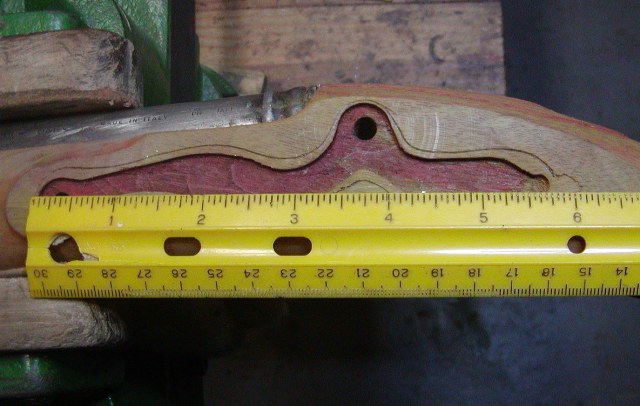
My new plate is just 1/8" short of the the originals, which is just fine because it fills up the space much better.
CYKnwfs.jpg

CYtBGvu.jpg

VnJek9l.jpg


dave
1640530757862.png

Dave,

I wanted to ask about the slight dip downward in the beavertail carving behind the tang? I've seen this in the early stocks with more drop, is this why you did it on this stock?

Gus
 
Hi Gus,
It seems to vary a lot on the original guns. I prefer the look of the concave surface but on some it was just a flat slope. I think it does show up more on the earlier patterns but as I dug deeper into these guns and particularly examining originals, the variation in stock work is considerable. That includes how the tails in back of the lock panel and side plate panel were done. On many, particularly later versions, the shaping is indifferent at best. It is sometimes hard to even see a beaver tail in the mound of wood left. On other guns of the same pattern it is well formed and sometimes skinny and sometimes a bit broader like mine. On one gun I examined there was sort of a tail on the lock side and nothing on the side plate side. So it goes.

So major SNAFU today. I was engraving "DUBLIN CASTLE" and when I got to the "C" the graver went right through the plate! What the heck!! Well, I did not realize how deep the slot for the sear spring was cut into the back side of the plate. It is about 1/16" deep, which is way deeper than is needed and after filing off the old lettering, I thinned the plate paper thin over the slot. Oh well, that is what welders are for. I'll fill the slot, cut it to a proper depth and add a little metal to the outside. That will solve the problem.

dave
 
Last edited:
Hi,
Fixed the lock plate and engraved it. The fix was tricky because the edges of the plate are very thin so I had to use my smallest tip and as small a flame as I could. It worked and I finished engraving the lock plate. If you look at original Dublin Castle Bess, such as those shown in Goldstein and Mowbray's book on Brown Besses, you clearly see how crude the engraving was on Irish Besses. It was not of the standard used on muskets assembled by the Tower. I don't like crude at all but the gun is supposed to represent the authentic appearance of an Irish Bess during the first years of the Rev War. So I have to do crude. Over the years I've practiced and perfected procedures that make doing clean, crisp work easy and they are my relaxed default. I have to work at doing crude. So how to do this. I decided to freehand pencil the letters, scale them to the size of the lock plate and then transfer the freehand design to the plate, which I did.
nGsoREj.jpg

Then I cut it with a fairly small square graver to give it a thin "stick figure" look with heavy serifs. I may go back and deepen the serifs a little more.
TM4c2DY.jpg

The thick and thin border was done freehand with no guide lines so it looks a little uneven and the crown and "G R" were re-engraved freehand as well. That produced the right look in my opinion. Below are examples of the higher quality engraving typically found on Tower produced muskets for comparison. This is really fun stuff.
ZqsEFcQ.jpg

lckvYKf.jpg


I added the Crown ownership arrow and the letter "T" within the frizzen spring. The "T" is a mystery to Bess scholars but i believe it is the mark of the Irish contractor Trulock who directed much of the production at Dublin Castle.

dave
 
Excellent work, Dave. Regarding the "T" mark, there are historically similar mysterious markings on firearms, especially military.
 
Hi,
I promised to show a piece of black walnut from the stock blank with just finish on it and compare it with my stock. Here they are with wet finish applied so you can see the color difference and how cold and bland the unstained walnut is.
qzjSLPG.jpg


I finished the flint cock and engraved the border. Here are some photos showing my lock, an original Dublin Castle Bess, and the Pedersoli lock before I worked it over.

4u5v4Q7.jpg

KD6zW1k.jpg

tWQe4Lp.jpg

BcAAmXV.jpg


dave
 
So thanks for showing the unstained piece with the final product. Grampa Munster down in his basement lab couldn't have topped that kind of transformation.
 
Hi,
I am almost done. I haven't posted photos because watching a stock dry is not really very exciting. On the other hand the lock has been a pain in the butt. After taking it apart and starting to work it over, I noticed the tumbler spindle hole in the bridle was way too large. The tumbler actually rattled in the hole. So I welded steel in the hole and drilled it to the proper precise size. After refitting the bridle I discovered why the hole was over sized. The tumbler holes in the lock plate was not true. It was at a slight angle so they drilled the spindle hole in the bridle over sized so the spindle could wobble around. When I fitted the spindle and hole precisely, the tumbler jammed when rotated. So I welded steel in the main tumbler hole and trued it with the spindle. I've written this before, I am so glad I never have to settle for this commercial reproduction Brown Bess trash regardless if it is India, Italian, or Japanese made. It also makes me hesitate to try and work over these reproductions anymore. They are a lot of work and unless you replace the butt plate, trigger guard, stock and work over the lock, you will never have a satisfactory musket that would ever pass British ordnance inspection. I recently received a Pedersoli trade gun lock installed on a custom gun to work over. because the owner was frustrated that he could not get it to hold at half cock. The reason is the geometry of the sear and tumbler is off so the sear hits the lip of the half cock notch when the gun is fired, mashing it and eventually rounding it over so trigger pressure can push the sear out of half cock. Worse, the trigger bar of the sear drops below the lock plate so when the lock is installed in the stock, the sear is kept from fully engaging half cock and full cock. The amazing thing is that Pedersoli would ever sell a lock like that and that some amateur hack would install it on a gun he sells to someone. Anyway, I fixed the Bess lock and it works fine now. I still need to case harden the internals and frizzen. I am also going to sole the frizzen face because it is so thin. I reshaped, hardened and tempered all the springs and polished all the internals. I also cut a new full cock notch in the tumbler closer to the half cock notch. That reduces the travel arc of the flint cock to a more reasonable length but also reduces the risk that the sear reengages or damages the half cock notch when fired. It will be a fine lock when done but I really get tired of fixing shoddy work.

dave
 
Hi,
Done! I still have to finish making the swivels but the rest is done. The finish is Sutherland-Welles polymerized tung oil in medium sheen. I may add one more coat after the last one cures. I may want a little more gloss. The finish on these guns was not a dull "in the wood" oil finish, which so many modern makers seem to like. It was an oil varnish and it shined a bit. I highlighted some of the features with bone black glaze to give a slightly older look amd I left mush of the brass from the old Pedersoli as it was with just a little cleanup and polishing. In a short while all the brass will tarnish and catch up with the old Pedersoli stuff. The owner and I decided to have me engrave a company and rack number on the thumb plate. He decided on company 4 ("D" company) musket number 19, which also was a clever historical idea. Enjoy.
EfWsNTc.jpg

lWPPZQx.jpg

yzA1pLC.jpg

xQVWE3d.jpg

xFV7MAt.jpg

iSZnIyO.jpg

M2GXV1C.jpg

36K9sdb.jpg

Vj4d7fB.jpg

8EYr1dj.jpg

ktxZYNX.jpg

LnNI6kX.jpg

16jpS8V.jpg

Kus8Zrs.jpg

iBeATDM.jpg


dave
 
Back
Top