• This community needs YOUR help today. We rely 100% on Supporting Memberships to fund our efforts. With the ever increasing fees of everything, we need help. We need more Supporting Members, today. Please invest back into this community. I will ship a few decals too in addition to all the account perks you get.


    Sign up here: https://www.muzzleloadingforum.com/account/upgrades
  • Friends, our 2nd Amendment rights are always under attack and the NRA has been a constant for decades in helping fight that fight.

    We have partnered with the NRA to offer you a discount on membership and Muzzleloading Forum gets a small percentage too of each membership, so you are supporting both the NRA and us.

    Use this link to sign up please; https://membership.nra.org/recruiters/join/XR045103

Turning a Pedersoli Bess into a Dublin Castle Short Land Musket

Muzzleloading Forum

Help Support Muzzleloading Forum:

This site may earn a commission from merchant affiliate links, including eBay, Amazon, and others.
Hi,
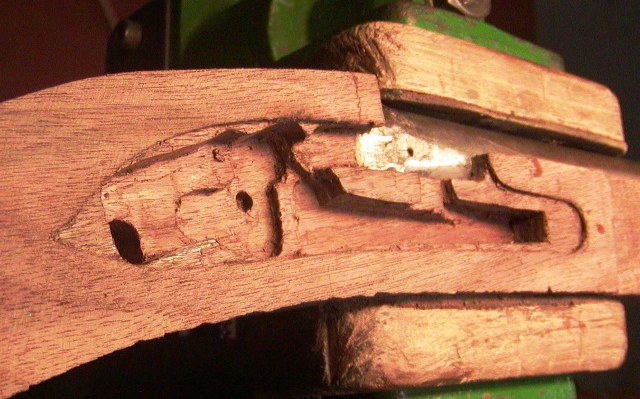
Thanks for all your comments and support. The project will be more fun now making a proper stock. I began my drawings and have the profile done sufficient for band sawing out the blank.
olxZ1Kj.jpg

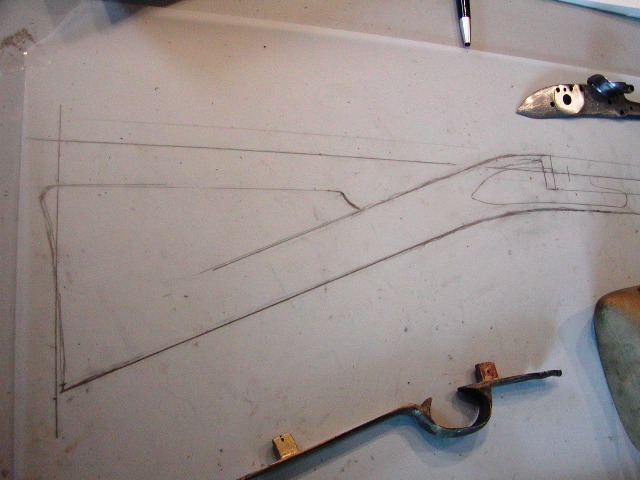
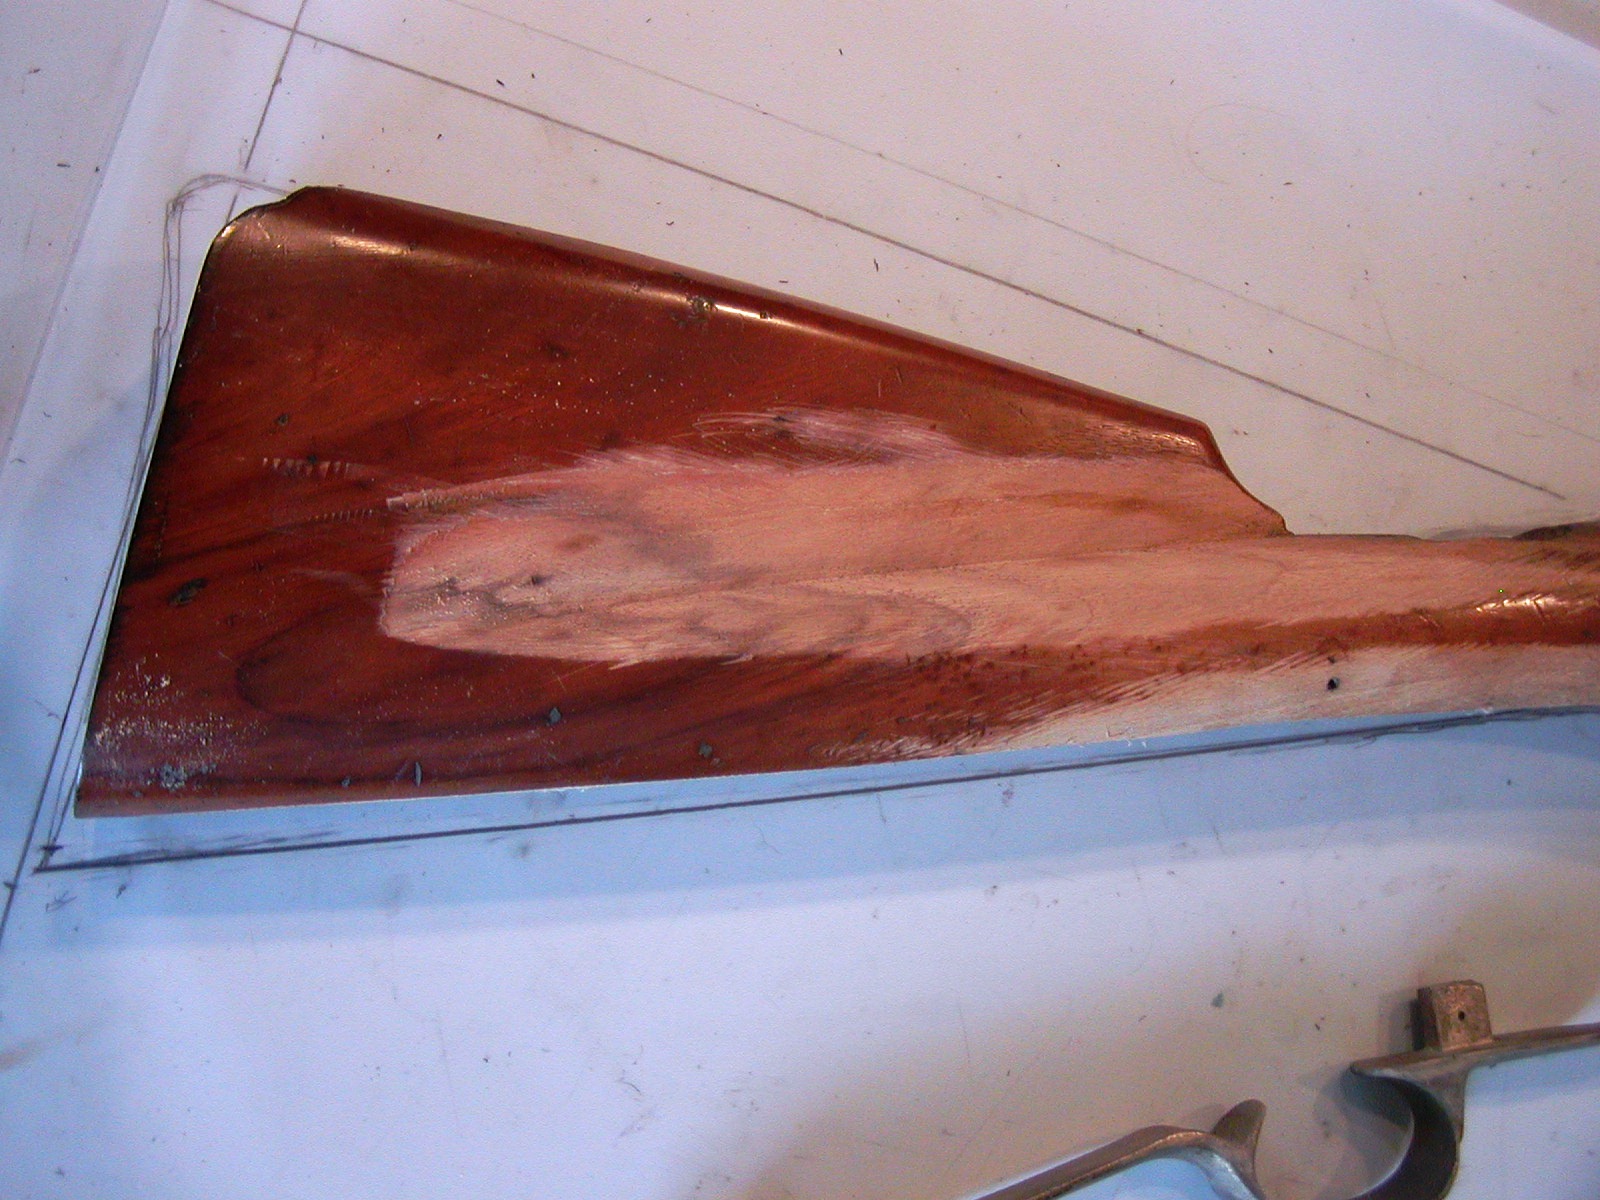
You can see the difference it will make from the old stock.
cdSqYjV.jpg


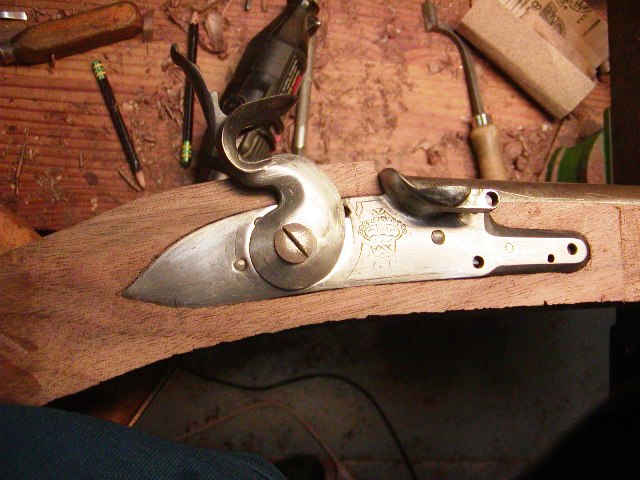
I dug into more of my references and notes for any further details on the Irish muskets. I think I have a good plan, which includes swapping out the Pedersoli trigger guard for one from an old Miroku Bess. I annealed the guard and then hammered out the odd crushed flattened, shape of the Miroku so it looks correct. It is much heavier brass, which is closer to the heavy, clumsier brass used on the Irish guns. As I was digging into the details I noticed many stock dimensions associated with Liege made Bess copies are similar to the Pedersoli Bess. In particular the butt plate dimensions and shape are spot on. Moreover, those muskets were of notoriously poor quality such that surviving examples often have replaced locks, frizzens, and flint cocks. I have a feeling that the prototype Bess sent to Pedersoli by Val Forgett and Turner Kirkland back in the early 1960s was a Liege gun with a replaced lock that happened to be marked "Grice 1762". Perhaps it was salvaged from an old long land musket or marine and militia musket. Back then there wasn't nearly the detailed scholarship on Besses that we have today so they may not have known any better. British ordnance got rid of the Liege contract guns as soon as they could but some may have been issued to loyalist units in America.

dave
 
Hey Dave - looking forward to seeing your progress on this project. Going by your previous works, this will be a stunner.
Really enjoying the history lessons that accompany your work. And very envious of your abilities.
 
Hi,
I really like building Brown Besses. It is the only "plain" gun I really like doing. The barrel is really pretty easy to inlet. The large breech tapers rapidly so for most of its length it is almost a straight tube. I first trim out the stock blank on my band saw but leave the wood on top of the barrel channel uncut and even with the breech. That allows me to use a dado cutter on my table saw to hog out a minimum with and depth for the barrel.
5sSr2eE.jpg

Then I use scary sharp gouges to round the bottom of the inlet.
gaUD1tk.jpg

I also cut out the breech pretty fully allowing me to set the barrel down in the stock and tracing an accurate outline.
EiUzDgt.jpg

8Hk0XmY.jpg

I cut along that outline with a mortise chisel until the barrel sits down into the stock.
46ZQU2x.jpg

Then I use inletting black to coat the barrel for final fitting, which is done with a round scraper, gouges, and a Gunline round barrel float. The barrel goes in easy.
OcGkaR5.jpg


It requires most of a good work day.

dave
 
Hi,
Black walnut is weaker, generally cuts less cleanly, chips a lot more, holds details less well than English walnut, and usually has a much more boring, cold, brown color. However, I can make it much warmer in color and make it look like English walnut

dave
 
Hi,
Black walnut is weaker, generally cuts less cleanly, chips a lot more, holds details less well than English walnut, and usually has a much more boring, cold, brown color. However, I can make it much warmer in color and make it look like English walnut

dave
Interesting. Thanks for the info.

How much of your hand tools are old/antique or period? We have a place near Plimoth plantation. There is a guy there doing wood working/furniture stuff. He has quite a few period/antique tools. It was really interesting.
 
I have a feeling that the prototype Bess sent to Pedersoli by Val Forgett and Turner Kirkland back in the early 1960s was a Liege gun with a replaced lock that happened to be marked "Grice 1762". Perhaps it was salvaged from an old long land musket or marine and militia musket. Back then there wasn't nearly the detailed scholarship on Besses that we have today so they may not have known any better. British ordnance got rid of the Liege contract guns as soon as they could but some may have been issued to loyalist units in America.

dave

I actually had a chance in the early 1980's to ask Val Forgett in person about this and also spoke to the man who took it to Italy to be copied, though the latter man's name doesn't spring to mind right now. Val wanted an original to have copied, but Val was not at all going to pay dearly for it, as Val knew how to squeeze a penny till Lincoln screamed. Val also knew little to nothing about Brown Bess muskets at the time, so when the one the latter guy found for "a good price," Val bought it. Oh, the latter man knew something of Brown Bess's, but he was no expert either. So it is quite possible it was a Liege made Bess copy.

Gus
 
Last edited:
I readily confess I knew little to nothing of the Irish/Dublin Castle made Brown Bess Muskets until only a few years ago, because even though I've been buying Dr. De Witt Bailey's Books since the middle 1970's, he never went into any detail on the Irish Muskets for quite a long time, if at all.

However the book, "The Brown Bess" by Goldstein & Mowbray gives us rather fascinating examples of Irish made Muskets. It seems Dublin Castle wasn't real conservative about sticking to Tower Patterns. Matter of fact, they sometimes added "improved" details earlier than the Tower. Sometimes they did things completely different.

So I'm really looking forward to Dave's interpretation of this Irish Musket Conversion, as he has a wider range of details to choose from.

Gus
 
Hi Gus,
I will be following the Irish Bess in Goldstein and Mowbray's book as closely as I can. I actually handled a Dublin Castle Bess years ago and have note but at the time I was just noting its details as a Bess not how it differed from Tower assembled guns. It was the same with the short land muskets I examined in Museums. I was always looking at them as just another Bess not for special Irish changes. So I am going to rely on Goldstein and Mowbray as well as descriptions in Bill AHearn and Richard Nittolo's large book on British arms in North America. The one detail I did note about Besses I've looked at, the Irish ones were lighter colored. One in Fort Ti is a really boring monochrome light brown. You know how English walnut cut from the outer layers of a log can have a dull light grayish-brown color. That was the color of this musket. I ought to be able to reproduce it well if I choose because I learned how at an early age from my Dad. Dad was a great craftsman and built well made and designed furniture but he could not stain and finish wood if his life depended on it. Part of the problem is he often used really boring wood like tulip poplar and white birch and then he would mix up some special secret concoction of stain but in the end the wood always looked like the same shade of mud. " Dad's really good mud colored furniture" as we used to say. Occasionally he wandered into "bandaid" brown territory but mostly it was just plain mud. I remember how to do that.

dave
 
Hi,
After a some days of conference calls and Zoom meetings, I got back to my real job building this musket. I cut the ramrod channel and drilled the ramrod hole. I usually use a 1/4" rounded router bit on my router table to do the job. However, all the other distractions in my life right now are making me stupid. To use the router table I have to leave the bottom of the stock even all the way without the step at the rear pipe cut away. Well, in my haste to trim wood off the stock, I forgot that little detail and cut the bottom of the fore stock down all the way to the rear pipe. So no router table for me. Instead I cut the groove by hand with a 1/4 gouge and a small router plane. It took longer but it is all good. Then I drilled the hole. I don't use anything fancy just a drill bit welded to a long rod and a brace and bit, which happens to be my great grandfathers. Because I build so many different kinds of guns, I have a large array of ramrod drills all different sizes and lengths. I make them really easily and quickly. I just buy a regular drill of the right size and steel rod the same diameter from the hardware store. I chamfer the ends of the drill and rod where they will be joined on my grinder. Then I place them in the crease of a steel angle iron, but the chamfered ends together and tack the centers together using my gas welder. The channel iron aligns them perfectly. Then I fill in the chamfered "V" ringing the joint with a fillet of weld. Grind flush and the drill is ready to go. It usually takes me all of 30-45 minutes to make a new ramrod drill.

dave
GwdY6dz.jpg

HRdSJd6.jpg
 
Hi,
I finished inletting the barrel tang. One thing that is important is to get rid of any radius connection between the tang and bolster. It makes inletting a nightmare. and you won't find it on original Besses.
77AXoud.jpg

plt8M4Q.jpg

8jaR2KJ.jpg


The tapered bolster is a challenge to inlet but not that hard. Notice the patch of wood in the barrel channel. It was not uncommon for the ramrod hole to break into the barrel channel at the breech because the breech flared a lot and if you designed the stock to be as slim as the originals, that was a possibility. Any way, I cut out a slot in the barrel channel to make sure I had enough clearance for the forward lock bolt, and I do. I glued in a patch and will cover it with the thin AcraGlas coat I paint in the barrel channel. I do that not to fill gaps but to strengthen the barrel channel walls. Reenactor guns like this one fight battles repeatedly over a much longer time period than the Rev War soldiers and the glassed barrel channel protects their investment. If I was making the gun for a museum (which I do) that would not be required..

dave
 
Hi Gus,
I will be following the Irish Bess in Goldstein and Mowbray's book as closely as I can. I actually handled a Dublin Castle Bess years ago and have note but at the time I was just noting its details as a Bess not how it differed from Tower assembled guns. It was the same with the short land muskets I examined in Museums. I was always looking at them as just another Bess not for special Irish changes. So I am going to rely on Goldstein and Mowbray as well as descriptions in Bill AHearn and Richard Nittolo's large book on British arms in North America. The one detail I did note about Besses I've looked at, the Irish ones were lighter colored. One in Fort Ti is a really boring monochrome light brown. You know how English walnut cut from the outer layers of a log can have a dull light grayish-brown color. That was the color of this musket. I ought to be able to reproduce it well if I choose because I learned how at an early age from my Dad. Dad was a great craftsman and built well made and designed furniture but he could not stain and finish wood if his life depended on it. Part of the problem is he often used really boring wood like tulip poplar and white birch and then he would mix up some special secret concoction of stain but in the end the wood always looked like the same shade of mud. " Dad's really good mud colored furniture" as we used to say. Occasionally he wandered into "bandaid" brown territory but mostly it was just plain mud. I remember how to do that.

dave
Hi,
I finished inletting the barrel tang. One thing that is important is to get rid of any radius connection between the tang and bolster. It makes inletting a nightmare. and you won't find it on original Besses.
77AXoud.jpg

plt8M4Q.jpg

8jaR2KJ.jpg


The tapered bolster is a challenge to inlet but not that hard. Notice the patch of wood in the barrel channel. It was not uncommon for the ramrod hole to break into the barrel channel at the breech because the breech flared a lot and if you designed the stock to be as slim as the originals, that was a possibility. Any way, I cut out a slot in the barrel channel to make sure I had enough clearance for the forward lock bolt, and I do. I glued in a patch and will cover it with the thin AcraGlas coat I paint in the barrel channel. I do that not to fill gaps but to strengthen the barrel channel walls. Reenactor guns like this one fight battles repeatedly over a much longer time period than the Rev War soldiers and the glassed barrel channel protects their investment. If I was making the gun for a museum (which I do) that would not be required..

dave
This tip is extreme helpful— "One thing that is important is to get rid of any radius connection between the tang and bolster. It makes inletting a nightmare."
Thanks Dave! :)
 
Last edited:
Hi Folks,
The holiday is past and I am back in the shop. I am going to show you how I inlet Bess locks so the end result matches the originals. This may be the only place on the internet that shows these details. Dublin Castle made muskets were cruder cosmetically compared with their Tower assembled sisters but they were made just as well where it counted. That included the lock inletting, which was very well done on all British muskets. I have a good mental image of the work so I can proceed quickly and when I have a TRS copy of a Bess lock, I can inlet the whole mortice without the lock after tracing the plate on the stock. The locks just drop in place when I am done. However, the Pedersoli lock is not an exact copy internally so I have to use the components to guide me. The first step is inletting the plate. Obviously, I position it to coincide with the vent hole on the barrel. On Besses, that was not necessarily at the sunrise position and was usually a little below the level of the pan. I chose that position for this gun. Then the bolster is inlet so the lock plate sits down on the wood so I can trace the outline with a sharp carving knife. I remove the plate and deepen the outline with my stab in chisels. Then I back cut the edges to establish the mortise edges and use a shallow sweep gouge to remove the bulk of the wood. Scraping with a flat chisel cleans it up and the plate is in.
ytt76hf.jpg

Next, I mark the tumbler hole in the mortise through the lock plate. I find the center and drill a hole the diameter of the bridle spindle to the proper depth. I put the tumbler in the mortise and outline its circular travel. Then I cut out that circle using chisels and a router bit on my Dremel.
ERaPq0A.jpg

I attach the cock and make sure the tumbler swings through its arc without jamming on wood.
X8btHD5.jpg

I locate the sear screw hole through the lock plate, position the sear accordingly in the mortise but reversed to locate the deep sear hole. Then I drill out that hole and turn the sear around as it will be installed.
8p0afVW.jpg

I outline it and also consider the sear spring. I cut out a block of wood to accommodate both.
BXfsB6C.jpg

British stockers just squared off the ends of these deep mortises. The sear, tumbler, and sear spring are all inlet to the same depth.
Then I outline the bridle using the bridle and sear screw locations as a guide. I inlet the outline of the bridle just a bit (1/16"-3/32") lower in the mortise. Now all the guts fit except the mainspring. I use the holes in the plate to position the mainspring and outline it approximately. I use a 1/4" flat chisel the cut into the mortise and clear out most of the wood for the spring. The front of the inlet at the bend of the spring is a square cut in. No attempt is made to follow the curve of the bend. In addition, a notch is cut for the anchoring stud and screw but wood is cut away at an angle from the lug matching the angle of the edge of the upper leaf of the mainspring. No wood is removed more than necessary about the barrel breech.
Oc67FcL.jpg

p1da1rm.jpg

bUQYCWg.jpg

Smnef08.jpg


With that, the job is done.

dave
 
Hi,
Compare my lock inlet with the the Pedersoli mortise and you can understand why the Pedersoli Bess would never pass British ordnance inspection. None of the repros, Japanese or Indian would pass inspection. They are all very, very poor attempts to copy British muskets.
pYuHAWB.jpg

p1da1rm.jpg


dave
 
I am imagining the shops where such work was done. Wondering if they used patterns to do the lock inlets or, like you, knew pretty much by heart how it’s done once the lock plate is set in.
As always, another great tutorial. We are so fortunate with you.
 

Latest posts

Back
Top