Hi,
Yes, I posted the pistol case tutorial above. It is in 5 parts. Unfortunately, my wife Gail, died in 2012, so I no longer have her to guide me with the lining. However, she taught me well and the tricks for lining that we show in the tutorial are worth their weight in gold and probably the only information of that kind and quality available anywhere in the world. The case we made was the equal of any of the finest cases made in the 18th or early 19th centuries. There are 2 changes from that tutorial, however, that I now incorporate when making cases. The first is I use hide or pearl glue for attaching the lining. That is the traditional glue and it is applied hot. It has 3 very important qualities, other than it works as a glue. It allows quite a bit of working time before it sets so you can tug and push the fabric around to fit. It is viscous so it fills gouges and rough spots in the underlying wood so you don't have to smooth that surface so much as we did in the tutorial case. Finally, it can be loosened with steam so repairs to the lining are easily made. The third change concerns the finger joints. In subsequent years I examined more cases and period furniture and discovered that what I thought were parallel sided finger joints were actually subtle hand cut dovetails. Dovetails from that period, which were all hand cut, do not have the distinct angles of modern work. The angles are very subtle and often obscured by old blackened finish.
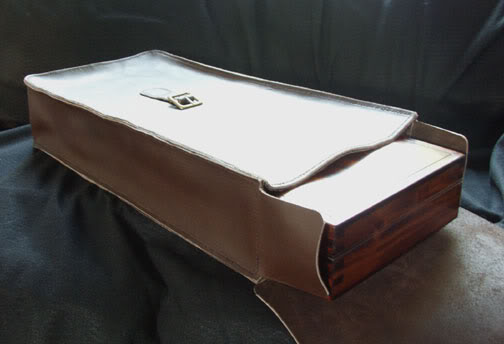
On English-style cases, most modern repros get it badly wrong and produce cases that I call "TV dinner" trays. The partitions on fine original cases were designed to cradle the pistols and hold them securely so they did not rattle around during travel. The cases were not for display, rather they were made to protect the pistols during travel. The pistols should fit snug and in a slight "V" cradle formed by partitions that are tapered. Finally, because the cases were meant for protection during travel, they were sold with protective leather outer coverings. Obviously few of those survive so when I made my first example, the leather was thinner than it should be but the design was bang on.
Beautiful work Dave.


![DSCN0416[1].JPG](https://cdn2.imagearchive.com/muzzleloadingforum/data/attach/50/50767-DSCN0416-1-.JPG)
![DSCN0422[1].JPG](https://cdn2.imagearchive.com/muzzleloadingforum/data/attach/50/50768-DSCN0422-1-.JPG)
![DSCN0428[1].JPG](https://cdn2.imagearchive.com/muzzleloadingforum/data/attach/50/50769-DSCN0428-1-.JPG)
![DSCN0432[1].JPG](https://cdn2.imagearchive.com/muzzleloadingforum/data/attach/50/50773-DSCN0432-1-.JPG)
![DSCN0435[1].JPG](https://cdn2.imagearchive.com/muzzleloadingforum/data/attach/50/50774-DSCN0435-1-.JPG)
![DSCN0437[1].JPG](https://cdn2.imagearchive.com/muzzleloadingforum/data/attach/50/50775-DSCN0437-1-.JPG)
![DSCN0439[1].JPG](https://cdn2.imagearchive.com/muzzleloadingforum/data/attach/50/50776-DSCN0439-1-.JPG)
![DSCN0404[1].JPG](https://cdn2.imagearchive.com/muzzleloadingforum/data/attach/50/50777-DSCN0404-1-.JPG)
