• This community needs YOUR help today. We rely 100% on Supporting Memberships to fund our efforts. With the ever increasing fees of everything, we need help. We need more Supporting Members, today. Please invest back into this community. I will ship a few decals too in addition to all the account perks you get.


    Sign up here: https://www.muzzleloadingforum.com/account/upgrades
  • Friends, our 2nd Amendment rights are always under attack and the NRA has been a constant for decades in helping fight that fight.

    We have partnered with the NRA to offer you a discount on membership and Muzzleloading Forum gets a small percentage too of each membership, so you are supporting both the NRA and us.

    Use this link to sign up please; https://membership.nra.org/recruiters/join/XR045103

My Apprentice and Her English Fowler

Muzzleloading Forum

Help Support Muzzleloading Forum:

This site may earn a commission from merchant affiliate links, including eBay, Amazon, and others.
Hi,
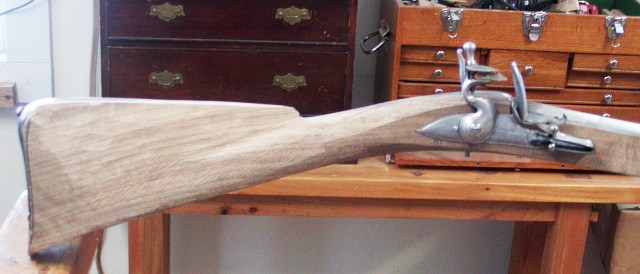
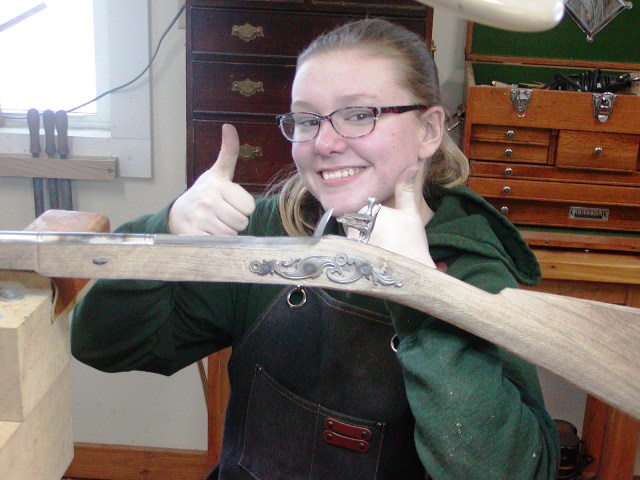
Another milestone day. The butt plate is in and we are starting to shape the butt stock. Maria finished inletting the butt plate. It came out very well considering she has never inlet a butt plate before. Let me be clear, I guide Maria, sometimes I step in and show her how to better use a tool or make a slight course correction. But then I get out of her way and go off and work on other guns. She does 99% of the work. Sometimes I watch her struggle with a task, I let her figure it out, and only step in when there is a really good teachable moment that enables her to make a big step forward. Then I leave her to it.


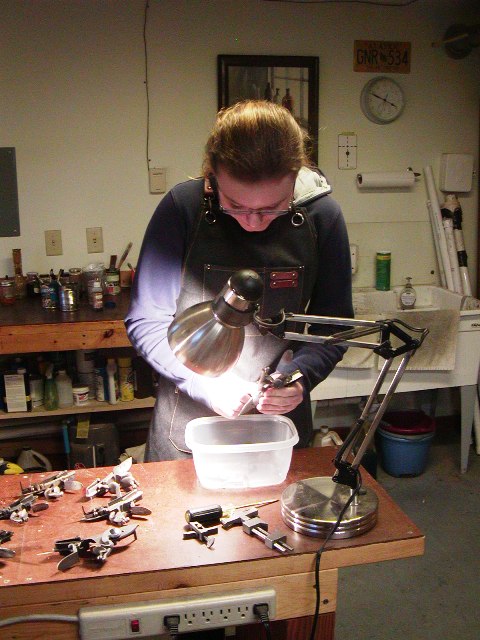
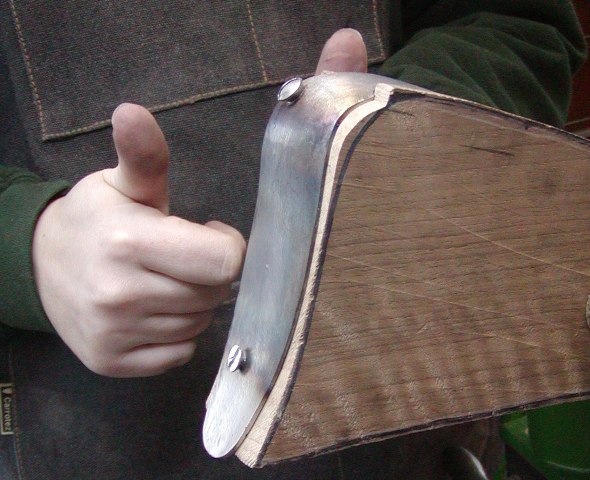
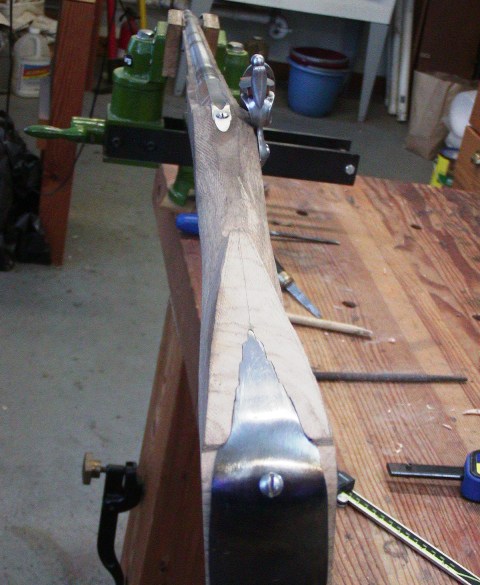
After inletting it, we drilled for the screw holes and installed the screws.


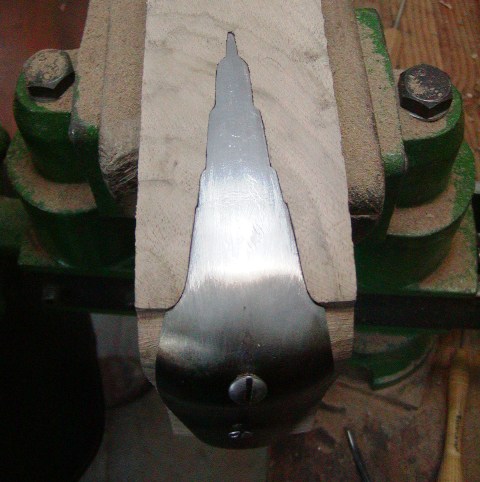
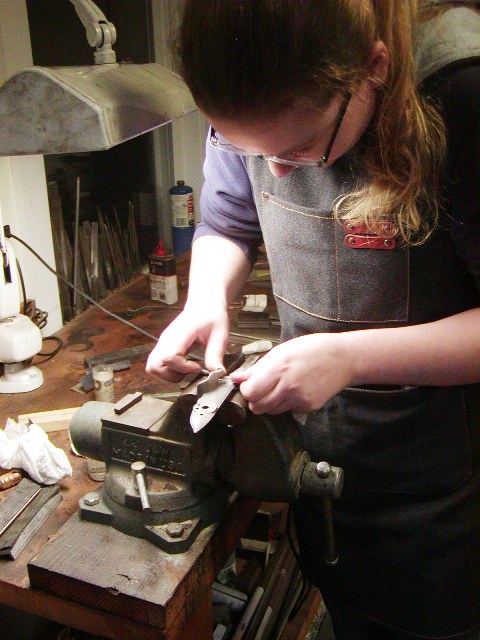
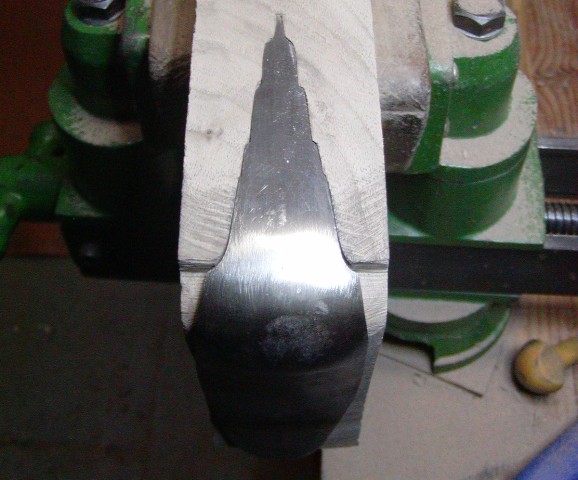
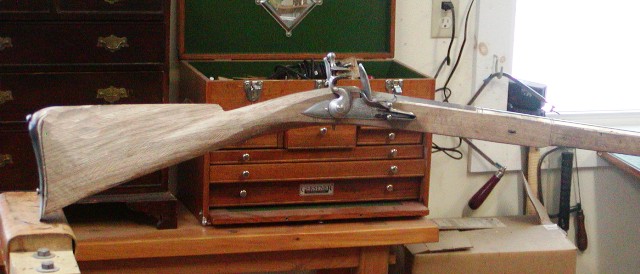
Not bad for a first butt plate inlet. Next up we began shaping the butt stock using shallow sweeps, gouges, and rasps. This fowler will have a baluster wrist merging with the comb in a radius rather than a seam or crease like a Brown Bess. First we draw a mark on the side at the comb very slightly above the top of the wrist. Then we make a mark on the stock about 1" above the toe of the stock at the butt plate. We draw a straight line through those marks. This is the initial guideline for the top of the baluster wrist. On top of the comb, we draw lines from the maximum width of the butt plate at the heel to the point of the comb. We initially make that point blunt and wider than it will ultimately be. Then Maria chiseled away the appropriate wood until most excess wood was removed.


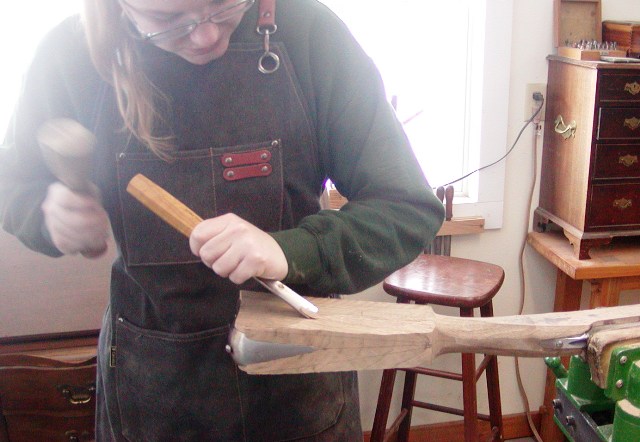
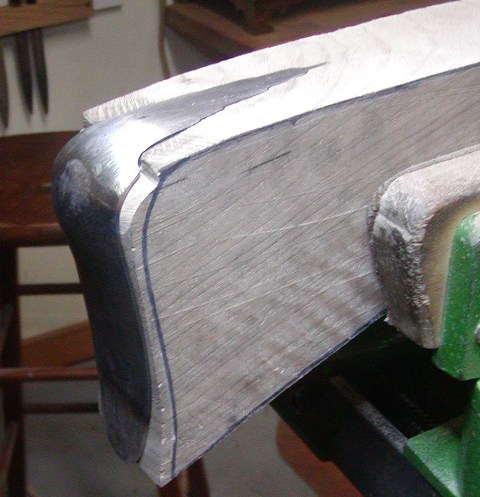
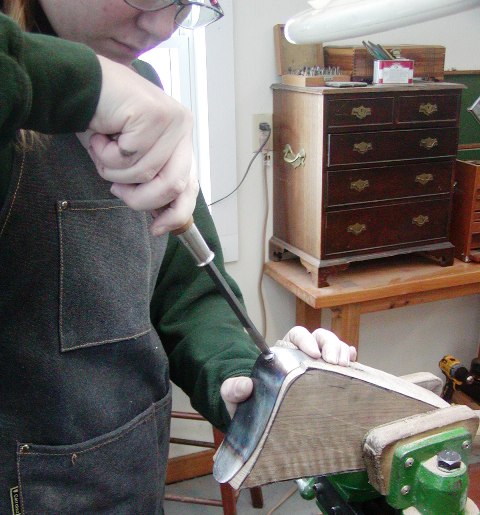
Then she smoothed the cuts using our Liogier gunsmith's rasp. This tool is superb and its long length allows you to reach the front of the comb without rapping your knuckles on the butt plate.


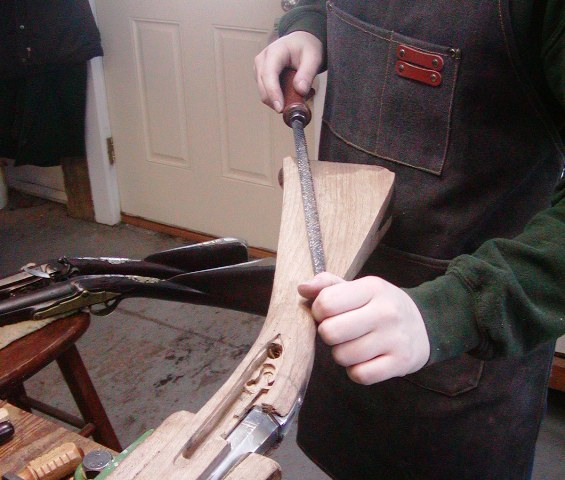
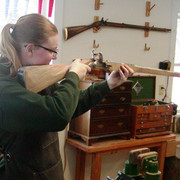
We do this in stages. I do not take anything down to a final profile all at once. We work down to that over time, always allowing some room for course corrections. I urge Maria to handle her gun at this point to see how it feels and gain insight about future shaping needs.


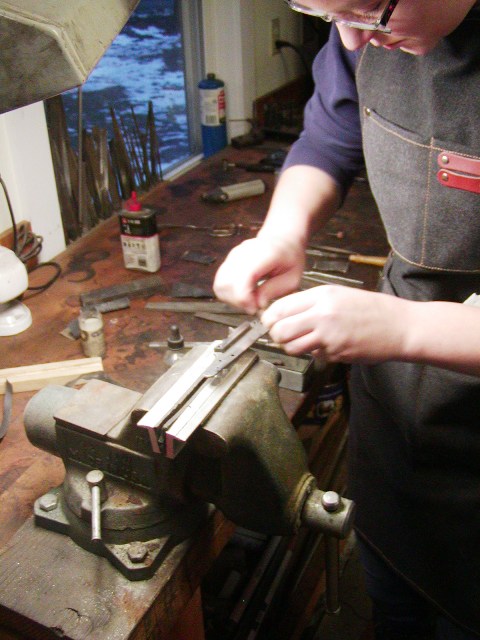
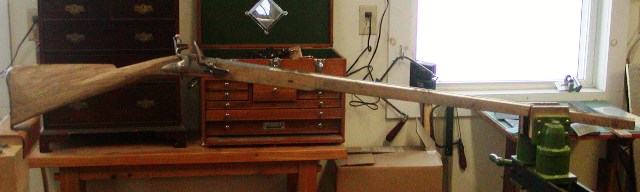
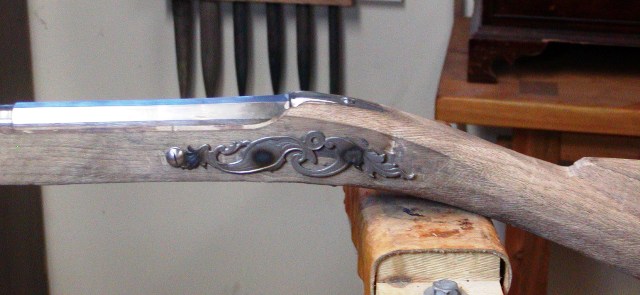
I think you can begin to see how elegant this fowler will ultimately be. We also drilled the stock for the forward lock bolt. Then use the side plate from Chambers English rifle kit to locate the rear lock plate bolt hol.


dave
 
She did a good job on a difficult buttplate with excellent guidence. I like that you are letting her do most of the work. Thanks for these posts Dave!
 
The old-grand-dad I am loves Maria... 😍

where-we-are-2-25-2023-5.jpg
 
This smoothbore is pure elegance. Good job all the way 'round. I'm so proud of what has been accomplished here. Maria the Amazing. There's a lot of guys out there , that want to build a gun, but few with the talent , to learn how to accomplish the mission . I know a few. Maria is light years , ahead of the norm.
 
Hi,
Maria and I did not get a lot done today because we were visited by some reenactor friends with faulty guns. The first was a Miroku Brown Bess that would not hold at half cock. It became clear to Maria and I that the gun was a kit assembled by someone not very knowledgeable or skilled. It has a lot of problems but the lock issue is the primary one. Solving it was just a simple matter of grinding off a little of the top of the trigger lever so the sear could fully engage in the tumbler notches. The trigger plate is inlet almost 1/8" too deep resulting in the trigger issue. We fixed that. The other gun was a Pedersoli Charleville model 1777. The story was the owners bought it second hand and it never worked properly. It always stopped at half cock when fired but sometimes if the trigger was pushed to the right, it fired properly. The owners sent the lock to Pedersoli who did nothing saying it was fine. They brought it to a number of local experts who could not solve the problem. After testing the lock, I shocked the owners by telling them with certainty that I will show them what the problem is. I disassembled the lock and then measured the height of the halfcock notch lip relative to the height of the full cock notch lip measured from the center of the tumbler spindle. It was at least 1/32" higher causing the tip of the sear to catch in the half cock notch or mash down the lip every time it was fired. I ground down that lip to be lower than the full cock notch and polished the notch with a diamond file. That solved a problem that none could figure out for many years for this gun. It just took someone who actually understands lock geometry to fix it. It was a good lesson for Maria. She learned it well.

dave
Dave,

Here's one more hitting the half cock problem with a Miroku Bess that Maria and other forum members may wish to know, as in over 30 years of working large Military percussion and flintlock locks, I had never run across it before.

The original owner bought the Miroku Bess "used for a good price" and it hit the half cock most of the time. He had three or four gunsmiths or armorers look at it and no one was able to fix it. He informed me he had detail disassembled the musket a few years before we met and was still not able to figure it out. He then admitted he "might not still have all the parts," but if I wanted to fix it, he would donate it to the unit for use as a "loaner musket" for new members.

He was missing a lock plate screw, a top jaw and something else I can't remember right now, but thank heaven no other lock plate parts. Since Miroku had stopped selling the muskets decades before, there was no buying replacement parts. I wound up using a much larger Rifle Shoppe P1730 Top Jaw, as it allowed proper fit to the back of the cock and then did quite a bit of shaping to match the Miroku bottom jaw. I could have made a replacement lock plate screw on a lathe, but found a different screw from TOW that I was able to re-thread and file the head to match using my drill press. That and the last part I can't remember turned out to be the "easy" things to do.

Of course the half cock notch was all buggered up and when filing and stoning that, it took the notch slightly below the length of the full cock notch. I did some clean up and some polishing of the other parts, but that was all the lock needed. I made sure the top of the sear leg/arm was not hitting wood inside the stock and not allowing the face of the sear to be pulled far enough away from the full or half cock notches. With no little confidence, I finished assembling the musket, put a dummy flint in the jaws and tried the trigger a few times. RATS!! I could still feel the sear catch the half cock slightly on one out of four or five trigger pulls.

I checked and checked and could not find anything else wrong till after half a pot of coffee I decided to look at everything very slowly under magnification. I almost missed it, but I just happened to turn the musket so as to catch a TINY little shiny fresh ding on the inside of the top of the trigger guard bow a little way to the rear of the trigger when it was fully forward. Who would have thought that was the problem even with the sort of mashed down bow of the trigger guard on all Miroku Bess's? However, that little ding showed it kept the sear arm/leg down from being pushed up enough to clear the half cock notch just at the point the sear face caught the half cock notch.

I decided not to hog out the trigger guard bow anymore as that would have made it even less authentic and funny looking. I filed between 1/16" and 3/32" off the bottom of the trigger, reshaped it a bit and polished it and that did the trick. I left the tiny little ding in the trigger guard, because the owner said he was interested in finding out what caused the problem, if I could fix it.

Though I've never heard of anyone who ran into this before or since, perhaps this is something else Maria might keep in her bag of tricks.

Gus
 
Hi Gus,
You are a gem and more than worth your weight in gold! That is a great piece of information to tuck away. We resolved the problem by grinding the lip of the half cock notch but I am sure there are still folks out there struggling with the hitting the guard issue. At some point, Maria wants to work as the armorer for Warner's Green Mountain Boys and other regiments. At some point I think we need to create a notebook of tips and methods for working over reproduction and other guns.

dave
Hi Dave,

You are very kind.

I think a notebook of tips and techniques for armorers would be a great thing to help unit armorers do "field fixes" that while may not always be the best way to do things you can do in a shop at home, there are things that are good enough to at least get them through the weekend events. I think it would also help others to at least identify problems that can occur and how they can be fixed the correct ways to do things.

From many years of working large military percussion locks, I was a bit surprised that if you understand how a basic lock works, it was not a huge transition to military flintlock locks or even large trade locks. Still there are some things unique to flintlock locks that would be great to pass along.

I don't want to further hijack your current thread, so perhaps we should start a new thread on that when you have time?

Gus
 
Last edited:
She's a very talented little lady and that's going to be a stellar fowler! It's almost time to pick a name for it!
She has a good teacher to go along with her natural talent! Good rifle building not only takes skill, it takes patience. I wish I could have learned from someone when I put my first rifle together. Some of my expletives had my dog's ears standing up!
 
Last edited:
Hi,

Maria and I got started on the actual work on the gun today. We are waiting on the barrel but there is a lot we can do in the meantime. Her interest is not just building the gun but understanding the history and context behind it. There is nothing I would rather hear than that. So for the first hour today, I showed her the presentation I made on making a mid-18th century English sporting gun at the Kempton Gunmakers Fair. I covered a brief history of the British gun trade from 1637 until 1800 and discussed the style changes that occurred during that period and why they happened. Then we went out to the shop and I demonstrated to her what makes a good flintlock.


We covered all the components and their names both modern and old. She preferred the old names so a frizzen is a battery, frizzen spring is a feather spring, mainspring vise is a spring cramp, etc. Then we spent time looking at some very fine original and modern made locks and some lesser modern made locks to teach her what makes a good lock. In the process, I had a great teaching device. I had a Chambers round-faced English lock purchased last summer and one purchased some years ago. Both were identical except for one thing, the toe of the mainspring hook on the newer lock was right at the tip of the toe of the tumbler when the lock was at rest. At full cock, it was 2/3s of the way up the foot of the tumbler. On the older lock, the toe of the hook was part way up the foot of the tumbler at rest and then right at the corner of the tumbler at full cock. I had Maria measure the force to pull the flintcock back to half and then full cock on both locks. On the newer lock, it took 10 lbs pull to bring it to half cock and 10 lbs to bring it to full. On the older lock, it took 11 lbs to bring it to halfcock and just 8 lbs to bring it to full. That slight difference in the relation of the toe of the hook and its position on the tumbler made all the difference. Next we studied later locks with stirrup tumblers. We measured the forces needed to pull the flintcock back to half and then full cock on the new "Nock" lock and on an original English lock by Fields from the 1820s. On the Nock lock it took 8-9lbs to pull it back to half and 10 lbs to pull it back to full. On the original lock, it took 11 lbs to pull it back to half and 8 lbs to pull it back to full. Then I had Maria use calipers to measure the distance between the centers of the stirrup spindle held by the mainsprings and the centers of the tumbler spindles when the lock was at full cock. That distance was 0.28" for the "Nock" and 0.21" for the Fields original. That closer distance meant greater mechanical advantage. We then examined and measured a collection of modern and original locks including one from a pair of Wogdon pistols. She learned the lesson really well.

We also discussed other lock features and then I had her disassemble her Chambers lock and start working on polishing and tuning it.


She is very happy doing this work and is a lightning quick study. She quit varsity basketball so she could work on this project. She is dedicated.

dave

Read in "Muzzleloader" magazine she was the recipient of the 2023 Youth Gunbuilding Scholarship sponsored by Muzzleloader and the Kentucky Rifle Foundation.
 
Hi FishDFly,
Yes, she is going to the workshop. She is flying to Columbus, OH and then someone from the workshop will pick her up. Get this, her high school principal arranged for the school to pay her travel expenses. I think this weekend we will box up all her tools for shipping to Ian Pratt. I have given her and bought her quite a few tools plus her original grant from the school to do our project gives her funds for tools as well. Eventually, we will build a nice armorer's chest for her tools. I have some fantastic old growth Sitka spruce lumber from my days in Alaska earmarked for that project.

dave

I thought it was really nice to read her name in Muzzleloader and that others have recognized her talent. She will do well.
 
Everyone with drive and fire like Maria needs an "Uncle Dave".
Kudos to both of you!
Thank you James. I benefited from my dad teaching me the rudiments of wood and metal working from a young age. However, I would get frustrated because Pop would step in and do too much of a task I was struggling with instead of showing me a few tips and letting me go. I learned from that and do not do that with Maria or anyone else I have taught. I get them started and let them go, step in occasionally to make a course correction or demonstrate how to better use a tool, and then get out of the way. Maria will do well no matter what she takes on in the furture.

dave
 
Back
Top