Ahh, to be young again!Hi Guys,
Maria probably will post stuff during summer. Right now she has her last two months of high school to finish, she works at horse stables, at a local restaurant, 2 days a week with me, and has chores at home to do. I don't know how she does it particularly when she often has several hours of homework to do as well. She really doesn't have time to be active on this or any other forum right now. She worked at the stables the afternoon before our last session and the owner asked her to exercise several horses that were mostly cooped up during winter. To say the least, they were pretty wild so her legs were so tired the next day she had to work from a stool in my shop. Her time working with me and on horseback are her times to decompress and escape the drama of still being a high school student, which includes band, chorus, and running the school newspaper.
dave
-
This community needs YOUR help today. We rely 100% on Supporting Memberships to fund our efforts. With the ever increasing fees of everything, we need help. We need more Supporting Members, today. Please invest back into this community. I will ship a few decals too in addition to all the account perks you get.

Sign up here: https://www.muzzleloadingforum.com/account/upgrades -
Friends, our 2nd Amendment rights are always under attack and the NRA has been a constant for decades in helping fight that fight.
We have partnered with the NRA to offer you a discount on membership and Muzzleloading Forum gets a small percentage too of each membership, so you are supporting both the NRA and us.
Use this link to sign up please; https://membership.nra.org/recruiters/join/XR045103
You are using an out of date browser. It may not display this or other websites correctly.
You should upgrade or use an alternative browser.
You should upgrade or use an alternative browser.
My Apprentice and Her English Fowler
- Thread starter dave_person
- Start date


Help Support Muzzleloading Forum:
This site may earn a commission from merchant affiliate
links, including eBay, Amazon, and others.
- Joined
- Nov 26, 2005
- Messages
- 5,012
- Reaction score
- 9,950
Hi Frank,And, in her free time she does what?

In her "free" time she does reenactments with Warner's Green Mountain Boys and sews her 18th century clothing. She does not watch TV or play computer games. She leaves those things to the "boys" in her life.
dave
I would love to see this story published in Muzzle Blasts or similar magazines. This is special.
Brokennock
Cannon
+1!I would love to see this story published in Muzzle Blasts or similar magazines. This is special.
- Joined
- Nov 26, 2005
- Messages
- 5,012
- Reaction score
- 9,950
Hi folks,
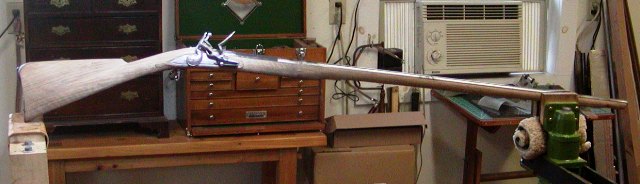
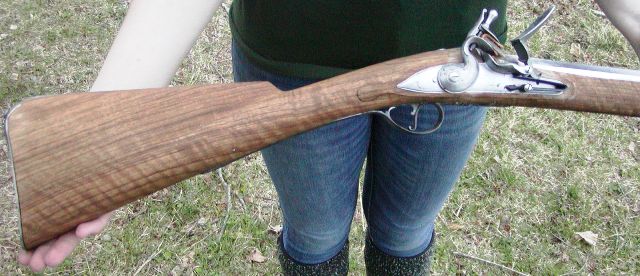
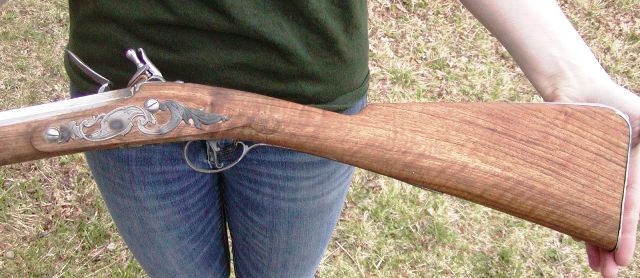
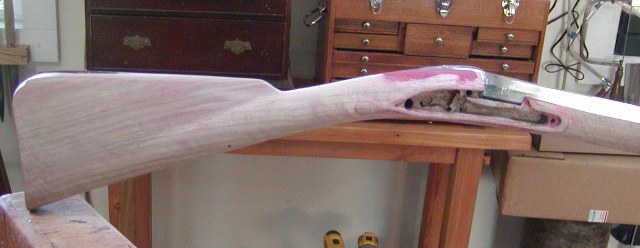
Thanks for supporting and encouraging Maria. I know many on this forum would like to hear from her but she is so busy. She has 2 more months of high school including band, chorus and running the school newspaper. She works 3 days a week at a horse stable, 2 days at a restaurant, and 2 with me. She quit varsity basketball to work with me. When she has time she is reenacting with Warner's Green Mountain Boys and sewing her 18th century kit. As you might imagine, she does not watch TV or waste her time with computer games. She leaves those useless distractions for the "boys" she knows. Anyway, we made more progress finishing her gun. You can see how elegant it will be.
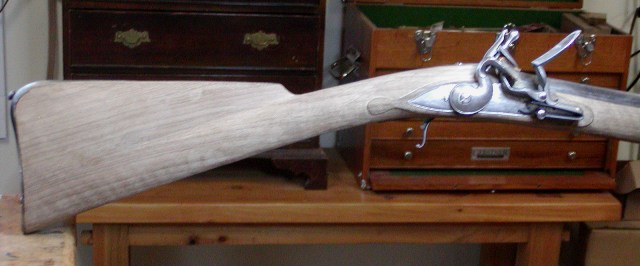

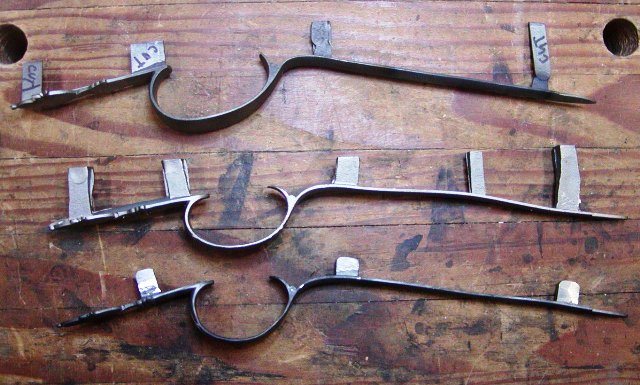
We moved on to the trigger guard. The commercially available trigger guards for English fowlers are pathetic. There used to be a small bowed urn finial guard sold on all the major sites and by Chambers. It was the only guard that met any historical standards. All the others had bows too big and in the case of the acorn finials, they looked to be designed by shriveled, myopic, Mr. MaGoo. Pathetic. I found a supplier that still had the smaller bowed urn guards in steel and I bought 3. I might just buy them out. However, even that guard lacks certain historical details. The most important is the bow should be egg shaped not an even oval. The egg shape creates a lot of space in front of the trigger for your finger. The photo below shows 3 guards. The top is the currently available version with oversized bow. the second is the raw guard before we altered it, and the third is our altered guard for the fowler.

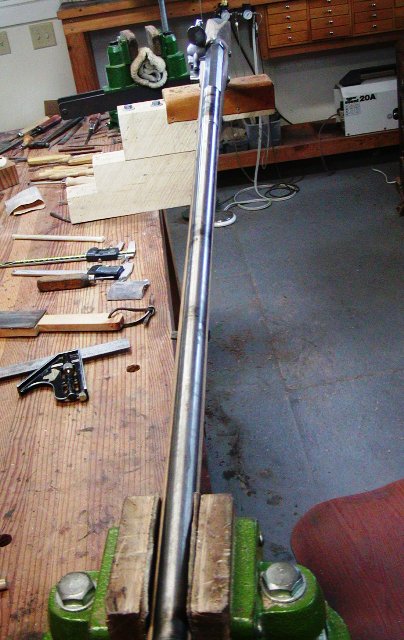
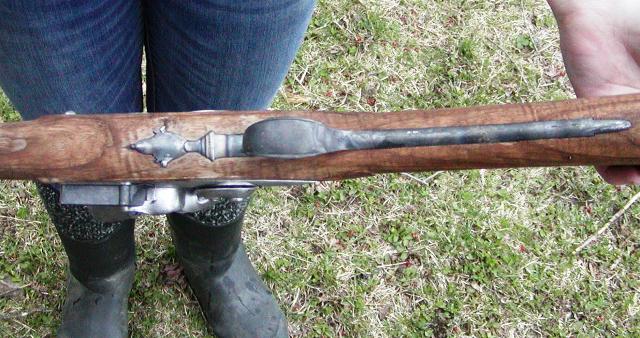
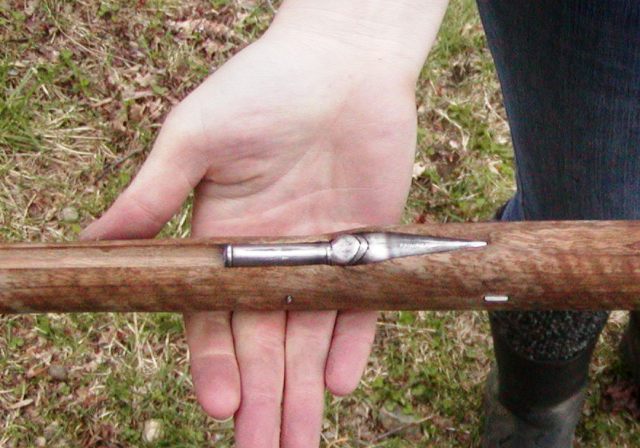
We had to move the forward lug further forward to avoid the trigger plate. We cut it off and welded it in place at its new position. I tacked it in place to hold it, then welded a fillet on the one side. Then I gave it to Maria to weld the fillet on the other side. She did a fine job for her second weld.
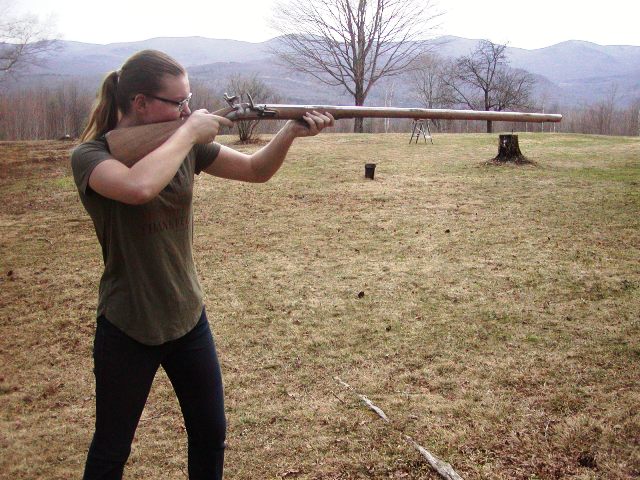
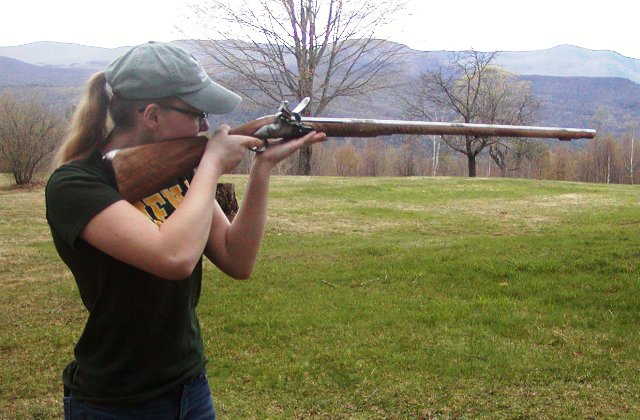
Here she is shouldering her gun. An elegant gun to match the owner.
dave
Thanks for supporting and encouraging Maria. I know many on this forum would like to hear from her but she is so busy. She has 2 more months of high school including band, chorus and running the school newspaper. She works 3 days a week at a horse stable, 2 days at a restaurant, and 2 with me. She quit varsity basketball to work with me. When she has time she is reenacting with Warner's Green Mountain Boys and sewing her 18th century kit. As you might imagine, she does not watch TV or waste her time with computer games. She leaves those useless distractions for the "boys" she knows. Anyway, we made more progress finishing her gun. You can see how elegant it will be.
We moved on to the trigger guard. The commercially available trigger guards for English fowlers are pathetic. There used to be a small bowed urn finial guard sold on all the major sites and by Chambers. It was the only guard that met any historical standards. All the others had bows too big and in the case of the acorn finials, they looked to be designed by shriveled, myopic, Mr. MaGoo. Pathetic. I found a supplier that still had the smaller bowed urn guards in steel and I bought 3. I might just buy them out. However, even that guard lacks certain historical details. The most important is the bow should be egg shaped not an even oval. The egg shape creates a lot of space in front of the trigger for your finger. The photo below shows 3 guards. The top is the currently available version with oversized bow. the second is the raw guard before we altered it, and the third is our altered guard for the fowler.
We had to move the forward lug further forward to avoid the trigger plate. We cut it off and welded it in place at its new position. I tacked it in place to hold it, then welded a fillet on the one side. Then I gave it to Maria to weld the fillet on the other side. She did a fine job for her second weld.
Here she is shouldering her gun. An elegant gun to match the owner.
dave
My question was actually intended to be a joke. I did not think it possible for her to have activities beyond those you had already described. That young lady is a phenomenon. I predict she will have a very successful life.Hi Frank,
In her "free" time she does reenactments with Warner's Green Mountain Boys and sews her 18th century clothing. She does not watch TV or play computer games. She leaves those things to the "boys" in her life.
dave
maria_gray
32 Cal
In my free time I read. I read lots of history books of various time periods although the American War of Independence is the time period I am most interested in. I also read training books as I am currently training a 5 year old untouched mustang and assisting with the training of a 3 year old Fresian Cross.And, in her free time she does what?
You do credit to your generation Maria. While we on the forum only get a snippet of what your life is, it is very rewarding to get a glimpse of it through the window of your rifle build. Keep it up!In my free time I read. I read lots of history books of various time periods although the American War of Independence is the time period I am most interested in. I also read training books as I am currently training a 5 year old untouched mustang and assisting with the training of a 3 year old Fresian Cross.
Brokennock
Cannon
Thank you for sharing this journey with us. You really are an inspiration.In my free time I read. I read lots of history books of various time periods although the American War of Independence is the time period I am most interested in. I also read training books as I am currently training a 5 year old untouched mustang and assisting with the training of a 3 year old Fresian Cross.
Maybe there is hope for this country yet.
- Joined
- Nov 14, 2010
- Messages
- 872
- Reaction score
- 1,003
Atta girl Maria.you gogirlHi folks,
Thanks for supporting and encouraging Maria. I know many on this forum would like to hear from her but she is so busy. She has 2 more months of high school including band, chorus and running the school newspaper. She works 3 days a week at a horse stable, 2 days at a restaurant, and 2 with me. She quit varsity basketball to work with me. When she has time she is reenacting with Warner's Green Mountain Boys and sewing her 18th century kit. As you might imagine, she does not watch TV or waste her time with computer games. She leaves those useless distractions for the "boys" she knows. Anyway, we made more progress finishing her gun. You can see how elegant it will be.
We moved on to the trigger guard. The commercially available trigger guards for English fowlers are pathetic. There used to be a small bowed urn finial guard sold on all the major sites and by Chambers. It was the only guard that met any historical standards. All the others had bows too big and in the case of the acorn finials, they looked to be designed by shriveled, myopic, Mr. MaGoo. Pathetic. I found a supplier that still had the smaller bowed urn guards in steel and I bought 3. I might just buy them out. However, even that guard lacks certain historical details. The most important is the bow should be egg shaped not an even oval. The egg shape creates a lot of space in front of the trigger for your finger. The photo below shows 3 guards. The top is the currently available version with oversized bow. the second is the raw guard before we altered it, and the third is our altered guard for the fowler.
We had to move the forward lug further forward to avoid the trigger plate. We cut it off and welded it in place at its new position. I tacked it in place to hold it, then welded a fillet on the one side. Then I gave it to Maria to weld the fillet on the other side. She did a fine job for her second weld.
Here she is shouldering her gun. An elegant gun to match the owner.
dave

- Joined
- Nov 26, 2005
- Messages
- 5,012
- Reaction score
- 9,950
Hi,
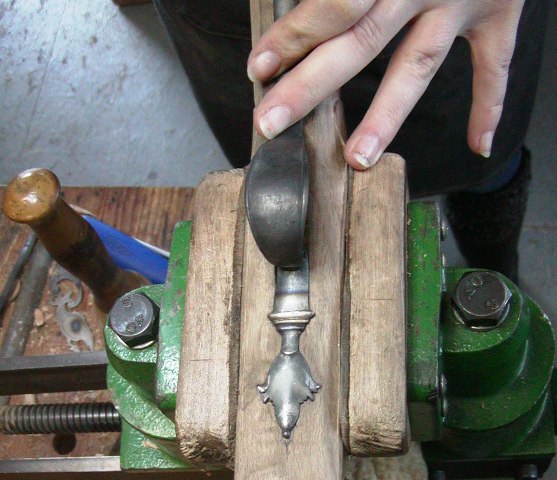
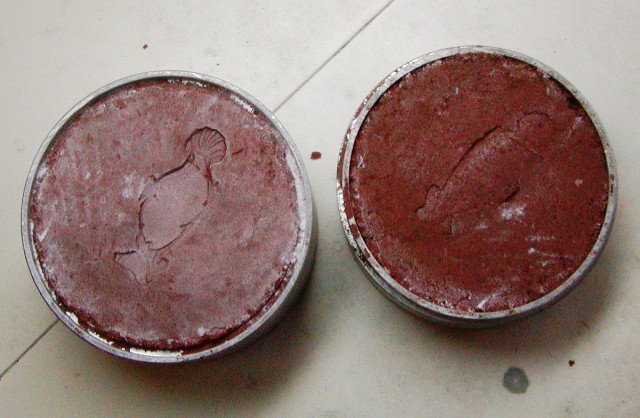
Our work slowed down a bit owing to Maria's schedule. She inlet the trigger guard and here lies a tale. The selection of trigger guards for English fowlers has hit rock bottom these last few years particularly ones cast in steel. The selection from the main suppliers is very limited and I don't know what hardware they copied, but it doesn't look like anything I've examined on original guns. The trigger bows are too large and misshaped. I found one supplier that had steel guards with small ribbed bows and the husk finial. They used to be readily available but no more. I bought 3 and now they are no longer listed. Anyway, Maria inlet the trigger guard. Before she did, we had to shape the bow into an egg-shaped loop rather than an even oval. The top guard is the current commercial offering that is large and has no ribbing on the bow. The middle guard is the smaller version we used to be able to get. The bottom guard is the same but reshaped and prepared for inletting.
Cast steel guards are a pain because the steel remains springy even when fully annealed. Unlike brass guards, you really have to bend them in vise, often using heat while bending to get them to set down on the wood and even then the steel fights you. With annealed brass, you can usually push the guard down on to the wood with your fingers. We start by filing a recess on the bottom of the front of the guard where it overlaps the trigger plate. That allows the guard to set into the wood mortise despite the trigger plate being almost flush with the surface of the stock. Then we cleaned up the guard and filed draft along the edges. We also curved the front finial slightly in cross section, and hollowed out the underside to conform to the stock. Finally, we moved the front lug further forward to avoid the trigger plate.
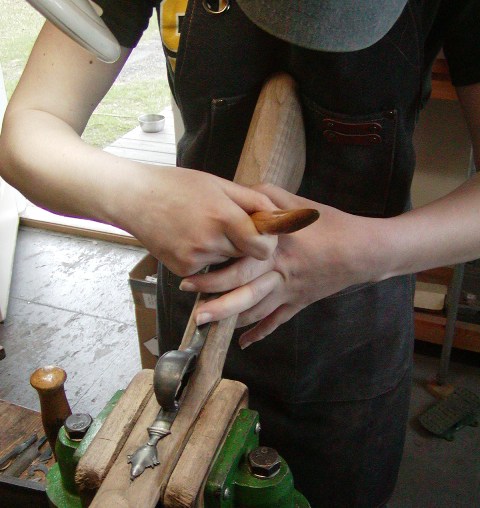
We start by cutting in the the slots for the lugs. She drills 3 holes in a line, cuts the ends and sides of the slot with flat chisels and then removes the bulk of the wood with a router bit in a Dremel. It is best to cut the rear 2 slots so there is excess length in the forward end because as the guard is pushed into its mortise, it tends to migrate forward. Maria inlet inletting the front finial first.
I know this guard gives some folks pause but it really is not hard to inlet with the aid of small stab in chisels and small skew chisels. The mortise is only about 1/16" deep, just enough to mostly cover the edges of the guard. It is foolish to inlet this kind of guard before the stock is pared down to its final profile. Once the front is in and pinned, she begins to cut the rear mortise. It is best not to outline and stab in the edges of the entire rear of the guard in one shot. Just do the forward 1/3, set the guard in a little, then trace the next 1/3, cut it in, and leave the rear 1/3 of the guard until last. That way, as you push the guard into the mortise and it migrates a little forward, you don't end up with a gap at the end.
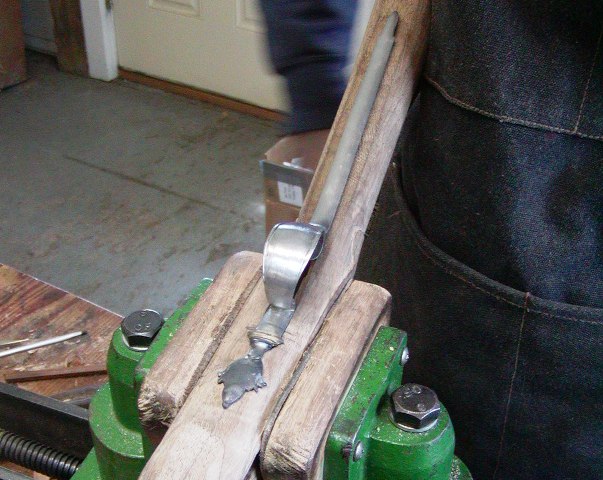
We pinned the rare lug but did do so for the middle lug. Unfortunately that lug sits right where the screw should be for the wrist escutcheon plate. We are going to consider 2 options for anchoring the plate. The easiest would be to just pin the plate to the wrist and pin the guard lug. However, another option is to install the screw entering from under the trigger guard that usually attaches wrist plates on English fowlers and have the rear guard lug simply hook on to the head of that bolt. Maria has to cast her wrist plate so once it is made, we will decide on our course. In the meantime she finished most of the stock shaping.
Then we took a tea break, sat down, enjoyed the scene and talked British guns while examining a pair of original Wodgon dueling pistols.
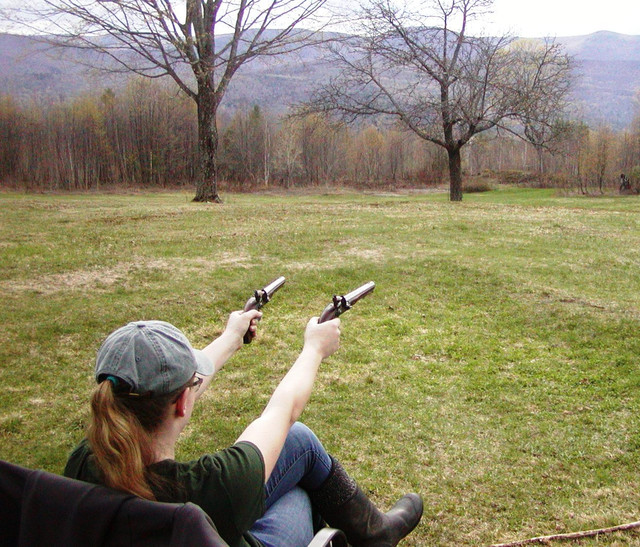
Green Mountain Girl trying to decide if the pistols fit better in her left or right hand.
dave
Our work slowed down a bit owing to Maria's schedule. She inlet the trigger guard and here lies a tale. The selection of trigger guards for English fowlers has hit rock bottom these last few years particularly ones cast in steel. The selection from the main suppliers is very limited and I don't know what hardware they copied, but it doesn't look like anything I've examined on original guns. The trigger bows are too large and misshaped. I found one supplier that had steel guards with small ribbed bows and the husk finial. They used to be readily available but no more. I bought 3 and now they are no longer listed. Anyway, Maria inlet the trigger guard. Before she did, we had to shape the bow into an egg-shaped loop rather than an even oval. The top guard is the current commercial offering that is large and has no ribbing on the bow. The middle guard is the smaller version we used to be able to get. The bottom guard is the same but reshaped and prepared for inletting.
Cast steel guards are a pain because the steel remains springy even when fully annealed. Unlike brass guards, you really have to bend them in vise, often using heat while bending to get them to set down on the wood and even then the steel fights you. With annealed brass, you can usually push the guard down on to the wood with your fingers. We start by filing a recess on the bottom of the front of the guard where it overlaps the trigger plate. That allows the guard to set into the wood mortise despite the trigger plate being almost flush with the surface of the stock. Then we cleaned up the guard and filed draft along the edges. We also curved the front finial slightly in cross section, and hollowed out the underside to conform to the stock. Finally, we moved the front lug further forward to avoid the trigger plate.
We start by cutting in the the slots for the lugs. She drills 3 holes in a line, cuts the ends and sides of the slot with flat chisels and then removes the bulk of the wood with a router bit in a Dremel. It is best to cut the rear 2 slots so there is excess length in the forward end because as the guard is pushed into its mortise, it tends to migrate forward. Maria inlet inletting the front finial first.
I know this guard gives some folks pause but it really is not hard to inlet with the aid of small stab in chisels and small skew chisels. The mortise is only about 1/16" deep, just enough to mostly cover the edges of the guard. It is foolish to inlet this kind of guard before the stock is pared down to its final profile. Once the front is in and pinned, she begins to cut the rear mortise. It is best not to outline and stab in the edges of the entire rear of the guard in one shot. Just do the forward 1/3, set the guard in a little, then trace the next 1/3, cut it in, and leave the rear 1/3 of the guard until last. That way, as you push the guard into the mortise and it migrates a little forward, you don't end up with a gap at the end.
We pinned the rare lug but did do so for the middle lug. Unfortunately that lug sits right where the screw should be for the wrist escutcheon plate. We are going to consider 2 options for anchoring the plate. The easiest would be to just pin the plate to the wrist and pin the guard lug. However, another option is to install the screw entering from under the trigger guard that usually attaches wrist plates on English fowlers and have the rear guard lug simply hook on to the head of that bolt. Maria has to cast her wrist plate so once it is made, we will decide on our course. In the meantime she finished most of the stock shaping.
Then we took a tea break, sat down, enjoyed the scene and talked British guns while examining a pair of original Wodgon dueling pistols.
Green Mountain Girl trying to decide if the pistols fit better in her left or right hand.
dave
- Joined
- Nov 26, 2005
- Messages
- 5,012
- Reaction score
- 9,950
Hi,
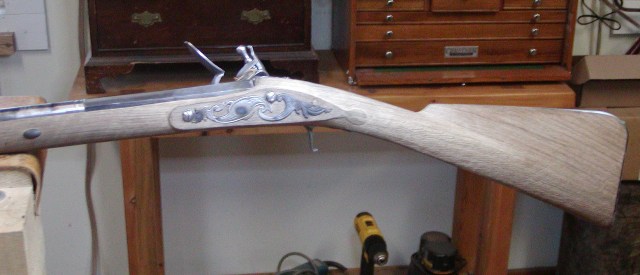
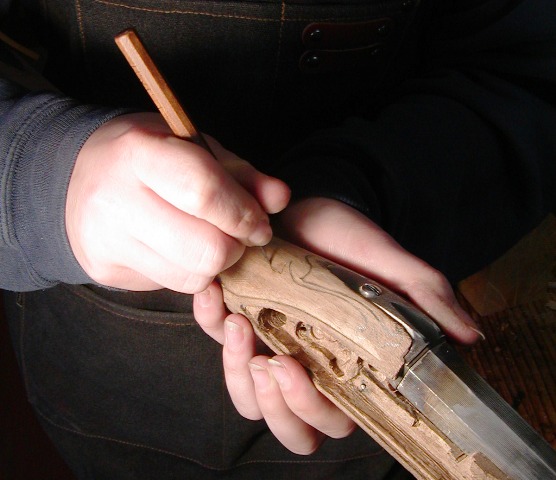
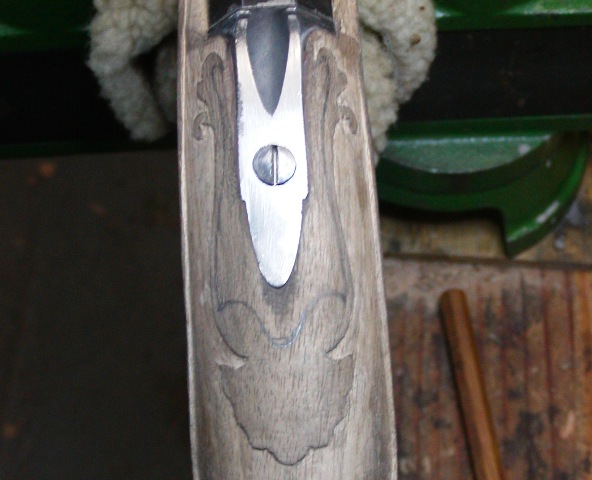
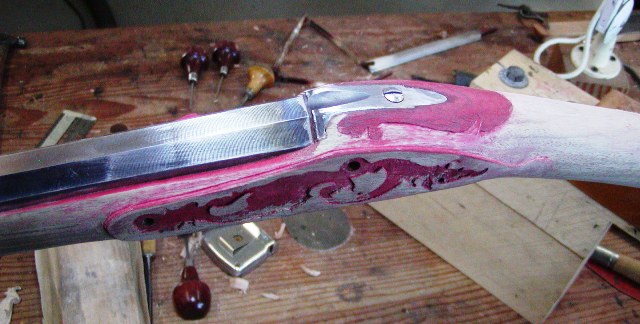
We started carving the shell around the barrel tang. That will be the only carving on this gun, as it should be. First, we did a paper rubbing of the carving on the Heylin fowler in my possession. We just did one half. The Maria traced the rubbing on to card stock using carbon paper. Next, she cut out the card stock tracing and we taped it on the stock.
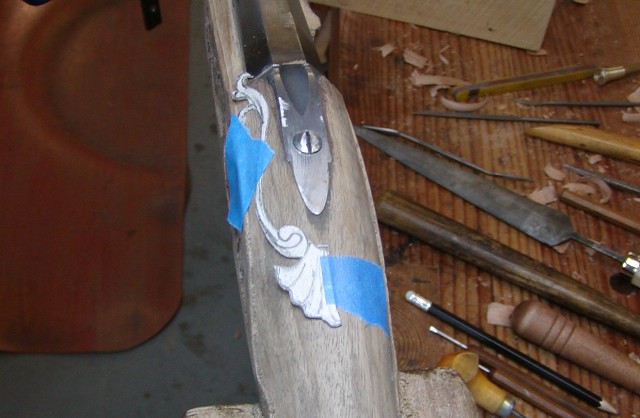
The Heylin design is a little too wide and long for Maria's stock so we traced the shell on the stock but contracted the forward decoration to fit her stock. Here is the fully traced design on the stock.
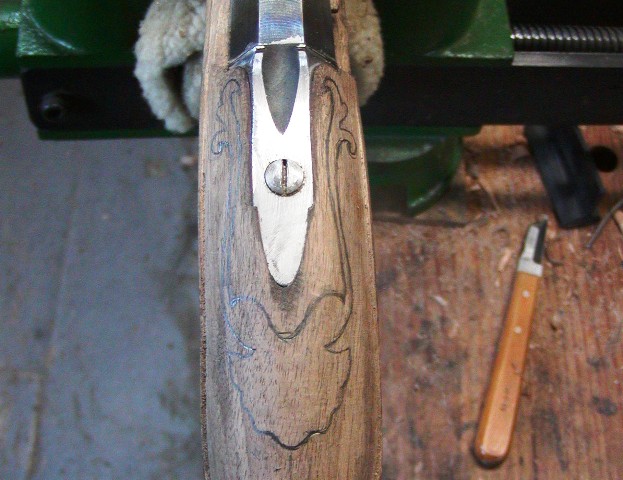
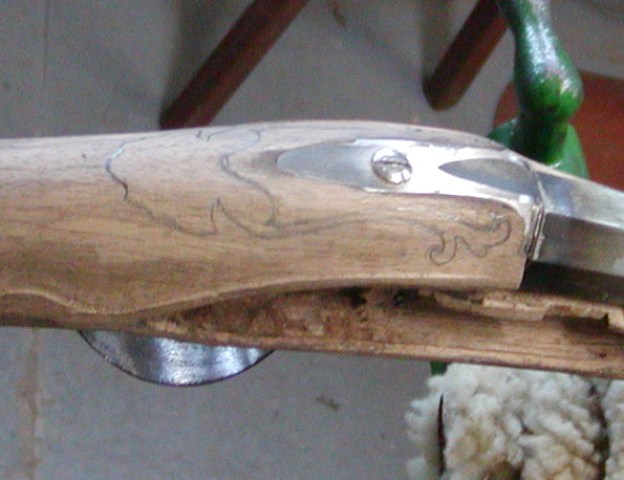
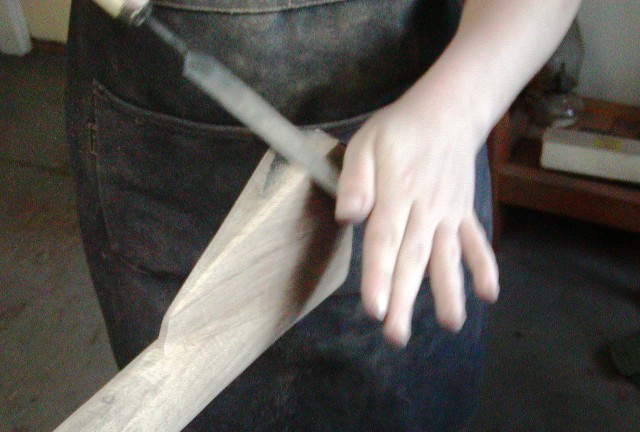
We may simplify the forward ends if they are too busy and don't really fit well. The Heylin barrel is wider at the breech so we have less space in which to work. It may be that we have simple tendrils going forward that fade out in a simple scroll. Regardless, Maria stabbed in the current design. When I stab in an intricate design, I walk the tiny stab in chisel forward along my line by always making sure the rear edge of the chisel is in the incised line I just made and then rocking the tool forward to create a new segment of stabbed in line. That way the line is smooth and continuous rather than jagged. Maria acquired that skill very quickly.
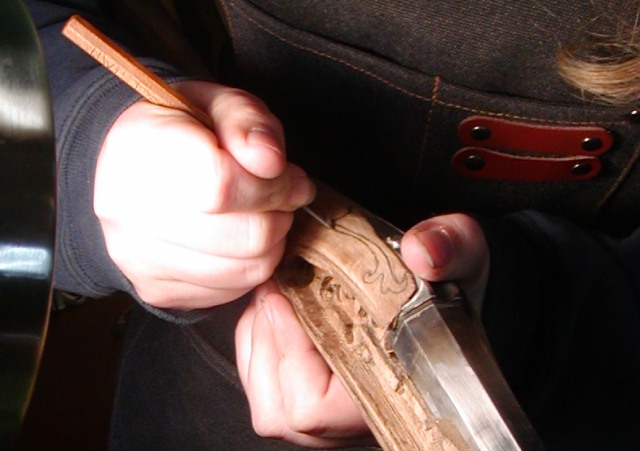
After stabbing in the outer edge of the carving design, she relieved the background. She likes my palm chisels so I started her using a small palm skew chisel to remove background.
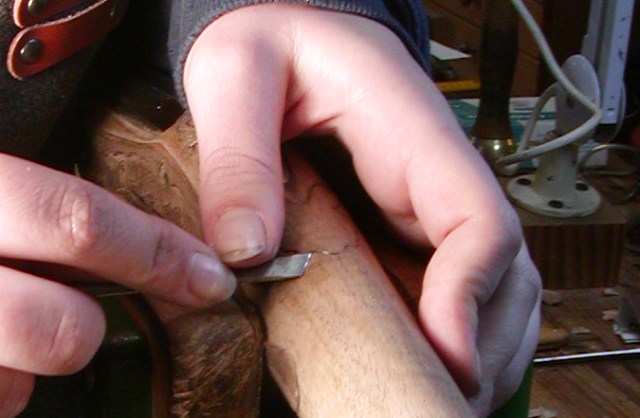
However, my method of teaching is to let the student work with a tool for a while to discover its strengths and weaknesses, and then I introduce a new tool for comparison. That way they learn the differences and develop their own preferences. In this case, I introduced a full length skew chisel to Maria for removing the background. I have very strong hands but severe nerve damage in my fingers. I cannot position full length chisels very quickly like palm chisels so I use the latter. But that is me and Maria is different. She quickly discovered that she likd the full length skew chisel much better. It gives her more control and power.

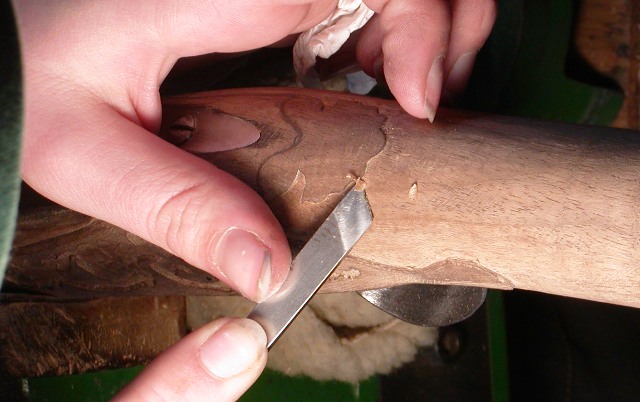
Finally, for tight sections, she still needed small chisels like this tiny skew.
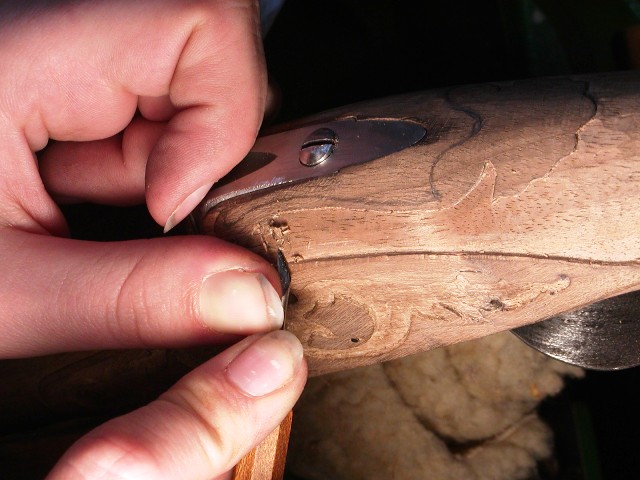
Her outlining came out great and we are on our way. Not to bad a start for her first carving.
She will ouline the inner edges of the carving and then we will leave it until after whiskering the stock. When that is done, she will carve the details just prior to staining.
dave
We started carving the shell around the barrel tang. That will be the only carving on this gun, as it should be. First, we did a paper rubbing of the carving on the Heylin fowler in my possession. We just did one half. The Maria traced the rubbing on to card stock using carbon paper. Next, she cut out the card stock tracing and we taped it on the stock.
The Heylin design is a little too wide and long for Maria's stock so we traced the shell on the stock but contracted the forward decoration to fit her stock. Here is the fully traced design on the stock.
We may simplify the forward ends if they are too busy and don't really fit well. The Heylin barrel is wider at the breech so we have less space in which to work. It may be that we have simple tendrils going forward that fade out in a simple scroll. Regardless, Maria stabbed in the current design. When I stab in an intricate design, I walk the tiny stab in chisel forward along my line by always making sure the rear edge of the chisel is in the incised line I just made and then rocking the tool forward to create a new segment of stabbed in line. That way the line is smooth and continuous rather than jagged. Maria acquired that skill very quickly.
After stabbing in the outer edge of the carving design, she relieved the background. She likes my palm chisels so I started her using a small palm skew chisel to remove background.
However, my method of teaching is to let the student work with a tool for a while to discover its strengths and weaknesses, and then I introduce a new tool for comparison. That way they learn the differences and develop their own preferences. In this case, I introduced a full length skew chisel to Maria for removing the background. I have very strong hands but severe nerve damage in my fingers. I cannot position full length chisels very quickly like palm chisels so I use the latter. But that is me and Maria is different. She quickly discovered that she likd the full length skew chisel much better. It gives her more control and power.
Finally, for tight sections, she still needed small chisels like this tiny skew.
Her outlining came out great and we are on our way. Not to bad a start for her first carving.
She will ouline the inner edges of the carving and then we will leave it until after whiskering the stock. When that is done, she will carve the details just prior to staining.
dave
Capt. Jas.
58 Cal.
- Joined
- Aug 19, 2005
- Messages
- 3,005
- Reaction score
- 1,249
Looking great!
- Joined
- Nov 26, 2005
- Messages
- 5,012
- Reaction score
- 9,950
Hi Folks,
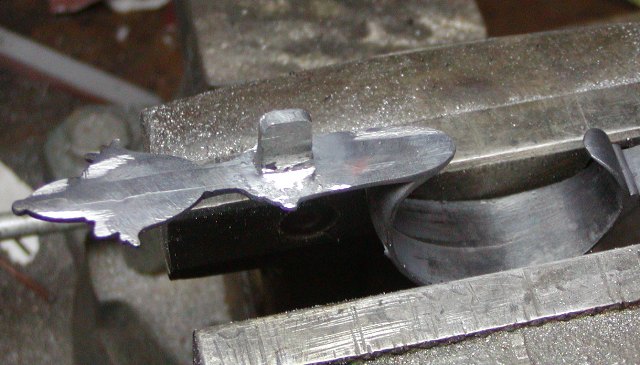
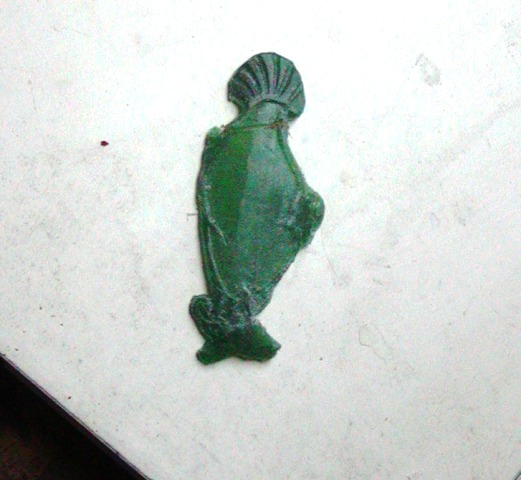
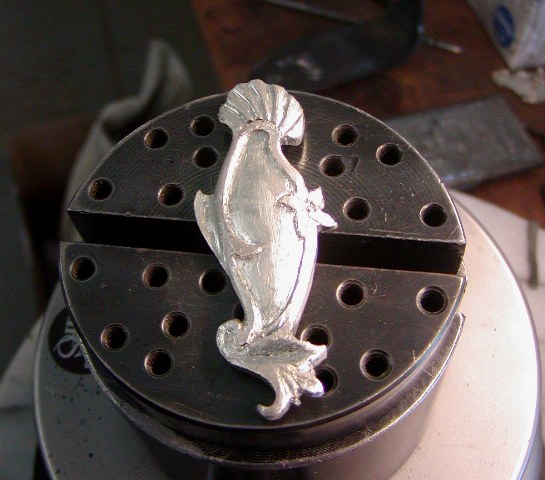
Thank you all for encouraging Maria. She made her final choice on May 1 to attend Siena College in NY. An exciting milestone for her. Today we began making her wrist escutcheon. I loaned her my old copy of Great British Gunmakers by Neal and Back and she used it as inspiration for her own design. Here is what she came up with.
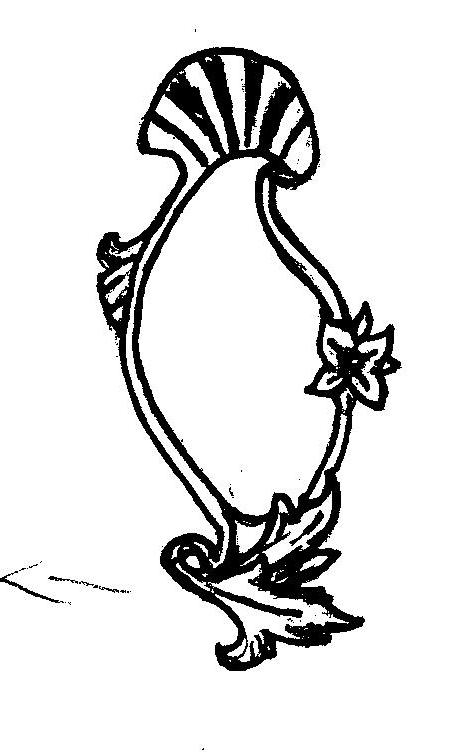
It was ambitious and I warned her she would need to carve that complex of acanthus leaves at the bottom. I suspected rightly that it would present an obstacle but that is part of learning. So we went forward with her design and took a slab of green carving wax, hollowed out the back and glued it to a piece of PVC pipe. Then we rounded the top as well. When that was done, we glued her paper pattern on the wax and she pricked the main lines and details into the wax through the paper using a needle held in a pin vise handle. When that was done, we removed the paper pattern and she carved the outline of the escutcheon in the wax.
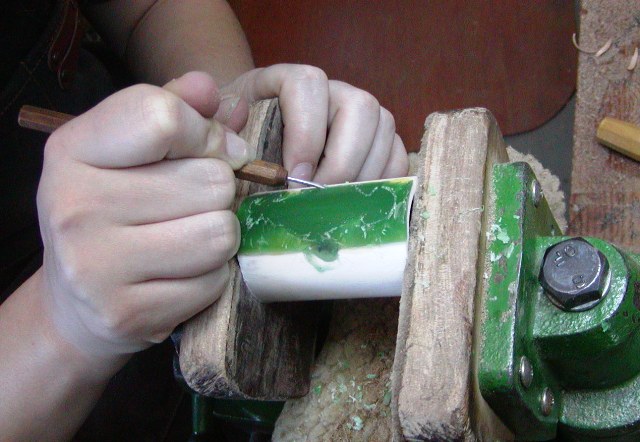
Unfortunately, carving those delicate leaves caused a break in the thin wax at the bottom and another break occurred at the top. No worries, wax can be repaired by melting more wax on top. We decided to just lump some extra wax on some of the fragile leaves and carve the details after casting the plate in silver. Metal is stronger and can preserve fine details better. So she finished the wax as best she could and then we carved/chipped it off the PVC.
Next, Maria made the Delft clay mold.
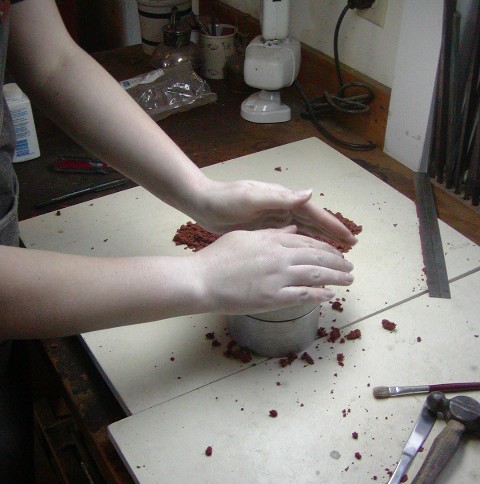
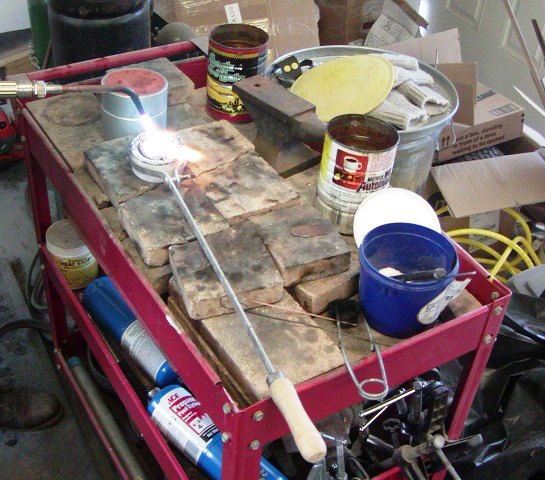
Then we heated sterling silver in a crucible using my oxy-acetylene torch and poured the mold.
It took 3 tries to get it right. I could not figure out why it did not work the first time. I was using sterling silver melted from sheet silver and had some problems with it in past castings. On the third try, I added 50% fresh casting grain and the rest the melted sheet silver. It worked great. I believe the melted casting grain flowed into the mold better. Anyway, we now have an escutcheon with which we can work to engrave and carve the details.
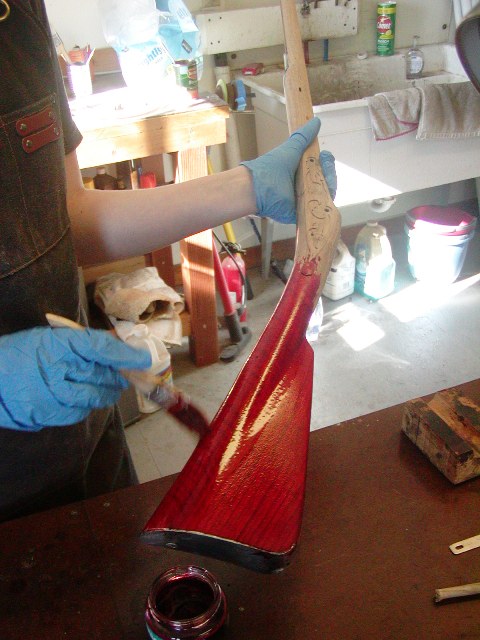
While letting the mold cool, Maria did some final shaping of the stock and began the whiskering process. We stained the stock red with scarlet aniline dye dissolved in water. When she has scraped and sanded off all the color, she has whiskered the entire stock. Then we will finish the barrel tang carving and inlet the wrist plate.
dave
Thank you all for encouraging Maria. She made her final choice on May 1 to attend Siena College in NY. An exciting milestone for her. Today we began making her wrist escutcheon. I loaned her my old copy of Great British Gunmakers by Neal and Back and she used it as inspiration for her own design. Here is what she came up with.
It was ambitious and I warned her she would need to carve that complex of acanthus leaves at the bottom. I suspected rightly that it would present an obstacle but that is part of learning. So we went forward with her design and took a slab of green carving wax, hollowed out the back and glued it to a piece of PVC pipe. Then we rounded the top as well. When that was done, we glued her paper pattern on the wax and she pricked the main lines and details into the wax through the paper using a needle held in a pin vise handle. When that was done, we removed the paper pattern and she carved the outline of the escutcheon in the wax.
Unfortunately, carving those delicate leaves caused a break in the thin wax at the bottom and another break occurred at the top. No worries, wax can be repaired by melting more wax on top. We decided to just lump some extra wax on some of the fragile leaves and carve the details after casting the plate in silver. Metal is stronger and can preserve fine details better. So she finished the wax as best she could and then we carved/chipped it off the PVC.
Next, Maria made the Delft clay mold.
Then we heated sterling silver in a crucible using my oxy-acetylene torch and poured the mold.
It took 3 tries to get it right. I could not figure out why it did not work the first time. I was using sterling silver melted from sheet silver and had some problems with it in past castings. On the third try, I added 50% fresh casting grain and the rest the melted sheet silver. It worked great. I believe the melted casting grain flowed into the mold better. Anyway, we now have an escutcheon with which we can work to engrave and carve the details.
While letting the mold cool, Maria did some final shaping of the stock and began the whiskering process. We stained the stock red with scarlet aniline dye dissolved in water. When she has scraped and sanded off all the color, she has whiskered the entire stock. Then we will finish the barrel tang carving and inlet the wrist plate.
dave
HighUintas
40 Cal
- Joined
- Jan 11, 2022
- Messages
- 433
- Reaction score
- 513
Hi Folks,
Thank you all for encouraging Maria. She made her final choice on May 1 to attend Siena College in NY. An exciting milestone for her. Today we began making her wrist escutcheon. I loaned her my old copy of Great British Gunmakers by Neal and Back and she used it as inspiration for her own design. Here is what she came up with.
It was ambitious and I warned her she would need to carve that complex of acanthus leaves at the bottom. I suspected rightly that it would present an obstacle but that is part of learning. So we went forward with her design and took a slab of green carving wax, hollowed out the back and glued it to a piece of PVC pipe. Then we rounded the top as well. When that was done, we glued her paper pattern on the wax and she pricked the main lines and details into the wax through the paper using a needle held in a pin vise handle. When that was done, we removed the paper pattern and she carved the outline of the escutcheon in the wax.
Unfortunately, carving those delicate leaves caused a break in the thin wax at the bottom and another break occurred at the top. No worries, wax can be repaired by melting more wax on top. We decided to just lump some extra wax on some of the fragile leaves and carve the details after casting the plate in silver. Metal is stronger and can preserve fine details better. So she finished the wax as best she could and then we carved/chipped it off the PVC.
Next, Maria made the Delft clay mold.
Then we heated sterling silver in a crucible using my oxy-acetylene torch and poured the mold.
It took 3 tries to get it right. I could not figure out why it did not work the first time. I was using sterling silver melted from sheet silver and had some problems with it in past castings. On the third try, I added 50% fresh casting grain and the rest the melted sheet silver. It worked great. I believe the melted casting grain flowed into the mold better. Anyway, we now have an escutcheon with which we can work to engrave and carve the details.
While letting the mold cool, Maria did some final shaping of the stock and began the whiskering process. We stained the stock red with scarlet aniline dye dissolved in water. When she has scraped and sanded off all the color, she has whiskered the entire stock. Then we will finish the barrel tang carving and inlet the wrist plate.
dave
Is she using the dye just to make sure she's whiskering/sanding all areas of the stock since she's removing all the color?
- Joined
- Nov 26, 2005
- Messages
- 5,012
- Reaction score
- 9,950
Hi,Is she using the dye just to make sure she's whiskering/sanding all areas of the stock since she's removing all the color?
Yes.
dave
- Joined
- Nov 14, 2010
- Messages
- 872
- Reaction score
- 1,003
Maria is doing a beautiful job .I hope she stays with it.Hi Folks,
Thank you all for encouraging Maria. She made her final choice on May 1 to attend Siena College in NY. An exciting milestone for her. Today we began making her wrist escutcheon. I loaned her my old copy of Great British Gunmakers by Neal and Back and she used it as inspiration for her own design. Here is what she came up with.
It was ambitious and I warned her she would need to carve that complex of acanthus leaves at the bottom. I suspected rightly that it would present an obstacle but that is part of learning. So we went forward with her design and took a slab of green carving wax, hollowed out the back and glued it to a piece of PVC pipe. Then we rounded the top as well. When that was done, we glued her paper pattern on the wax and she pricked the main lines and details into the wax through the paper using a needle held in a pin vise handle. When that was done, we removed the paper pattern and she carved the outline of the escutcheon in the wax.
Unfortunately, carving those delicate leaves caused a break in the thin wax at the bottom and another break occurred at the top. No worries, wax can be repaired by melting more wax on top. We decided to just lump some extra wax on some of the fragile leaves and carve the details after casting the plate in silver. Metal is stronger and can preserve fine details better. So she finished the wax as best she could and then we carved/chipped it off the PVC.
Next, Maria made the Delft clay mold.
Then we heated sterling silver in a crucible using my oxy-acetylene torch and poured the mold.
It took 3 tries to get it right. I could not figure out why it did not work the first time. I was using sterling silver melted from sheet silver and had some problems with it in past castings. On the third try, I added 50% fresh casting grain and the rest the melted sheet silver. It worked great. I believe the melted casting grain flowed into the mold better. Anyway, we now have an escutcheon with which we can work to engrave and carve the details.
While letting the mold cool, Maria did some final shaping of the stock and began the whiskering process. We stained the stock red with scarlet aniline dye dissolved in water. When she has scraped and sanded off all the color, she has whiskered the entire stock. Then we will finish the barrel tang carving and inlet the wrist plate.
dave
- Joined
- Nov 26, 2005
- Messages
- 5,012
- Reaction score
- 9,950
Hi,
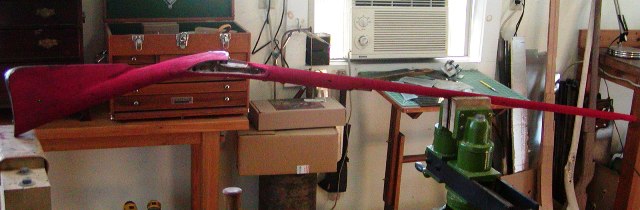
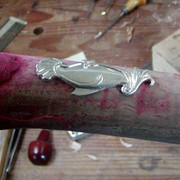
This won't be a big post. Maria scraped and sanded off the pink stain and when done had completed the finish smoothing and cleanup for the stock.
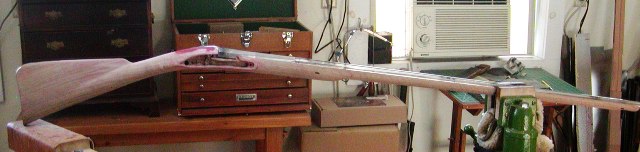
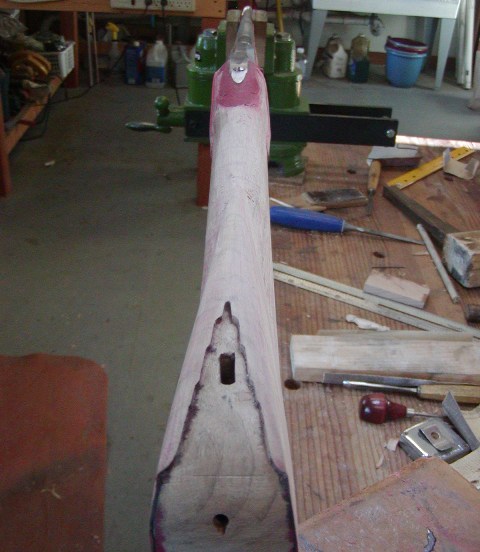
She shaped the lock and side plate moldings into a narrow bead with no actual flat. We also made sure the breech area of the stock was contoured flush with the standing breech.
I decided that the cast wrist plate we made on Saturday was not going to work. It was a little too wide for the wrist of the stock and the leaf design at the bottom was too complicated to sculpt well given the final thickness that the plate had to have. So on Sunday, I carved a narrower design in hard maple and then cast it. I used my oven and crucible for heating the silver and added fresh casting grain to the mix. It came out well. Today, while Maria cleaned up the stock, I began the process of sculpting the cast plate with die sinker's chisels and my Lindsay Airgraver. After a while I introduced Maria to those tools and let her have at the plate. She did well but appreciates the skill and challenge involved. Anyway, the new plate will look great when we are done shaping and polishing it.
Next up, she inlets the wrist plate and finishes the carving around the standing breech. Then stain and finish and we are on the final stretch.
dave
This won't be a big post. Maria scraped and sanded off the pink stain and when done had completed the finish smoothing and cleanup for the stock.
She shaped the lock and side plate moldings into a narrow bead with no actual flat. We also made sure the breech area of the stock was contoured flush with the standing breech.
I decided that the cast wrist plate we made on Saturday was not going to work. It was a little too wide for the wrist of the stock and the leaf design at the bottom was too complicated to sculpt well given the final thickness that the plate had to have. So on Sunday, I carved a narrower design in hard maple and then cast it. I used my oven and crucible for heating the silver and added fresh casting grain to the mix. It came out well. Today, while Maria cleaned up the stock, I began the process of sculpting the cast plate with die sinker's chisels and my Lindsay Airgraver. After a while I introduced Maria to those tools and let her have at the plate. She did well but appreciates the skill and challenge involved. Anyway, the new plate will look great when we are done shaping and polishing it.
Next up, she inlets the wrist plate and finishes the carving around the standing breech. Then stain and finish and we are on the final stretch.
dave
I am going to miss following this thread when it is completed but I do want to see the end result and range report
- Joined
- Nov 26, 2005
- Messages
- 5,012
- Reaction score
- 9,950
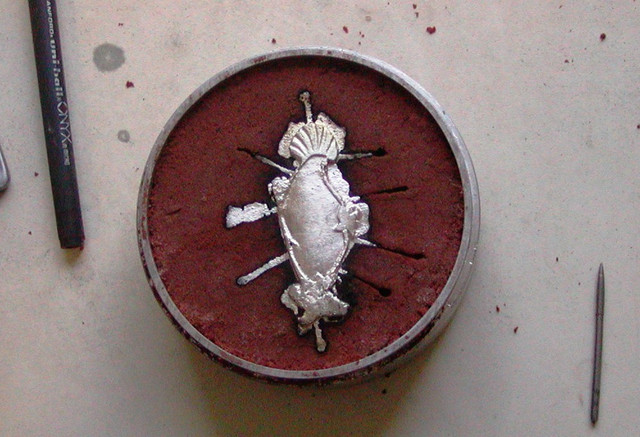
Hi,
Just a short post. I worked on finishing the wrist plate. Maria will work on the final details but I needed to get us moving and it will take time for her to acquire the metal working skills. This stuff is not easy. Anyway, here is the plate on Saturday.
Here it is today.
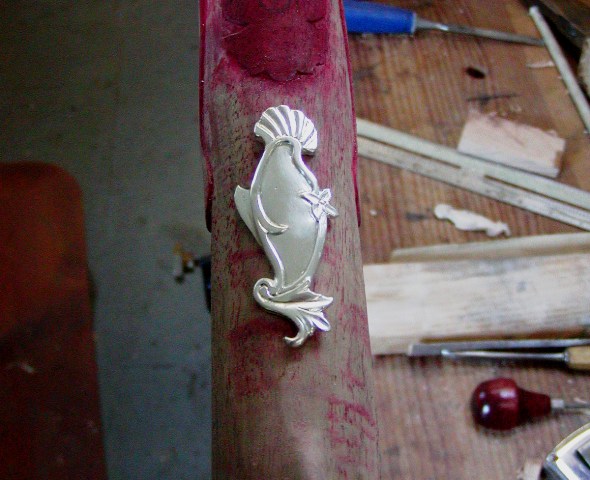
My preliminary polish always shows up rough areas that have to be worked on. There are also some engraving needed before it goes into the wood. However, you can see what a fine wrist plate it will be. Hopefully, in the next session, she will inlet it and get to work on the breech carving.
dave
Just a short post. I worked on finishing the wrist plate. Maria will work on the final details but I needed to get us moving and it will take time for her to acquire the metal working skills. This stuff is not easy. Anyway, here is the plate on Saturday.
Here it is today.
My preliminary polish always shows up rough areas that have to be worked on. There are also some engraving needed before it goes into the wood. However, you can see what a fine wrist plate it will be. Hopefully, in the next session, she will inlet it and get to work on the breech carving.
dave
Similar threads
- Replies
- 15
- Views
- 1K
