• This community needs YOUR help today. We rely 100% on Supporting Memberships to fund our efforts. With the ever increasing fees of everything, we need help. We need more Supporting Members, today. Please invest back into this community. I will ship a few decals too in addition to all the account perks you get.


    Sign up here: https://www.muzzleloadingforum.com/account/upgrades
  • Friends, our 2nd Amendment rights are always under attack and the NRA has been a constant for decades in helping fight that fight.

    We have partnered with the NRA to offer you a discount on membership and Muzzleloading Forum gets a small percentage too of each membership, so you are supporting both the NRA and us.

    Use this link to sign up please; https://membership.nra.org/recruiters/join/XR045103

Traditions Mountain Rifle .50 calibre "assembly".

Muzzleloading Forum

Help Support Muzzleloading Forum:

This site may earn a commission from merchant affiliate links, including eBay, Amazon, and others.
I have found that things like Varathane and Minwax work real good for book cases and tables as long as they are not pine. Not so good for any gun staining though.:(

As I mentioned in at least one post, IMO, one should NEVER use those dam factory "all in one stains" on a gun. They never look right and because the color never actually penetrates into the wood, applying more coats of them, one on the top of the other won't improve the looks.

'Course, that is just my opinion.

You are correct, and these are just stains without any poly-whatever it is in the other stains.
I learned that on the Kentucky I built last September and had to re-do that one the next month cause it was...… shall we say "yucky" looking.... heheh

Initially I made my own stain for the Kentucky by boiling walnut husks for over 1 hour, but by the time I got to actually needing it, I found it in the garage spilled all over the place.
My fault for not having it in a sealed container I guess, and leaving the garage door open far too often.
By then, all the local Walnuts were gone, so I could not make more sadly.
 
It's just as well.
Although walnut stain made from real walnuts seems to want to stain everything that touches it, the color won't last if it is used to stain wood.
Sunlight will cause it to fade.

Stick to the real, ALCOHOL or WATER based stains made by the factory when your working with gun stock finishes. :)

Interesting stuff, and another to store in my bag-o-tricks down the road.

I have read and learned that oil based stains protect better over water based stains, but due to my obsession with boiled linseed oil (yeah, I know it is not the best protection, and minimal at best) and my aversion to standing out in the rain if avoidable with my rifles, what would be the best protection for a stock that you would recommend?
 
It seems no stock finish is truly protective 100% of the time. Linseed oil isn't, but neither is the epoxy finish that used to be put on factory rifles. Everything seems to break down.

Attempting to protecting wood is sometimes a sure way to ruin it. All other things being equal, outdoors, painted wood rots faster than unpainted wood. Paint can keep moisture out, but once moisture gets under the paint, like through a crack, the moisture is very slow to get back out letting rot to set in.

Guns aren't going to be left out in the weather, but the idea is the same. Once moisture manages to get under a gunfinish it's pretty much trapped for a time. The finish will peel, flake, or otherwise breakdown.

Beeswax actually makes a pretty good finish that is naturally water reppelent and easy to touch up when needed. A paste made of beeswax and turpentine is what I like to use on all sorts of projects. The past is applied with a rag and rubbed and rubbed and rubbed until every bit of tackiness goes away. The arrangement of the molecules in the wax changes and it becomes a tough polymer finish. If it needs repair just apply more wax and rub again. You'll never notice the touch-up. It blends right in.

I have stained an unissued beech Lee-Enfield stock with LMF walnut stain and sealed it with peramalyn. It turned out very nice, but scratches do show. The LMF products ought to do well on your kit projects.
 
Not bad, lock panels are a bit proud, as in the lock plate should be flush around them but in all bet it'll go bang just fine. :)

Also will second permalyn, IMO no modern concoction comes close to the ease and protection it provides to wood stocks. Very easy to use and provides a very durable and appealing finish. When building a quality kit I shutter at the thought of people using Minwax finishes that are not designed for outdoor hunting and shooting conditions.
 
Last edited:
The past 24 hours have been a rather furious flurry of activity here!
Nothing was rushed,
Really hate to bust your bubble, are you ready for that?
I'm not a pro,, but this is the Gun Builder's Bench section of the forum.
It has years and years of archives from pro builders,
You've been offered several tutorials to review,,
 
Looks like a job well done to me.

For those sore hands you might try taking turmeric in capsules. I take 3,000 mg daily in two doses. It does seem to help with the arthritis pain in my hands. The antiinflamatory med the doc prescribed doesn't seem to help a whole lot. The hardest thing I've done with my hands today is to carry a couple of small boxes, yet my hands are really aching now.

Anything that will help with the pain interests me if anyone has other ideas.
a visit to a rhumatoligist (spelling ??) could be a blessing. I suffered from the GOUT in knees,hands and legs for MANY years. doctors kept giving me INDOMETHICINE a blue and white capsul. after an ill-fated moose hunt on the north east border of BRITISH-COLUMBIA and the North west territories, I spent several weeks in a hospital back home.....an older doctor got me to visit the above mentioned doctor......after 2 months of ''regulating a proper dose,the new meds have worked wonders......its been almost 6 years,no pain at all...I;m back into the mountains which I thought would never happen.
the medication is 400 mg. ALLOPURINOL.
the other meds. I had taken for years are DEADLY on the kidneys.......
red meat, sea food and red wine/tequila/ cheap Canadian whisky are all back on the menu....
in moderation of course..........speak to your doctor about a visit to a RHUUMATOLIGIST.
 
Really hate to bust your bubble, are you ready for that?

In no way shape or form am I ready to teach, tell, or show someone how to build a rifle as is done here, but I am ready to help people find, explore, and enjoy the act, along with sharing my growing knowledge of local facts and history.

That is my goal for the next several months, to share and mentor locally.... not looking for a big crowd, just even one person that has the passion to learn history.
This forum will be a resource that I will promote people to use, and to inspire others when it comes to the building aspect.
You guys are good!

My favorite place to visit local to me is a type of historical park called "Old World Wisconsin".... google it sometime and you will understand.
 
Final post on this one, but I just had to add to it.

I have re-stained the stock with Varathane Kona, and I am more than pleased with the final finish after 2 sessions of hand rubbing boiled linseed oil over it. Both are oil based, and compliment each other quite well.

I did not remove the base stain which was a penetrating Minwax dark walnut prior to re-staining with the Varathane Kona... I am sticking with Kona from now on from the get-go.
Pretty sure the base stain did nothing other than maybe darken the final shade just a tad...… not that much to be honest.
It worked, I like it, so.....

If it works, and you like it, do it.
It is your gun.
If you like it when you are done..... heheh, shoot it and be proud.
I am!

Nothing other than re-staining has been done.
No further inletting, polishing, adjusting, etc.

I hope others can take this "assembly" post, and do their own thing, improve and change their kit as wanted, and also enjoy what they have when completed and be proud of it.

Kona finish 1.jpg


Kona finish 2.jpg


Lock fitment.jpg


Time to concentrate on a few other things in life, so see you all in a bit.
Dave!
(or, "blackpowder dave" as I am becoming known locally..... heheh. :()
 
The past 24 hours have been a rather furious flurry of activity here!
Nothing was rushed, and everything was done with quality and safety in mind first and foremost.

The new vice has really aided me in getting this to the point so quickly, so if you have the opportunity, git 'yerself one!

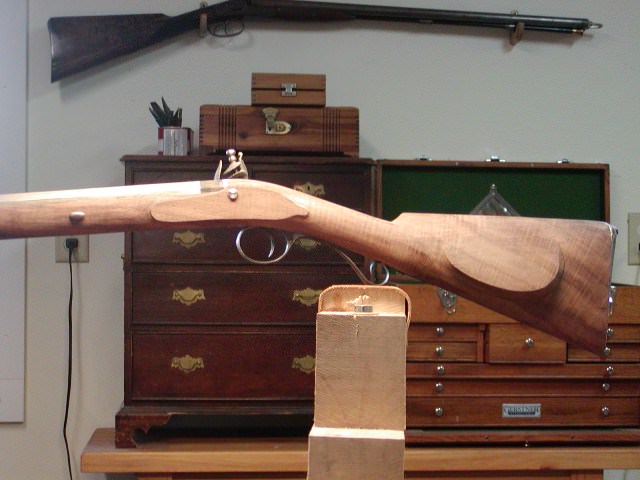
I did not think that I needed to bore everyone with final sanding, fitting, yada, yada, yada, pictures..... so here is where I am at today.
Fit, sanded, and stained...

View attachment 2000

View attachment 2001

Everything is fit and functional.
I only have 1 coat of boiled linseed oil on it in the pictures above, and will continue to add more until I get the final finish that I am happy with.

Also, I have found that if I linseed oil it within 1 hour of staining, it will distribute the stain to create a much more even finish, as the linseed oil will lift the oil based stain and move it to lesser stained areas, and remove it from over stained areas ...…. (heheh, really brown hands when doing this, but worth it in the end!)

Shots have been fired safely.... !!!!!
Heheh, if that is a concern for anyone?
I am still alive and here to post, so that says quite a bit, and I must say, it shoots just fine but needs the sights adjusted just a wee bit. No pics of the target though...… (forgot to do that), but it is low to the left about 1" and with a very tight pattern (within 1" with my shaky old hands) at 50 yards with 75 grains.

The flurry of activity was motivated by something else I have a keen interest in that I plan on doing / starting very soon, and I just may be taking a 6 to 7 month "vacation" from building anything else.
This will allow me to check into the oh so many other builds available, and decide on what skill level I really want to tackle.

I know what I am about to say here is not going to sit well with a few, but if I could find a "Traditions Shenandoah" kit that has not been touched and is raw, I would be a very happy camper!

Out of production for a while now, and I find it quite attractive!
Heck, 200 years from now it just might be worth what I pay for it...….. Heheheh! :rolleyes:

I will be checking in with you boys to see what all of you are up to fairly regularly, and do appreciate you all putting up with me so far and the advice and critiques!

Just think of me as being "on a new quest"...… and it is related to this forum for sure!

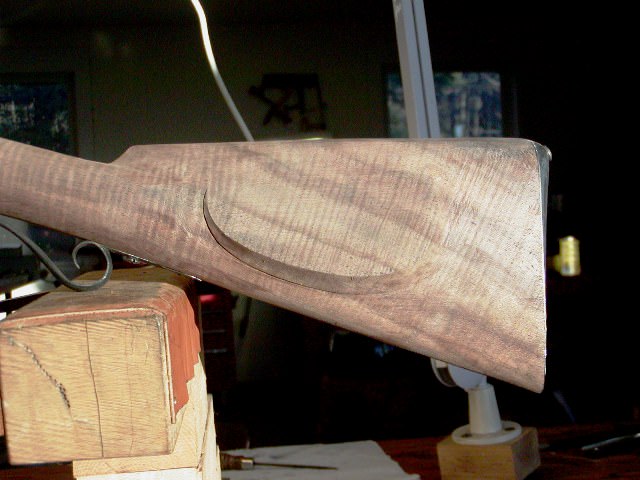
"The Wall" as of today...… In order of "assembly"!
I am very proud of the variations in color / depth I have created so far, and feel like I have learned quite a bit from everyone here, so thank you all from the bottom of my...………. Leinenkugel!

(Only 3 Leine's have been sacrificed over the past 24 hours!)
Heheh

View attachment 2002
Hi Railshot,
You mentioned that you wanted to use the kits to learn about gun making. Are you interested in comments that will help you learn from this kit?

dave
 
The alcohol and water based stains are actually dyes and work well with any finish from shellac to modern poly and lacquers. Alcohol based dyes also color maple which is difficult to do with oil based stains. Your finished product looks quite nice and you’re right to be proud of your efforts.
 
Absolutely, as it may help others that may be following along also.
Hi,
OK. The first big thing is the flats around the lock and sideplate are way, way too big and they give the gun an ugly slab sided look. The photo below shows how they should look although the gun is English so the tail on mountain rifles usually looked a little different. The third photo shows 2 original Hawken rifles. The point is the flats on your gun should be reduced by 50% or more.
6QP3ZXG.jpg

pbUjvX4.jpg

GstVfDh.jpg

Here are more examples of proper lock panels:
vMLAxTd.jpg

dkxGiCr.jpg

Nf2KqBW.jpg


The cheek piece is too large and should also be reduced. The photo below shows a proper cheek piece on an English sporting rifle but mountain rifles were usually a little different. There are plenty of photos available on the internet of Hawken and other mountain rifles to provide you with examples. A little research can go a long way.
KkDtmjG.jpg

LFyIFVs.jpg


Plains and mountain rifles rarely had "perch" bellies like your stock behind the trigger guard. The stock profile was straight or slightly curved downward with no step behind the trigger guard.
dave
 
Last edited:
Hi,
OK. The first big thing is the flats around the lock and sideplate are way, way too big and they give the gun an ugly slab sided look. The photo below shows how they should look although the gun is English so the tail on mountain rifles usually looked a little different. The third photo shows 2 original Hawken rifles. The point is the flats on your gun should be reduced by 50% or more.
6QP3ZXG.jpg

pbUjvX4.jpg

GstVfDh.jpg

Here are more examples of proper lock panels:
vMLAxTd.jpg

dkxGiCr.jpg

Nf2KqBW.jpg


The cheek piece is too large and should also be reduced. The photo below shows a proper cheek piece on an English sporting rifle but mountain rifles were usually a little different. There are plenty of photos available on the internet of Hawken and other mountain rifles to provide you with examples. A little research can go a long way.
KkDtmjG.jpg

LFyIFVs.jpg


Plains and mountain rifles rarely had "perch" bellies like your stock behind the trigger guard. The stock profile was straight or slightly curved downward with no step behind the trigger guard.
dave


Very well said Dave and beautiful examples as usual, true masterpieces!!! :)

If one wants learn how to correctly shape a stock without botching a quality piece of wood (Done it...) I will say traditions has that going for them. Yet the brittle beach wood they use will make you a believer of good wood after working through aggravation.
 
Last edited:
If one can learn just one small thing,once a day, about muzzleloaders and black powder,in short order you become a person of knowledge .................................
always open to others knowledge ,I wish I had the wisdom to listen more when I was younger.
so much more to learn,so little time left.
 
dave_person, those are beautiful examples that may inspire me to revisit the Mountain just a bit.
Originally I purchased this kit to replace my long lost 1978 CVA Mountain, so I had decided to leave it just as I built that one back in 1978.

I had considered modifying this one to be more like an original Hawken (I spent a week collecting pictures of originals prior to beginning this build) as far as the stock work when I started this kit build, and just may still do that when time permits.

SHawkenFSCheek_zpsd3mfhltu.jpg

wm_8937236.jpg
wm_8937234.jpg

Personal touches do make the rifle, and I can see very many areas that could be improved to make it truly mine and a bit more appealing.

Thanks to everyone again for the input, and I have nothing but time...…. and none of my kit builds will ever be truly done as far as I am concerned.
There is always room for improvement.

If one can learn just one small thing,once a day, about muzzleloaders and black powder,in short order you become a person of knowledge .................................
always open to others knowledge ,I wish I had the wisdom to listen more when I was younger.
so much more to learn,so little time left.

I hear you OLD CROW, I too did not listen enough, and at 66 years old am just beginning to understand the value of that.... one thing a day.....
 
Well you got it "assembled" and working.
That's what so many do.
It was that,, "rather furious flurry of activity here",, that got ya as does many folks.

Ya left a ton of wood on it. And hurried to sanding and finish before shaping.
The comb and butt could have been brought down to the butt plate shape and line to nose with a rasp.
The sanding you did at the nose cap is good, but that belly line under the nose cap back to the lock panel could have used a rasp also to keep it straight.
(rasping's a bugger, you have to file and sand so much more for finish)
Rail could have been brought down a bit
Some over sanding on the lock-side panel, and forgot to shape the left side panel to match.

I'm sorry if you find me rude, you did say your open to critique, and I'm not good with diplomacy an such.
But you did a hurry-up "assembly", concentrating on the wood finish instead of shape.

You could re-visit those tutorials and advise that was offered here for you and finish shaping the kit properly at any time.

I do not find anything posted in response to my requests for input rude at all, and appreciate the feedback sincerely...… really I do!

You are correct about the "rather furious flurry of activity here" part 100%.
Tis the season to be.... doing other things, but I could not just leave it untried.... so I assembled it and shot it...... in the rather quiet parts of the day just to get the feel back again, and heheheh, it felt good to shoot one again...…. shhhhhh!

I do intend on revisiting this one rather soon to be honest, and just wanted to get it to a point that made a "rifle" that I could shoot.
This one is special as it is a perfect copy of my first kit gun.

Now, what I do to it may, or may not be what you or others may see as being appropriate, but it will be modified to something that I like, taking into consideration all of the input so far.....
Like I have said previously, if I mess one of these up, no biggie as far as investment costs.

Believe it or not, this is one of the reasons I joined this forum and almost instantly became a supporting member.
You guys are brutally honest, (I really like that) and have the experience in fit and function that I did not even consider when I built my Kentucky last September.
Heheh, the "worse" the feedback is, the more I appreciate it.

You all have been doing this much longer than me ……. now, ask me about injection molding processing, or tooling, or plastics in general, and I am probably at your level or above, but not with building muzzleloaders!
Injection molding is actually one of the projects I am assisting on gratis, that is occupying quite a bit of my time.
I still need to contribute something to "society"...….. heheh.
 
Back
Top