• This community needs YOUR help today. We rely 100% on Supporting Memberships to fund our efforts. With the ever increasing fees of everything, we need help. We need more Supporting Members, today. Please invest back into this community. I will ship a few decals too in addition to all the account perks you get.


    Sign up here: https://www.muzzleloadingforum.com/account/upgrades
  • Friends, our 2nd Amendment rights are always under attack and the NRA has been a constant for decades in helping fight that fight.

    We have partnered with the NRA to offer you a discount on membership and Muzzleloading Forum gets a small percentage too of each membership, so you are supporting both the NRA and us.

    Use this link to sign up please; https://membership.nra.org/recruiters/join/XR045103

Opinions Requested

Muzzleloading Forum

Help Support Muzzleloading Forum:

This site may earn a commission from merchant affiliate links, including eBay, Amazon, and others.

Buckskinn

45 Cal.
Joined
Dec 12, 2018
Messages
501
Reaction score
429
Location
Mukwonago, Wisconsin
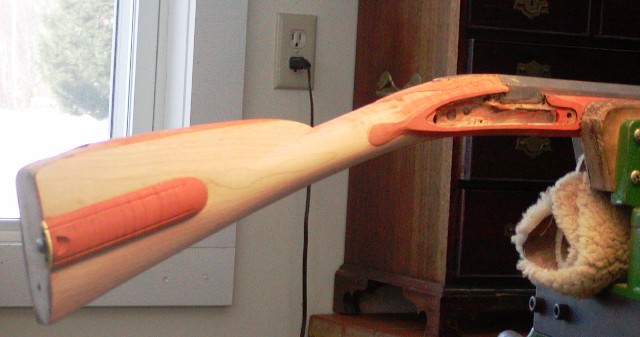
Well I figured before I get too far along I should post some pictures and get a some recommendations of what I have done. I wet the stock to highlight flaws and found several in the pictures already, so it already paid off. Just getting it in different lighting showed a bunch. Hopefully more will come from you guys! ( I used a paper towel, so a lot of the stuff that is showing up is lint). Trigger guard is just for show, not inlet.

I have most of what I feel semi-final shaping done, although I still need to file stock/butt plate, final shaping of patch box and tang/stock interface areas. Then a lot of polishing and sanding.

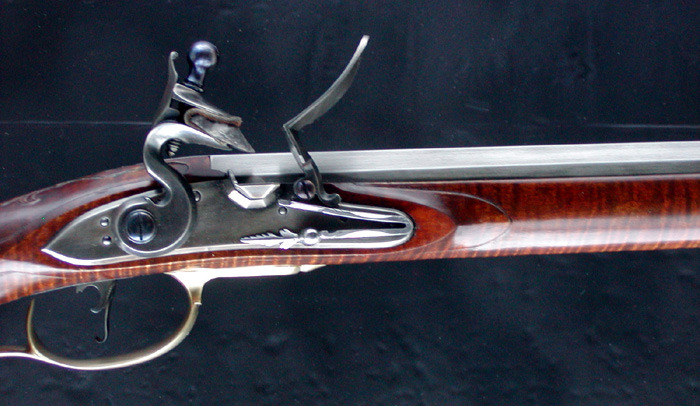
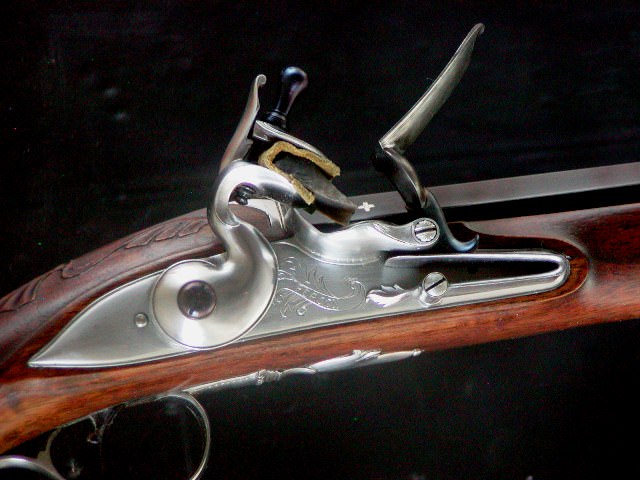
Please let me know areas that need attention, thinning or look odd or out of whack... And don't hold back, I'd rather hear about it now then when it's finished. Hopefully most are correctable yet...
Also let me know if any other perspectives would be more helpful.
20190217_21044A.jpg
20190217_21011A.jpg
20190217_205619A.jpg
20190217_205627A.jpg
20190217_21043A.jpg
20190217_21041.jpg
20190217_21000A.jpg
20190217_220110a.jpg
Still need to fix right side of tang.
20190217_21003A.jpg
20190217_210019A.jpg


Thanks!
 
Hi Scott,
You did very well so far! It is really shaping up nicely. Assuming you are trying to emulate the original to the extent you can there are some things to consider doing. The patch box should thin substantially from the rear to front. I am referring to height above the stock. It also should have a more spherical cross section than a rectangle with the corners rounded. I would thin the flats on the lock panels a lot, almost making them disappear. The flats do not need to be even all the way around. Thin molding on top also helps to clear the shoulder of the flintcock and shape the top of the stock to meet the barrel flats at the breech. The photos below show how I handle lock moldings for colonial era guns with large locks.
dkxGiCr.jpg

vMLAxTd.jpg

I looks like you cut in too deeply for the tail of the sideplate panel molding. It appears that you need to re-establish the full roundness of the wrist at that point. Also, I would file the top of the barrel tang to smooth the arc of the curve downward. It seems you may have a little hump near the end of the tang.

The nose of the comb can be thinned a little and the sides right at the nose given a slight concave shape. If you have a good carving knife, use it to scrape the shields in front of the lock moldings to smooth them out a bit although the original is a bit lumpy. I use a 2/3s rule on guns I make with large barrels. I have 2/3s of the side barrel flats and 2/3s of the ramrod pipes exposed above the wood. That tends to slim the gun a lot.

dave
 
First, Find some pictures of the original. Then slim down the lock panels like the original. You also need to unbury the barrel, show more barrel flat, you only need between 1/2 to 1/3 of the side barrel flat in the wood. That trigger guard is a crying shame. Replace that pronto. That patch box cover needs a lot of attention. Follow Mr. Person's instructions.
Buy the KRA disc on Moravian guns before you go any further, I believe the Marshal gun is on that disc . You're obviously capable of relief carving and the KRA disc will really help you.
 
Dave, thanks again for the help! I shaped the patch box prior to really looking at the Brennan rendition of the rifle, but I should be able to round it a bit.

The lock panels have been giving me fits, look like elephant ears from the top to me. Didn't know how aggressive I should get with them. After looking at your Little Fellah I have a better idea. If I thin much more I will likely lose the molding on the bottom of the panel, but may be able to re-establish.
 
Another question. Since I will not be carving anything intricate into the stock, should I put any straight-line moldings such as along barrel and from butt to trigger guard or would that look out of place?

Unfortunately the bulge around the ram rod pipe came very thin, so it will not be nearly as pronounced as the original, but I could run a molding out of it, if appropriate.
Jud's gun is a great example to use. It appears you can relief carve so I'd do the whole works, copying Jud's carving as the original is carved the same way. You'll feel pretty good about your self and your gun if you put a maximum effort into this one.
 
You must be on the Dark Side of the Moon if you think I can pull that off!
Your lock panels look good, I see no reason why you can't pull off the rest of the carving. I know it looks intimidating but you just need to dissect the designs into small sections as you draw them, then add them all together until you have them. You can do it. With out challenge you'll never get better.
I've been wanting to make a Marshal gun for myself, now I have the inspiration to get with it.
 
Dave,
I did see that. I actually read it when deciding on what style gun to go with and that write up sealed the deal. Very interesting history of Edward and the rifle. I would love to see it in person.
 
I worked on lock panels and shoulders last night, still need to work on edges, clean up border and molding, but I feel it's starting to look better. Also worked on patch box, side barrel flats exposure and comb area. New trigger guard on the way...

20190218_221751A.jpg
20190218_221902A.jpg
 
I know nothing technical about it, but I'm impressed as heck with you making it. I think it is amazing looking.
 
on maple, If you really want to see the flaws in your wood working?? mix a lil yellow food dye into a bottle of isopropyl alcohol and water.. ( yes I know the alcohol is mostly water ) wipe this onto your stock and let it dry. it will raise the whiskers on your stock and make your errors VERY obvious. The good thing is it can be stained over and you will never see it..

Respect Always
Metalshaper/Jonathan
Hi,
On this gun it was opening day of deer season so I thought blaze orange would be nice rather than yellow.
:)

dave

dp24ybL.jpg
 

Latest posts

Back
Top