• Friends, our 2nd Amendment rights are always under attack and the NRA has been a constant for decades in helping fight that fight.

    We have partnered with the NRA to offer you a discount on membership and Muzzleloading Forum gets a small percentage too of each membership, so you are supporting both the NRA and us.

    Use this link to sign up please; https://membership.nra.org/recruiters/join/XR045103

More striker inspiration for blacksmiths - and history lesson

Muzzleloading Forum

Help Support Muzzleloading Forum:

This site may earn a commission from merchant affiliate links, including eBay, Amazon, and others.

ameling

45 Cal.
Joined
Jun 29, 2005
Messages
855
Reaction score
2
Well, here is some more inspiration for you
blacksmiths out there - and another history lesson
as well.

These are some of the flint strikers I made up
yesterday. And the historical time periods vary
quite a bit.

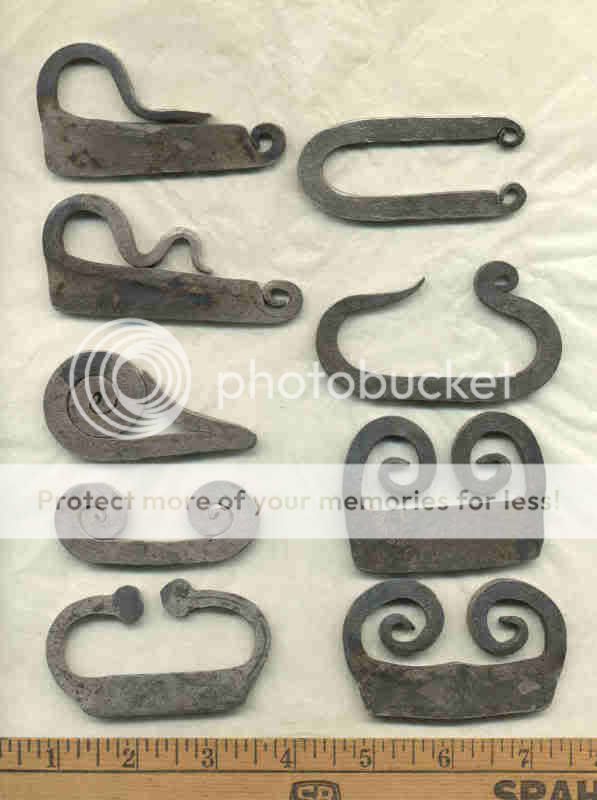
Left side from bottom:

- Found at the Fox Hill Seneca Indian village site up in New York.
- Found at the Cherry Hill Seneca Indian village site up in New York.
These two Indian village sites were in use from
1650 to 1680. The strikers are believed to be of
Dutch origin - from traders operating out of New
Amsterdam on Manhattan Island - before the British
captured it and renamed it New York.
- A Scottish flint striker. The British museum
dates this to the 18th century, and said it was
more decorative than the local British flint
strikers, and probably from the Scottish dealings
with France and Flanders were it was common. Note
the similarities with that Dutch striker from the
Cherry Hill village site. More than just coincidence.
- The top two on the left are Roman 1st to 3rd
century style flint strikers. There is a French
striker dated 1566 that has some similarities to
the top one, but otherwise these styles went out of
fashion several centuries before.

Right side from bottom:
- a Burgundian flint striker. The shape shows up
in the mid 1400's, and continued to be seen up into
the mid 1700's. It even shows up in several family Coat-of-Arms.
- an Irish flint striker. The British museum dates
it to the 18th century. Don't you just love those
museum 100 year date ranges. Note the similarites to
that Burgundian striker.
- Classic C striker. With that extra little curl
on only one end, this became pretty common in the
early 1800's, and is more generally associated with
the Western fur trade - Rocky Mountains.
- Classic Spanish Colonial or Mexican U shaped
flint striker. Usually called an Eslabone - which
means Link - because it resembles a chain link.
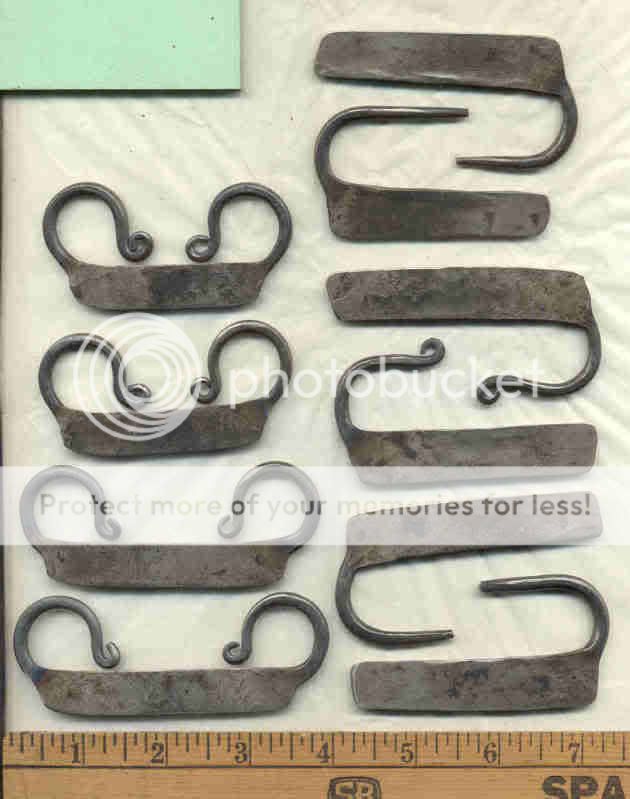
There are lots of little variations on these -
longer, shorter, thicker, with almost no gap in the
middle, with a gap wide enough to put your fingers
in it, almost V shaped, and with those extra little
curls bent/curled from either side of the bar.
There is also an Italian version dated 1634 where
the two little curls are bent/curled into the center gap.

The unique thing about those Scottish and Irish
flint strikers is that the British museum actually
identified them as Scottish and Irish. They
usually just give them that generic "British" or
"English" designations.

HistoryLesson1.jpg


Just some more iron work to get people inspired to
beat up steel. And to show people some more
shapes/styles of flint strikers.

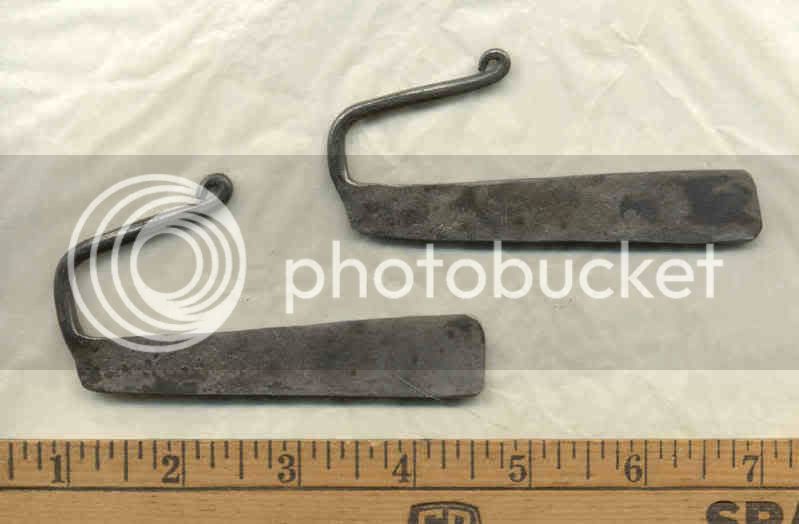
Now I have to work on some more of those "bar"
styles. Lots of variations with them - some being
some of the very first ever traded to the Indians
in North America. Yes, that very thin/small
"handle" was often broken off.
FrenchBarStrikers.jpg

Ganondaga1.jpg


Have fun blacksmithing.

Mikey - that grumpy ol' German blacksmith out in the Hinterlands
 
:hatsoff: Thank You Mike!~very interestin! pretty cool..!


umm no hot metal poundin fer me... nail an hammer dangerous enough! :shocked2: get sparks there too! :haha:
 
:hmm: I'm beginning to think that my "scrap pile" is full of "museum quality recreations" instead of "not quite right" junk! :haha:
Mike, does the tool steel you use forge better than files? When I try to draw a file out to that thinness, it always seems to break when putting a curve or scroll into it. I work it at a yellow heat...too hot?
 
Stumblin Wolf said:
:hmm: I'm beginning to think that my "scrap pile" is full of "museum quality recreations" instead of "not quite right" junk! :haha:
Mike, does the tool steel you use forge better than files? When I try to draw a file out to that thinness, it always seems to break when putting a curve or scroll into it. I work it at a yellow heat...too hot?

Hey, now. You challenging the ... quality ... of MY scrap pile? My scrap pile can stand up to anybody's low standards!

I prefer to use new steel to forge strikers. "Used" steel can have hidden ... problems. I've found cracks and splits in some "scrap" steel. But I've also had some good scrap steel.

I usually work with new 1095 or 1080 (lots of "agricultural" steel is 1080).

Cracking when bending? I sometimes have this problem when I bend a thin piece too many times. The grain structure in the steel just seems to "work harden" on me no matter what temp I have it at. So if I mess up some bends, I try to work around it instead of straighting things back out and starting over. Or I cut it off and start over. Experience has just shown me that I might have problems.

Too hot? Shouldn't be any problems with too hot. I know I've pushed the lower limits bending things - like that last little "tweak" when there's no color left in the steel. And, occasionally, it breaks off when I do that. So I do tend to re-heat the steel more often than I would really need to. It's just better in the end.

I only occasionally use old files. And then it's usually to duplicate something specific or a special request. But I always check the quality of the file before I put any work into it.

Problem pieces? I've got about a dozen junker strikers on the shelf next to my computer right now. Most forged out wonderfully, and bent/curled great. The only problem is that I grabbed a piece of mild low-carbon steel to start with. I picked up a chunk of generic "welding shop" iron without realizing it. So they won't heat-treat, and won't throw sparks. But they LOOK GREAT! That's what can happen when you don't pay attention. Or when I put a piece of mild steel in my special bucket of high carbon tool steel.

And, occasionally, a buddy will stop by to make forge something up, and he will grad a piece of that high-carbon tool steel - to make a simple tent stake or S hook. And then he will start complaining about how tough/hard it is to forge. I always tell them to ASK me first, but sometimes they don't listen.

So YES, my scrap pile is interesting as well. And YES, there are a bunch of things that I started and that did not turn out like I wanted. But I try to remember the advice Frank Turley gave to a friend of mine down at his class. Joe was complaining about something not working out right. Well, Frank looked at it and told him: "You're a blacksmith. Move the metal to where you want it!" And then calmly walked away. Such ... simple advice, yet so hard to do.

Mikey - that grumpy ol' German blacksmith out in the Hinterlands

p.s. The Irish and Burgundian strikers started out as 3/16 inch thick bars 1 inch wide by 4 inches long. The strikers in the last two pictures were 1/8 inch thick by 1/2 or 3/4 inch wide and however long was needed. The Scottish and C strikers were made from modern hay rake teeth that is 1/4 inch diameter round. One tooth is around 30 inches long when you straighten it out. The last ones I bought at Farm Fleet were $1.38 each. It's probably 1080 steel. Old hay dumprake teeth are 3/8 inches in diameter,and about 5 feet long when straightened out.
 
The swirl is a classic Celtic motif that persists into the 19th century in Scotland in the curl of the ends of Scottish horn and silver snuff boxes.
 
Hey Mike you been buisy! Nice strikers I made 1 from a pc of file yesterday seemed to work hard kept looseing heat at the anvil. Gives some nice sparks though its large being I can get 4 fingers in it to use it
 
LHunter said:
I made 1 from a pc of file yesterday seemed to work hard kept looseing heat at the anvil.

You might try Japanese wet forging. The anvil is wet between heats with water. The forging metal only touches the anvil for a second or two. The smith lifts the metal off the anvil with each hammer strike. It looks like he's bouncing it, but it's a real controlled process. It works particularly well when welding. I use it for everything. It sounds like overkill but with a little practice it'll become part of your hammering. Also great for preventing scale from being beat into the metal and weakening it.
Regards
Loyd Shindelbower
Loveland Colorado
 
Lloyd. I suspect the japanese blacksmiths were more concerned about protecting the hard surface of their anvils- often hundreds of years old-- than in protecting the work being hammered.

Many years ago, now, in the early 1970s, I watched a black smith at Rockhome Gardens, near Arthur, Illinois, pound out a souvenire horseshoe for a child, while the child and her mother watched. The smith used alternating hammer blows- one hitting the shoe, and the next hitting the surface of the anvil, while the shoe, held with tongs, and red hot, was allowed to be " lifted up with each rising hammer, and then was moved to a different surface on the anvil for the next blow.

When the child and her mother left, leaving my wife and I alone with the smith, I asked him if there was a purpose for the alternating hammer blows, or was he just being a showman!

He told me, " NO, I am listening to my anvil!"

He explained that he moved the work around the anvil to allow him to continue to work the shoe to shape, while keeping the surface of the anvil cool enough . If he left the shoe in one spot long enough, it would anneal that spot on the anvil, and it would no longer keep the hard flat surface he needed for his work. He showed me the corner of another anvil in the smithy that was discolored if not rusted because someone held a hot piece of steel against that corner so long it annealed the steel. He bought the anvil from another man because the rest of the anvil was in excellent condition.

He admitted that this is more a problem with the cheap anvils with the welded on 1/2" steel plate to cast iron bases. But, as he showed with that expensive, cast steel anvil that weighed in at about 150 lbs., if you leave something hot enough on the anvil long enough, it will anneal even a portion of the steel anvil.

He took out a piece of iron from his forge, and put it on the anvil and didn't move it until we could hear an audible drop in the tone of the sound the hammer blows produced. Putting water on the surface of the anvil before placing a red hot piece of iron or steel on it to work will perform much the same function as moving the piece and orchestrating the sound. Water will vaporize at 212 degrees, and as you move a piece over to other areas, the disappearance of the water tells you that the temperature of that portion of the anvil has risen that much, and its safer to move the work to the other areas of the anvil to continue working the piece.

Now, 212 degrees is WAY low a temperature to be worrying about annealing steel, and probably not much closer to annealing iron ore. But those old masters didn't have thermometers, or thermocouples to tell them what melting points were for various iron alloys. The did have water, and they did have " lodestones- magnets". So those were used to make the knives and swords, and armor, and other iron implements, while expensive tools like anvils were preserved to be passed on down through generations of a family.

There really is an " Anvil Chorus", and its not just to make music.
 
What fascinated me about his anvils is that they were both Old industrial grade( Large and heavy) anvils- not like the 40-60 lb. anvils you see at farm auctions, and flea markets. And, the top of his anvils were as smooth as Mirrors, even after all the years of work they had seen. I asked him about it, and he explained that a truly FLAT surface was among the hardest things to find in nature, and it was essential that he have a hard, flat surface, to make flat surfaces in the metal parts he worked. He could draw file metal to get it straight, but that was highly labor intensive work, time consuming, and expensive. If you can forge flat surfaces in metal with a hammer and anvil, you can produce products much cheaper.

Hammer forged products are still the majority of parts made in industry today. It may involve using dies and large presses to form sheet metal in to curved parts, but its still a form of forging. And a die is nothing more than a specialized hammering surface.

When I asked my questions, I was wanting to know how he kept those flat surfaces from being gouged, and scratched, or rounded. He convinced me that an anvil is a very specialized tool for general machine work, and should be given great care to maintain its top performance. He oiled his anvils eat night at the end of his workday. He brushed off the slag, from the iron he was working often - every time he returned the metal to the forge to heat up again. He told me he didn't want to be beating any slag into his anvil, so that he moved the work from one end to the other, and moved his hammer so that he was never hitting the slag with the hammer.

He was Amish, and told me he learned his craft from his father, and his father before him. I have to believe that blacksmiths have been passing down these ideas for thousands of years, and that they are found in smithys in all cultures.

The Japanese islands are a LOT short of iron ore- they have to import it from China, or the USA. Taking care of their iron tools was the first responsibility of all smiths. If you have ever examined an original 19th century or earlier Japanese sword or knife, you can't help be in impressed with the quality of the metal work, and the polish they achieved without power tools. A lot of that flat blade began with forging it on an anvil.
 
Sorry it took so long to get back to you. I've never seen a video of it.
How to use the wet anvil technique....
Do this each heat...
1. Wipe the anvil with a gloved hand, I use my left.
2. Dip hammer in water and coat anvil.
3. Hammer each strike and move metal piece up and away from the anvil in the direction of the hammer. Both hands will feel like they work together. It becomes real natural. I often want to move the piece of iron at different angles or flip it over anyway. It's kind of the way I picture people using a trip hammer. The hammer blows are stationary and the smith moves the metal around as the trip hammer hits.

Anyway, use it or don't use it. I like this because pieces of junk are blown out of the way when the water explodes when the hot iron hits it. I have very little problems with in-bedding junk in my blades now. Besides, I often forge when it's miserably cold outside and keeping an anvil warm just isn't practical.
 
But don't you get a lot, well not a lot, of sizzling water heading out in all directions? :hmm: Might keep them pesky tourist kids out of my shop! :haha:
 
It sounds like gun going off for the first few strikes after each heat. That way you know it's working. The water explodes blowing the cr@p away from the metal, keeping everything clean.
I've gone back to working low carb the old way some times and it makes a mess. The anvil gets completely covered with black junk that gets hammered into the work. Not really a bad thing on low carb but something a knife maker really doesn't need.
Remember, this wet anvil thing and holding the work off the anvil is just the way I like doing things. What's important is the outcome.

Regards
 
Back
Top