• This community needs YOUR help today. We rely 100% on Supporting Memberships to fund our efforts. With the ever increasing fees of everything, we need help. We need more Supporting Members, today. Please invest back into this community. I will ship a few decals too in addition to all the account perks you get.


    Sign up here: https://www.muzzleloadingforum.com/account/upgrades
  • Friends, our 2nd Amendment rights are always under attack and the NRA has been a constant for decades in helping fight that fight.

    We have partnered with the NRA to offer you a discount on membership and Muzzleloading Forum gets a small percentage too of each membership, so you are supporting both the NRA and us.

    Use this link to sign up please; https://membership.nra.org/recruiters/join/XR045103

inletting

Muzzleloading Forum

Help Support Muzzleloading Forum:

This site may earn a commission from merchant affiliate links, including eBay, Amazon, and others.

brushbuster

40 Cal.
Joined
Sep 14, 2004
Messages
471
Reaction score
0
serious question guys
what is the safest way to do inlays and such ?
i dont trust myself with a dremmel :eek: :redface:
 
I don't trust you with a Dremel either! ::

First of all, I am not the champion of all inlays. The real artists may have a better method. Mostly I have done simple initial plates and wedge key plates.

I have played with a couple of methods, and ended up with this. I file my draw angle to the edges of the inlay. I bend the inlay to fit the stock curvature. Then I attach the inlay to the stack with double stick tape. ( They would of used it if they had it! ::)

With a sharp exacto knife, I cut the outline of the inlay following the angle of the draw. That way my cut line is inside the outside border of the inlay. I remove the excess tape, and then outline the inlay in pencil held vertically. That establishes a line that I don't want to cross. Now remove the inlay and tape.

I then use my exacto and a 1-16" chisel to remove wood, and SLOWLY work out to fit the inlay. I then fit the inlay, tap it in with a mallet, and file it flush.

:results: Hopefully some of the REAL inlay artists will jump in and explain the errors in my way!
 
i'd say ol zonie will pipe in on this one very shortly..................bob
 
Brushbuster: Doc's got it right. The only difference I use is after filing the "draft" or "draw" and forming the inlay so that it rests fully on the stock where it is going to live, I attach it with a small dot of Cynoacrylate Gel ::
Just funnin with ye! Super Glue Gel.
I'm sure Doc's double stick works well too. The important thing to remember is the inlay must not move at all, in any direction while your cutting in the edge.

I'm sure you know what draft or draw is, but for those who don't, it means you file the edges inward towards the bottom of the insert. The angle isn't real critical except it should be noticable. I use something around 5 to 10 degrees.

After securing the inlay to the stock, use the Exacto knife (or equal) with the really sharp point to cut completly around the edge of the inlay. Don't try to do this in one pass and hold the knife at the same angle as the draft so it is forming a tapered cut in the wood which is larger at the surface than it is at the bottom.
When I say "cut" I am really saying stab. Don't try to actually cut along the edge. If you do, the knife point will try to go slicing wood in all directions except the one you want it to.
I usually go around the inlay at least three times to make sure I have a cut which is continious and about as deep as the inlay is thick.
Unlike Doc, I don't bother with a pencil. IMO It is much too course of a line to do much good other than allowing you to easily see where the inlay is going to go.

Because I use super glue, when I'm happy with the cuts I've made, I then give the inlay a light tap straight down on it with a hammer. This usually breaks it loose. If you use Doc's method, you won't have to whack it.

Yup, I, like Doc use really tiny chisles and cut down at about a 30-45 degree angle from the inside of the inlay area towards the incised edge cuts. Take very little cuts. Your just trying to chip in a good safe edge.
I may say others use the exacto knife to do this little task.
While that works well for them, I don't want to risk the point slipping and cutting outside the inlay.

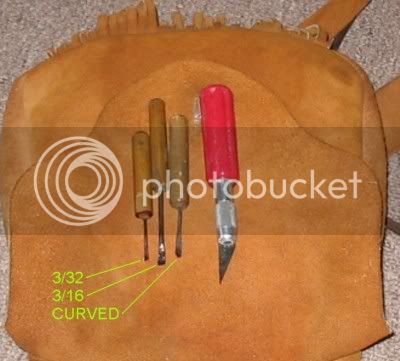
The chisels I use I made from a piece of music wire and a length of wooden dowel.
They look like this:
chiselstext.jpg


After chiseling in the edge cuts, I then remove the wood in the middle to a depth which is the same as the inlay is thick.

At this point, I reinstall the inlay. If I did things right, it won't fit down in the pocket very well because of the draft or taper. You can either very gently file off the inlays taper or do as I do, and recut the edge with the Exacto except hold it almost straight up and down to the face of the inlay. About once around it, remove the inlay and the hairlike cuttings this cut produced and then tap the inlay into the pocket.

If it is standing proud of the wood, use a file to file it flush. If it is slightly too deep (almost never happens if your careful about depth when you remove the center area of the cut), you can sand the wood flush with the inlay.

I have been known to use Epoxy under the inlay to hold it in place, but I really can't recommend this.
A much better (+PC) way is to nail it in. Nails have worked well for over 200 years, Epoxy for ???

There are little nails or brads available from some Suppliers but a good Plated Brass straight pin is carried by some Cloth Stores. Drill the smallest holes you can, cut off the pin and tap it in and file the head flush with the inlay. :)
 
hey brushbuster, i do the same as doc, no dremel tool here.
but i do use forestner drill bits for some of the larger
inlays. a little safer!!!. as for the bevel on the inlay
you have to be carefull not to make it too much, or as
you file and sand the inlay will get smaller and a noticable
gap will appear. one thing i do is once the inlay is fit
close to the suface, i pull it out, rough the back surface
glue it in" they would have used it, if they had it".
let it set overnight. then drill and pin it.this keeps
you from distorting the metal and makes final finish
easyer. :redthumb:
 
wish i had asked a day earlier :redface:
while inletting the sideplate on my sitting fox langcaster,
my small chistle slipped and i knocked a couple of points off.i think i can use my side plate as a pattern with some mold release or candle wax and rebuild them with some epoxy/sawdust mix then blend it back wtih a dowel and sand paper.does that sound right or do you have any other suggestions? it dosent look bad but i would like to make it look better. how bad does a fix like that show when you stain it? :redface: :cry:
 
hey brushbuster, try super glue and 400 grit sand dust.
thats what i do for small ooppps!!! it takes stain well.
just mix put in mistake, let harden,re-cut, sand. don't
put inlay, sideplate,ect. in or they will get stuck.
 
If your going to use Epoxy, you might want to look into the rifle bedding types that you can dye. Several others on this site have mentioned doing this, but I don't recall exactly what they used.
I think un-dyed Epoxy won't be stained by anything after it has set up.

Another idea is to mix the sandpaper dust with carpenters glue.
That will take staining (kinda).
Another product that kinda takes staining is Elmer's "Carpenter's Wood Filler".
I used this on the 1842 Springfield to fill a crack which is just under the new wood behind the rear lockbolt on the Lockplate side. The crack in this case extended into the pocket for the lockplate so I left the lockplate in place when I applied the filler. After about 5 minutes, I removed the lockplate so it wouldn't be bonded in place. The stuff is thick enough that it didn't try to flow into the lockplate cavity and retained the exact shape of the lockplate while it hardened.
It did "take" some Walnut stain applied with a Minwax "Wood Finish Stain Marker" which is a felt tipped pen like applicator. The nice thing about the Minwax Marker is you can apply the stain exactly where you want it. ::
 
Epoxy even mixed with sawdust will not take a stain well if the area is to big .
Super glue or CA can be hard to sand and while it at times can be used you must be careful as it can make the problem area stand out even worse after the stock is finished.


I either take Elmer
 
Thanks for the info guys !! I was hoping I was on the right track .When I get these rifles finished i hope to post them up to let you see them .Just like slowpoke and a few others...I gotta play Mr Mom too, so it may take awhile :master: :master: :thumbsup:
 
Back
Top