


A continuing saga with the hopes that it will help someone.
When you first get the as cast butt plate it is easy to think I've been had! This will never work!
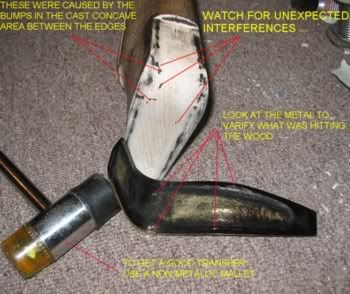
It is as rough as a cob and twice as ugly but with some light grinding, a lot of sanding with silicone carbide wet/dry paper (wet seems to work better) and a lot of filing, the blob will become a thing of beauty. Don't worry about the rough cast pocket on the underside...no one will ever see it, but note that it caused me some unexpected suprises as is shown in the photos.
After determining the length of pull and rough cutting/drum sanding the area close to the desired shape it is time to install the real thing.
You will need something to put on the mating surfaces of the buttplate which will rub off on the stock wood. You will do this process many times before your thru with fitting the plate so there is no noticeable gaps.
Some people don't like inletting black but 9 years ago I bought a small bottle of it and it's about half gone after building 11 guns so I will continue to use it.
If you prefer sooting with a candle or using lipstick that's fine too but buy yourself a color your wife wouldn't be caught dead wearing so she won't blame you for stealing it from her.
I do use a high speed grinder to remove the wood all over the area at first but as the wood takes form, I switch to files and a good sanding block. I will continue to use the grinder, but only in the center area, never out where the edge of the wood and plate will be visable. Why? Because it is too good at creating deep pockets which will screw up the whole thing.
If your buttplate shoulders out on the stock at the top like the one I'm installing, go easy on cutting this area. It is better to leave wood and cut it again than to start off with a big gap in this critical location. If you do remove too much wood here, you will find that you have to keep removing wood along the entire rear surface to move the plate forward to close the gap.
By the way, I cut this shoulder with a razor sharp 1 inch wide chisel.
Speaking of chisels, now is a good time to use one to get rid of most of the wood along the comb from the rear to the shoulder we just talked about.
DO notice how it cuts while doing this. If it is cutting smoothly your in business but if the wood breaks out leaving a rough surface, it is trying to tell you that your going against the grain so you should not use that method any more. Switch to cross grain cutting, or better yet use a course double cut file (not a rasp). Failure to listen to the wood will result in large breakouts and tares in the wood.
In the photo, notice that the fit is getting there but more needs to be done. Remove the wood with the marks on it but do not remove any wood that is unmarked.
After removing the marked wood, re-blacken the plate and repeat until the fit is almost complete.
NOTE: Castings are usually warped. When you get to the point where it almost fits on one side but there is a large gap on the other, hold it tightly in the proper place and WHACK the raised area with your mallet. Do this several times and the plate will bend to almost match the wood shape. There is a little spring back which prevents your pounding it for an exact fit. By the way, DON'T use this method on thin sheet metal style buttplates as it will look terrible forever and the only way to fix it is to buy a new sheetmetal buttplate.
NOTE: If your a perfectionest you will spend the next 2 months doing this until it fits exactly everywhere at once! I choose to use a more realistic approach.
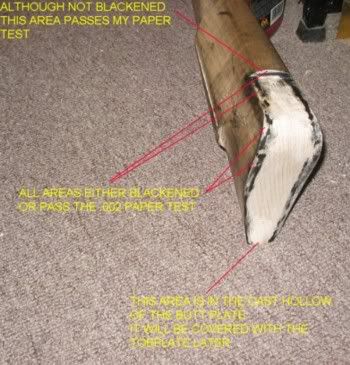
A piece of paper is about .002-.003 thick. (about one hair thick). If the gap between the metal and the wood won't allow a piece of paper into it, I say it is good enough. This is why there are places on the wood which are not blackened but I decided to stop here.
One piece of paper will not fit anywhere between the metal and the wood! WORKS FOR ME!
With the buttplate installed, it doesn't match the stock shape!
If this happens (and it will) file the metal down to match the wood. If the wood sticks out, sand it down to the metal.
I'm leaving the wood on the left side, proud of the buttplate to provide material for some raised carving. I will finish the stock down to match the buttplate later.

The overhang doesn't show well but the light file mark on the wood was made with the file touching the wood and the metal at the same time.
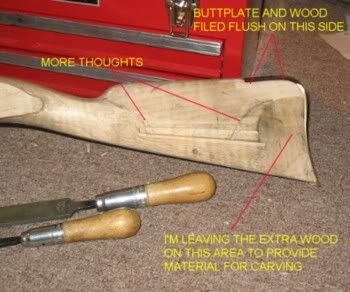
This side is filed totally flush.
Installing the screws. The location is up to you, but it is best to look at photos of originals to know where to put them.
A word about the lower hole location:
Although some old guns have the lower butt plate screw located close to the lower end of the buttplate you will find that a lot of these same old guns have cracks because of it.
The screw should be perpendicular (normal) to the surface of the butt plate and this often points it down towards the belly or toe of the stock. If you move it up so it is at least 1 1/4 (1/3/8 is better) from the toe (bottom) of the buttplate it will still hold the plate tight against the wood but it won't overstress and crack the wood.
After laying out the location with scribed lines, center punch the metal to guide the drill.
NOTE! The drill has a mind of it's own and won't like your location, so you will have to train it.
I advise either drilling the centerpunched dent with a 1/16 dia drill first (it won't walk out of the dimple as easily), or bringing the drill down into the dimple and rotating it by hand while applying light pressure. This will make the dimple into a larger pocket and will keep the drill bit from walking when you start actually drilling.
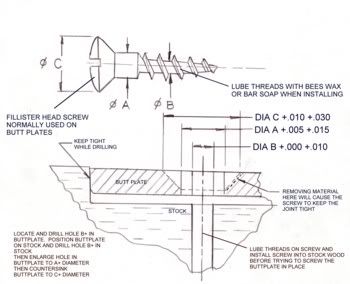
To get a good alignment of the hole in the buttplate and the threaded hole in the wood, first measure the minor diameter of the screw (B in the photo). This is the size you want to drill thru the buttplate.
Then locate the buttplate on the stock and use this hole as a drill guide to drill the wood.
NOTE: When working with ANY gunstock wood you should pre drill the holes for the screws. If you just screw the screw into the wood without pre-drilling it will never be in the right place. It will also create so much pressure inside the wood that the stock may split. It is also just about impossible to do without tearing the head off of the screw.
After drilling the wood, the hole in the buttplate can be enlarged to fit the screw dia A. It can then be countersunk to diameter C.
Note the comment about the countersink in the screw photo. If you remove a little extra metal on the side AWAY from the direction you want the buttplate to move, when you install the screw the tapered underside of the screw head will cause the metal to want to move. This will keep the forward joint tight. Don't overdo this though or the screw head will never look centered in the hole.
When screwing the screw in for the first time, lubricate the entire threaded area with bees wax or bar type hand soap. You will be glad you did!
Happy building!!
When you first get the as cast butt plate it is easy to think I've been had! This will never work!
It is as rough as a cob and twice as ugly but with some light grinding, a lot of sanding with silicone carbide wet/dry paper (wet seems to work better) and a lot of filing, the blob will become a thing of beauty. Don't worry about the rough cast pocket on the underside...no one will ever see it, but note that it caused me some unexpected suprises as is shown in the photos.
After determining the length of pull and rough cutting/drum sanding the area close to the desired shape it is time to install the real thing.
You will need something to put on the mating surfaces of the buttplate which will rub off on the stock wood. You will do this process many times before your thru with fitting the plate so there is no noticeable gaps.
Some people don't like inletting black but 9 years ago I bought a small bottle of it and it's about half gone after building 11 guns so I will continue to use it.
If you prefer sooting with a candle or using lipstick that's fine too but buy yourself a color your wife wouldn't be caught dead wearing so she won't blame you for stealing it from her.
I do use a high speed grinder to remove the wood all over the area at first but as the wood takes form, I switch to files and a good sanding block. I will continue to use the grinder, but only in the center area, never out where the edge of the wood and plate will be visable. Why? Because it is too good at creating deep pockets which will screw up the whole thing.
If your buttplate shoulders out on the stock at the top like the one I'm installing, go easy on cutting this area. It is better to leave wood and cut it again than to start off with a big gap in this critical location. If you do remove too much wood here, you will find that you have to keep removing wood along the entire rear surface to move the plate forward to close the gap.
By the way, I cut this shoulder with a razor sharp 1 inch wide chisel.
Speaking of chisels, now is a good time to use one to get rid of most of the wood along the comb from the rear to the shoulder we just talked about.
DO notice how it cuts while doing this. If it is cutting smoothly your in business but if the wood breaks out leaving a rough surface, it is trying to tell you that your going against the grain so you should not use that method any more. Switch to cross grain cutting, or better yet use a course double cut file (not a rasp). Failure to listen to the wood will result in large breakouts and tares in the wood.
In the photo, notice that the fit is getting there but more needs to be done. Remove the wood with the marks on it but do not remove any wood that is unmarked.
After removing the marked wood, re-blacken the plate and repeat until the fit is almost complete.
NOTE: Castings are usually warped. When you get to the point where it almost fits on one side but there is a large gap on the other, hold it tightly in the proper place and WHACK the raised area with your mallet. Do this several times and the plate will bend to almost match the wood shape. There is a little spring back which prevents your pounding it for an exact fit. By the way, DON'T use this method on thin sheet metal style buttplates as it will look terrible forever and the only way to fix it is to buy a new sheetmetal buttplate.
NOTE: If your a perfectionest you will spend the next 2 months doing this until it fits exactly everywhere at once! I choose to use a more realistic approach.
A piece of paper is about .002-.003 thick. (about one hair thick). If the gap between the metal and the wood won't allow a piece of paper into it, I say it is good enough. This is why there are places on the wood which are not blackened but I decided to stop here.
One piece of paper will not fit anywhere between the metal and the wood! WORKS FOR ME!
With the buttplate installed, it doesn't match the stock shape!
If this happens (and it will) file the metal down to match the wood. If the wood sticks out, sand it down to the metal.
I'm leaving the wood on the left side, proud of the buttplate to provide material for some raised carving. I will finish the stock down to match the buttplate later.
The overhang doesn't show well but the light file mark on the wood was made with the file touching the wood and the metal at the same time.
This side is filed totally flush.
Installing the screws. The location is up to you, but it is best to look at photos of originals to know where to put them.
A word about the lower hole location:
Although some old guns have the lower butt plate screw located close to the lower end of the buttplate you will find that a lot of these same old guns have cracks because of it.
The screw should be perpendicular (normal) to the surface of the butt plate and this often points it down towards the belly or toe of the stock. If you move it up so it is at least 1 1/4 (1/3/8 is better) from the toe (bottom) of the buttplate it will still hold the plate tight against the wood but it won't overstress and crack the wood.
After laying out the location with scribed lines, center punch the metal to guide the drill.
NOTE! The drill has a mind of it's own and won't like your location, so you will have to train it.
I advise either drilling the centerpunched dent with a 1/16 dia drill first (it won't walk out of the dimple as easily), or bringing the drill down into the dimple and rotating it by hand while applying light pressure. This will make the dimple into a larger pocket and will keep the drill bit from walking when you start actually drilling.
To get a good alignment of the hole in the buttplate and the threaded hole in the wood, first measure the minor diameter of the screw (B in the photo). This is the size you want to drill thru the buttplate.
Then locate the buttplate on the stock and use this hole as a drill guide to drill the wood.
NOTE: When working with ANY gunstock wood you should pre drill the holes for the screws. If you just screw the screw into the wood without pre-drilling it will never be in the right place. It will also create so much pressure inside the wood that the stock may split. It is also just about impossible to do without tearing the head off of the screw.
After drilling the wood, the hole in the buttplate can be enlarged to fit the screw dia A. It can then be countersunk to diameter C.
Note the comment about the countersink in the screw photo. If you remove a little extra metal on the side AWAY from the direction you want the buttplate to move, when you install the screw the tapered underside of the screw head will cause the metal to want to move. This will keep the forward joint tight. Don't overdo this though or the screw head will never look centered in the hole.
When screwing the screw in for the first time, lubricate the entire threaded area with bees wax or bar type hand soap. You will be glad you did!
Happy building!!
")
