• This community needs YOUR help today. We rely 100% on Supporting Memberships to fund our efforts. With the ever increasing fees of everything, we need help. We need more Supporting Members, today. Please invest back into this community. I will ship a few decals too in addition to all the account perks you get.


    Sign up here: https://www.muzzleloadingforum.com/account/upgrades
  • Friends, our 2nd Amendment rights are always under attack and the NRA has been a constant for decades in helping fight that fight.

    We have partnered with the NRA to offer you a discount on membership and Muzzleloading Forum gets a small percentage too of each membership, so you are supporting both the NRA and us.

    Use this link to sign up please; https://membership.nra.org/recruiters/join/XR045103

Wow, This is Ugly

Muzzleloading Forum

Help Support Muzzleloading Forum:

This site may earn a commission from merchant affiliate links, including eBay, Amazon, and others.

Cosmoline

40 Cal.
Joined
Apr 7, 2008
Messages
420
Reaction score
0
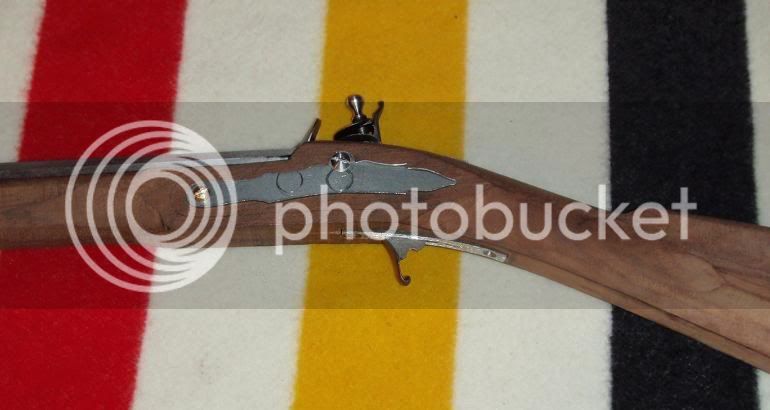
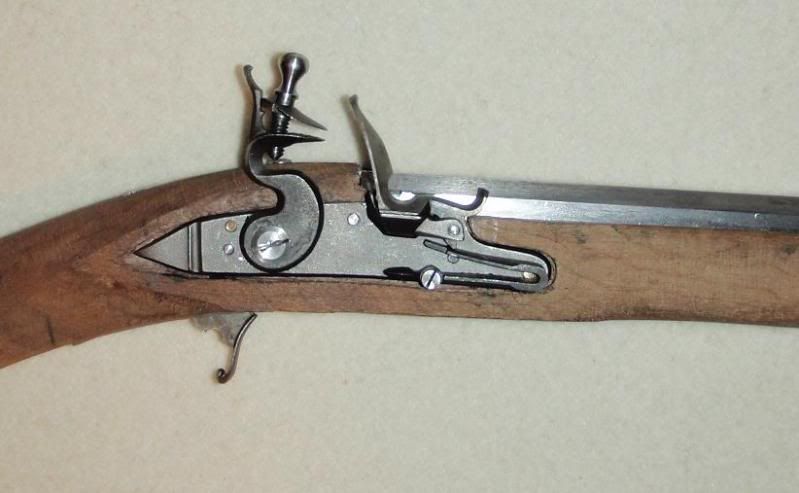
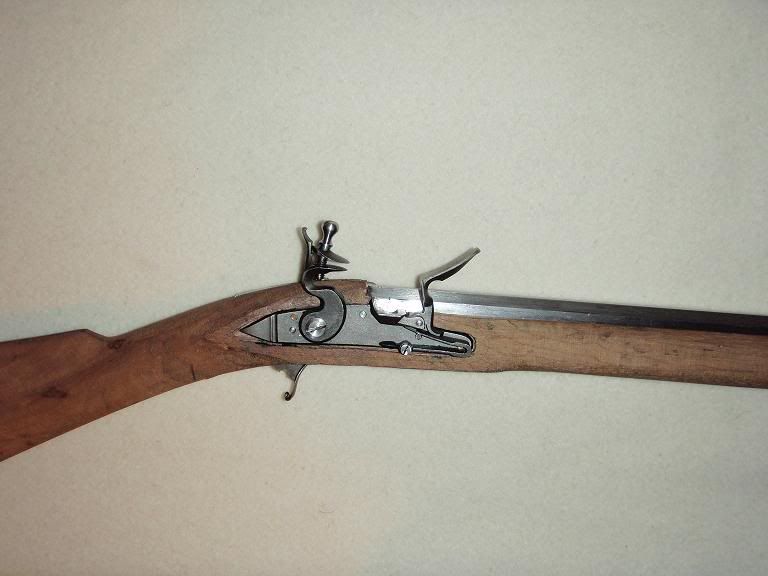
I'm wrapping up the initial work on my first-time build--a flintlock smooth rifle from Sitting Fox. I intentionally ordered a lower-grade stock because I knew I'd mess it up. It's been a real steep learning curve. Getting the holes in the lock plate located, drilled and tapped for the receiver screws (or whatever they're called) turned out to be exceptionally tricky for me, but in the end it's all there and it works. I'm drilling the touch hole tonight.

All along this site has been invaluable, so thanks to all those who have posted their prior problems. But I can't say I'm too happy with my stock work. It all fits, and it's nice and tight, but man is it ugly. I over-chiseled all around the parts, and kept doing it even after I thought I had corrected the problem. I finally figured out I need to make these cuts smaller than the etched diameter and sand or carefully scrape my way into them, rather than coming in with the chisels.

In the end I will end up with a very rough looking flintlock, but I suppose that's realistic since I was going for the meat bag look with this thing. Anyway NEXT time I'll know better. There's no substitute for getting in and actually doing it.

I've also learned my lesson about having the shop pre-inlet the lock. They had it in a spot that didn't jibe with the barrel, so I had to back it up and rearrange it. Barrel locates the lock, so until the barrel is in nothing should be cut for the lock, at least that's how I understand it now.
 
I'd be real proud of that rifle, Coz. I'm betting you'll shoot it lots and it will be your first choice for hunting. Build a fancy one for the fashion shows, but your first will be your constant companion when the going gets tough.

Yeah, I've got some fancy guns but they're only slightly better than safe queens. Call em range roosters. They're perty on the range, but they don't get to go on my hunting trips.
 
I'm not sure my ego could take the pain of actually showing this beast to the world. The plus side is the gaps around the lock are so wide I could quite easily fill them with a strip of wood inlay. Which is prob. what I'll do before I get around to the sandpaper stage.
 
If the lock is Preinlet, you have to move the barrel to where it needs to be to match up with the lock. If this cannot be done, you send the stock back for a replacement as it is defective.......

On a stock with a preinlet barrel & Preinlet lock, you Always inlet the lock 90% of the way first. Then you move the barrel where it has to go to relate to the vent liner/pan, etc.

EVERY single preinlet I have built I have had to move the barrel to the lock & probably on at least 25+ of them, I had to move the barrel back. I expect to have to do that on any precarve.

If the barrel is inlet & the lock not preinlet, then you inlet the lock to the barrel & put the Lock where it needs to be.

If you are scratch building, you do the barrel inlet first.

:thumbsup:
 
But how can you move the barrel forward without losing the wood contact with the back of the breachplug?

Next time I'm just going to get a stock with the barrel channel cut and do the rest to my own liking.
 
My first attempt at building a LR was a scratch build in 1977 and the stock was so ugly and had so many flaws that one night it became kindling. The second was also a scratch build using the same parts and it is presently my squirrel rifle. Just keep at it, slow down, read and re-read some good "how to" books and lo and behold you've built a MLer that you can be proud of....Fred
 
I've also learned my lesson about having the shop pre-inlet the lock. They had it in a spot that didn't jibe with the barrel, so I had to back it up and rearrange it. Barrel locates the lock, so until the barrel is in nothing should be cut for the lock, at least that's how I understand it now.

Sounds like the whole project was worth it :grin:

I did a hawken pistol precarve build as my first parts build, made many mistakes and still ended up with a serviceable weapon. I probably spent close to the same amount of time as a rifle, but I knew I would screw up and didn't want to junk $800 worth of parts.

I would recommend that if you are using a pre-carve that you don't have the barrel/breech plug inletted. Have the barrel channel cut and thats it.

On my PR TN Mt walnut rifle I'm trying to finish up, the barrel channel was cut, but the barrel was not "inletted". I also opted not to have the lock pre-inlet. The breech end of the barrel channel was left rounded from the channel cutter, so I had to inlet the breech plug and finish inletting the barrel. I had to move the barrel back back a bit to make sure I would be able to inlet the lock plate in decent location. Having the barrel channel only cut out gave me a lot more flexibility. Its a bit more work finishing the barrel inlet and inletting the breech plug, but I planned to bed the breech and about 4" of the breech end of the barrel anyway.
 
Cosmoline brings up a good question. If you have the barrel and the lock inlet and the lock seems to far forward ,what are you to do. Send the stock back or make due with what you have as long as the gun fires reliably. Allthough you wont know that until the gun is built and noone will then take the stock back. Just curious how to handle a problem like that.
 
All is not lost ...do not be long in the tooth..
If ya hafta move yer barrel forward;
Accra-glass is a good item to replace
that wood in the rear area..
Gunsmiths use it to "float" barrels, etc.it will take up the slack..
I really want a good fit in the back - don't need the barrel decoratin' my ugly mug..
I've used sawdust mixed with glue to hide
mess-ups; and I'm famous for lottsa goofs !!
Also used tooth picks for mis-drilled barrel
pin lug holes..
Ya would be surprized what a little repair; sanding and staining can do --
If the gun looks good; well then that's nice-
But if the gun shoots safe that's the most important thing !
Yer already ahead of the lernin' curve ..
 
Cosmoline said:
But how can you move the barrel forward without losing the wood contact with the back of the breachplug?

If the barrel was too far back for the lock, you should have sent the stock back. :hmm: Normally it is the other way around, the barrel is not back far enough.
 
fort fireman said:
Cosmoline brings up a good question. If you have the barrel and the lock inlet and the lock seems to far forward ,what are you to do. Send the stock back or make due with what you have as long as the gun fires reliably. Allthough you wont know that until the gun is built and noone will then take the stock back. Just curious how to handle a problem like that.

You should mark the middle of the flashpan. Put the barrel in the barrel inlet. Put a RR in the barrel to the B/Plug & mark the RR at the muzzle. Now lay the RR along the barrel aligning the RR mark & now mark the face of the breechplug on the barrel flat where the vent liner goes.. So now you know where the face of the breechplug is.
Lay a vent liner on the barrel flat you just marked & go about 1/16" in front of the breech face. (IF that is how you want it) Now mark the center of the vent liner on the barrel. Now align that mark to your flashpan center........

That will tell you if the barrel has to go Up, Down, Fore or Aft in the stock.

All of that being said.............. It is your first rifle. It is SUPPOSED to be ugly........ Were it me, I would chalk it up to experience & go on....... Get a box of Accraglass & fill in the screwups, reinlet or bed the parts, stain it almost black & go have fun with it. Or..... you can buy another stock & start over....... Or shoot it a while & this winter work it over with a new stock. So you messed it up a lil.... No Biggie...... Hell I have messed them up, got ****** off, cut them in half on a band saw & tossed them in the fireplace !! :rotf: :rotf: :haha:
It's just a piece of wood & there is ALLOT of wood out there. :wink:
 
Hey to Birddog6 -
Did I ever tell ya bout the time I got a whiz-bang brain-fart idea?
I figgered if I put a little dishwashing soap in with my windsheild wiperfluid; why that would be wonderous!
Ya shoulda seen the look on the guy's face in my rear view mirror as the bubbles flew .. :rotf: :youcrazy:
That Tenn. gun is awesome- bet there was some swear n' prayer inletting that tang ...
Have a goodin' -
Don't forget to "Save The Naugas" -They're making seat covers outta em ya know - NAUGAhides!!!.. :blah:
Limpin'frog
 
The good news is I must have done the trigger right because it's very smooth. I've decided to run a strip of wood along the bottom of the lock and around the sides as "decoration" to cover the gap. Yes it's cockeyed a little, but it seems to work fine and it's real solid. The lock throws a nice shower of sparks. I must admit in spite of the difficulties, the black on my fingers and the shed blood, seeing a lock you installed on a firearm you put together is a new sensation for me. I'm no stranger to firearms, but this is something different. It should be operational by the weekend and I do intend to burn some powder in it.

My C-Clamp dents should come out when I polish that piece up. I didn't realize it was doing that till after I'd drilled the holes. My primary concern was lining everything up just right--a surprisingly tricky maneuver.

It will hopefully work for its intended purpose--a rustic "poor boy" style meat bag smooth rifle. For loading with shot, ball, slugs or whatever. The barrel is nice. And I can always get a new stock eventually if the spirit moves.

Uglystick3.jpg


Uglystick2.jpg


Uglystick1.jpg
 
It's not that bad & not nearly as bad as you made it to be. Looks like ya got a lil heavy with the C clamps. Clean 'er up & finish it & go shoot it !

:thumbsup:
 
Doesn't look to me like the barrel is back too far. If anything, the barrel is too high at the breech area. Is you vent liner centered on the flat ? Looks like the vent liner is going to be on the edge of the flat ? :hmm:
 
You know, that's really not bad. I don't know that my first build was much better, if any. I know that it's easy to get upset with yourself when things aren't perfect, especially when all the examples you've handled were built by pros and were perfect. But yours looks good, and I'm sure once your file, scrape, sand, etc. to the finished dimensions and everything, it will look wonderful.
 
Back
Top