


Thanks for all of your input. Do you have suggestions on brown bess building books that provide real practical insights?1. Really this is above my pay grade.
I do believe that Besses have flats on both sides of the barrel. This helps with stock architecture.
If the barrel has no flats it must be faced for the lock. This is critical. Miss-filed .... it could be a disaster. The Bess has a large barrel with a larger face so it’s a little more forgiving but still, this is critical.
The barrel needs to be in final profile before any inlet is started.
2. You do not lube breech threads.
This is file and fit file and fit.....
This is covered in the “building books”.
3. Some builders inlet the plug and barrel together as a time saving measure.
I recommend that the barrel be “profiled” to final dimensions inlet, plug installed and the the plug cut in after the barrel is inlet.
1. Most plugs do have a taper wide at the tang, narrow at the bottom. If it’s perfectly straight, it’s a good idea to file a slight draft where it’s wider at the tang so as it goes down it fills the inlet.
2. It depends on how thick the plug is and the bend of the stock.
A thick plug can be left nearly straight and filed to shape.
Most will require a little bend and filing.
Some will thin a thick plug and bend it....
This gets into preference.
This is covered in the building books.
One trick is to take the curve out of the bolster under the tang. Make this a 90 degree. It aids in inleting and helps bending the tang.
4. Above my pay grade.....
The barrel needs to be in final profile before it’s inlet....
Same for the lock in my opinion.
This is critical.
5. This is a basic step in gun building.
There drill press jigs for this
There’s jigs available for hand drills
Some will eyeball it with a hand drill.
This is covered in the building books.
Yes, the rear lock bolt usually goes through the bolster. The bolster will need to be drilled through or notched.
This really is best done out of the stock. The bolster can be “marked” in the stock, then drilled through or notched out of the stock.
6. Personally I put my lugs in well into the build after the barrel, lock and triggers....
You’ll need to find the info on spacing by study....
-
This community needs YOUR help today. We rely 100% on Supporting Memberships to fund our efforts. With the ever increasing fees of everything, we need help. We need more Supporting Members, today. Please invest back into this community. I will ship a few decals too in addition to all the account perks you get.

Sign up here: https://www.muzzleloadingforum.com/account/upgrades -
Friends, our 2nd Amendment rights are always under attack and the NRA has been a constant for decades in helping fight that fight.
We have partnered with the NRA to offer you a discount on membership and Muzzleloading Forum gets a small percentage too of each membership, so you are supporting both the NRA and us.
Use this link to sign up please; https://membership.nra.org/recruiters/join/XR045103
You are using an out of date browser. It may not display this or other websites correctly.
You should upgrade or use an alternative browser.
You should upgrade or use an alternative browser.
My 1756 Long Land Pattern Kit - TRS
- Thread starter patrickhatton
- Start date
Help Support Muzzleloading Forum:
This site may earn a commission from merchant affiliate
links, including eBay, Amazon, and others.
rich pierce
70 Cal.
Regarding filing a flat on both sides of the barrel- a lot will depend on the barrrl inlet they did. If it’s wide and you narrow the barrel, you’ll have a gap.
- Joined
- Jul 5, 2012
- Messages
- 1,860
- Reaction score
- 2,929
A number of years ago, before the move TRS was switching to making their own barrels. Odds are it's one of theirs.So to start, I believe that the barrel and breach plug are in very good condition. Not sure where TRS gets them but the fit looks really good and no adjustment needed as to the plug length or breach.
54ball
62 Cal.
- Joined
- Aug 23, 2004
- Messages
- 3,117
- Reaction score
- 1,018
The books I was referring to are the Kentucky Rifle building books.Thanks for all of your input. Do you have suggestions on brown bess building books that provide real practical insights?
Recreating the American Longrifle
The Gunsmith of Grenville County
The Art of the Pennsylvania Longrifle (Dixon’s book)
While not specific to the Bess they give the foundation and basic steps that will help any new builder.
That is my worry. I think I am going to stick with a single face towards the pan.Regarding filing a flat on both sides of the barrel- a lot will depend on the barrrl inlet they did. If it’s wide and you narrow the barrel, you’ll have a gap.
Thanks I will check them out!The books I was referring to are the Kentucky Rifle building books.
Recreating the American Longrifle
The Gunsmith of Grenville County
The Art of the Pennsylvania Longrifle (Dixon’s book)
While not specific to the Bess they give the foundation and basic steps that will help any new builder.
- Joined
- Nov 26, 2005
- Messages
- 5,018
- Reaction score
- 9,972
Hi,
Just flatten the side facing the lock and don't go over board. Just enough flat so the entire lock bolster fits tightly against a flat on the barrel. Also, on original Besses, the decorative rings at the breech were hand filed just across the top 1/3 of the barrel. So, it is useful to file off the rings on your barrel both underneath and up the sides, which makes fitting the breech into the stock easier. Your barrel should fit nicely into the stock once you get rid of the closed muzzle end of the channel and clean up the rounded corners at the breech. Then you need to determine if the barrel has to move back a little and down. Make sure the breech plug is removed and measure the depth of the threads. Mark that depth on the flat of the barrel. You want your vent hole to be 1/16"-1/8" in front of the face of the plug. So fit the barrel first, then put the lock plate against its mortise to see if the end of the plug, your mark, is just behind the center of the pan. I predict if you position the lock plate as far forward in its mortise as you can without creating any gaps around the plate, you will be fine with its position. However, the barrel may have to be moved backward 1/16". Don't fret about, just cut the back of the breech in the stock to allow the barrel to move backward. You are not going to create any appreciable gaps along the sides when you do that. The top of the pan should bisect your mark for the vent hole or the hole can be a little lower in the pan. Original Besses usually have the hole just below the top of the pan. Your vent hole does not have to be centered on the flat you filed. It can be lower than center if needed. A problem with many TRS profiled stocks is they rout the raised apron around the barrel tang and it sits up too high. I usually want to bury my barrel tang deeper in the stock so I can lower the top of the apron and make it more authentic. That often means burying the barrel a little deeper in the channel but because the lock is already partially inlet, you don't have much room to maneuver without burying the vent hole deep in the pan.
These parts sets are not good "kits" for novice gun makers and to make an authentic Bess you really need to examine the original guns up close. You do not get a proper sense of scale from photos in any of the books including Goldstein and Mowbray.
dave
sportster73hp
45 Cal.
- Joined
- Jan 16, 2020
- Messages
- 876
- Reaction score
- 648
I built a TRS 1769 bess. Flattened only one side for the lock, bent the tang down then filed it. TRS was still building locks at that time so I payed them to do mine.
Used a full scale drawing to locate pins, ramrod thimbles, and cut stock to length.
I also purchased the books Dave suggested even before he said to do so. Much experience with him.
Used a full scale drawing to locate pins, ramrod thimbles, and cut stock to length.
I also purchased the books Dave suggested even before he said to do so. Much experience with him.
- Joined
- Jul 5, 2012
- Messages
- 1,860
- Reaction score
- 2,929
Just got my TRS kit, a little more involved than a bess though.

- Joined
- Nov 26, 2005
- Messages
- 5,018
- Reaction score
- 9,972
Hi Commodore,
I've built 3 of those. Here is a link that might help you.
https://www.muzzleloadingforum.com/...uson-rifle-from-rifle-shoppe-part-set.160115/
They can be a challenge to get right if you've not examined the original ordnance rifles but my thread above provides a lot of the details. Fortunately, I've had that privilege to examine the Morristown gun and it really helps.
Here is another I did.

dave
I've built 3 of those. Here is a link that might help you.
https://www.muzzleloadingforum.com/...uson-rifle-from-rifle-shoppe-part-set.160115/
They can be a challenge to get right if you've not examined the original ordnance rifles but my thread above provides a lot of the details. Fortunately, I've had that privilege to examine the Morristown gun and it really helps.
Here is another I did.
dave
Last edited:
- Joined
- Jul 5, 2012
- Messages
- 1,860
- Reaction score
- 2,929
This will be my second when I get to it.Hi Commodore,
I've built 3 of those. Here is a link that might help you.
https://www.muzzleloadingforum.com/...uson-rifle-from-rifle-shoppe-part-set.160115/
They can be a challenge to get right if you've not examined the original ordnance rifles.
dave
Clark Badgett
40 Cal
On the question of the lock plate bow. You will need to straighten it. It usually doesn’t take much effort to do so. This is fairly common on the longer lock plates in kits.First of all, thanks to all for your comments and insights. Greatly appreciated.
Ok. So I believe pictures can explain better than a thousand words so here I go. Please ignore the barrel not being clean yet at the time of these pictures. I had to remove the tape adhesive. Also you may see some chalk residue that I was using before receiving the Prussian blue.
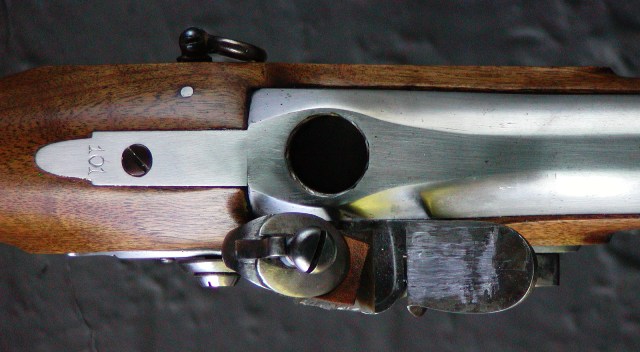
So to start, I believe that the barrel and breach plug are in very good condition. Not sure where TRS gets them but the fit looks really good and no adjustment needed as to the plug length or breach. The angle under the tang is already at 90 degrees and I don't see no adjustment there:
View attachment 275155
I have also noticed that the tang already has a taper almost mid section towards the back, so maybe in the end there will be no bending required but just some filing towards the back and overall.
View attachment 275157
The back of the breach bolster is straight. I am good with that, but I did see on some rifle building videos that sometimes it is tapered inwards towards the bottom. This complicates inletting but was wondering if it is necessary or historically correct. I do not want to cause me additional work for nothing. I'm glad to keep it straight if there isn't a real benefit in tampering it; even because that feels like a complicated filing operation.
View attachment 275158
The plug screws in very nicely and tight. In the pictures I have just slightly tighten them by hand to see the fit.
The funny part is that this thread has already confirmed my reading experience around breach plug installation and lubrification. I have one response saying that you need anti-seize lub like Copper grease, and another saying that no lub is used (1-1) it's a tie. I am willing to use the lub as long as it does not impede performance or powder igniting towards the breach face. Funny how you find multiple posts on how to remove a breach plug but not on how to install it! Including if to set hand tight or use major torque.
View attachment 275159
View attachment 275160
View attachment 275161
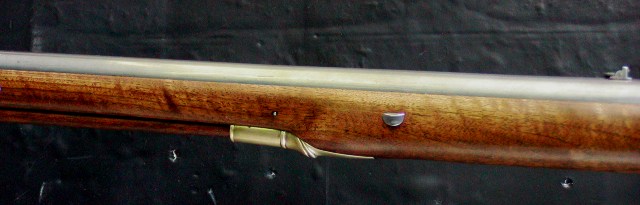
Of course the barrel needs inletting. Out of the box it looks like this.
View attachment 275162
View attachment 275163
Now my question about the facing of the barrel to accommodate the lock pan was if I needed to face even the opposite side. From pictures of originals it is not clear. However looking at how the barrel fits tight on the other side I am not sure the stock will support facing the other side and besides doesn't seem useful as it would apparently serve no purpose at least one I would not know.
View attachment 275164
Of course the first step is to inlet the barrel but if I had to face the other side I would have to do it previously to follow the barrel profile. I may be hitting a dead horse here as an argument. However, of course the breach plug needs complete inletting.
And finally a question about the lock plate. I think it needs straightening. Is it normal that it bends out slightly? It does tend to rock back and forth when inletting. I put the back side of the plate against a file to try to show how strait it is. If I do need to straighten this do I do it cold or does it need heating of some time?
View attachment 275167
I am taking this slow and pondering decisions based on the info that I can collect from you guys. Also, I am waiting on a few other tools to come in so I use the right tool for the job!
Thanks to all for your precious insights!
Thanks Dave! Lot's of great helpful details here. I will start this process soon.Hi,
Just flatten the side facing the lock and don't go over board. Just enough flat so the entire lock bolster fits tightly against a flat on the barrel. Also, on original Besses, the decorative rings at the breech were hand filed just across the top 1/3 of the barrel. So, it is useful to file off the rings on your barrel both underneath and up the sides, which makes fitting the breech into the stock easier. Your barrel should fit nicely into the stock once you get rid of the closed muzzle end of the channel and clean up the rounded corners at the breech. Then you need to determine if the barrel has to move back a little and down. Make sure the breech plug is removed and measure the depth of the threads. Mark that depth on the flat of the barrel. You want your vent hole to be 1/16"-1/8" in front of the face of the plug. So fit the barrel first, then put the lock plate against its mortise to see if the end of the plug, your mark, is just behind the center of the pan. I predict if you position the lock plate as far forward in its mortise as you can without creating any gaps around the plate, you will be fine with its position. However, the barrel may have to be moved backward 1/16". Don't fret about, just cut the back of the breech in the stock to allow the barrel to move backward. You are not going to create any appreciable gaps along the sides when you do that. The top of the pan should bisect your mark for the vent hole or the hole can be a little lower in the pan. Original Besses usually have the hole just below the top of the pan. Your vent hole does not have to be centered on the flat you filed. It can be lower than center if needed. A problem with many TRS profiled stocks is they rout the raised apron around the barrel tang and it sits up too high. I usually want to bury my barrel tang deeper in the stock so I can lower the top of the apron and make it more authentic. That often means burying the barrel a little deeper in the channel but because the lock is already partially inlet, you don't have much room to maneuver without burying the vent hole deep in the pan.
These parts sets are not good "kits" for novice gun makers and to make an authentic Bess you really need to examine the original guns up close. You do not get a proper sense of scale from photos in any of the books including Goldstein and Mowbray.
dave
Not to get ahead of me here, but just for info collection when I will reach that step, I was wondering if you had distances for lug positions on the barrel and thimbles. I did see you provided these distances in other posts but they were for the Short Land Pattern. I do have the Ravenshier's brown bess plans, maybe I can use those.
I do realize that this is an advance kit and with time I am pondering which parts I can do and which I may outsource to experts. I also would like to find places where I may have access to originals in Maryland. I did visit Williamsburg a few times and saw what I think are muskets hanging on the Governor's palace walls; but I believe those are reproductions and anyhow not manually accessible to the public. Each time I tried to visit the gunsmith shop it was closed! I need to do some research.
Clark Badgett
40 Cal
Per De Witt Bailey the barrel lugs are 11 15/16”, 20 15/16” & 39 13/16” from the breech, the swivel lug is 31 13/16” from the same.Thanks Dave! Lot's of great helpful details here. I will start this process soon.
Not to get ahead of me here, but just for info collection when I will reach that step, I was wondering if you had distances for lug positions on the barrel and thimbles. I did see you provided these distances in other posts but they were for the Short Land Pattern. I do have the Ravenshier's brown bess plans, maybe I can use those.
I do realize that this is an advance kit and with time I am pondering which parts I can do and which I may outsource to experts. I also would like to find places where I may have access to originals in Maryland. I did visit Williamsburg a few times and saw what I think are muskets hanging on the Governor's palace walls; but I believe those are reproductions and anyhow not manually accessible to the public. Each time I tried to visit the gunsmith shop it was closed! I need to do some research.
Actually scrape that Dave. I received in the mail today "Pattern Dates for British Ordinance Small Arms" by Bailey that I saw you mention in one of your posts and found all of the distances I was requesting. This book seems to contain lots of great details.Thanks Dave! Lot's of great helpful details here. I will start this process soon.
Not to get ahead of me here, but just for info collection when I will reach that step, I was wondering if you had distances for lug positions on the barrel and thimbles. I did see you provided these distances in other posts but they were for the Short Land Pattern. I do have the Ravenshier's brown bess plans, maybe I can use those.
I do realize that this is an advance kit and with time I am pondering which parts I can do and which I may outsource to experts. I also would like to find places where I may have access to originals in Maryland. I did visit Williamsburg a few times and saw what I think are muskets hanging on the Governor's palace walls; but I believe those are reproductions and anyhow not manually accessible to the public. Each time I tried to visit the gunsmith shop it was closed! I need to do some research.
- Joined
- Nov 1, 2018
- Messages
- 3,224
- Reaction score
- 2,285
Hello,
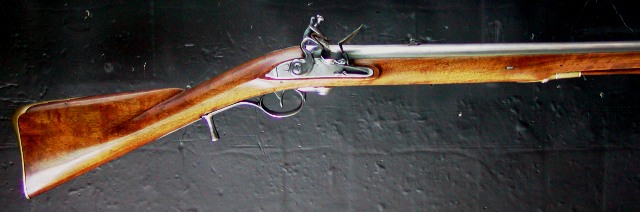
This is my first post in these forums, and I am a novice with BB and flintlocks. I have always wanted to own a realistic reproduction and did some research. I ultimately decided to go with what I could understand being the most historically accurate kit out there which is the one from The Rifle Shop. I was lucky because they had the 1756 pattern in stock and received it in 2 weeks! Now that being said I have been spending much time reading, looking at videos and ordering tools! Again, I am a novice at this, and you may be wondering why did I purchase such a kit which seems a little more involved than other options? No worries I ask myself the same question! I must also add that I have purchased the entire set of Kit Ravenshear's books and the good old Brown Bess book for reference. I also bought the Ravenshear's Brown Bess plans which should be full size but did not validate that yet.
That being said, I am in no hurry and intend to take this build one step at the time and learn as I go along.
The major worry I had with this kit was the lock assembly and as you probably already know, TRS does not do assemblies at the moment. They did say that they could have heat treated the lock pieces for me and drill the lock plate for the correct geometry. That is a great help, but they also mentioned that I needed first to:
- Inlet the barrel
- Inlet the lock plate with screws including facing the lock.
Now at first, I thought "not too bad", but then I started to think about all of the things that need to be done in order to reach this point.
From what I can figure out I need to do the following more or less in order:
Guys I know this is a lot of details I am requesting but as you most certainly already know this is just a few steps in the beginning!
- Inlet the barrel without the breech plug. This is throwing me off a little because I would assume "facing the lock" would have an impact on the inletting of the barrel. So do I face the lock beforehand? Also do you straighten the barrel on both sides or just on the lock side. Looking at pictures of the originals it seems as if the barrel was faced on both sides (Or maybe my eyes are pulling a trick on me!).
- Install the breech plug. This seems simple but I yet have to run by a definitive answer about lubricating the plug. How do you install the breech plug? Do you use an anti-seize like blue. I saw a video of one guy building a rifle and used Copper grease so I bought that. But it would be great to know what you guys used on a Brown Bess kit to fix the plug.
- Inlet the barrel with the breech plug. Kind of straight forward if you can get it right. However, I do have a couple of questions:
- Is there any tapering (filing) that needs to be applied to the bolster or do I just leave it straight?
- Do you bend the tang do the curvature of the stock like I have seen done on rifles or do you keep it straight and then just file the excess at the end of the tang. The Brown Bess book seems to show fairly deeply filed tangs. Uncertain if they were bent.
- Face the lock. This one is tricky. do you start at the breech and straighten forward? Is there a measurement of how long the facing needs to be? Or is this just "enough" to allow for the pan to fit straight against the barrel?
- Drill the holes for the lock plate. This means through the plate, wood, and what I did not realize initially also through the breech plug bolster!!
- Solder the barrel lugs. Not sure this is necessary for the initial step but at some point I will need to solder the bottom lugs. Does anyone know at which distances from the breech for the 1756 pattern?
I would greatly appreciate it if you could provide me with any information that could help my journey. If this is productive I will update you on this thread as the project proceeds.
Thanks,
Patrick
A 1756 lock I assembled for my own 1756 kit. Internal parts are hardened and tempered, frizzen is case hardened.
The other parts , plate, cock and jaw i eventually will harden after the musket is assembled.
My plate was not warped much, I heated it placed it a vise with aluminum jaws, it straightened out well
I viewed a few original 1756s, some 1756s had A larger frizzen spring, some had a hole in the bottom jaw to grip the lead. A few with a pierced jaw screw, most with a taller fatter V notched jaw screw.
Attachments
-
 623FD33D-389F-48E6-BF80-3336D092AC59.jpeg2.1 MB · Views: 0
 -
 CF557741-07CF-42C2-9C72-A352A39C69B5.jpeg1.9 MB · Views: 0
 -
 78C95BB6-50AE-4975-B67D-30E9C3AFCA15.jpeg1.7 MB · Views: 0
 -
 C236E494-2732-4BFB-B61C-E7A5434E8262.jpeg1.7 MB · Views: 0
 -
 7A0E3E7C-2C46-4E30-9A01-E6DB12D5E821.jpeg1.9 MB · Views: 0
 -
 1F2BC93D-DF91-41FF-A471-7F315BC9796E.jpeg1.7 MB · Views: 0


Last edited:
- Joined
- Nov 1, 2018
- Messages
- 3,224
- Reaction score
- 2,285
Regarding filing a flat on both sides of the barrel- a lot will depend on the barrrl inlet they did. If it’s wide and you narrow the barrel, you’ll have a gap.
For flats on round barrels I start with a smooth file and finish with a sanding plane and check with a machinist level and layout blue.
Thanks Nick. Out of curiosity how did you find the holes for the internal components with the right geometry? Did you follow the procedure that Ravenshear writes in his booklet? TRS has a gig for these locks.A 1756 lock I assembled for my own 1756 kit. Internal parts are hardened and tempered, frizzen is case hardened.
The other parts , plate, cock and jaw i eventually will harden after the musket is assembled.
My plate was not warped much, I heated it placed it a vise with aluminum jaws, it straightened out well
I viewed a few original 1756s, some 1756s had A larger frizzen spring, some had a hole in the bottom jaw to grip the lead. A few with a pierced jaw screw, most with a taller fatter V notched jaw screw.
- Joined
- Nov 1, 2018
- Messages
- 3,224
- Reaction score
- 2,285
Thanks Nick. Out of curiosity how did you find the holes for the internal components with the right geometry? Did you follow the procedure that Ravenshear writes in his booklet? TRS has a gig for these locks.
Lots of practice, I’ve built 2 of these and other patterns.
Never used a jig.
I do the frizzen and frizzen spring to start.
For the internals I start with the sear screw location as it’s easily located.
Mark the tumbler location with the cock distance to the pan. Then place it with the sear, I try to get it as close as possible.
All of my marks are etched over layout blue.
After the tumbler is drilled The bridle is the toughest part. I turn around on the front of the plate with the sear screw as the locating mark. Then work forward, starting with the integral lug first.
I did learn a lot from Kit’s booklets yes, much of what i know is just from repetitious practice over and over.
Last edited:
- Joined
- Nov 1, 2018
- Messages
- 3,224
- Reaction score
- 2,285
That is my worry. I think I am going to stick with a single face towards the pan.
I only file one side of the barrel.
Similar threads
- Replies
- 77
- Views
- 4K
- Replies
- 22
- Views
- 825
- Locked
- Replies
- 2
- Views
- 556

Latest posts
-

-

-
-

-

-

-
1st Experiment with various forms of Tinder Fungus to fire Snap Locks
- Latest: Pukka Bundook
-

-

-