• This community needs YOUR help today. We rely 100% on Supporting Memberships to fund our efforts. With the ever increasing fees of everything, we need help. We need more Supporting Members, today. Please invest back into this community. I will ship a few decals too in addition to all the account perks you get.


    Sign up here: https://www.muzzleloadingforum.com/account/upgrades
  • Friends, our 2nd Amendment rights are always under attack and the NRA has been a constant for decades in helping fight that fight.

    We have partnered with the NRA to offer you a discount on membership and Muzzleloading Forum gets a small percentage too of each membership, so you are supporting both the NRA and us.

    Use this link to sign up please; https://membership.nra.org/recruiters/join/XR045103

Building a Ferguson Rifle from Rifle Shoppe Part Set

Muzzleloading Forum

Help Support Muzzleloading Forum:

This site may earn a commission from merchant affiliate links, including eBay, Amazon, and others.
Hi,
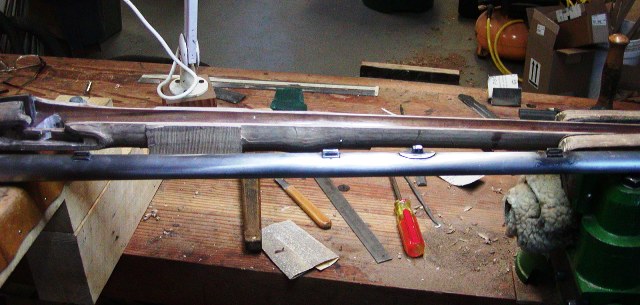
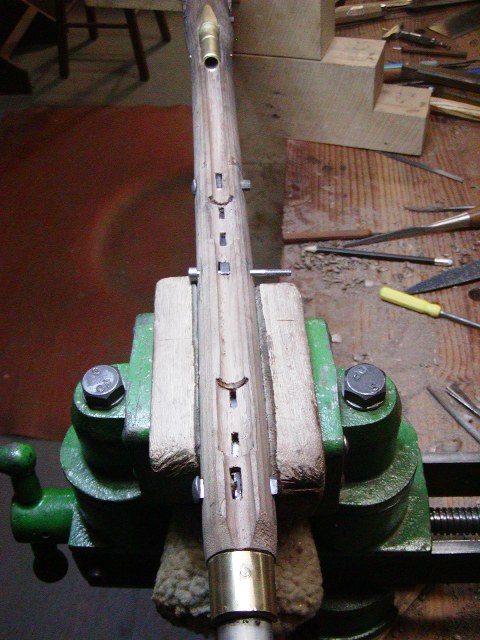
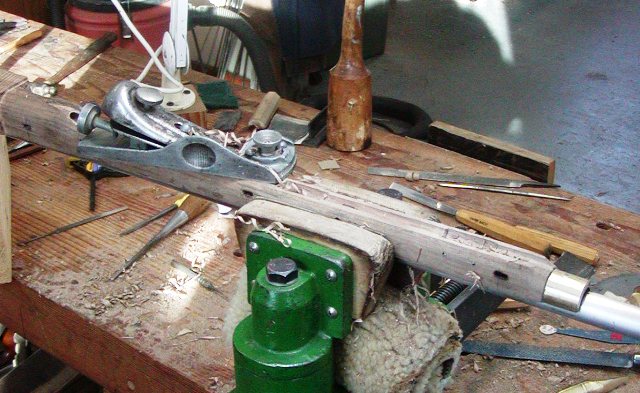
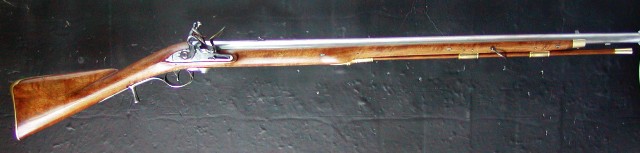
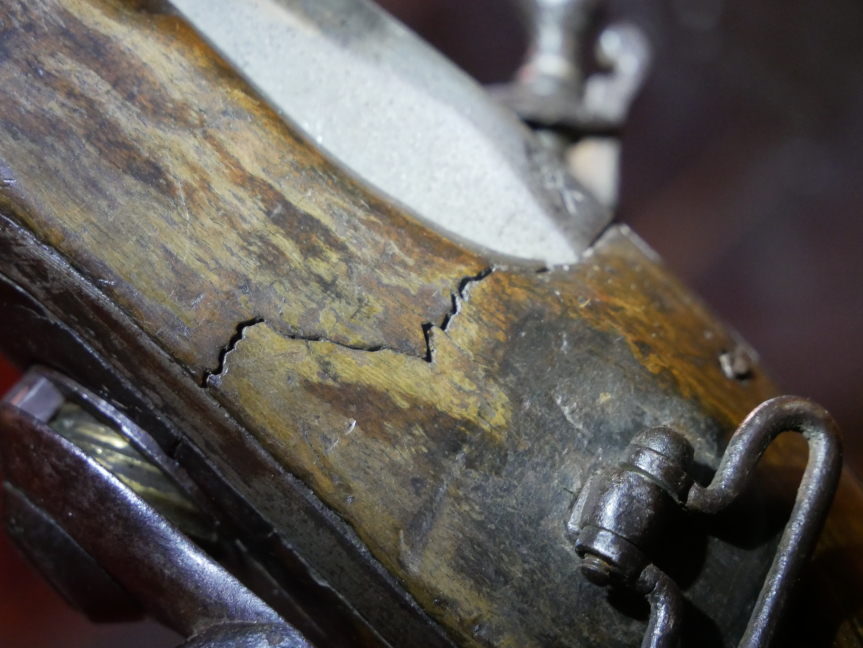
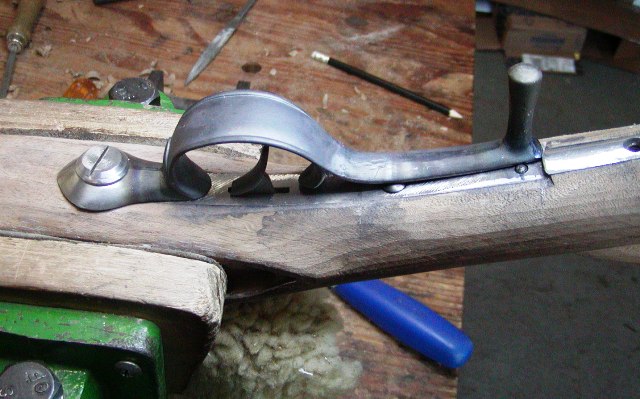
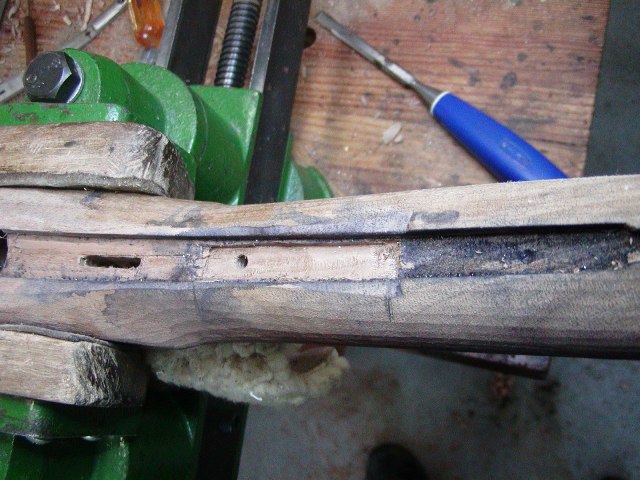
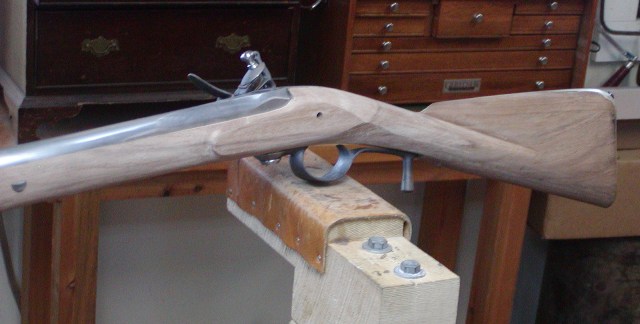
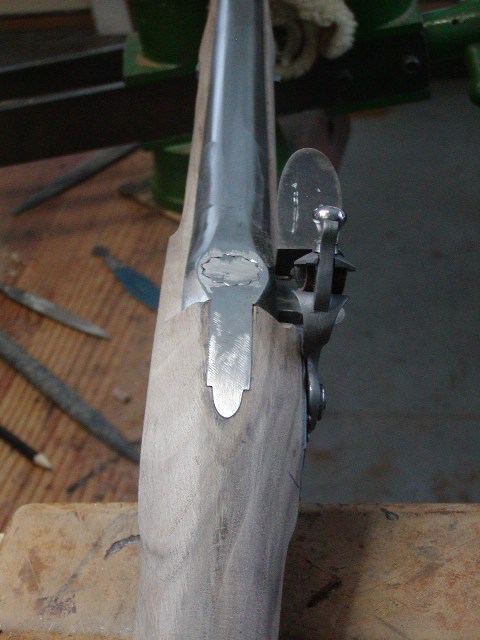
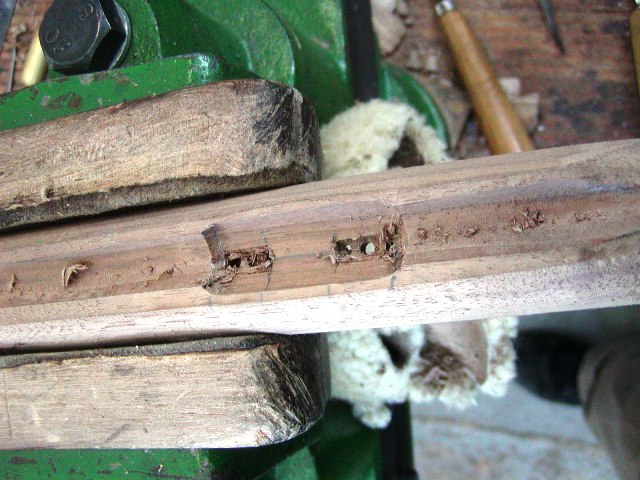
More done. I cleaned up a lot of the cast parts today. Kind of boring filing and grinding. However, I also installed the other ramrod pipes and the nose cap. Fortunately, the pipes are spaced on the stock properly. The front of the first pipe is 2 7/16" from the front of the nose cap. The front of the middle pipe is 8" and the front of the rear pipe is 15 3/4" from the front of the nose cap. These are measurement from the Morristown gun. The nose cap should be 4 3/8" from the muzzle of the barrel. That provides clearance for the bayonet, which should fit snugly on the barrel with up to 1/4" inch of barrel protruding beyond the socket. The socket is not flush with the muzzle. I will discuss that later, and how to properly fit a bayonet that is meant to function in battle rather than being a reenactor's prop.

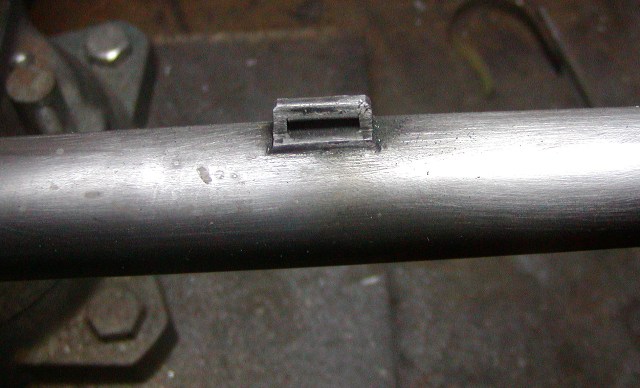
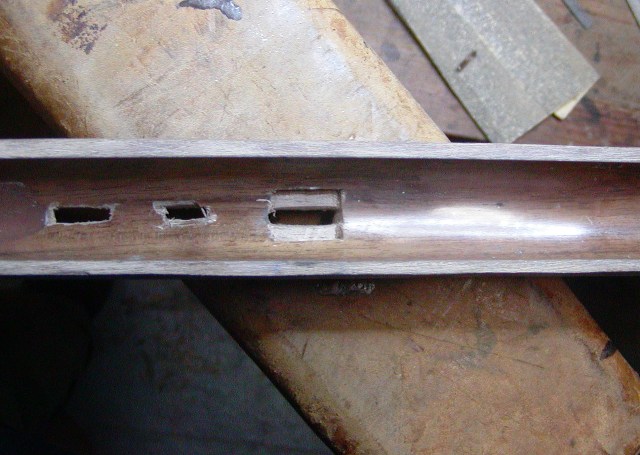
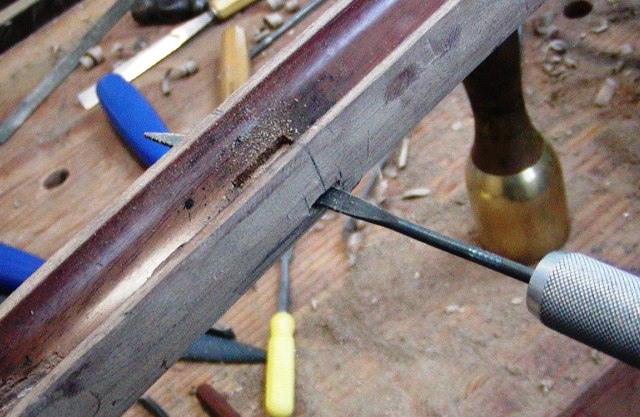
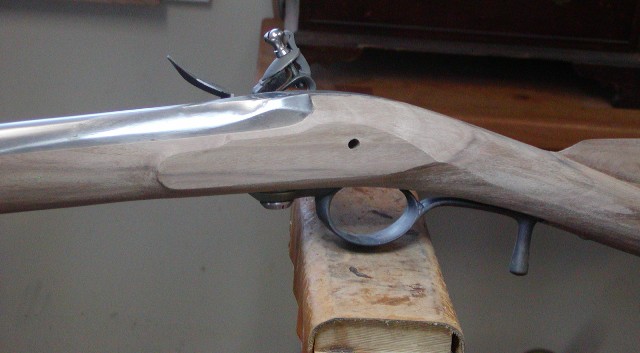
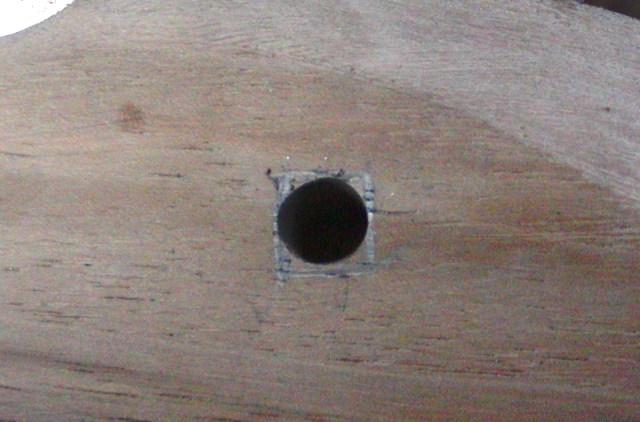
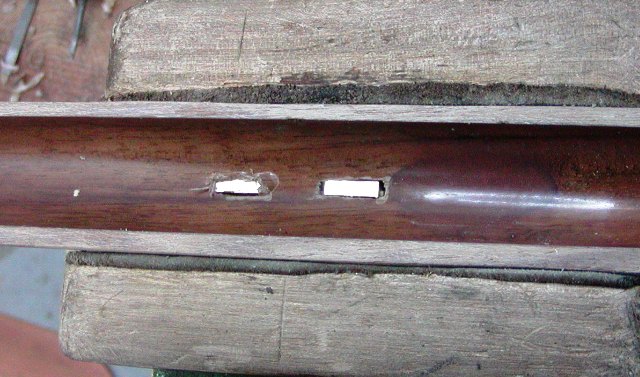
The machine inlets for the pipes are located correctly but the mortising work is sloppy. Apparently, the cutters dive into the wood at an angle leaving behind chamfered edges to the mortise. That would be fine if the chamfer begins at the edge of the pipe but the edge is located where the cutter reaches full depth. So now you have a sloping gap at either end of the pipe. TRS is not the only stock maker guilty of this. I've had two other recent precarved stocks from a highly esteemed company that had the same flaws. I have to say that today, the only manufacturer of stocks that can reliably produce truly precise fit of parts is Jim Kibler. Anyway, I have to work with what I have and it will be fine in the end.

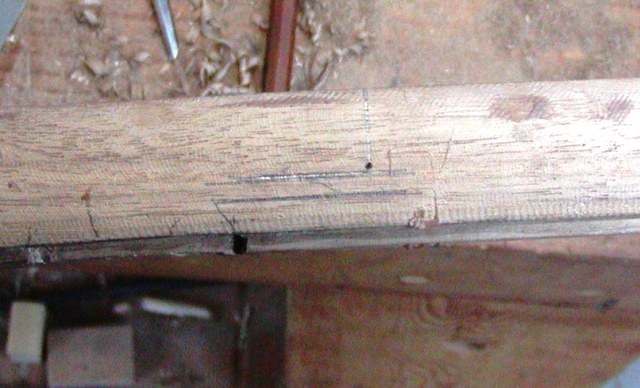
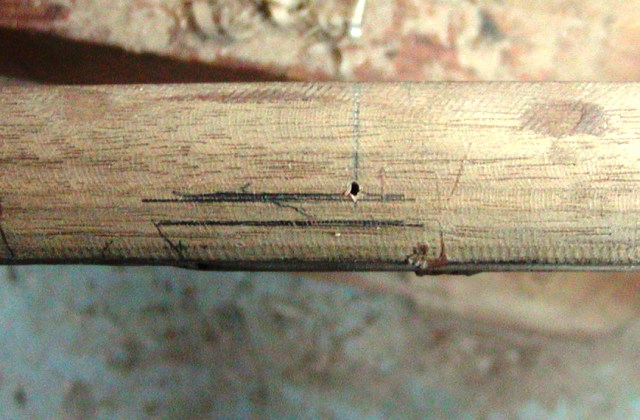
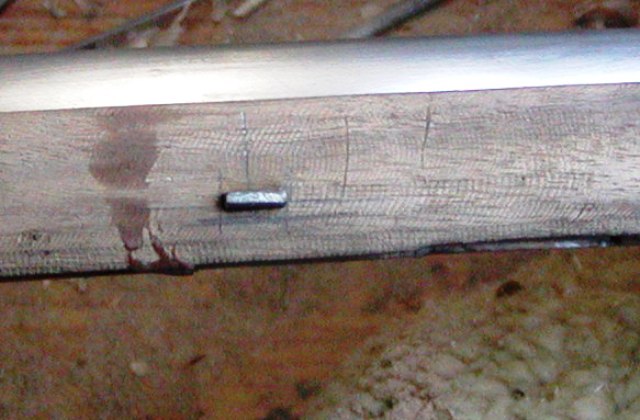
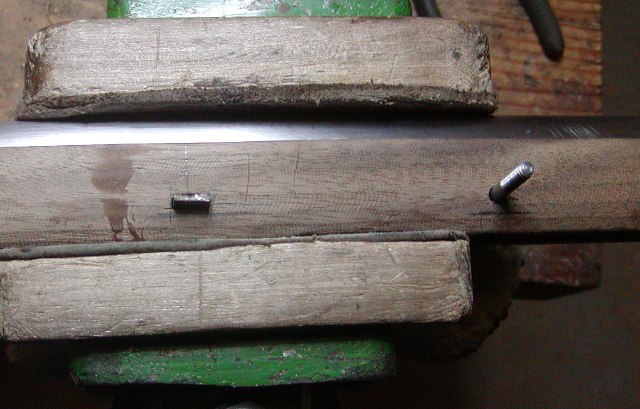
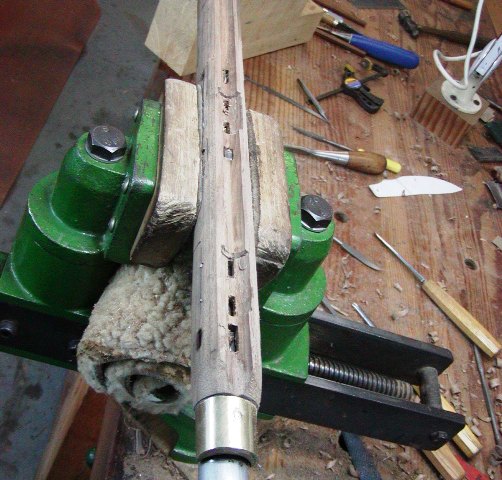
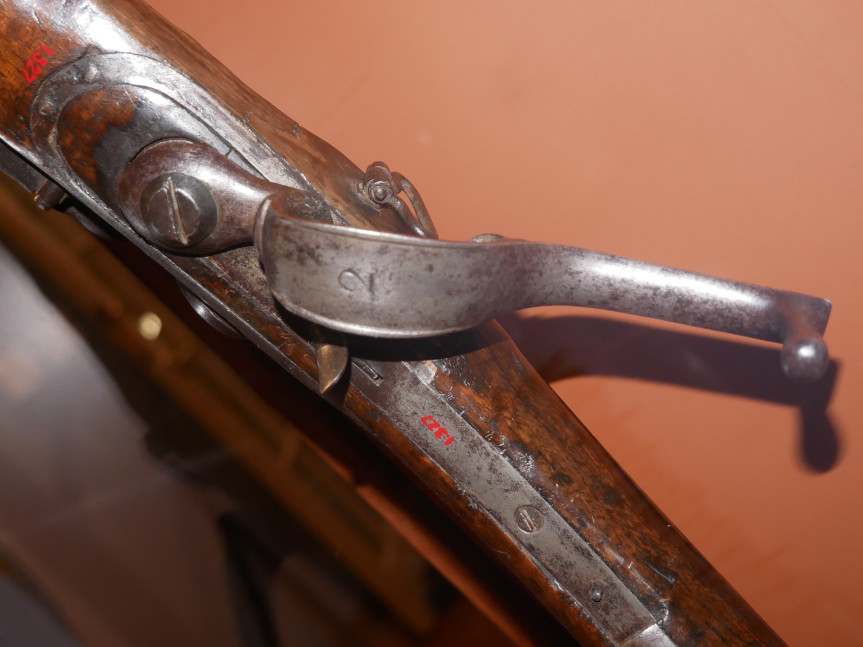
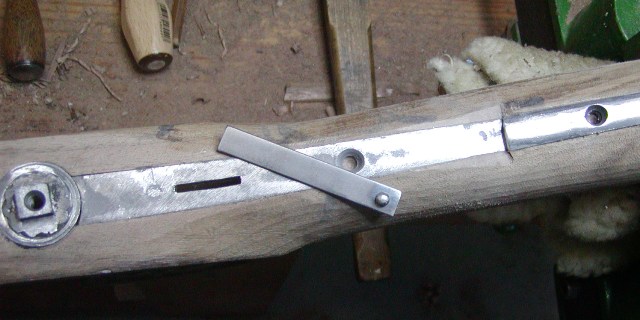
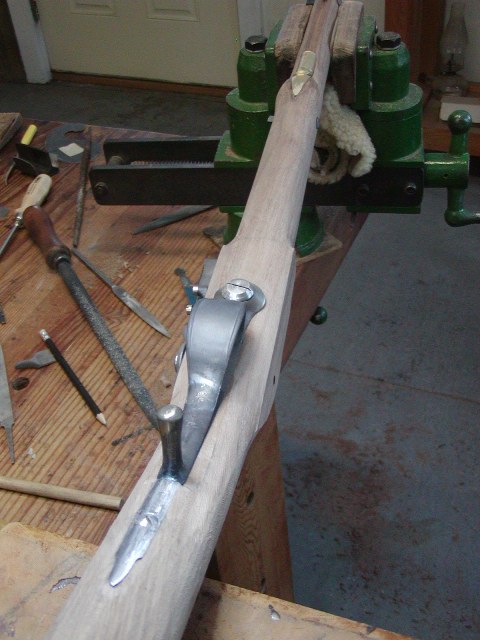
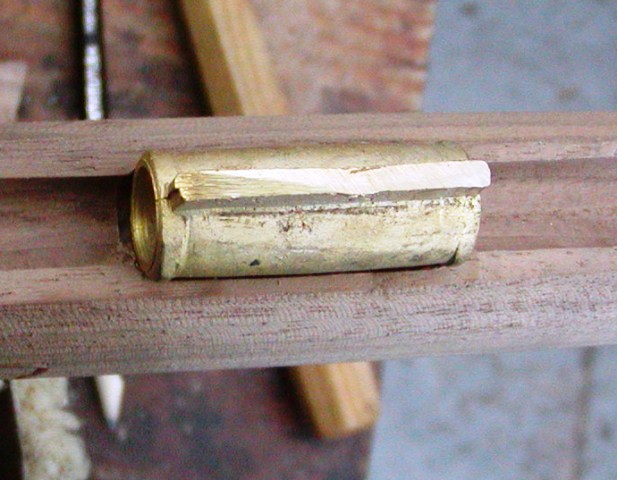
Here you can see the gap in front of the pipe caused by the machine cutter.
lKQrpoi.jpg


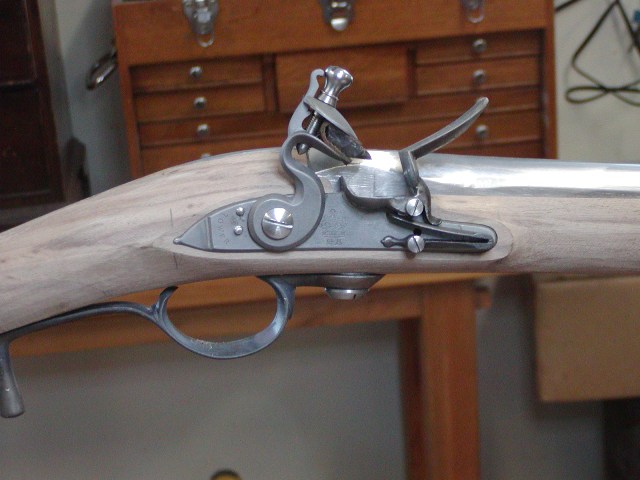
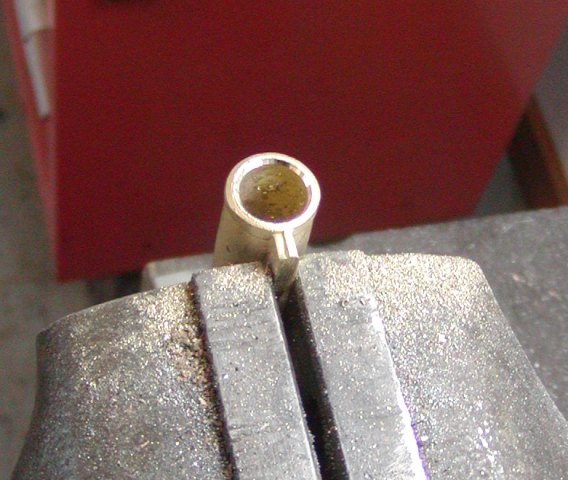
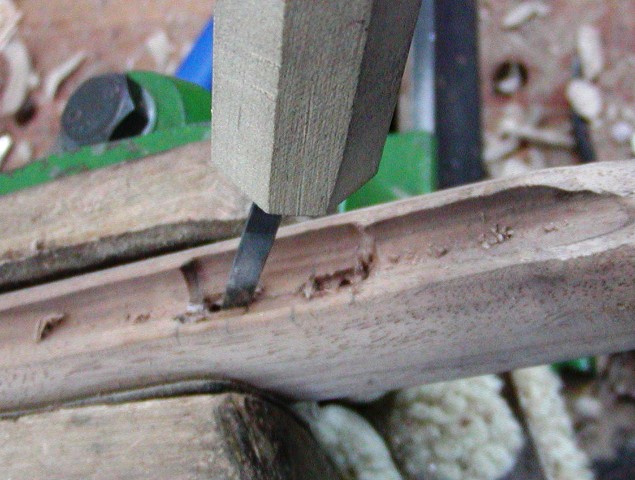
I will bed the damn things in AcraGlas to fill in the voids and they will disappear. Anyway, first I clean up the castings and I always countersink the mouths of the pipe to prevent a sharp edge scraping the ramrod. Just a little extra thing I routinely do.
EJ2AmyR.jpg


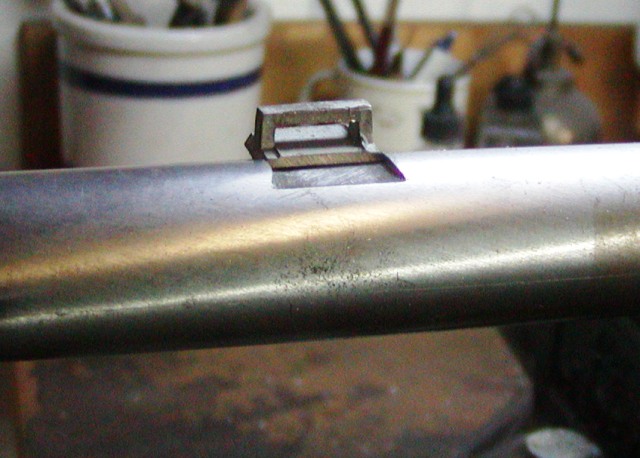
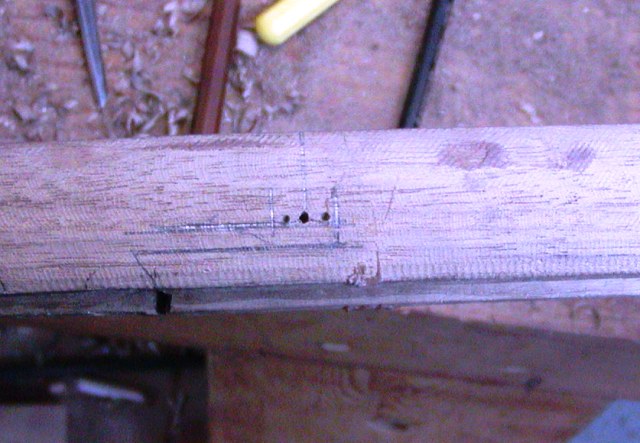
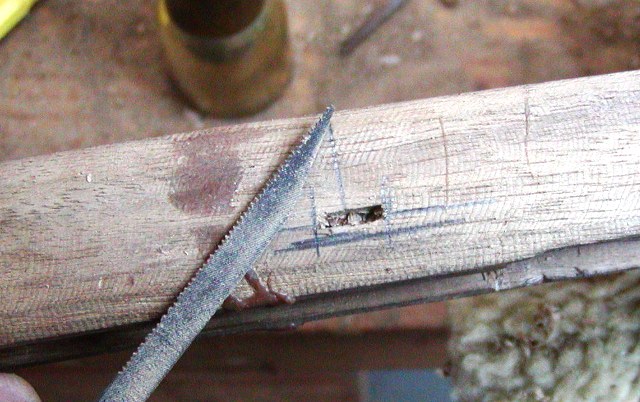
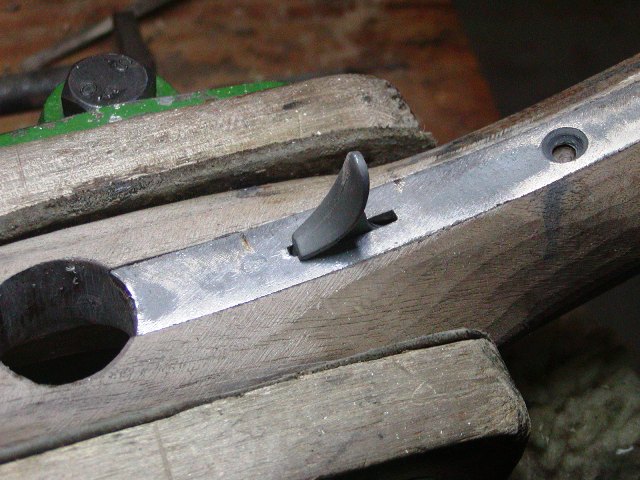
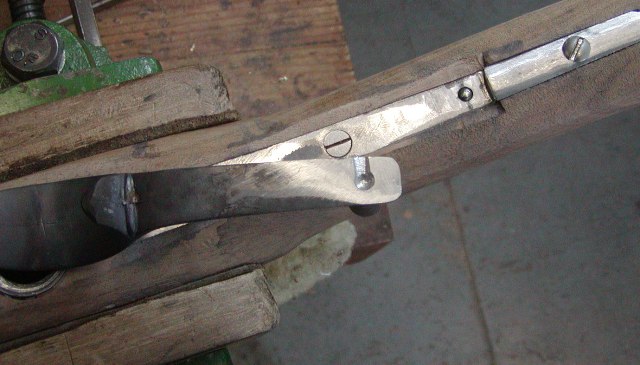
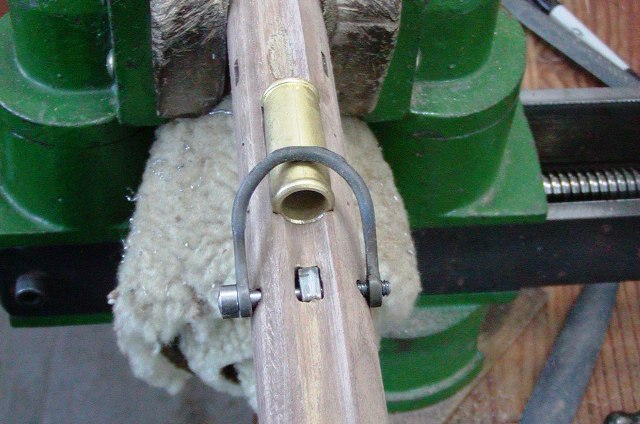
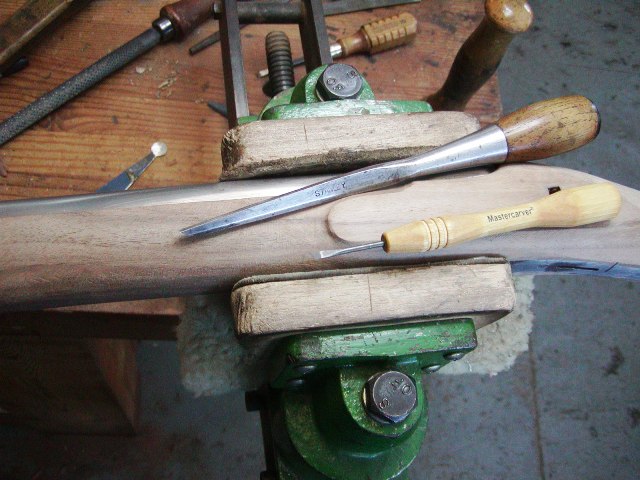
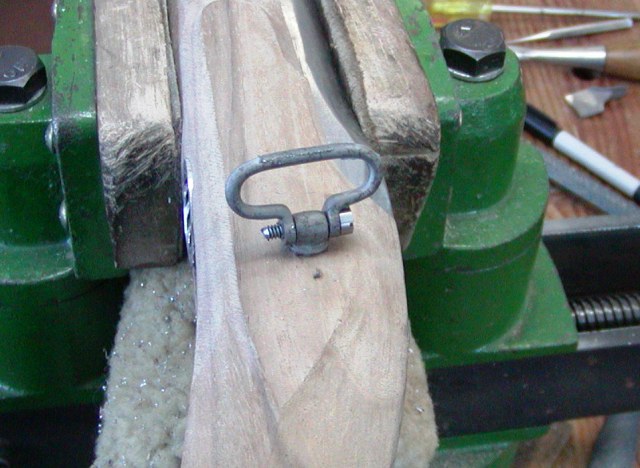
The forward pipes on Fergusons have two pins and two separate tabs. So I cut and form those tabs before inletting. I draw a center line down the machine inlet and mark the lengths of each tab.
Ywlq8Hu.jpg


I don't waste time with "machinist" measurements for this. Just eyeball it. Then I mark the extent of the tabs and punch holes for drilling. After drilling the holes, I cut the edges of the slots with flat chisels and then use my thin slot saw to cut between the holes. I clean up the slots until the pipe can fit down on the wood.

gJPUKFe.jpg

XmXZMnf.jpg

V5GivAj.jpg


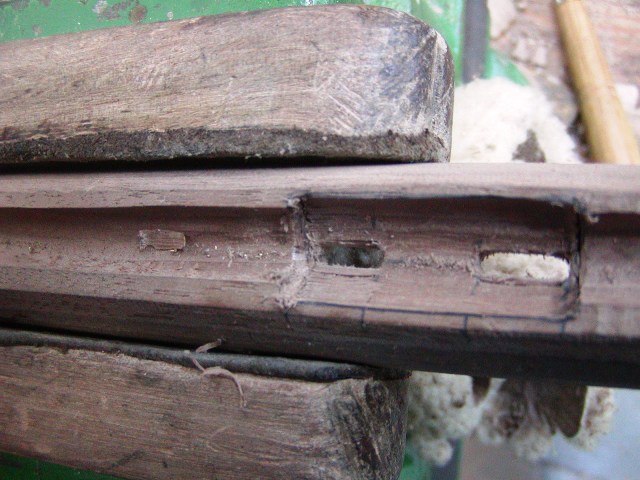
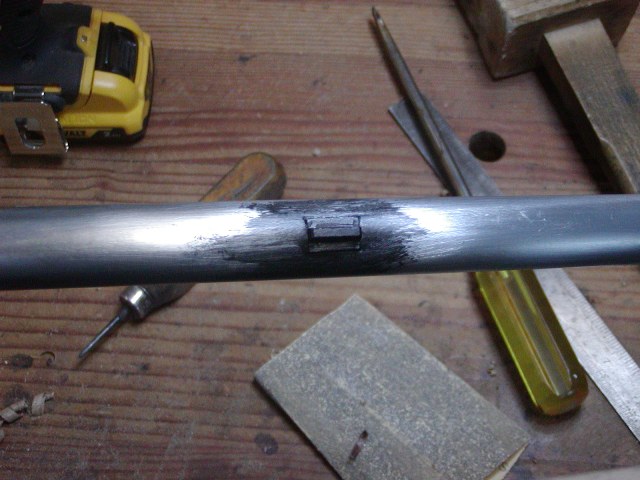
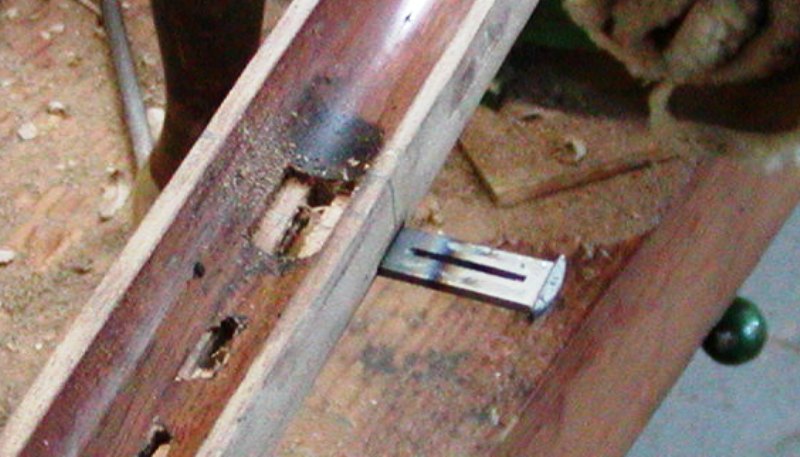
Now I can trace the pipe and set it in in a few minutes using gouges.
bEr2H8E.jpg

HItk3Kd.jpg

SVKpR6z.jpg


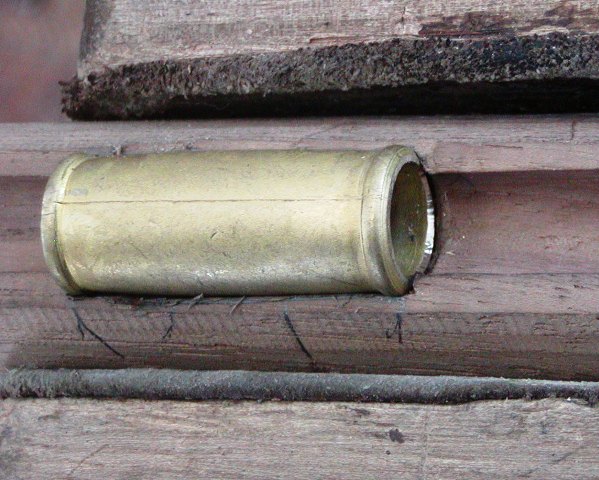
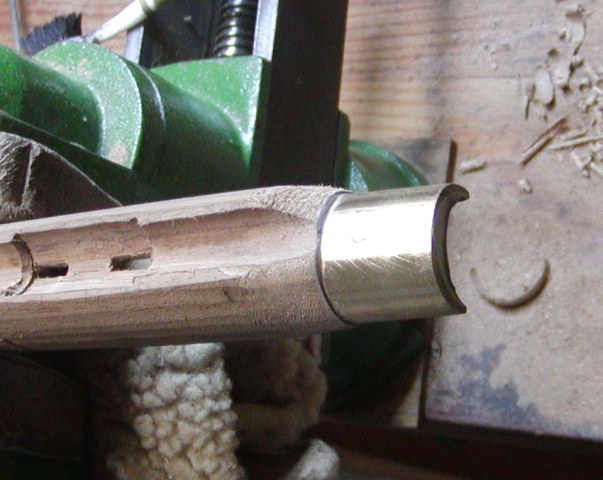
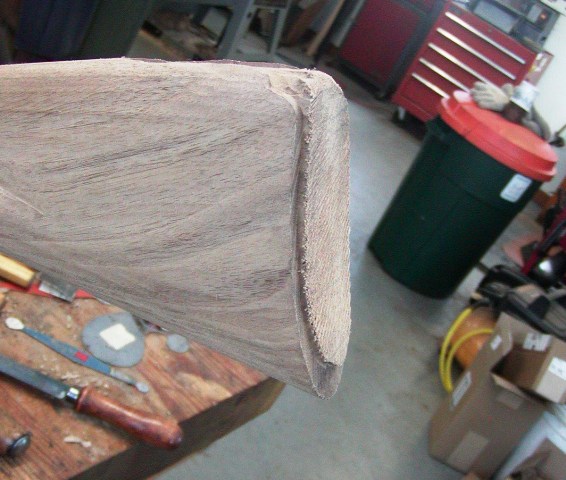
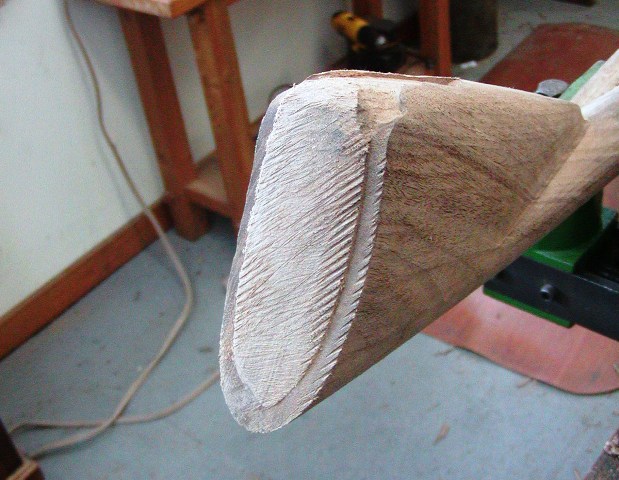
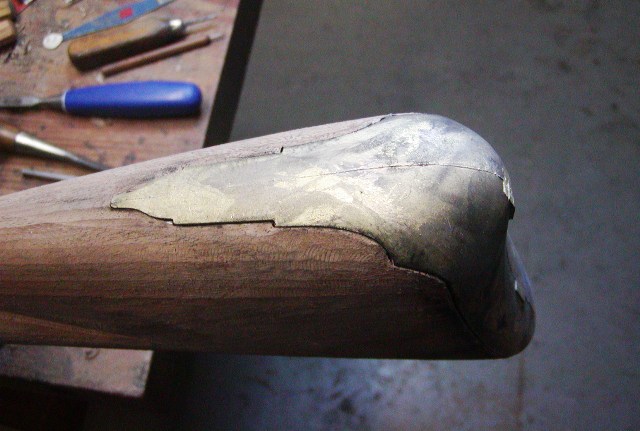
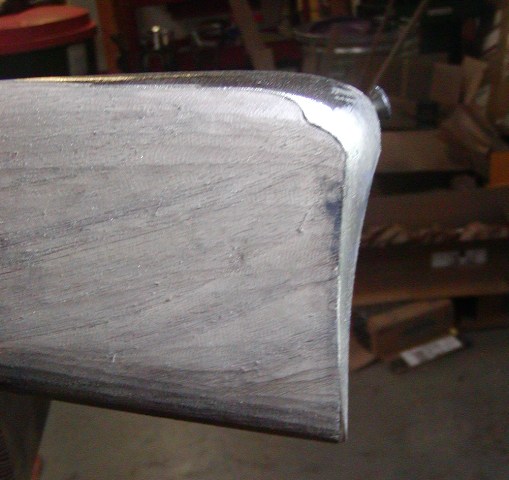
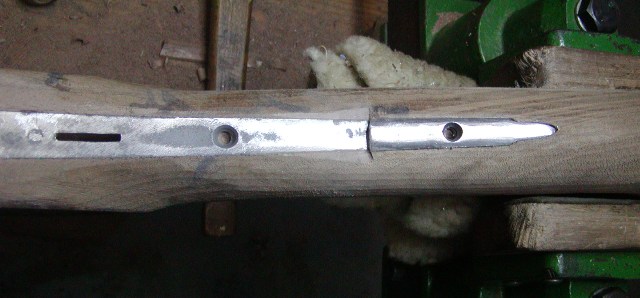
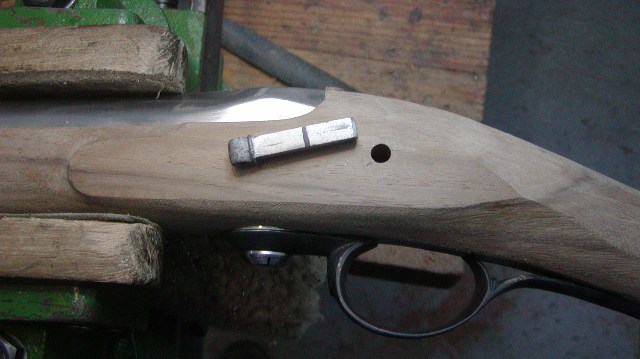
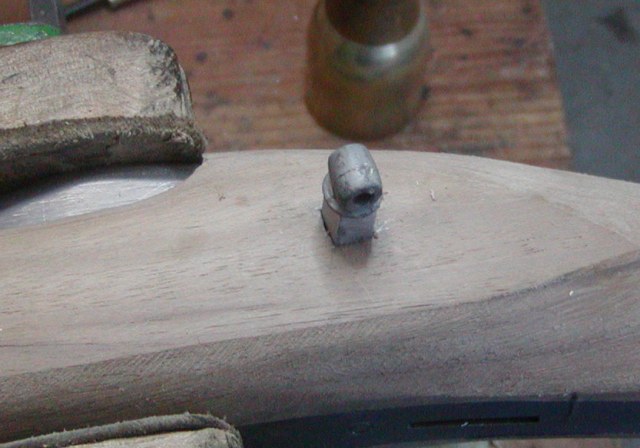
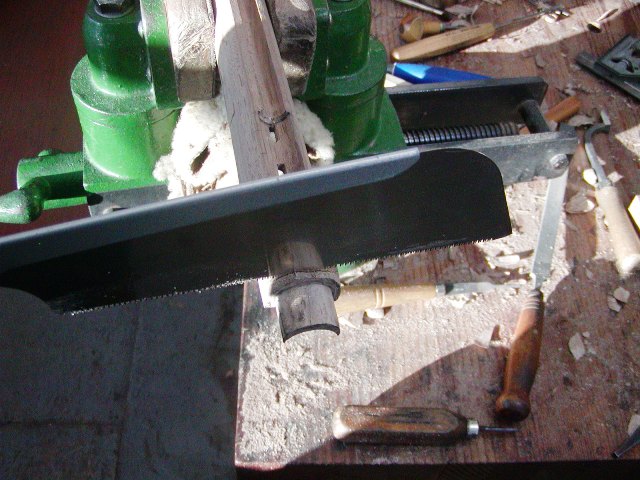
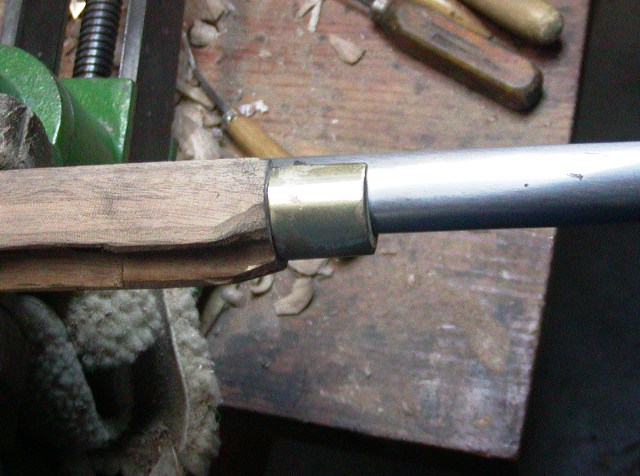
The front and rear gaps are small but will be filled. Next, I installed the nose cap. I cut the front of the stock to the correct length and measure a line for the edge of the nose cap using a square. Then I just cut along that line with a Japanese saw, and fit the cap using inletting black. It goes fast.
NYKpFoe.jpg

X8mQx06.jpg


Bingo Badda Boop and it is all done. That is my new catch phrase for a job well done. It combines "bingo" with "baada bing badda boom", with Bette Boop's famous sign off. It combines a whole lot of old white geezer stuff.

dave
 
Hi,
I so wanted to do the butt plate today and the long trigger plate. Fun stuff. BUT, I really needed to get all the barrel lugs attached and inlet, as well as the lug for the forward sling swivel. And then get the barrel keys mortised and installed. 😒 
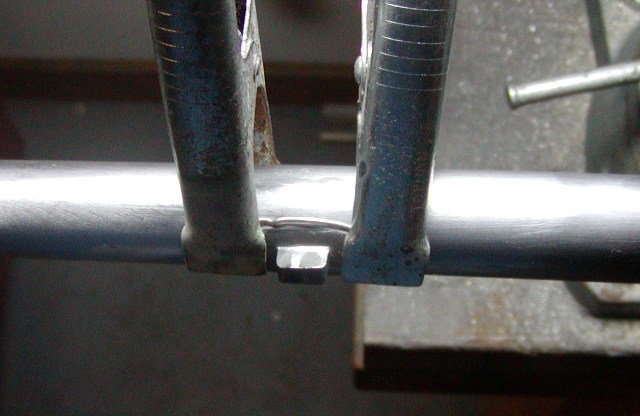
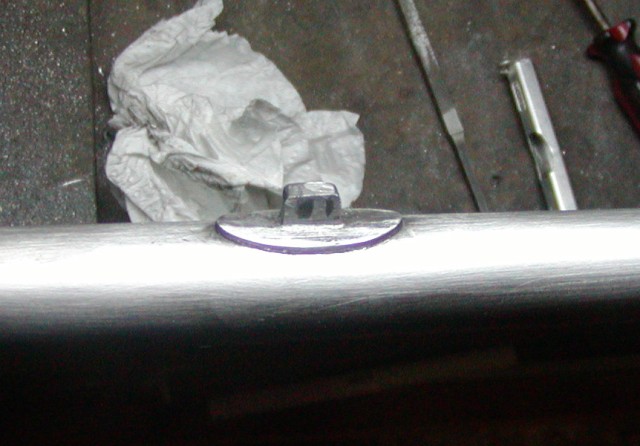
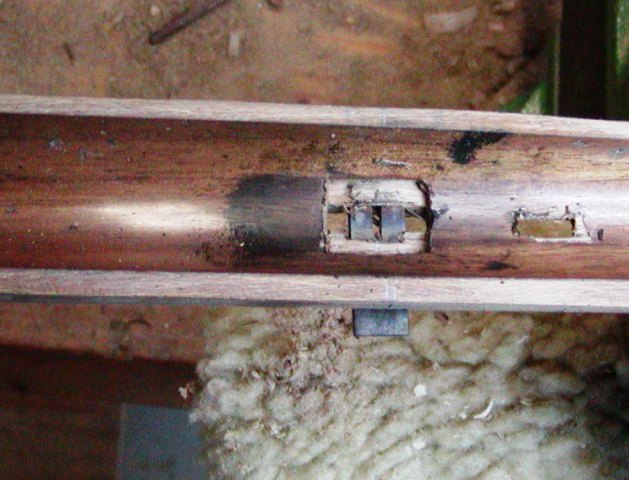
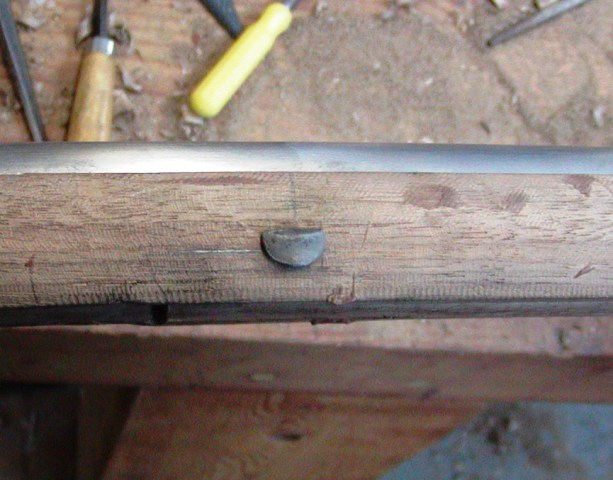
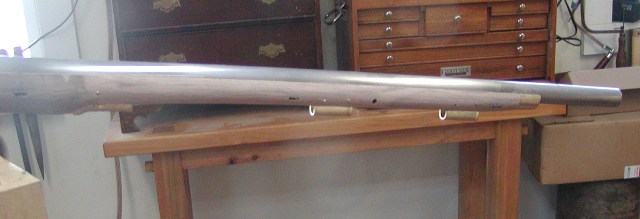
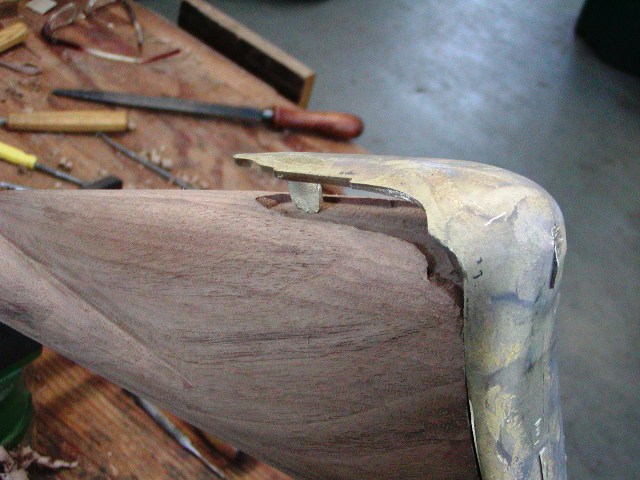
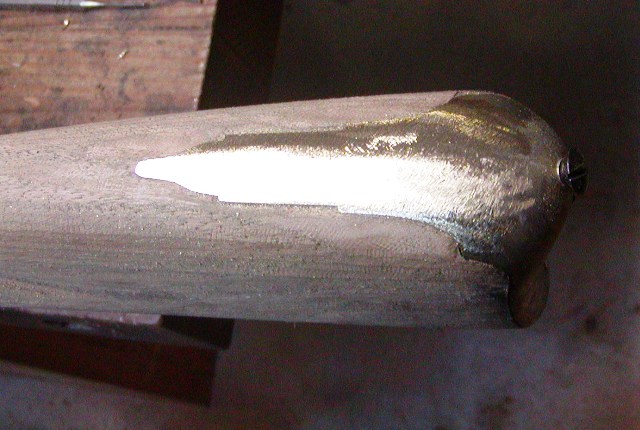
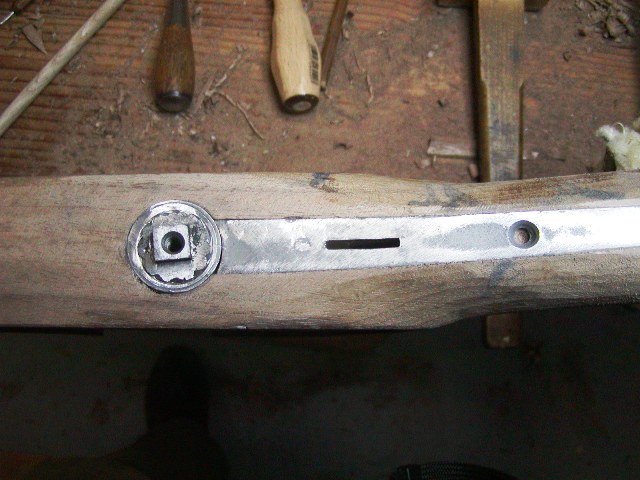
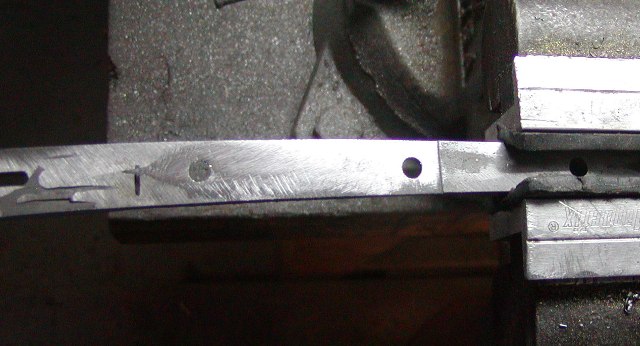
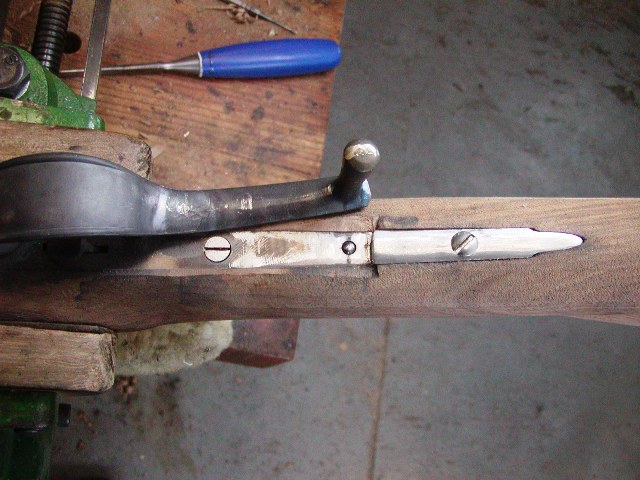
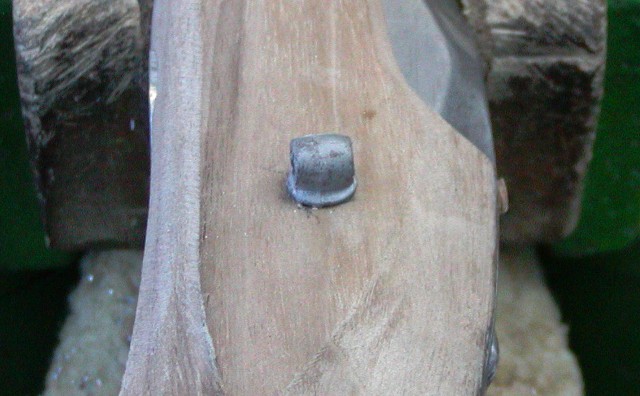
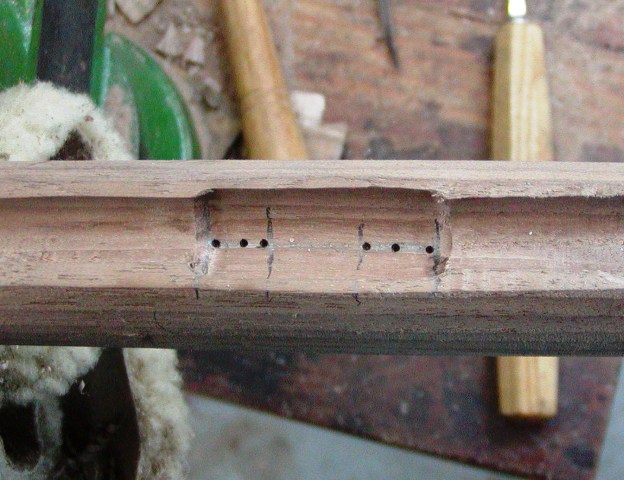
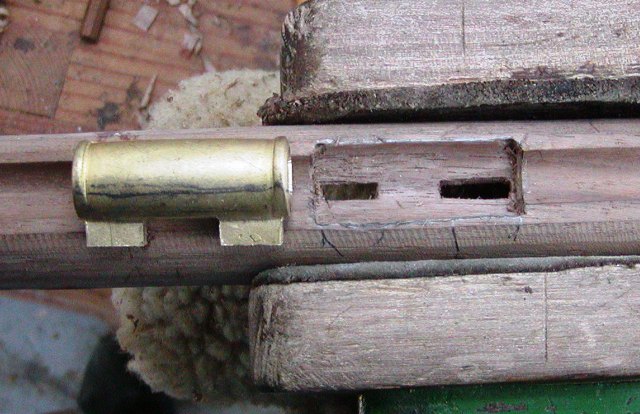
Oh well. I finished the nose cap and installed the anchoring screw. It should really be a brass rivet not the steel screw provided with the kit. I used the screw but will replace it with a brass screw that will be peened to make a rivet. I usually glue the muzzle or nose cap in place so I can drill it in the stock, which makes sure everything is held in alignment. That is what I did here and it came out just fine.
Zd8mprd.jpg

NUECVVy.jpg


Next up the barrel lugs. The lugs provided are excellent and have 5/32" wide loops, which is good. The wide loops provide more metal surface area in contact with the keys. That makes for better adjustment and smooth and reliable tension on the keys. There have been scores of posts on this forum asking about attaching lugs to round barrels. The lugs on Fergusons were first shallowly dovetailed in place and then brazed or soldered. The round barrel has plenty of thickness to allow dovetailed lugs. So how do you find center of the barrel to align the lugs? The breech makes it impossible to use the flat surface and file method. Instead, I hold the barrel by the breech flats in a vise and then put a torpedo level across the barrel. When it balanced, that is center assuming the breech flats are square.
Jo3EpnR.jpg

I think they are and any deviation is minimal. Then I mark their position and make a series of shallow saw cuts across the barrel.
efkSkj6.jpg

Then I file the slot flat and even. Next I use a triangular file with one face ground smooth to cut the dovetails on either end of the slot.
GtZxIIy.jpg

Eventually the lug fits tightly in the slot.
fOYbxnu.jpg


Then I tilt the barrel to the side, dribble flux in the lug mortise, place low temp silver bearing solder on the upper edge of the lug, and heat with a torch from below drawing the soldr through the joint. The end result is a nice clean solder and dovetail lug.
9OTowd5.jpg


Next it gets inlet into the stock. I paint it with blacking, and then insert the barrl in the stock. The blacking marks the location of the lug in the barrels channel.
0PMnXi7.jpg

J2bYtXA.jpg


Then I drill holes along the lug imprint.
yKFDaMw.jpg


Using my slot saw, I clean out the wood between the holes and then inlet the mortise for the base of the lug.
molvUbK.jpg

Eventually, the barrel sits down fully and the job is done. I do each lug individually, fitting one before working on the next.

dave
 
Would the dovetailed lug be strong enough without solder? It looks nice and deep.
Hi Bob,
Probably although the dove tail is very shallow for the forward lugs. The originals were dovetailed and then brazed. The solder is good insurance and it is so easy to do. Each solder job took me maybe 5 minutes.

dave
 
Hi,
I soldered on the lug for the forward sling swivel. It should be located a little in front of the middle ramrod pips so that the swivel rests against the top of the pipe when the gun is hld muzzle up. That prevents the sling blocking or interfering when you return the ramrod. Kind of important when in the heat of battle. The lug is just soldered on. It has a massive oval base so there is a lot of surface area for solder. I clean up the casting, then clean the barrel and lug base with sand paper and then acetone. I coat it and the barrel with flux, position the lug on the barrel and hold it in place with these handy clamps.

FtybmW7.jpg

Then turn the barrel on its side, place a piece of Stay Bright (or Brownells Hi-Force 44) low temp silver bearing solder on the edge of the base, and heat from below until the solder sweats through the joint. Clean it up and I have a nice clean soldering job.

9Ytlgfy.jpg


Next I have to inlet it in the stock. I blacken it and tap it in the stock, marking its location. Drill a series of holes through the stock and clean out the wood until the lug goes in. I coat the base heavily with blacking and it marks the outline of the oval base in the stock. Then I just cut a mortise for the base and I am done. Now I have to drill all the holes and cut the slots for the barrel keys. Man, there is a lot of stuff packed into the underside of that barrel and in the barrel channel.

IbXgB0s.jpg

MIWvnUe.jpg


This is definitely not a project for a new builder.

dave
 
Hi Folks,
I am building this Ferguson rifle for a client down south. It is my third Ferguson but my first using the TRS precarved stock. I like Fergusons and shoot my personal rifle a lot. However, I have no illusions about the place of the Ferguson rifle in history. Patrick Ferguson and his rifle have almost a cult following. According to those folks if the British were not so stupid and made more Fergusons, we might have lost the Rev War. They also place Paddie on a pedestal as a far sighted visionary and superior officer. However, historical opinion and evidence is not so hegemonic. Ferguson did not invent the breech loading rifle design. He modified an existing design by Isaac de la Chaumette and made a few minor improvements. He was enough of an entrepreneur to stage demonstrations before the Ordnance and the king showing the advantages of his rifle. He was no fraud as a marksman and his demonstrations were legitimate and awe inspiring. But his rifle had some serious weaknesses as a military weapon. First, from the production standpoint, only a handful of British gun makers were qualified to make rifle barrel and breech. While those makers could produce 1,000 muzzleloading rifles, they struggled to make 100 Ferguson barrels and breeches and at 4 times the cost. Paddie put together his experimental rifle corps, who failed early marksmanship demonstrations but eventually congealed into a tight unit. That unit was thrust upon General William Howe in New York without his initial knowledge or consent. The rifle corps was a project of the king. General William Howe and his brother Admiral Richard Howe hated meddling in the American war by the government in Britain without it consulting them first. That put Ferguson and his experimental corps of riflemen on the wrong foot with Howe right away. They arrived in America and asked, "OK, here we are. What do you want us to do?" Anyway, they were put to use and Ferguson's riflemen acquitted themselves well but not superior to other groups like the German jaegers or John Simcoe' s Queens Rangers. They suffered heavy casualties during the Brandywine campaign and lost Ferguson owing to a serious wound. Ferguson recovered but his rifle corps was disbanded and the rifles ordered to be returned to stores in New York. That some of his rifleman kept their rifles is clear but to what extent remains a mystery. Ferguson was a good officer but neither Howe or Cornwallis trusted him. When he went south to operate under Cornwallis in South Carolina, Cornwallis did not trust him and was afraid he would impulsively get into trouble. He did at King's Mountain, a battle that should put to rest any illusion that Ferguson was a brilliant battlefield tactician or strategist.

dave
thanks Dave for posting any pictures. They are very helpful to all.
 
Hi,
Not a lot done these past few days. I've been pretty sick with bad sinus and lower respiratory infections and not able to work very much. I also lost power due to a major snowstorm and keeping the wood stove going while sick ground me into the dust. Hopefully, things will get better tomorrow. I installed all the barrel keys, ramrod pipe pins and forward sling swivel bolt. That might not seem much but I know that every one of those tasks gives many builders anxiety and sometimes heartburn. Here is how I avoid both. I've written about this in many threads on this forum and will do it again. It is foolish to drill barrel lug pins, install barrel keys, and drill for ramrod pipe pins until the stock is trimmed down with only maybe 1/8"-3/16" extra wood left at most. On the Ferguson pre-carved stock, that extra wood is already gone, although the fore stock will be further trimmed down a lot, and the tops of the barrel and ramrod channels are even. That makes it easy to install the barrel keys and pipe pins. For the keys, I scribe a line on the barrel indicating the top of the barrel channel wall. Then I use a caliper to measure the distance from that line to the inner edge of the barrel loop. I transcribe that to the stock. The parallel lines represent the inner and outer edges of the loop. I mark the center of the loop and punch a hole at the intersection of that center line and the inner edge of the loop.
ROBM4EA.jpg

I do the same on both sides of the stock. Then I drill a 1/16" hole from one side halfway through the stock and again from the other. I hold the drill as level as I can and the hole is smaller than the thickness of the barrel key. Folks use drill presses and drill guide tools that are great for this but I don't need them. Because the depth of the holes drilled to the center of the stock are so shallow, because I've trimmed the stock down, any deviation vertically or horizontally has little effect.
7rFcfTo.jpg


Then I mark the width of the key on the stock lining the center of the key slot on the center hole. I mark two holes on either side and drill them as before.
Hme8NWA.jpg


On both sides, I cut in the edges of the key with flat chisels for a short depth.
iyzcYBD.jpg


then use my slot saw made from a flat needle file to cut the slot all the way through.
1Gyhuls.jpg


With the slot opened up almost enough to fit the key, I hold the head of the key with pliers, heat the end until blue (no more than that) and insert it into the slot. It burns its way through for a perfect fit. Do not overheat t0 key, just to blue (600 degrees) and no more.
J4mILF3.jpg


There should be just a little smoke. Repeat until the key is all the way through.
wvskntT.jpg


There should not be a lot of charred wood except on the very surface of the stock.
I installed all three keys and then drilled for the sling swivel bolt. That was easy because I could measure the depth of the hole accurately from the ramrod groove.
mYhVAoT.jpg

5WoFWTZ.jpg

edE7jlW.jpg

0HgAnHN.jpg


The ramrod pins were a piece of cake. I just measured the depth of the hole from the top of the ramrod channel walls and drilled them through holding the drill as level as I could. I drilled the holes first through the wood, and then clamped the pipes in place and drilled through the brass. They came out great.

dave
 
Hi,
Still under the weather but getting better. Something to note, on all British guns without exception, the heads of barrel keys and swivel screws are ALWAYS on the side of the stock opposite the lock. Always. If you find a British gun with the barrel key heads on the lock side, it indicates someone put them in wrong.

Today I shaved down the fore stock, a task I can do without to much mental stress. Any of you who actually examined an original ordnance Ferguson realize the gun is daintier than photos would suggest. The plans from TRS are great but they produce a much more "pregnant" Ferguson than the real guns. Today I deal with the forestock. Here is how it looks at the beginning.
X8mQx06.jpg

molvUbK.jpg

SVKpR6z.jpg


First, I need to get rid of the stepped transition at the nose cap. It is the same on Pedersoli Besses and is very wrong. I plane the height of the ramrod groove down to eliminate most of the vertical step at the nose cap.
50W1gXv.jpg

Then I thin the sides.
Lp5iVfr.jpg

Now the stock almost looks like it should although more wood will come off.
MUgTC8T.jpg

SxjMz9t.jpg

Here is where I am going with most of the ramrod pipes exposed above the wood and no prominent step to the ramrod channel.
y3KEh8k.jpg


dave
 
Being a bear of very little brain (and even less experience or training) I've puzzled more than a few times about drilling a very long, very small and very straight hole with a wandering drill bit. The method I've gravitated toward is pecking through the material with light ... as in using a laser as a guide. There. I've said it. And now I can go to rest in peace.
 
Hi,
I did not get much done today but at least I installed the butt plate. After cleaning up the wax cast brass, flattening all the edges that will butt against the wood, and filing draft on the edges of the tang, I inlet it. The first thing is to remove "da schmutz" left over on the end of the stock.

U2BP9ea.jpg


I don't try to carve it into any dome-like surface. I just get rid of it using a rasp.
KppRc0H.jpg


Then I place the plate on the stock and mark where the forward lug is to be mortised. Don't grind that lug off thinking it is flashing or sprue. It is for a cross pin that will hold the tang down snug in the stock.
YMZzAqS.jpg


I make the slot by drilling down the proper depth for the lug and making 3 holes in a line. Then I use a router bit on my Dremel Destroyer to cut away the wood in between the holes. Make sure the slot has a little extra space in front of the lug so the butt plate can be moved forward during the inletting process. Then I put the plate in position, trace the outline of the tang with a sharp pencil, and cut away the wood to my lines. In just a few minutes the plate is down in the mortise.
YT9zGus.jpg

All that is left is a little tweaking using inletting black and the plate is in.

zi9TDc2.jpg


I drilled and installed the screw in the heel and then filed the brass down flush with the wood.
79skDlo.jpg

b2rWYjZ.jpg


All done and nice and tight. It only took about 2 hours to install it after the brass was cleaned up ready for inletting. There is another screw to be fitted above the toe of the plate and then a hole drilled for the cross pin under the tang.

dave
 
Hi,
Bit of a hiatus from working on the Ferguson. I had other work to do but also I am not fully recovered from being ill and find I cannot work a full day in the shop. Too tired. The most technically challenging task on the Ferguson is fitting the trigger guard and trigger plate arrangement, and tweaking it all to make it work properly. But first I'll post some photos of the original Morristown gun showing the plug, guard, and trigger plate arrangement.
tADpbkQ.jpg

You can see the plate used to repair the cracked stock.
Here is that crack. It extends right through to the lock side.
REHGN8N.jpg

Here is the breech partly open showing the trigger plate and the little detent that locks the trigger guard in place when the breech is fully closed.
WJasFw1.jpg

Notice that the breech plug is a bronze colored alloy and when fully closed there is still a gap between the trigger guard and the stock. Some speculate there was a thick leather washer there to seal the bottom. I don't know what for because I experience no gas escape on the bottom and no other Ferguson or Ferguson style gun I have seen has a leather washer. Some authors make a big deal about the bronze or gun metal plug being the secret to the rifle's success over coming powder fouling. However, Ferguson never mentioned it in his patent or in any correspondence with the four gunsmiths who made his military rifles. Moreover, the plug on the ordnance Ferguson in the Milwaukee Museum has a steel or iron plug and no gap. In my opinion, the bronze plug is a replacement or experiment of some sort. Ernie Cowan, who made a reproduction using a bronze plug claimed it is the reason he can get up to 30 shots without cleaning. Well, I get more than 30 shots without cleaning my Ferguson with a steel plug as long as I lube the plug before the day's shooting and I load carefully. Anyway, there is a lot of "chest thumping" about Fergusons. I do enjoy shooting mine very much but I also appreciate it for what it is rather than the myth.

Inletting the trigger plate is straight forward, however, let me give a couple pieces of advice. Clean up the bottom and edges, file draft on the edges, and then inlet the plate without the barrel in place. Let a little of the front over hang the screw plug hole in the stock. Work from front to back as the plate goes in. When it is inlet, file the over hanging metal on the front such that the screw breech fits in the hole. In my opinion, don't make the connection between the breech and the front of the trigger plate too precise and tight. A tiny gap helps make sure the barrel and breech can be easily removed from the stock for cleaning.
zVw2Ox1.jpg

VCEI3zf.jpg


Next up is cutting the slot for the trigger and bending the trigger guard to fit the trigger plate. I won't pin the trigger until later. It took some work to heat and bend the guard to fit.
4WgsM6c.jpg

1SqAPz0.jpg


The guard has extra metal behind the handle. That has to be cut back and thinned so it slips under the lip at the step in the rear of the trigger plate. Go slow here and cut and file a little, try to fit it, and then cut off more as necessary. There is a small detent riveted to a flat spring that has to be installed under the trigger plate. The detent catches in a shallow hole on the bottom of the guard lock it in place when closed.
9cvBCk6.jpg

Anneal the spring so you can bend and drill it. Drill an appropriated sized hole in the trigger plate make sure it is large enough to allow the detent to move up and down easily. You will fine that the detent is not high enough to protrude much through the plate. My solution is to file the bottom of the plate thinning it near the hole such that the detent protrudes more.
ZHodBtC.jpg

Next inlet space for the spring and detent in the trigger plate mortise. You have to bend the spring to fit the curve of the plate.
icyTzTQ.jpg

With the detent and plate in place, drill the holes for the wood screws holding the plate in place. The lower hole is also through the spring. Install the wood screws, file the lower one flush with the plate and fit the guard.
1SqAPz0.jpg

Drill a cavity in the bottom of the guard into which the detent slips to lock the guard. Let me add another little detail that you may never know unless you examined the Morristown gun closely. File a little channel leading to the cavity in the bottom of the trigger guard, which allows the detent to pass easily under the guard to reach its cavity where it pops up and hold the guard in place.
2NkHgy9.jpg

File, bend, grind, whatever you have to do to the guard and trigger plate to final fit the guard.
NSPLa6R.jpg

q8yeqQS.jpg

It should work smoothly and the detent should not apply too much pressure so you can unlock the handle easily for loading. Finally, harden and temper the spring detent.
dave
 
Hi Lads,
Feeling stronger every day. I think it is the Woodford Reserve. I have a rule, single malt scotch when I feel good, bourbon when I don't.

Got a lot of shaping done. I wrote this previously but the military Fergusons were much daintier than you think based on the published photos. If you build one based on the plans sold by TRS, it will be a very pregnant Ferguson. Those plans are fine but shave 10-15% more off the stock dimensions. I want to emphasize that the TRS part set, despite some flaws, has been pretty good. I've encountered nothing I can't fix in a straight forward manner although those solutions may be more than a less experienced builder can absorb. The castings are superb. I shaped the stock a lot more and focused on the lock panels. Here is where I am at.
7QoqCb9.jpg

VFXoSfs.jpg

id6Sk3F.jpg

VWE4qE0.jpg


I am getting very close to final finish. I still have to mount the sights and bayonet lug on the barrels, fit the rear sling swivel, and install the lock screw and barrel tang screw. In a future post, I am also going to show how to fit the bayonet properly so it doesn't pull off the barrel when you pull it out of the body (essentially so it is not fitted like a movie prop).

On both surviving original ordnance rifles, the flats or surrounds around the lock are almost nonexistent. So why do modern builders insist on wide flats around the lock? It is because they don't know any better or they simply cannot see their mistakes. Don't build your Ferguson like the photo in the TRS catalog, which is a gun built by someone who did not really get the surviving originals. That is a mistake if you care about historical accuracy. There is a lot to discuss about the shaping of this gun. The lock panels are very narrow and surround the lock very closely. On the Milwaukee gun, any flats basically disappear. The barrel tang should sit up in the stock like it is a crown on a pedestal. The stock is blended into the barrel flats at the breech with no step up. The bottom of the stock at the lock is not flat. It curves up to meet the lock and side panels. The stock is quite thin along the barrel channel.
N9VjcSW.jpg

Rcuzs7i.jpg

tno56xP.jpg


This stock still has a lot of wood to be removed but it is beginning to look right.


dave
 
Hi,
More done. I installed the sling swivels. I already installed the lug and drilled the hole through the stock for the forward swivel. It was just a matter of cleaning up the casting a bit and then tapping for an 8-32 thread on one side and drilling a clearance hole on the other. The swivel is useful for giving you an idea how slim the fore stock should be. Thin the stock to the swivel, don't spread the swivel for a pregnant stock.

39CrNSa.jpg


Also note, and this is important, the swivel overlaps the middle ramrod pipe when folded to the rear. That prevents the swivel and sling from blocking the groove when returning the ramrod. This may not be critical for a breech loading gun but it was for any muzzleloading musket and carbine. However, the Ferguson could be muzzleloaded too if there was a need.


The rear swivel is more involved. Clean up and square the swivel stud, and cut it off at the required depth (line marked on it).

MImLdDi.jpg


The machined hole in the stock is of the right depth and position and just needs to be squared to fit the lug.

yVHjyZ0.jpg


Using 1/8" or smaller chisels, square up the hole and gradually tap the stud in place.

WZ7M7Ew.jpg


rmnNJ7o.jpg


You want to fit it snugly. Now another detail. The swivel is angled down a small amount. It is not installed so the sling swivel faces directly forward. It is angled downward. Gradually fit the stud until the collar on the swivel stud is against the wood. Clean up the swivel and drill and tap it for a 6-32 screw. At this point do not install the anchoring pin that goes from the top of the stock through the stud. Do not do that until the stock is fully finished because in that process, you may need to inset the stud deeper.

ir8TCsO.jpg

qRyefTp.jpg


dave
 

Latest posts

Back
Top