• This community needs YOUR help today. We rely 100% on Supporting Memberships to fund our efforts. With the ever increasing fees of everything, we need help. We need more Supporting Members, today. Please invest back into this community. I will ship a few decals too in addition to all the account perks you get.


    Sign up here: https://www.muzzleloadingforum.com/account/upgrades
  • Friends, our 2nd Amendment rights are always under attack and the NRA has been a constant for decades in helping fight that fight.

    We have partnered with the NRA to offer you a discount on membership and Muzzleloading Forum gets a small percentage too of each membership, so you are supporting both the NRA and us.

    Use this link to sign up please; https://membership.nra.org/recruiters/join/XR045103

Building a British Pattern 1760 Light Infantry Fusil

Muzzleloading Forum

Help Support Muzzleloading Forum:

This site may earn a commission from merchant affiliate links, including eBay, Amazon, and others.
On a higher-end civilian gun, I urge you to add another step, one that really makes a difference in the smoothness of the finish on walnut. After all the staining, apply the first coat of oil, oil-varnish, or varnish with 220 grit sandpaper. Dip the sandpaper in the finish and sand the wood until you create a slurry of finish and sawdust. Do the complete stock that way and let the slurry dry on the stock for a day or two. Then use 320 grit paper to sand off the dried slurry. It will have filled the grain leaving behind a nice glassy smooth surface. Sometimes I do this twice but usually only once. Then apply sparing coats of finish until you get the sheen you want. I usually tint the finish with alkanet root. The guns below were finished in that manner.dave
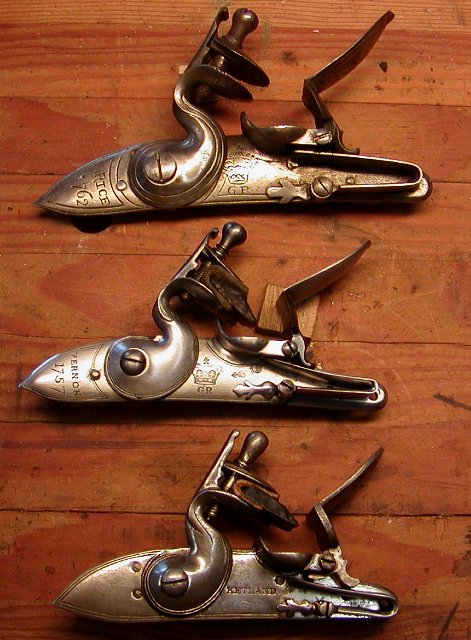
WOW! Blow me over with a marshmallow gun (flintlock of course)! You just showed us your top shelf stuff. I hated using walnut stock filler because it takes the glow out of the depth of the grain. I used many layers of Birchwood Casey Tung Oil that took a while to fill the grain. However, your use of sandpaper dipped in the oil got the majority of the work done in two coats. It manages to take sawdust that is already stained and repurposing it as the filler and because of the oil as a lubricant on the sandpaper, the grains don't come off plugging up the pores where they can sit there and look ugly.
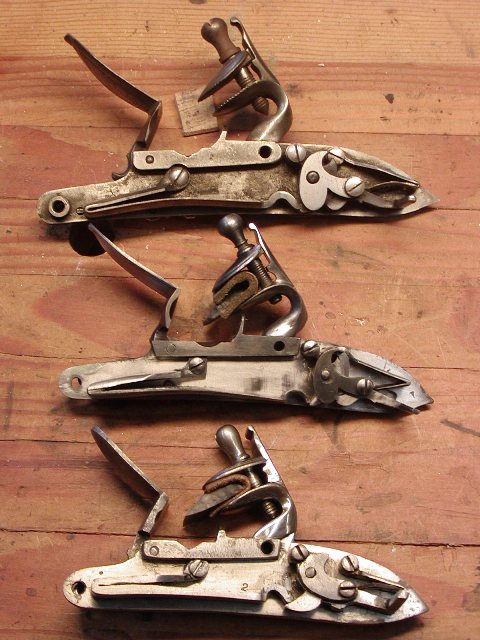
See some nice colors in your hardware. Would you reveal the secrets to getting the dark blue/purple/black (pictures can be hard to decipher) on the trigger guard and the breech/tang. And, while you are at it, what about the barrel plum brown color.
 
Hi 1861Colt,
I probably could write a book given the array of methods I've learned to meet different objectives relative to the historical accuracy and diversity of the guns I build. The charcoal bluing on the English rifle is achieved by first polishing the steel very highly with stones dipped in parafin oil and very fine sand paper dipped in water. I never use a buffing wheel because they tend to dish out screw holes and round edges. The the parts are degreased thoroughly and packed tightly in a steel box filled with bone and wood charcoal. The charcoal excludes most of the air from the surfaces of the parts. I put a lid on the box and place it in my heat treating oven set at 900 degrees for 3 hours. After the heat soak, the parts are allowed to cool enough so I can handle them with bare fingers and they are vigorously rubbed with a rag dipped in linseed oil and rottenstone. That removes any scale, polishes the surface further, and deepens the blue color. Then they get degreased and packed again in charcoal and the cycle repeated once more. After rubbing them down after heating I coat the parts with linseed oil mixed with beeswax and buff.

For the red brown barrel browning, I wanted to copy the color found on high-end British guns most of which had twist barrels. Wahkon Bay rust browning solution was the only product that could achieve this but had to be modified. I diluted it with a little ferric chloride and alcohol. The barrel is highly polished, degreased, and then very sparingly coated with solution. I let it rust for 4-5 hours for the first coat. After a thin coat of rust develops, I wash the barrel with scalding temperature water (about 160-180 degrees). That is key to the color. Boiling water will turn the brown color blue but lower scalding temperature gives the warm red color. I card it using a very soft stainless steel wheel by Grobet (so soft you can touch it without harm) spinning at 900rpm in my wood lathe. Then I coat it again with solution and let rust for only 2 hours. I do not want coarse oxide forming on the surface. I want the grain to be very fine, hence the short rusting periods. I wash with scalding water and card as before and repeat until I get the color. When done, I warm the barrel a little and coat it with linseed oil mixed with beeswax and buff.

I learned these methods by experiment and information found in old technical journals and writings.

dave
 
Last edited:
Hi, Dave,
I thank you for the information. It is amazing how the different temperature of the water can change the color. I never understood how the wire wheel can be kept from breaking through the color on the edges, but yet look at me, I used steel wool and it could have done the same because you can't keep it perfectly flat as it creeps around corners anyway. On my browning, I would let it go only a short time before I would clean it up and then go for another coat. I never fancied the rough heavy brown, albiet it is more durable. Makes me think of the nice charcoal blue that is an option for revolvers. It is beautiful, but too fragile and wears off too quickly.
 
Hi,

I am getting the lock ready for case hardening. It still requires a little more polish and then I'll pop the frizzen, cock, top jaw, and lock plate in the oven. The casting from TRS was marked "FARMER" and "1759". Farmer was a major lock contractor but none of the surviving light infantry carbines for which I have documentation were marked "FARMER". I suspect TRS uses the same carbine lock casting for a lot of different guns despite documentation. Anyway, the data I have indicates lock contractors Grice, Galton, Edge, Haskins, and Vernon are identified with surviving pattern 1760 carbines. I chose "Vernon" and a date of 1757 for this gun. During the process of filing and polishing the lock, I wiped out the old markings and most of the decorative double border. So I had to engrave the contractor name and refresh the double borders on the plate, cock, and frizzen. The engraving should not be banknote quality. Understandably, it is pretty hasty looking on most British military guns. I chose "VERNON" and "1757" because those markings are found on several pattern 1760 carbines in my reference collections. I then copied the lettering and borders found on originals. My purpose was historical accuracy. It came out well. I have to do a little more polishing and them the parts get case hardened. After hardening I will polish and burnish them like the originals. This was fun.
dave
ZqsEFcQ.jpg

Ar78wpI.jpg
 
Hi,

Much is done. The carbine is almost finished. It just needs some more coats of oil-varnish. I used Sutherland-Welles polymerized tung oil for the sealing and initial coats. Now I switched to S-W's tung oil wiping varnish, which is polymerized tung oil mixed with polyurethane varnish. This should fill the rest of the grain nicely and provide an authentic looking slightly glossy varnish finish. The lock is finished, tuned and polished. I am very pleased with it. It turned out to be a very fine lock and one I have no doubts would pass British Ordnance inspections, unlike our Italian and Indian repros. I included photos of the lock from a Pedersoli Brown Bess for comparison of size and quality and I also included an India-made "Ketland Officer's fusil" lock.
zp8qjo6.jpg

3Fye75T.jpg

The mainspring gives the lock a stout pull to half cock but the next step to full cock is like drawing a compound bow. Sparks sizzle in the pan and I will give the lock my "quartz rock from my driveway test" after snow melts. I sharpened or reestablished all the cast in engraving, including the crown, and added the "Vernon 1757" . I polished and then burnished the outside so it has the mellow sheen of the originals. No over buffing wheel-polish and dished screw holes like the India-made piece of junk shown below my lock.
65uNnCl.jpg

l2c8bGs.jpg

The photos also show the cartoon stamped or "cast in" quality to the engraving on the Pedersoli lock.
I3LK6qo.jpg

6PzgDrx.jpg

Unfortunately, none of our modern commercially made repros represent the quality and skill shown by the highly skilled 18th century workmen in the gun trade. They do those skilled and admirable workman a great disservice. I have to replace the top jaw screw with a correct one. The screw that came with the parts set is wrong and too small to modify. I have some Brown Bess top jaw screws coming that can be downsized for the carbine. All of the brass hardware is polished and I have to make the ramrod. The originals were made of ash so I bought some white ash blanks. I will attach a tip for a modern cleaning jag on the inner end but the correct brass tip for the muzzle end. If the eventual owner wants a more historically correct rod, I can easily make one with just a tapered wooden end or with a tow worm attached.


More to come.


dave
 
Wow! I’m speechless! I’m not very impressed with my rifle shoppe escopeta stock.inletting is ok, but seems like 3rd rate cheap walnut.may just make one from a blank.
 
Thanks very much for the effort in documenting this build. It helps the "newbys" like me in the crowd to learn that art and craftsmanship are still alive and well.
 

Latest posts

Back
Top