• This community needs YOUR help today. We rely 100% on Supporting Memberships to fund our efforts. With the ever increasing fees of everything, we need help. We need more Supporting Members, today. Please invest back into this community. I will ship a few decals too in addition to all the account perks you get.


    Sign up here: https://www.muzzleloadingforum.com/account/upgrades
  • Friends, our 2nd Amendment rights are always under attack and the NRA has been a constant for decades in helping fight that fight.

    We have partnered with the NRA to offer you a discount on membership and Muzzleloading Forum gets a small percentage too of each membership, so you are supporting both the NRA and us.

    Use this link to sign up please; https://membership.nra.org/recruiters/join/XR045103

Zouave Accuracy

Muzzleloading Forum

Help Support Muzzleloading Forum:

This site may earn a commission from merchant affiliate links, including eBay, Amazon, and others.
My old Zouave is a good shooter with a .578 minnie, but is a spectacular shooter with patched .570 round ball. It likes 75 grains of 3f and a PRB. That load has flattened several deer over the years. I had to do a lot of work on the trigger though.
 
rdillion said:
How did you smooth-up the trigger? Did you have to lighten up the mainspring?

One way would be to "lightly" polish all the moving parts with fine emery paper, just enough to remove any burrs and chatter caused by production.
 
rdillion said:
How did you smooth-up the trigger? Did you have to lighten up the mainspring?

Here's a link to a very useful, detailed description of lock modification as practiced by some good shooters in the N-SSA:
http://www.nwtskirmisher.com/useful-locks.shtml

The two musket locks of mine that are modified - both '61 Springfield types - have been so altered by the brass shim addition to the tumbler (option 2-B here), the easiest for the non-machinist. They both let go at right about 4 pounds. :thumbsup:

I'd recommend strongly against messing with the mainspring. That's a step down a dark road that leads to weeping, wailing, gnashing of teeth -- and orders for replacement springs... :cursing:
 
Last edited by a moderator:
rdilion asked:
How did you smooth-up the trigger? Did you have to lighten up the mainspring?

I just polished all the trigger surfaces to remove any tool marks & rough spots. Made sure it didn't rub anywhere. Didn't have to mess with the mainspring.
 
The first step to lightening up anything is to polish all contact surfaces, and make sure nothing is rubbing against a stock, or lockplate, that is NOT SUPPOSED to be rubbing against it!

You will be amazed at how much better every lock and trigger works when all the casting burrs, machine burrs, and bends on the edges of parts are removed so that everything moves freely! Put oil on those contact surfaces and pins, too!

Then, AND ONLY THEN, do you consider, polishing or changing anything else.

On triggers, I first check the nose of the sear, and the full cock notch, to see how they fit together, and whether there are obvious burrs on the edge of the notch. A few strokes with an India stone will remove the burrs, and that often improves the trigger pull/release without doing more.

Sometimes that notch is too deep, and the nose of the sear goes in too far. Putting in a piece of brass to fill in that notch a bit, to reduce the depth of the notch is about as easy a " fix " as most amateurs are equipped to do. I have even see solder put in the notch to do this job. I believe that this might even be easier.

Filing the sear nose back is another way to correct the problem, but you have to be careful about overdoing it. The sear nose also has to enter the Half Cock Notch properly, so you can't shorten the nose that much on most locks.This is the fastest way I know to be ordering another SEAR! :rotf: :hmm:

The last thing you work on is reducing the spring tension. I always check the sear spring, as it should be fitted into the corner of the sear bar, and not be pressing down on the arm away from that corner. Sometimes you have to order a new sear spring with a longer arm to get this working right. The sear spring does impact on both the trigger pull and sear release.

The mainspring, on the other hand, is putting all the tension on the tumbler, and if that is too strong, you won't have any other alternative than to reduce that spring tension.

Generally, trigger pulls can be "fixed" with polishing the bearing surfaces, including the nose of the sear and the full cock notch, or by shortening the depth of the notch.

The other way has to do with single triggers that are pinned to the stock, rather than to a trigger plate. As others have indicated, and Mike Brooks has been so kind to spell out, changing that location of the pivot pin in the trigger will lighten the trigger pull the quickest.

All these techniques FIRST REQUIRE that all contact parts( bearing surfaces) be polished, and then lubricated before you gauge the trigger pull and decide what needs to change.

This is not work to be done when you are angry or tired, or not clear-headed.

It is fine work. You are working on a fine Swiss Watch, not the drive shaft of your Jeep! Take your time, and take it slowly. Test frequently as you do any polishing, and test more often if you put a file to any part here.

This is work that is generally NOT done with power tools, for the same reason I recommend that you leave the Gorilla at the zoo, rather than letting him into your workshop. :shocked2: :blah: :hmm: :thumbsup:
 
Get yourself a Lee .58 REAL mould and you will love the results. This is in my experienced opinion the best load for my Euroarms Zouave. I use 50 gr. of fffg Goex behind the REAL with great results.
 
Yeah, but those little polishing wheels on a dremmel and some jeweler rouge sure speed things up. I ended up removing some sear nose and polishing hell out of the full cock notch. It wasn't hard but I was careful.
 
Slowpoke: The only problem with using those polishing wheels for a dremel tool on the full cock notch, and/or sear nose is that the wheels tend to round the edges. Does your sear and nose now have full contact across the width of the sear, when its in the notch? or just on the center high spot?

I prefer to use jeweler's files, and emery cloth to keep the surfaces square to each other. Otherwise, you induce torque to the sear, and that generally leads to bad consequences. Often the sear is trying to slide sideways out of the notch. In a deep notch, that does not pose any danger of a "slip-fire" or Accidental discharge, but if the notch is shallow, you can have those problems. The last thing you want is a gun that can be fired " accidentally" by a sharp rap to the side of the stock.
 
I had Whitacre Machine Shop put a taller front sight on mine. Then I tried several adjustable rear sights. The one that has worked best so far came off a Krag Jorgensen.
 
I took about a week, sitting around evenings messing with that lock. I would file a little, polish a little, put it back together, scratch my head, take it all back apart and start again.I used cold blueing to see if I had full contact across the face of the knotch. I made my own dremel polisher out of a .17 cal bore swab with rouge on it. The zouve has a nice smooth trigger pull now and I can thump the butstock on the floor at full cock with no ill effects. My problem was a WAY too deep knotch and a sear that went clear to the back of it.Not to mention that the sear had absolutely no polish to it. It still had file marks on it. It was the worst out of the box trigger I ever felt, almost took two fingers to get it to go off.
 
Readers should note that when reference to a Dremel Tool was made they were talking about "buffing", not grinding.
If the soft buffing wheel is used correctly it shouldn't damage the sear or tumbler.
If the hard grinding bits are used instant disaster is the nicest thing I can think of to say about what the results will be.

About 3 years ago, I posted the following information. Hopefully folks will think it is helpful.

"Most likely, your problem is with the angle of the sear notch and the way it engages the sear.
This angle of the surface on the tumbler and sear really shouldn't be frinkled with unless you know what your doing.
There may be a few things you can look at though.

The locks sear arm is held in place and pivots on the sear screw. I have seen cases where someone was apparently concerned with the screw being too loose so they tightened it up real good. The net result of this is that the sear would just barely move from the spring pressure on the top, or the trigger from the bottom.
With the lock uncocked, check to see that the sear moves freely against up and down against the spring load. If it doesn't loosen the screw just a little until it does move easily.

The tumbler notch and the nose (end) of the sear should be very smooth surfaces. If they are rough, the sear nose will not slide easily across the notch surface.
Some people take a very fine grinding (whet) stone and try to smooth the surfaces. While this can be done, it is not without it's dangers.
If the angle of these surfaces is changed by overuse of the grinding stone it can make the lock and gun a hazard because the sear can slip releasing the hammer all by itself.

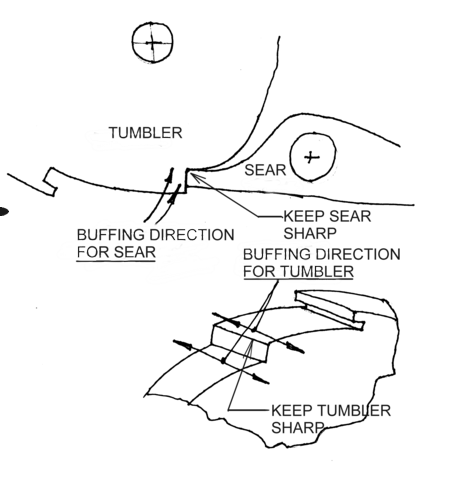
If you have access to a buffing wheel, the surfaces can be buffed using "stainless" compound (or equivalent) to get a mirror like surface.
This also should be done with the buffing done only in the direction shown in these sketches:
LAPPINGTEXT.png

Note that the direction of buffing is always in a direction that will not round off the critical sharp edges.

This buffing will remove less than .001 of the material which is often enough to really smooth out the lock but it will not change the critical angles or remove the sharp edges.
 
Zonie, thank you for the description as I could not state it that clearly. I wish I could show you a drawing of what my tumbler looked like so that I don't come off sounding like a dangerous fool. My seer had to overcome a lip that I can only assume was a production mistake.Also the seer itself still had visible tool marks on it. Polishihng and removal of a little material worked wonders.
 
rdillon asked:

I really like them, though they are not as versatile as some, like the Enfields. One tip you may find useful though, when you get your Zouave lift up all the sight leaves & you will see a disc with two dimples in it. The disc is the head of a screw that holds the rear sight to the barrel, if you loosen the screw the rear sight will pivot left/right which will enable you to get a fair amount of windage adjustment. I filed down a stubby screwdriver to two pins that locate in the dimples, & carry it in my shooting box. You can scribe a light reference mark on the sight & barrel showing the center-line if you like. I have found that feature to be very useful in competitions. As far as I know all Zouaves have that screw, my Euroarms-repro., & my original Remington both have it, so I would think most of the makers would have retained it.
That's a great tip. Thanks.
My Zoli has it. 👍🇦🇺
 
I have had Zoli and Euroarms Zouaves over the last 33 years. I currently have a very nice JRA Euroarms with a Robert Hoyt rifled barrel. It uses a .575" 510 grain Minie, sized to .574 and 3cc scoop of 3FG Goex or Ol Eynesford (45 grains +/-). That sounds to many folks like a light load, but believe me, it is a devasting load. At 100 yards, with dead soft lead Minie, this load will shatter a pine 2"x4" and drop a deer where it stands with good shot placement. Too much powder and most Minies, except those with very thick skirts, will risk blowing the skirt apart and destroying accuracy. These rifles will shoot and they will shoot Minies very accurately if you will take the time to develop a load, and size your Minie to 0.001 below bore diameter. No wrinkles in your cast Minies. Good luck and good hunting.
 
Back
Top