


Grizzly Adams
50 Cal.
- Joined
- Jul 21, 2014
- Messages
- 1,049
- Reaction score
- 2
I must first state that my work is noting like that of the fine craftsmen on this forum. I am merely a hack by comparison.
I sure wish I had more detailed pictures of the build process, and I wish the pictures I do have would end up in some sort of order, but Photobucket being the fickle beast it is, my hopes are not high.
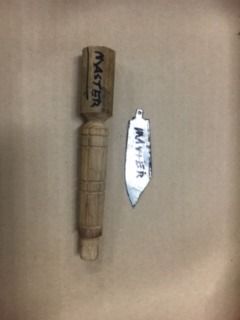
Once I established a design, I dismantled the knife and took measurements of the blade, handle, namely where the collet must fit, the length of that respective shoulder, depth of the slot for the blade, and the radius and profile of the tang of the blade. These are the important things to keep in mind so that the collar stays put when closed, but it rotates fairly freely when the blade is opened. I made the handle master pattern out of hickory and the blade master out of aluminum sheet.
Now to the lathe. I use approximately 1"x1" square walnut blanks, around 6" long. Accounting for the stub, which is needed later on for the cutting of the slot for the blade. The handle ends up at 3 1/2" and the blade ends up at 2 1/2". Once the handle is shaped, I add decorative grooves and do the final sanding. It is much easier to get all the lathe stuff done first, as getting it centered again is a pain.
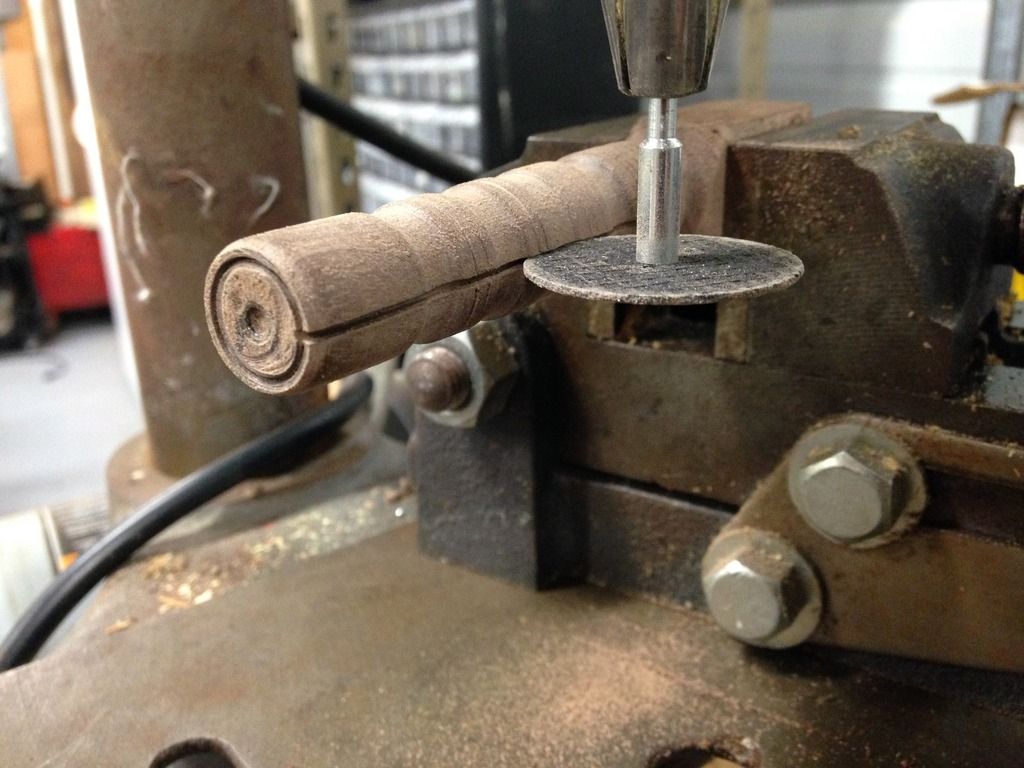
After all that is done, The next step is to cut the slot for the blade. Fortunately, my drill press can be adjusted to spin very fast; unusually fast in fact, so I put a Dremel cutting disc in the chuck, put the blank level in a machinists' vise, and simply cut the slot by sliding the vise on the table of the drill press.
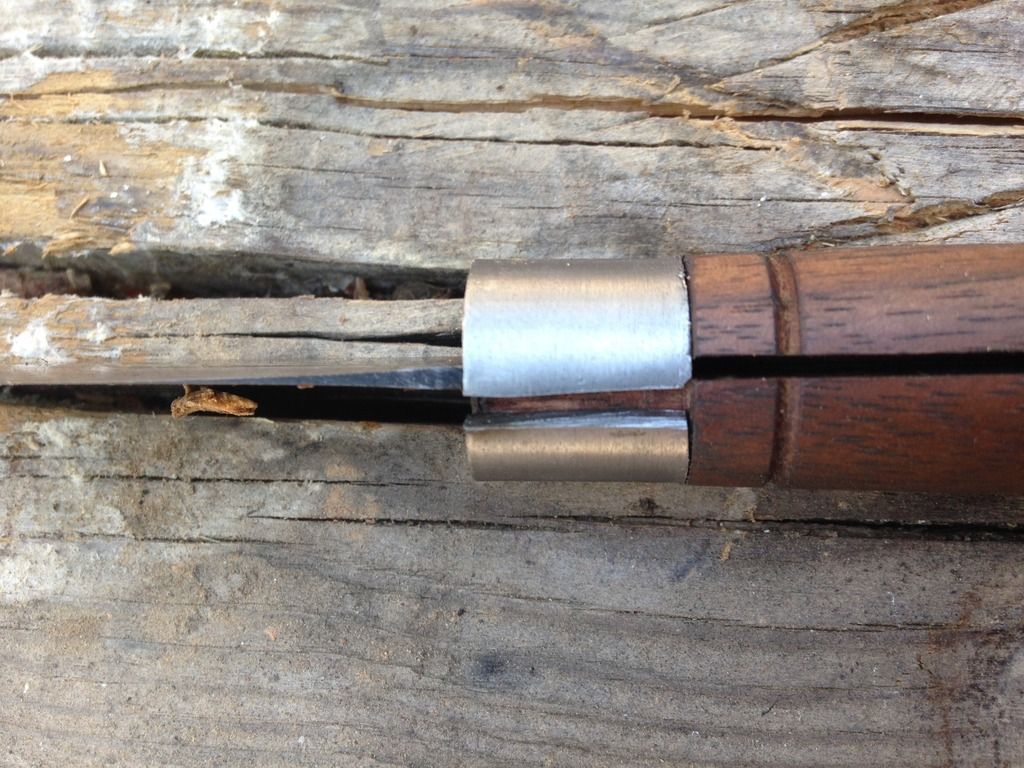
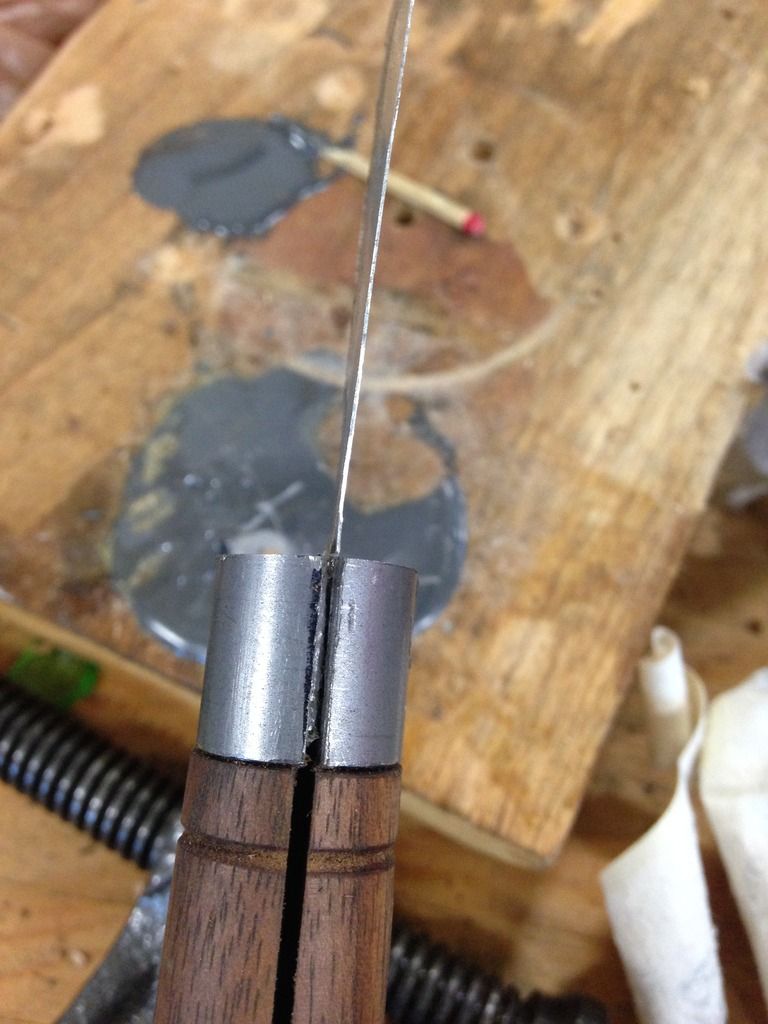
Next is making the blade. I used some very old saw blade that is around 1/16" thick. I used a homemade file guide to file a bevel (a quite shallow one as well), and drilled the hole through the handle and blade together. This is an eyeball affair. You will likely need to do a little filing to get the blade to fold perfectly. Also, make sure your bevel is a little fat at the base of the blade, that creates a wedging action that keeps the collar on when the knife is closed. This has been successful for me after thousands of openings of the knife and plenty of use cutting patches and whittling sticks. Once fit to the handle in a satisfactory manner, harden and temper your blade. The main thing to remember when pinning your blade is to leave plenty of wood in front of the pin. The collet will keep the wood from splitting out, but there is no support at the front to keep the end grain from blowing out. This is important, as there is a tensile force in that direction due to the locking mechanism. I used 1/16" pins on my knife with satisfactory results. The pin need not be pinned, the collet holds it in place. This allows for easy disassembly of the knife for disassembly or repair. It is also important that the shoulder of the blade rests against the front of the handle, as that is what keeps the blade from opening too far. [I am shown here fitting my aluminum master blade to the knife, that is not the actual cutting blade, an additional picture is shown displaying the taper needed for the wedging action necessary to hold the collet on, using the actual blade.]
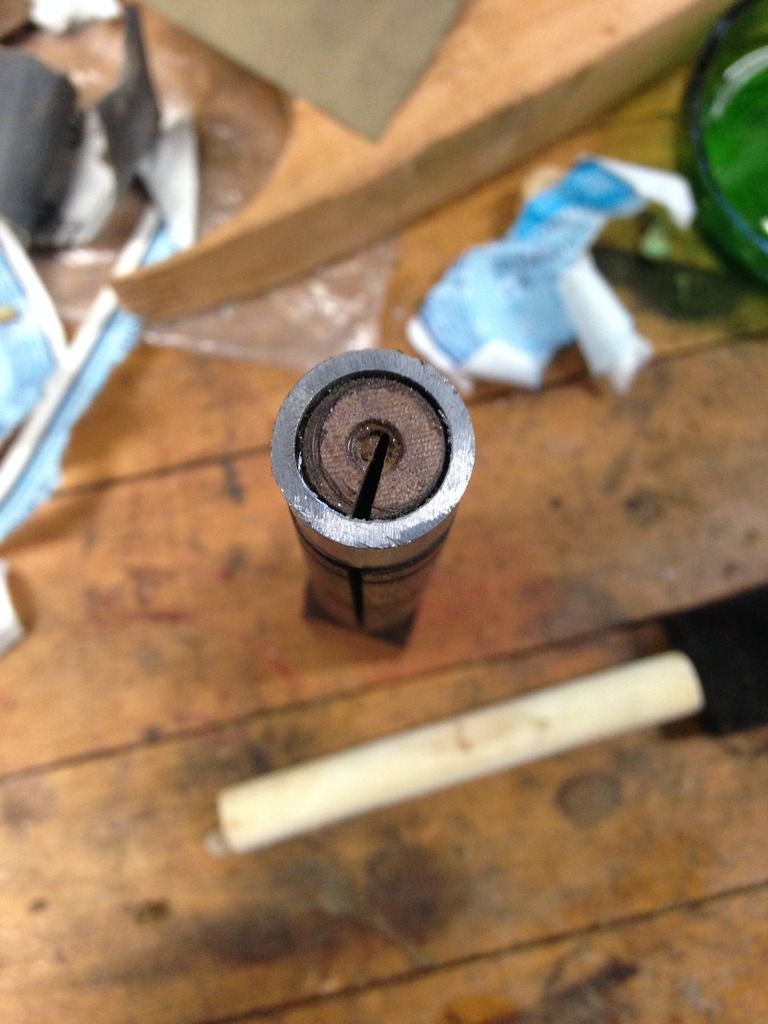
The only real fiddly part of the knife is fitting the rotating collet. I used J531 seamless hydraulic tubing. It has about a 1/16" wall and approximately a 1/2" ID. Cut it to length, then cut a slot wide enough for the blade. The closer you get this tolerance, the less noticeable your rotating collet will be. The main goal is to hide the fact that there is a rotating collet in the first place. We are already using way too thick of material to be passable for the collet found on an original penny knife, so one infraction is enough. When the slot is cut, slide the collet over the front of the handle. This should only be possible when the knife is OPEN. Ensure that the transition from the collet to the handle is flush and with the blade open, try to twist the collet gently. Close but no cigar? Good. Determine which direction you want your collet to rotate and file a gentle taper to create a wedging action to hold the blade open. A shallow, steady taper is most secure and will automatically adjust for wear. Mine has not yet needed adjustment and shows no signs of wear yet. If you rotate the collet to where the blade can pass through, but keep the blade open, you should be able to remove the collet with gentle to moderate force. When closed, a much greater effort should be necessary, and the collet should make it clear that it wants to stay put! Also, the blade shoulder should rest on the collet, not on the wood.
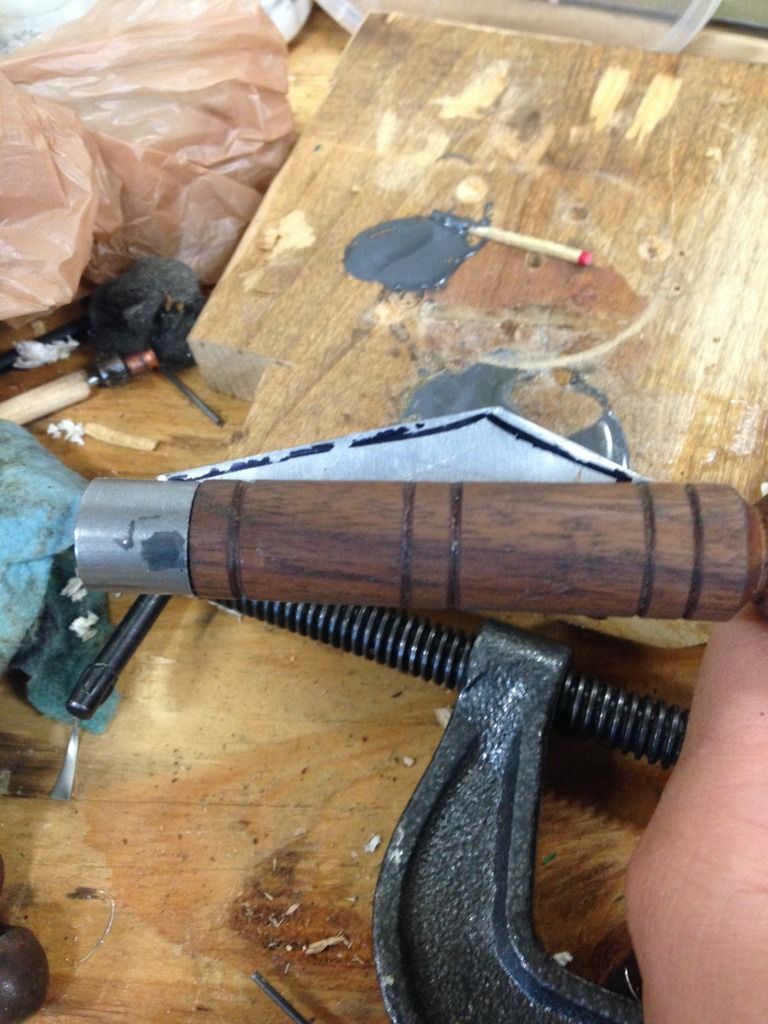
By now, you should have a folding knife that is dull, unfinished, and has a strange block on the end of it. If you do, good. You will find that keeping the block on till the bitter end has served you well. Open the blade, remove the collet, slide the pin out, remove the blade, and finish your handle with the [optional stain], sealer and finish. While the blade is out, carefully sand it smooth and finish it, or leave it to age as I did. Cutting spit patches will age a blade in a matter of hours. Place that faithful block in the vise, and do away with it. Sand the base of the knife and dob a little more finish in. Let dry. Reassemble the knife, sharpen and enjoy.
You will find that these little knives tend to "wear in", not "wear out". I keep mine shave sharp and it has not left my pocket since I made it. It has acquired a fine patina and all the edges have become soft and organic, except for the blade of course!

I sure wish I had more detailed pictures of the build process, and I wish the pictures I do have would end up in some sort of order, but Photobucket being the fickle beast it is, my hopes are not high.
Once I established a design, I dismantled the knife and took measurements of the blade, handle, namely where the collet must fit, the length of that respective shoulder, depth of the slot for the blade, and the radius and profile of the tang of the blade. These are the important things to keep in mind so that the collar stays put when closed, but it rotates fairly freely when the blade is opened. I made the handle master pattern out of hickory and the blade master out of aluminum sheet.
Now to the lathe. I use approximately 1"x1" square walnut blanks, around 6" long. Accounting for the stub, which is needed later on for the cutting of the slot for the blade. The handle ends up at 3 1/2" and the blade ends up at 2 1/2". Once the handle is shaped, I add decorative grooves and do the final sanding. It is much easier to get all the lathe stuff done first, as getting it centered again is a pain.
After all that is done, The next step is to cut the slot for the blade. Fortunately, my drill press can be adjusted to spin very fast; unusually fast in fact, so I put a Dremel cutting disc in the chuck, put the blank level in a machinists' vise, and simply cut the slot by sliding the vise on the table of the drill press.
Next is making the blade. I used some very old saw blade that is around 1/16" thick. I used a homemade file guide to file a bevel (a quite shallow one as well), and drilled the hole through the handle and blade together. This is an eyeball affair. You will likely need to do a little filing to get the blade to fold perfectly. Also, make sure your bevel is a little fat at the base of the blade, that creates a wedging action that keeps the collar on when the knife is closed. This has been successful for me after thousands of openings of the knife and plenty of use cutting patches and whittling sticks. Once fit to the handle in a satisfactory manner, harden and temper your blade. The main thing to remember when pinning your blade is to leave plenty of wood in front of the pin. The collet will keep the wood from splitting out, but there is no support at the front to keep the end grain from blowing out. This is important, as there is a tensile force in that direction due to the locking mechanism. I used 1/16" pins on my knife with satisfactory results. The pin need not be pinned, the collet holds it in place. This allows for easy disassembly of the knife for disassembly or repair. It is also important that the shoulder of the blade rests against the front of the handle, as that is what keeps the blade from opening too far. [I am shown here fitting my aluminum master blade to the knife, that is not the actual cutting blade, an additional picture is shown displaying the taper needed for the wedging action necessary to hold the collet on, using the actual blade.]
The only real fiddly part of the knife is fitting the rotating collet. I used J531 seamless hydraulic tubing. It has about a 1/16" wall and approximately a 1/2" ID. Cut it to length, then cut a slot wide enough for the blade. The closer you get this tolerance, the less noticeable your rotating collet will be. The main goal is to hide the fact that there is a rotating collet in the first place. We are already using way too thick of material to be passable for the collet found on an original penny knife, so one infraction is enough. When the slot is cut, slide the collet over the front of the handle. This should only be possible when the knife is OPEN. Ensure that the transition from the collet to the handle is flush and with the blade open, try to twist the collet gently. Close but no cigar? Good. Determine which direction you want your collet to rotate and file a gentle taper to create a wedging action to hold the blade open. A shallow, steady taper is most secure and will automatically adjust for wear. Mine has not yet needed adjustment and shows no signs of wear yet. If you rotate the collet to where the blade can pass through, but keep the blade open, you should be able to remove the collet with gentle to moderate force. When closed, a much greater effort should be necessary, and the collet should make it clear that it wants to stay put! Also, the blade shoulder should rest on the collet, not on the wood.
By now, you should have a folding knife that is dull, unfinished, and has a strange block on the end of it. If you do, good. You will find that keeping the block on till the bitter end has served you well. Open the blade, remove the collet, slide the pin out, remove the blade, and finish your handle with the [optional stain], sealer and finish. While the blade is out, carefully sand it smooth and finish it, or leave it to age as I did. Cutting spit patches will age a blade in a matter of hours. Place that faithful block in the vise, and do away with it. Sand the base of the knife and dob a little more finish in. Let dry. Reassemble the knife, sharpen and enjoy.
You will find that these little knives tend to "wear in", not "wear out". I keep mine shave sharp and it has not left my pocket since I made it. It has acquired a fine patina and all the edges have become soft and organic, except for the blade of course!


