• This community needs YOUR help today. We rely 100% on Supporting Memberships to fund our efforts. With the ever increasing fees of everything, we need help. We need more Supporting Members, today. Please invest back into this community. I will ship a few decals too in addition to all the account perks you get.


    Sign up here: https://www.muzzleloadingforum.com/account/upgrades
  • Friends, our 2nd Amendment rights are always under attack and the NRA has been a constant for decades in helping fight that fight.

    We have partnered with the NRA to offer you a discount on membership and Muzzleloading Forum gets a small percentage too of each membership, so you are supporting both the NRA and us.

    Use this link to sign up please; https://membership.nra.org/recruiters/join/XR045103

CVS Hawken Double Trigger Adjustment Problem

Muzzleloading Forum

Help Support Muzzleloading Forum:

This site may earn a commission from merchant affiliate links, including eBay, Amazon, and others.

wolfakkahn

Pilgrim
Joined
Feb 24, 2016
Messages
2
Reaction score
0
I am trying to follow the book on adjusting the triggers on a CVS Hawken .50 Cal that I built from a kit. I have placed the hammer in full-cock, set (pulled the rear trigger, and then turned the screw between the triggers clockwise as directed. But it will not "fire". When I operate the triggers, the rear trigger clicks allowing me to pull the front trigger. The front trigger then gives an audible click but does not release the hammer. As I continue to pull the front trigger it finally releases the hammer. I've been trying to figure this out, according to the book I should be able to adjust the front trigger from an hair trigger to a heavier trigger. Any suggestions? Thanks.
 
The little screw in between both triggers does not adjust the trigger poundage of the front trigger but rather the travel of the front trigger until it engages the sear arm. It will adjust for a longer pull or shorter one for the front trigger. For a better explanation of various causes to your problem, more experienced members will chime in and help you better than I can. Respectfully, Cowboy :hatsoff:
 
Remove the lock. Most likely the adjustable tumbler is set for a heavy trigger pull and the trigger when it goes off does not have enough power to set it off.
 
Not a problem, but we need to check 2 other adjustments to the trigger and it's best done with the trigger out.
So take the trigger out,,
Got it out? good.

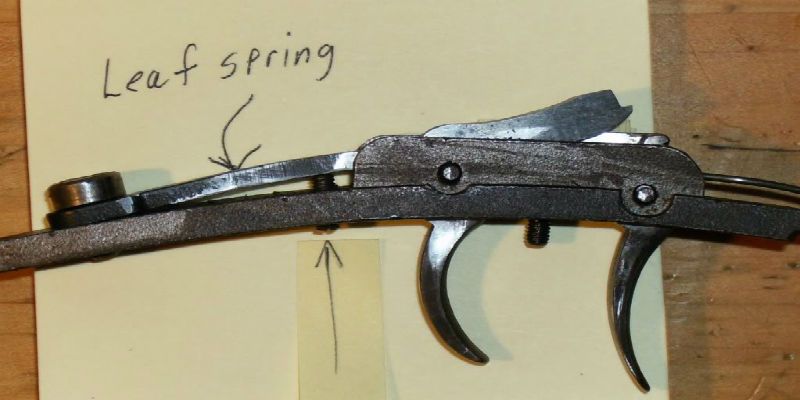
The rear trigger cam is driven by that leaf spring in back,, if that spring isn't down far enough, when the front trigger releases it, it's doesn't have enough power to raise and strike the locks sear arm.

Untitled.jpg


Leave the triggers un-set, tighten the screw in back that holds the leaf in place. As you do that you'll see the rear trigger cam rise.
Now goof around with setting the rear trigger and releasing it with the front trigger, the rear trigger should be pretty hard to pull, that's good, it's getting it's power from the leaf spring.

Next;
You can go too far, except for help with the next adjustment.
Sometimes that rear cam will be so high in the un-set position,(from spring pressure) that it always presses against the sear arm and the lock won't go into full cock. Not good.
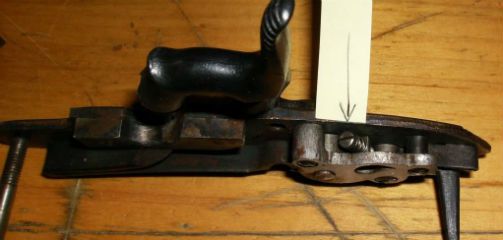
See the arrow underneath at that second screw in the trigger plate? If you turn that screw in,, it will lift the front of the leaf spring and allow the rear cam to drop.
Get that?
So there's kind of a balancing act here,, you want the rear leaf spring's screw turned down so the rear trigger has power, but use the little screw to stop the travel.
Ya gotta goof around with it.
Once you have the rear trigger doing what it's supposed to do,, you can adjust the screw between the triggers to get the pull you want.
There is nothing that say's you have to use the set feature all the time, you can use the front trigger alone any time you want.
 
There's more! But first things first.
later I'll explain a bit about this screw it's what FML mentioned;
FML said:
Remove the lock. Most likely the adjustable tumbler is set for a heavy trigger pull and the trigger when it goes off does not have enough power to set it off.

Untitled-6.jpg
 
FML said:
Remove the lock. Most likely the adjustable tumbler is set for a heavy trigger pull and the trigger when it goes off does not have enough power to set it off.
What FML is talking about is the nose of your sear is fully engaged in your full cock notch of your tumbler. If you turn the tumbler screw in, the tip of the screw engages the nose of the sear and pushes it out a little ways, thus creating a lighter trigger pull to release the hammer. The more you turn that screw in the lighter the trigger pull will get and if turned in to much, the nose of the sear will not engage the notch at all and the hammer will not stay cocked. The key is to tun it a little and then put the lock in and see if that helps. When your turning that screw with the lock out of your rifle, you can see it pushing the nose of the sear out of the full cock notch. I would try until the nose of the sear is a little ways out of the notch, then put the lock back in your rifle and cock it, then put thumb preasure on back of hammer to be sure the hammer doesn't fall with thumb preasure. Then I would fire the muzzleloader and see if the problem is solved. Respectfully, Cowboy ( P.S. Disreguard my reply, necchi is on it. I was in the process of making this reply when he stepped in) :thumbsup:
 
Good explanation Cowboy, Thank you.
But you forgot to mention there's a Gremlin who's only job is to turn that tumbler screw when no one is around. And he likes to do it just before a rendezvous!!
 
:metoo: I agree with Gene. I think your problem is with the trigger and/or inletting. Check to be sure that nothing is rubbing in the inlet areas of the triggers and lock. If there is anything rubbing, gently and carefully cut away small bits of wood until the part no longer rubs. Also, be sure that you are not over tightening the lock bolt. It only needs to be snug. Do not tighten it like you were torqueing a head bolt on an engine. Over tightening your lock bolts will draw your lock too deep into the inlet and cause problems.
 
Hey Danno3, I had similar issues with my older CVA 50 cal hawken. I followed Necchi's and Cowboy's instructions for adjustments and she is working perfectly now. One other thing, when you have the adjustment dialed in you can put a very little bit of clear nail polish on the set screws to prevent them from vibrating out of adjustment.

Good luck.
 
et a deer slayer replacement trigger. thehttp://www.redaviscompany.com/1007.htmly are a bargan and improvement .
 
Definitely not drop-in. I had to glue new wood in the trigger bar recess and inlet the Davis trigger. The mountain rifle trigger guard also requires modification to allow clearance for the set trigger. The Davis is a better trigger, but it requires quite a bit of fussing to get it installed and working.
 
As the others have mentioned it could be the trigger spring for the rear set trigger is not adjusted so it can provide enough force to trip the lock tumbler.

Or, the lock tumbler full cock notch screw is not adjusted to provide a safe engagement with the nose of the sear.

Another possibility is that the blade on the top of the rear set trigger is hanging up on a bit of wood in the stock instead of whacking the sear arm like it is supposed to do.

To test this last possibility, with the rear trigger left unset, cock the hammer to full cock.

Now, pushing from the rear of the rear trigger, try to force the trigger forward (towards the front trigger).

With a moderate amount of force on the rear of the rear trigger the lock should release and the hammer should fall.

If it doesn't, in all likelihood, the rear trigger blade is pushing against the stock wood instead of the lock sear arm.

To confirm this, remove the trigger from the stock.
Apply a light coating of soot from a candle to the blade that is on the top of the rear trigger.

Re-install the trigger, set the rear trigger and pull the front trigger. You should hear a click when it releases.

Now, remove the trigger from the stock and look at the soot on the blade.
If it is rubbed off, look for traces of it on the stock wood. If you find any, cut away the wood in that area and try the trigger test again.

When doing this, I use inletting black instead of soot.
If you don't have any inletting black and don't want to mess with soot, borrow some lipstick and lightly coat the blade on the rear trigger with it.

After the test, look for signs of the lipstick rubbing off and look for traces of it in the stock mortise.
 
Prussian blue is great for marking wood. It should be available at a auto supply store. If not, lipstick will work just fine. Probably, any color of acrylic artist paint would do as well.
 
Thanks for the help, everyone ! I used your information and have the triggers and the lock working properly. After getting the triggers working correctly I found that they needed to be set a hair deeper in the cutout in the stock.

Thanks again.
 
Back
Top