• This community needs YOUR help today. We rely 100% on Supporting Memberships to fund our efforts. With the ever increasing fees of everything, we need help. We need more Supporting Members, today. Please invest back into this community. I will ship a few decals too in addition to all the account perks you get.


    Sign up here: https://www.muzzleloadingforum.com/account/upgrades
  • Friends, our 2nd Amendment rights are always under attack and the NRA has been a constant for decades in helping fight that fight.

    We have partnered with the NRA to offer you a discount on membership and Muzzleloading Forum gets a small percentage too of each membership, so you are supporting both the NRA and us.

    Use this link to sign up please; https://membership.nra.org/recruiters/join/XR045103

Crafting a pistol box..

Muzzleloading Forum

Help Support Muzzleloading Forum:

This site may earn a commission from merchant affiliate links, including eBay, Amazon, and others.

Rick Son

45 Cal.
Joined
May 5, 2012
Messages
536
Reaction score
9
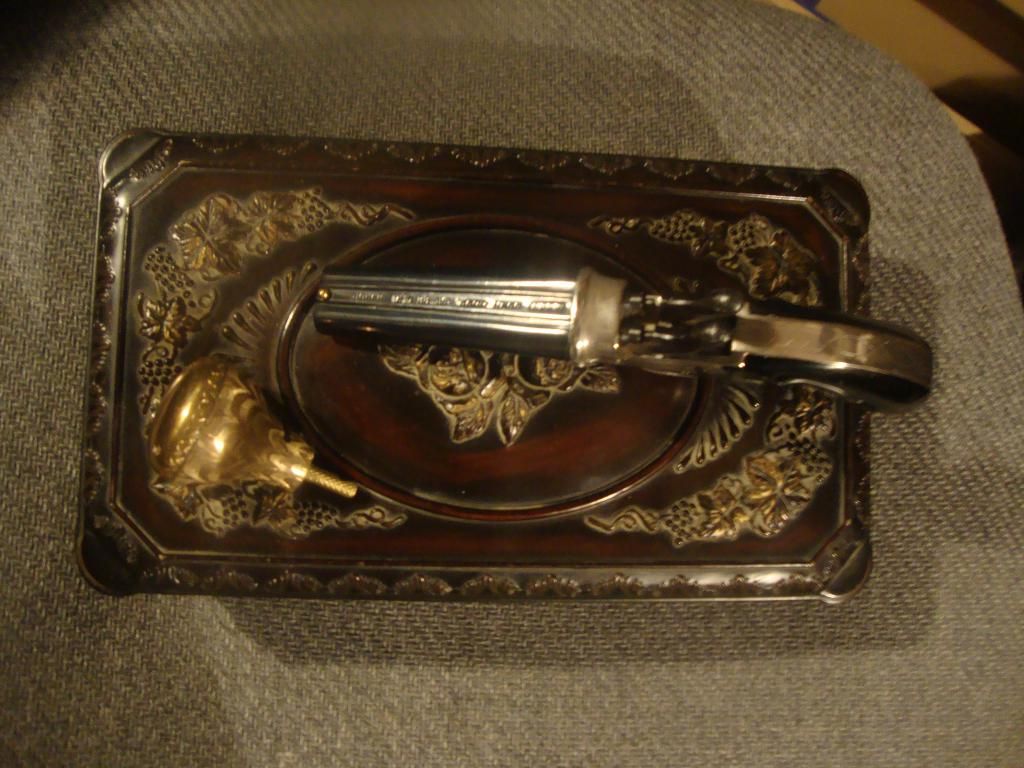
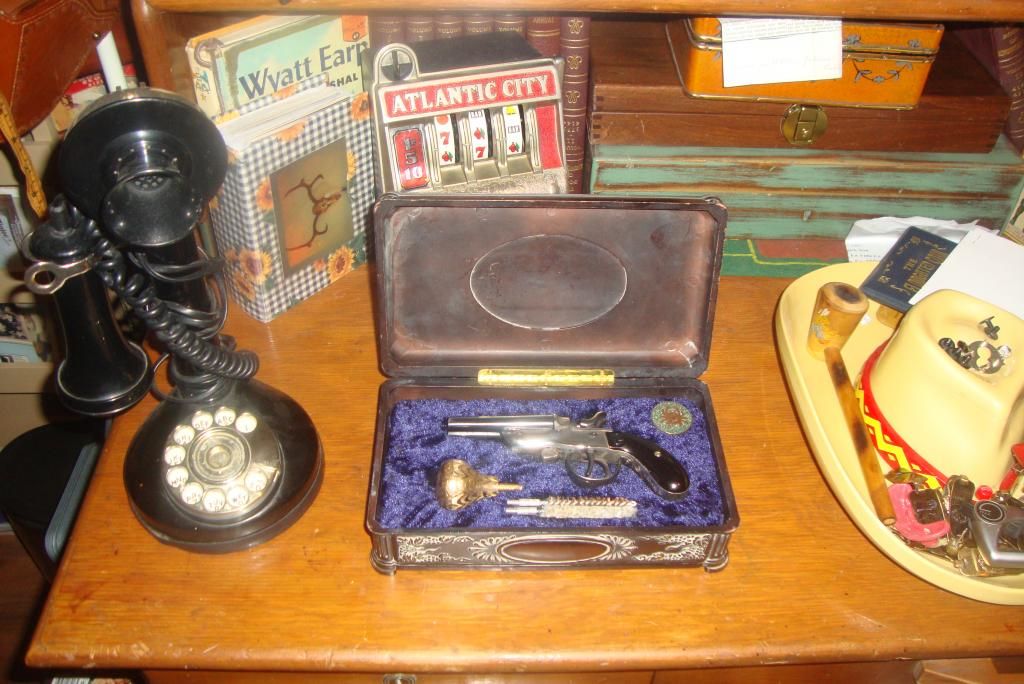
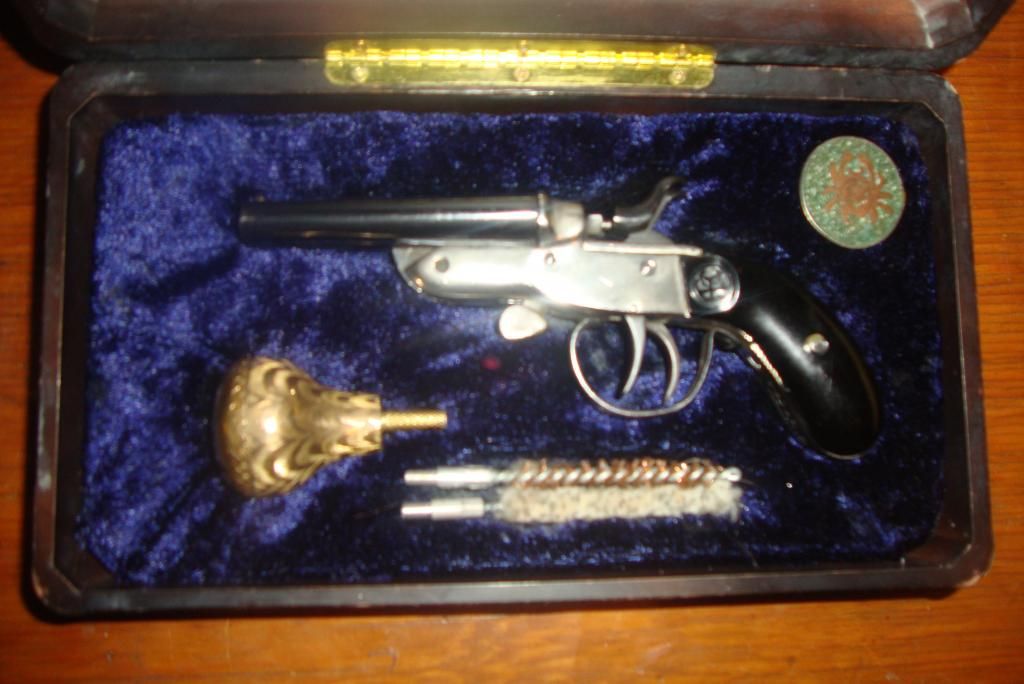
I found an old box at an antique store,i want to put a little side by 22 deringer in it with a brass tool i made for cleaning.I went and got some styrofome and want to put valour over that in the shape of the deringer so it sits down in it,is styro a good choice or what is your thoughts on this,i don't have any fancy tools and not much at carving,sorta want to make it look like presentation set.I used an 1800s round umbrella handle,and put a piece of dowel in it then drilled it for a jag,i just screw the cleaning brushes in and perfect length for the barrels,but is styrofome what i should use?
Not BP related,so if this need to go leter rip..And thanks
 
What about using a piece of 3/4" pine for the insert in the box. Cut out the outline of the pistol you want to mount in the box. Rockler wood working supply has a self adhesive felt type sheets used to line jewelry boxes and such. Cover the pine insert with something like that if you like. :hmm:
 
Styro will work. I've used it in a couple of pistol boxes. I'd suggest you not try to cut out the areas for the pistol, etc. but rather use a small spoon to crush those areas to a depth of a little over 1/2 the thickness of the pistol, and a little larger than the profile of the gun to allow for fabric thickness. Use fabric spray glue to stick the fabric down. You may have to practice a couple times so have enough styro on hand for that purpose.

This is one I made several years ago, like you want to do:

coltboxopen.jpg
 
When I made my pistol box, I bought something called "Kaizen Foam" from fastcap.com. It consists of many layers of about 1/8" so that you can cut the outline of your pistol with an exacto knife and then easily peel away the layers down to the depth you need. It is also allegedly resistant to oil and solvents.
 
Last edited by a moderator:
You can use Styrofoam if you wish and I think it would be the easiest thing to work with. The carving of the Styrofoam does not need to be perfect, just close. You start by carving out a hollow in the Styrofoam into which your pistol will fit nicely. Another way of making the depressions is to draw around your pistol and then use a dowel with a rounded end to press down the Styrofoam in the area where you have traced the pistol "Close enough" is good as long as it is just a little bit loose to allow for the velvet, because the Styrofoam is going to be covered with the velvet and will hide any irregularities. Once you have the styrofoam carved, dry fit a piece of velvet pressing it into the hollows that you carved. Use the tools and the pistol to help you in fitting the velvet. You may need to adjust the hollows as you go. Once you have the velvet fitted to your satisfaction, remove it and spray the Styrofoam with a spray adhesive that you can buy at any hobby shop. Work quickly so you can get the velvet in place before the glue drys. It may be easiest if you don't spray the whole piece of Styrofoam all at once. Lay the velvet on the Styrofoam and spray a bit, fit some of the velvet and then spray some more. Keep working along spraying and fitting until all of the velvet has been stuck in place and wrapped around the sides of the block. Make sure that you have allowed for the thickness of the velvet when you cut the block to fit in the box. Then press the Styrofoam into the box and you have it.

You can find all colors of velvet in any fabric shop.
 
That's it right there,my mistake was ctting the design out instead of compressing :doh: Ok back to the drawing board,yep i have plenty of foam~Thank yee kindly~ :hatsoff:
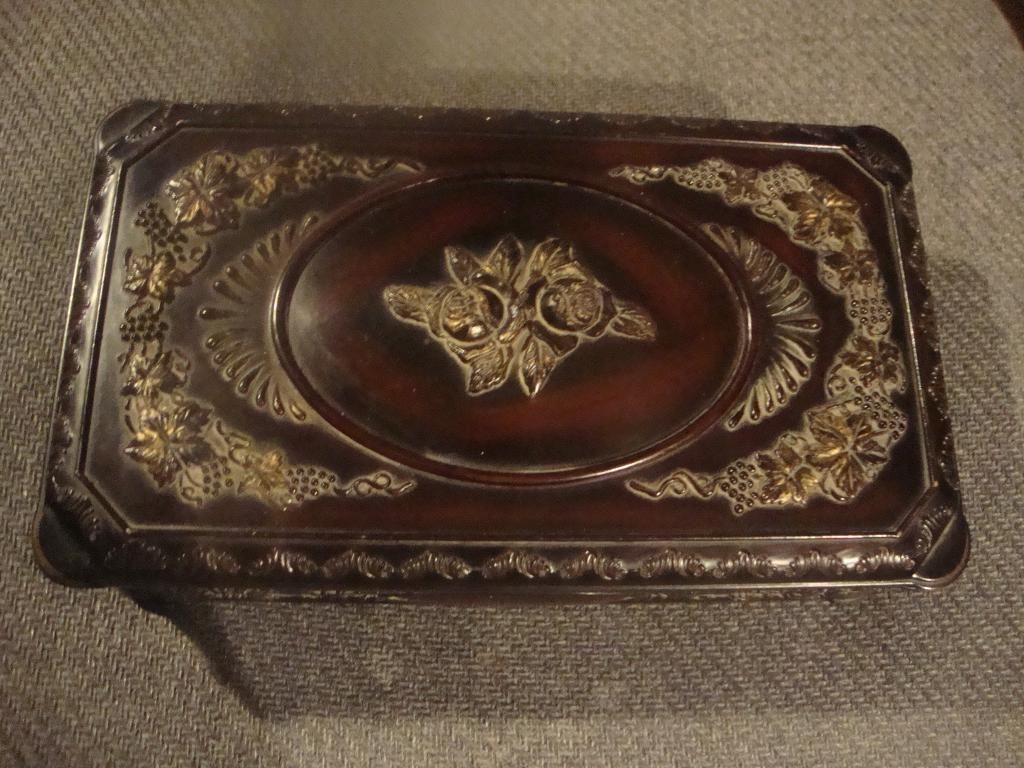
 
Keep in mind that all styro is not created equal. I've found that the light to medium density styro you can get at craft stores works best for crushing, not the high density stuff that cheap coolers are made of.
 
The stuff that is use for insulation in walls will work, too. You can sometimes get a scrap piece big enough for your box at a building site just by asking for some from the scrap pile. Also, you can often find broken sheets at places like Home Depot that they will either give to you free or sell at a deeply discounted price. The open foam is what you want. The closed foam is difficult to work with. The stuff that looks like little pellets that have been pressed together is also very difficult to work with.
 
Great idea Bill and they are building homes across the street from me,and by the way that is a real nice looking box you made by golly,this is starting to get a little easier now.Thank you fellers for the help! :hatsoff: That's the umbrella handle i made a cleaning jig with..

2014-05-22161356_zpsba73f36c.jpg


2014-05-22161442_zps6f3c1e6e.jpg
 
Curious i checked it out going to order some for another one i will do and give it a try,thanks much for the link! :thumbsup:
 
I used your suggestion on the foam and it worked great,I used a white dry clear styro glue,should have used the spray,yep practice as the glue comes through,i'll redo when i get some spray and put some velour on the lid :hatsoff:

2014-05-31180933_zps6aad3bdf.jpg


2014-05-31180922_zpsaad41c59.jpg
 
Chief Moonthunder said:
I used your suggestion on the foam and it worked great,I used a white dry clear styro glue,should have used the spray,yep practice as the glue comes through,i'll redo when i get some spray and put some velour on the lid :hatsoff:

2014-05-31180933_zps6aad3bdf.jpg


2014-05-31180922_zpsaad41c59.jpg


I like it a lot. Goes very well with the pistol. I think you did a fine job on your first attempt :).

I noticed what looks like where a picture or something occupied the oval space inside the lid. I think what I'd do is take advantage of that, and instead of velour on the inside, find some old small picture or drawing from the same era as the pistol and box, and put that in the oval. Even a reprint of something from a book or family album would work.

One small criticism - The cleaning brushes don't really fit with the overall theme to my eye. I'd suggest instead a small depression with a piece of wood in it, drilled to hold a few cartridges. Typically, that's what you'd see in a presentation set.
 
I agree don't like it either,was thinking a brass tube for the brushes to go in,i like the old picture idea in the oval,it's a Rossi double barrel 22~
 
That's one of those sovinuer,(how do ya spell soo va near),pipes,that one you no draw from long end,you have to smokem from short end behind bowl~I hang dream catchers from them,i find them at antique stores :)

2014-06-01090835_zpsef35fdc1.jpg
 
Old "Mr. Bottom One" sure looked more interesting in the upper photo! Got an old corn cob one, with a real stick for the stem, that I break out every once in a while to do my combo Douglas Mac Arthur/Mr. Green Jeans impression! :wink: :haha:

Antique shops is where it's at! :thumbsup:
 
Chief Moonthunder said:
I agree don't like it either,was thinking a brass tube for the brushes to go in,i like the old picture idea in the oval,it's a Rossi double barrel 22~

A brass tube would certainly work for that. Nice idea. :)
 
Back
Top