I probably should put this in the Gun Builders Bench forum but, I know that many of you pistoleers don't visit there and I think you might enjoy reading this.
As most of you know, Colts pistols almost always had some sort of scene roll stamped on their cylinders and the Italian reproductions do a very good job of duplicating this feature.
One of the other features of all of Colts pistols made between 1848 and 1873 on his Civilian guns was that they used silver plating on the brass parts such as the backstrap and trigger guard. This feature the Italians usually omit on their reproductions.
The Military issued guns and most all steel guns made in London did not have silver plating.
The models of Colt pistols that had silver plating are the Civilian Dragoons, the 1848 Baby Dragoon, 1849 Pocket Revolver, 1851 Navy (all except London steel grip), 1861 Navy, 1862 Police and 1862 Pocket Navy. (Flayderman's Guide)
With this in mind I started thinking, "I have some silver Bolo ties, I wonder if I could make some sort of acid solution and use a battery to transfer some silver from a tie to the brass parts so they would be silver plated?"
I started digging on the Internet and found that this idea had a severe problem.
All of the commercial silver plating that uses electrolysis also require cyanide!
I will mess with a lot of things but cyanide is one that I refuse to be around. Just a drop of it can kill you.
My next thought was, "I wonder how much it would cost to have these brass parts silver plated?" After talking to a lamp shop that specializes in silver antiques I learned the name of the Plating Company they use and the lamp shop owner said they were the lowest price in town. This commercial plating is fairly thick and will last a long time.
The Plating Company guy was very nice and said he would be glad to plate the backstrap and trigger guard for only $49. For any additional gun it would be another $49 (plus tax).
Back to the Internet.
There are several different home silver plating products available and the price is fairly reasonable. These are non-toxic so they are totally safe for us home gunsmiths to use.
They all share several things in common. They do not require the use of batterys and they all work on copper, brass and bronze.
The copper, brass or bronze creates the electrical power to move the silver ions from the solution to the surface of the part. The only problem with this is that as soon as the part is covered with a layer of silver, the battery no longer exists so the rest of the silver in the solution refuses to be deposited on the part. This means the plating thickness is VERY thin.
If your interested in silver plating one of your guns using one of these solutions you need to know that they do not work on steel parts without first plating them with copper. If your still interested in this or just curious, read on.")
I ended up at a company called METAL BRITE PRODUCTS. www.metalbrite.net
They offer a silver plating "kit" for about $25 or a "refill" for about $20 (plus shipping). I chose to buy the "kit" and within 4 days the mail delivered it to me.
This "kit" turns out to be the bottle of solution, a pair of rubber gloves, a "applicator" sponge and a "polishing cloth" along with some "instructions".
As with any surface treatment on metal parts oils, waxes and corrosion will slow or prevent the treatment from working correctly so all traces of any of these must be removed.
Also remember that the silver coating is only one silver molecule thick so the surface condition that exists before plating is exactly the way it will look after plating (except for the color). Put another way, you can not plate the surface and then polish it to make it shiny.
Because of this be sure to polish the surface to a mirror bright condition before applying the plating.
I used some wet/dry sandpaper to sand out a few rough places which the factory had missed, then polished them with a polishing disc on my bench grinder and some "stainless" compound, removed the waxes from the compound with lacquer thinner, washed them dried them and I was ready.
The instructions that came with the "kit" said to wash the part with soap, rinse and dry it. Then put on the rubber gloves, shake the bottle, apply the "lotion" to the applicator and immediately rub it on to the part. Then rub briskly and buff with the polishing cloth.
I followed these instructions and rubbed for 5 minutes. NOTHING!
Just about the time I was getting really Pi$$ed I changed my method.
Rather than putting the "lotion" on the applicator I poured a bit of it directly onto the parts surface. It instantly turned black.
This is GOOD. The silver looks black while it is still in solution but by rubbing the black solution with my rubber gloved finger the silver was deposited on the part.
After completely coating all of the surfaces that would be exposed when the gun was reassembled I washed it, dried it and repeated the "pour it on and rub it in" method with my finger and then rewashed it, dried it and lightly buffed it with the buffing cloth.
Remember, after every bit of the surface is silver plated additional applications will do nothing except to waste the "lotion" so rather than trying to add more silver, save it for another gun or another project.
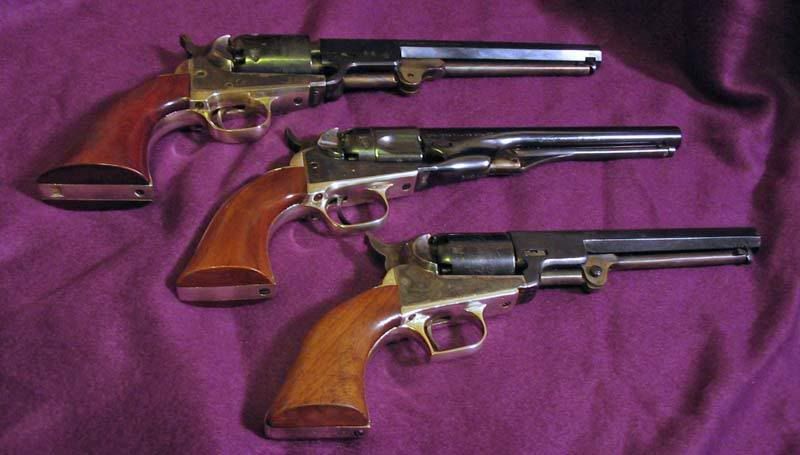
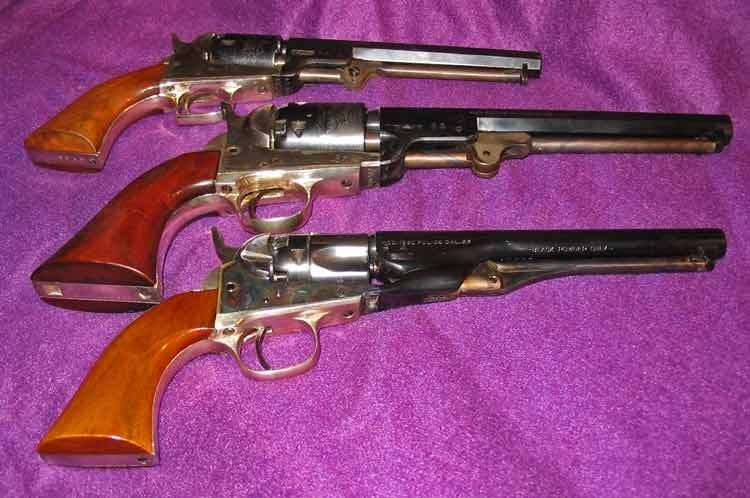
After reassembling the gun and looking at it I can see why Colt used silver plating. It really stands out with the Walnut grips and the color case hardened frame.
IMO, it is much nicer than polished brass.
In case you don't know, silver is a very active metal and sulfur will instantly react with it to form a black color so it is a good idea to use a quality paste wax to cover all silver plated surfaces before shooting your gun.
On the plus side if the plating does get damaged from shooting or from handling the 4 ounce bottle of "lotion" is enough to plate over 8 guns and you will have a lot left over.
If I were to start over from the beginning I would just buy the 4 ounce "refill".
Thin rubber gloves and some clean soft cotton cloth will do everything the "extras" do and by not ordering the "kit" you will save the cost of the shipping and handling.
As most of you know, Colts pistols almost always had some sort of scene roll stamped on their cylinders and the Italian reproductions do a very good job of duplicating this feature.
One of the other features of all of Colts pistols made between 1848 and 1873 on his Civilian guns was that they used silver plating on the brass parts such as the backstrap and trigger guard. This feature the Italians usually omit on their reproductions.
The Military issued guns and most all steel guns made in London did not have silver plating.
The models of Colt pistols that had silver plating are the Civilian Dragoons, the 1848 Baby Dragoon, 1849 Pocket Revolver, 1851 Navy (all except London steel grip), 1861 Navy, 1862 Police and 1862 Pocket Navy. (Flayderman's Guide)
With this in mind I started thinking, "I have some silver Bolo ties, I wonder if I could make some sort of acid solution and use a battery to transfer some silver from a tie to the brass parts so they would be silver plated?"
I started digging on the Internet and found that this idea had a severe problem.
All of the commercial silver plating that uses electrolysis also require cyanide!
I will mess with a lot of things but cyanide is one that I refuse to be around. Just a drop of it can kill you.
My next thought was, "I wonder how much it would cost to have these brass parts silver plated?" After talking to a lamp shop that specializes in silver antiques I learned the name of the Plating Company they use and the lamp shop owner said they were the lowest price in town. This commercial plating is fairly thick and will last a long time.
The Plating Company guy was very nice and said he would be glad to plate the backstrap and trigger guard for only $49. For any additional gun it would be another $49 (plus tax).
Back to the Internet.
There are several different home silver plating products available and the price is fairly reasonable. These are non-toxic so they are totally safe for us home gunsmiths to use.
They all share several things in common. They do not require the use of batterys and they all work on copper, brass and bronze.
The copper, brass or bronze creates the electrical power to move the silver ions from the solution to the surface of the part. The only problem with this is that as soon as the part is covered with a layer of silver, the battery no longer exists so the rest of the silver in the solution refuses to be deposited on the part. This means the plating thickness is VERY thin.
If your interested in silver plating one of your guns using one of these solutions you need to know that they do not work on steel parts without first plating them with copper. If your still interested in this or just curious, read on.
I ended up at a company called METAL BRITE PRODUCTS. www.metalbrite.net
They offer a silver plating "kit" for about $25 or a "refill" for about $20 (plus shipping). I chose to buy the "kit" and within 4 days the mail delivered it to me.
This "kit" turns out to be the bottle of solution, a pair of rubber gloves, a "applicator" sponge and a "polishing cloth" along with some "instructions".
As with any surface treatment on metal parts oils, waxes and corrosion will slow or prevent the treatment from working correctly so all traces of any of these must be removed.
Also remember that the silver coating is only one silver molecule thick so the surface condition that exists before plating is exactly the way it will look after plating (except for the color). Put another way, you can not plate the surface and then polish it to make it shiny.
Because of this be sure to polish the surface to a mirror bright condition before applying the plating.
I used some wet/dry sandpaper to sand out a few rough places which the factory had missed, then polished them with a polishing disc on my bench grinder and some "stainless" compound, removed the waxes from the compound with lacquer thinner, washed them dried them and I was ready.
The instructions that came with the "kit" said to wash the part with soap, rinse and dry it. Then put on the rubber gloves, shake the bottle, apply the "lotion" to the applicator and immediately rub it on to the part. Then rub briskly and buff with the polishing cloth.
I followed these instructions and rubbed for 5 minutes. NOTHING!
Just about the time I was getting really Pi$$ed I changed my method.
Rather than putting the "lotion" on the applicator I poured a bit of it directly onto the parts surface. It instantly turned black.
This is GOOD. The silver looks black while it is still in solution but by rubbing the black solution with my rubber gloved finger the silver was deposited on the part.
After completely coating all of the surfaces that would be exposed when the gun was reassembled I washed it, dried it and repeated the "pour it on and rub it in" method with my finger and then rewashed it, dried it and lightly buffed it with the buffing cloth.
Remember, after every bit of the surface is silver plated additional applications will do nothing except to waste the "lotion" so rather than trying to add more silver, save it for another gun or another project.
After reassembling the gun and looking at it I can see why Colt used silver plating. It really stands out with the Walnut grips and the color case hardened frame.
IMO, it is much nicer than polished brass.
In case you don't know, silver is a very active metal and sulfur will instantly react with it to form a black color so it is a good idea to use a quality paste wax to cover all silver plated surfaces before shooting your gun.
On the plus side if the plating does get damaged from shooting or from handling the 4 ounce bottle of "lotion" is enough to plate over 8 guns and you will have a lot left over.
If I were to start over from the beginning I would just buy the 4 ounce "refill".
Thin rubber gloves and some clean soft cotton cloth will do everything the "extras" do and by not ordering the "kit" you will save the cost of the shipping and handling.
Last edited by a moderator: