


longcruise
70 Cal.
We have had many discussions here on the forums regarding correct patch, lube, ball size, etc., etc. I have often mentioned that in my opinion bore and crown condition is the source of many shooters problems. Especially with new rifles. In our last discussion several forum members asked that I post more detail on what I mean and how I go about improving bores and crowns. So, here it is. Hope it comes across as understandable. I'm not very good at 'spaining things but hopefully the picutres will help.
One of the biggest problems that new shooters and old shooters with new guns seem to encounter is problems with "blown" or "burnt out" patches. The typical solutions applied are variations in patch material, lube, ball size and powder charge. Often these problems seem to be "solved" by finding that perfect powder charge or sweet spot. Generally the new shooter complains that his rifle shoots great up to xx grains of powder but won't shoot any heavier charge. In my experience, the reason for that sweet spot or max accurate charge is that the patches are able to hold together up to a certain point but after that point they give out. And, that they are giving out due to poor barrel and crown condition.
The purpose of conditioning your ml barrel is to prevent patch cutting and damage. Your patches can be damaged and cut when the load is pressed through the crown and on the sharp lands of a new ml barrel. Even if the sharp edges of the rifling don't cut the patch on the way down, they can still cut when your load is on the way out!
This process is not the solution to poor quality patch material. No matter what the condition of your bore, your patch material needs to be thick enough and tough enough. If it's not both of those things there will be problems. On the other hand, good patch material is not all that rare. There are many sources for good quality patch material. The dedicated shooter tries a number of patch materials with several different ball sizes until the best combination is discovered.
But, I contend that it's a waste of your time and resources to start out testing patches, balls and lubes before your barrel condition is optimized. You can shoot your rifle until the sharp edges of the rifling eventually wear down. Some shooters may prefer to do it that way. It could take anywhere from 200 to 800 shots to break in the rifling. And, on top of that, you will never improve the muzzle crown by shooting!
This process is most beneficial with the Italian and Spanish made barrels as well as the American made Green Mountain barrels. I feel that these barrels are all very well made but they just are not finished the way a custom or higher priced barrel is. These barrels can be made to shoot extremely well with just a few hours work on your part.
This is accomplished using two different procedures; barrel lapping and crown shaping. There is always more than one way of doing most things and that applies to barrel conditioning. Barrels can be lapped in several ways and crowns can be optimized in several ways as well. I'm only going to describe the two procedures that I use but am sure you can obtain the same end result using other methods.
The first procedure, crowning, is done at home with a set of tools that you will make yourself. You will need an electric hand drill, preferably a very high speed one, and a drill press with a sanding drum or a belt sander. You will also need three long 1/4 inch or 5/16 inch bolts, some five minute epoxy and a piece of 1 inch diameter hardwood dowel. Cut three sections of the dowel about two inches long. Using a drill press, drill a hole from end to end through the center as close to center as you can get it on the three sections of dowel. The hole should match the size of your bolts, eg., 1/4 or 5/16th. If you are going to lap barrels of less than .50 caliber, you should use the 1/4 inch size bolts. Cut the heads off the bolts and then, using your five minute epoxy, glue the bolts inside the dowel sections with about two inches of the unthreaded end of the bolt sticking out one end. Let these set up thoroughly, which, in my experience, is much longer than the five minutes advertised!
Here is a series of pictures showing what is described above and below.


You are going to make three tools, each with a different angle, with each tool having a steeper angle than the last. These angles are not critical but they should be mutually complimentary. Study the pictures accompanying to get an idea of the angles needed. Next, take one of your "tools" and lay it on the bench and roll it along with a pencil up against the dowel so as to draw a line around the dowel. The distance from the bottom of the dowel to the line will determine the angle you will end up with on that particular tool.
Chuck the unthreaded end of the tool into your hand drill and run it against the rotating sanding drum in such a way as to remove the wood on the dowel between the point where the bolt protrudes at the bottom of the dowel and the line you drew around the dowel. Don't use too much pressure while doing this. Too much pressure can put a bend in your bolt. Refer to the photos for a clearer understanding on this wood reduction process.
Once you have created your three tools, you are ready to begin work.
The reason we used the longish bolts was so that we can create a bore guide to help us keep the tools aligned on the muzzle while we work. Using the long bolts allows you to set the bore guide deep enough into the barrel so as to have less error. I found that using 5/16th bolts with two nuts locked together on the lower shaft made a near perfect fit on a .50 caliber barrel. Wrapping the bolts in tape made a fit to a .54 caliber barrel.
Use some double sided tape to attach 320 emery paper to the cones on your tools. The best type of tape is the kind with the foam backing on both sides. The foam helps create a more rounded radius in the crown. You will have to snip and fit to get the double sided tape on your cone but you will see it is not that difficult. You can use a compass to draw out the cuts on your emery paper or you can just wrap and snip to fit as well.
The actual crowning process is easier if the barrel is removed from the rifle. But, if your barrel is pinned or otherwise difficult to remove, then leave it in the stock. You can start with any of the three tools, just as long as you work all three tools on the crown before calling the job done. Assuming you are right handed, grip the barrel with your left hand near the muzzle. Hold the the tool in your right hand and insert it into the barrel. Don't try to work it by holding the piece of bolt that extends from the top. And absolutely do not apply a power tool to the process. Grip the tool around the top end of the dowel as in the photo. Now, work the tool, with some pressure applied, back in forth in the bore about five times. Then, rotate the barrel 1/8th turn, using the flats as a guide or using your best guess if the barrel is round. Once again, work it back and forth four or five times then rotate. Repeat this until you have made some progress in your crown. The combination of the guides on the bolts and the continuous turning of the barrel will eliminate any errors in your tools and technique.

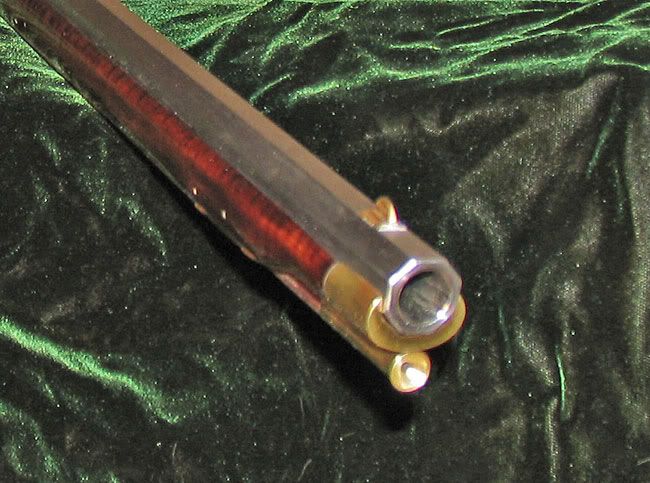
Here are before and after pics of a GM .54 barrel. And, yes, they are the same barrel! The difference in appearance is from one pic taken indoors under fourescent light and the other outdoors.


This one is not crowned very deep. I may go a bit deeper with this one depending on how it loads and shoots next time out. The next picture is a Traditions Deerhunter that I crowned a bit deeper. This gun was a patch wrecker before. Now it shoots with just about anything!

Use your own judgment as far as how much you crown the muzzle. It does not take a very wide or deep crown to prevent patch damage at loading and to make loading a thick patch easier. I take mine down until the lands are cut down to a point that is even with the grooves at the muzzle. It may not take that much with yours. Like I said, use your own judgment.
This crowning process is not coning. Coning goes much deeper into the barrel.
The second procedure is lapping. What I will describe here is fire lapping. Fire lapping is the process of firing bullets that have been impregnated with lapping compound through a barrel . It is a very simple process, as you will soon see. It is important that you use lapping compounds that are made specifically for fire lapping. Homemade concoctions will result in serious and permanent damage to your barrel. I have direct experience with two different compounds. One is Lead Bullet Technology (LBT) compound and the other is a set of three different grits offered as the Wheeler fire lapping kit. When using the wheeler kit, I apply only the coarsest compound since it is all that is needed to get us where we want to go. If you want to go another step or two in finer grits, it will certainly do no harm.
The compound is applied to conventional lead conical slugs of a caliber that fits your barrel. When they are available, I use hollow base conicals. My thinking here is that the hollow base will more readily expand into the rifling. However, I have used solid base conicals with equal success. The compound is applied by rolling the bullet between two steel pads with a liberal amount of the lapping compound slathered on the pads. I use two flat pieces of cold rolled steel about 1.5 inches wide. Hardware stores and home improvement centers have the metal in stock. When I cast my own conicals, I use them bare with no lube. When store bought with lube already applied, I leave the lube on. It does not seem to make any difference. You will need a minimum of 10 lap bullets for one barrel. More, as in 15 or 20 is better. It is easier if you load the compound into the bullets before heading off to the range. You can roll the compound into 20 bullets in about ten minutes. This is not a time consuming process!
These photos show the bullets used, the metal plates and the lap compound. Also before, rolling lap in and after.


Once you are at the range, you proceed as in any other shooting session. Wipe your bore clear of grease and/or oil, maybe pop a cap or two to clear your ignition path and you are ready to begin. Drop 25 or 30 grains of powder down the bore and push one of your lap slugs down on top. Cap and fire. It's that simple! After each shot, wipe your bore with a damp patch and then dry it with a dry patch before reloading. When you have fired all of your lap slugs, you are done with this process.
If you want to add interest and create a baseline by which you can measure your success, try this; before you crown or fire your lap rounds, load your typical patch ball combo on top of the max charge intended for your rifle. Use a marker pen to put a distinctive mark on the patch so you will know which is which when you pick up the fired patches. Do this about five times. When your crown job is finished and lap bullets have all been fired, repeat this process, putting a different mark on the patch so as to tell the pre conditioning patches from the post conditioning patches. If you see absolutely no difference in the before and after patches,...well, your barrel did not need lapping! But, I assure you it is no worse for the procedure and will at the very least be easier to load and clean. On the other hand, you will most likely see a difference in the condition of the patches.
One of the biggest problems that new shooters and old shooters with new guns seem to encounter is problems with "blown" or "burnt out" patches. The typical solutions applied are variations in patch material, lube, ball size and powder charge. Often these problems seem to be "solved" by finding that perfect powder charge or sweet spot. Generally the new shooter complains that his rifle shoots great up to xx grains of powder but won't shoot any heavier charge. In my experience, the reason for that sweet spot or max accurate charge is that the patches are able to hold together up to a certain point but after that point they give out. And, that they are giving out due to poor barrel and crown condition.
The purpose of conditioning your ml barrel is to prevent patch cutting and damage. Your patches can be damaged and cut when the load is pressed through the crown and on the sharp lands of a new ml barrel. Even if the sharp edges of the rifling don't cut the patch on the way down, they can still cut when your load is on the way out!
This process is not the solution to poor quality patch material. No matter what the condition of your bore, your patch material needs to be thick enough and tough enough. If it's not both of those things there will be problems. On the other hand, good patch material is not all that rare. There are many sources for good quality patch material. The dedicated shooter tries a number of patch materials with several different ball sizes until the best combination is discovered.
But, I contend that it's a waste of your time and resources to start out testing patches, balls and lubes before your barrel condition is optimized. You can shoot your rifle until the sharp edges of the rifling eventually wear down. Some shooters may prefer to do it that way. It could take anywhere from 200 to 800 shots to break in the rifling. And, on top of that, you will never improve the muzzle crown by shooting!
This process is most beneficial with the Italian and Spanish made barrels as well as the American made Green Mountain barrels. I feel that these barrels are all very well made but they just are not finished the way a custom or higher priced barrel is. These barrels can be made to shoot extremely well with just a few hours work on your part.
This is accomplished using two different procedures; barrel lapping and crown shaping. There is always more than one way of doing most things and that applies to barrel conditioning. Barrels can be lapped in several ways and crowns can be optimized in several ways as well. I'm only going to describe the two procedures that I use but am sure you can obtain the same end result using other methods.
The first procedure, crowning, is done at home with a set of tools that you will make yourself. You will need an electric hand drill, preferably a very high speed one, and a drill press with a sanding drum or a belt sander. You will also need three long 1/4 inch or 5/16 inch bolts, some five minute epoxy and a piece of 1 inch diameter hardwood dowel. Cut three sections of the dowel about two inches long. Using a drill press, drill a hole from end to end through the center as close to center as you can get it on the three sections of dowel. The hole should match the size of your bolts, eg., 1/4 or 5/16th. If you are going to lap barrels of less than .50 caliber, you should use the 1/4 inch size bolts. Cut the heads off the bolts and then, using your five minute epoxy, glue the bolts inside the dowel sections with about two inches of the unthreaded end of the bolt sticking out one end. Let these set up thoroughly, which, in my experience, is much longer than the five minutes advertised!
Here is a series of pictures showing what is described above and below.
You are going to make three tools, each with a different angle, with each tool having a steeper angle than the last. These angles are not critical but they should be mutually complimentary. Study the pictures accompanying to get an idea of the angles needed. Next, take one of your "tools" and lay it on the bench and roll it along with a pencil up against the dowel so as to draw a line around the dowel. The distance from the bottom of the dowel to the line will determine the angle you will end up with on that particular tool.
Chuck the unthreaded end of the tool into your hand drill and run it against the rotating sanding drum in such a way as to remove the wood on the dowel between the point where the bolt protrudes at the bottom of the dowel and the line you drew around the dowel. Don't use too much pressure while doing this. Too much pressure can put a bend in your bolt. Refer to the photos for a clearer understanding on this wood reduction process.
Once you have created your three tools, you are ready to begin work.
The reason we used the longish bolts was so that we can create a bore guide to help us keep the tools aligned on the muzzle while we work. Using the long bolts allows you to set the bore guide deep enough into the barrel so as to have less error. I found that using 5/16th bolts with two nuts locked together on the lower shaft made a near perfect fit on a .50 caliber barrel. Wrapping the bolts in tape made a fit to a .54 caliber barrel.
Use some double sided tape to attach 320 emery paper to the cones on your tools. The best type of tape is the kind with the foam backing on both sides. The foam helps create a more rounded radius in the crown. You will have to snip and fit to get the double sided tape on your cone but you will see it is not that difficult. You can use a compass to draw out the cuts on your emery paper or you can just wrap and snip to fit as well.
The actual crowning process is easier if the barrel is removed from the rifle. But, if your barrel is pinned or otherwise difficult to remove, then leave it in the stock. You can start with any of the three tools, just as long as you work all three tools on the crown before calling the job done. Assuming you are right handed, grip the barrel with your left hand near the muzzle. Hold the the tool in your right hand and insert it into the barrel. Don't try to work it by holding the piece of bolt that extends from the top. And absolutely do not apply a power tool to the process. Grip the tool around the top end of the dowel as in the photo. Now, work the tool, with some pressure applied, back in forth in the bore about five times. Then, rotate the barrel 1/8th turn, using the flats as a guide or using your best guess if the barrel is round. Once again, work it back and forth four or five times then rotate. Repeat this until you have made some progress in your crown. The combination of the guides on the bolts and the continuous turning of the barrel will eliminate any errors in your tools and technique.
Here are before and after pics of a GM .54 barrel. And, yes, they are the same barrel! The difference in appearance is from one pic taken indoors under fourescent light and the other outdoors.
This one is not crowned very deep. I may go a bit deeper with this one depending on how it loads and shoots next time out. The next picture is a Traditions Deerhunter that I crowned a bit deeper. This gun was a patch wrecker before. Now it shoots with just about anything!
Use your own judgment as far as how much you crown the muzzle. It does not take a very wide or deep crown to prevent patch damage at loading and to make loading a thick patch easier. I take mine down until the lands are cut down to a point that is even with the grooves at the muzzle. It may not take that much with yours. Like I said, use your own judgment.
This crowning process is not coning. Coning goes much deeper into the barrel.
The second procedure is lapping. What I will describe here is fire lapping. Fire lapping is the process of firing bullets that have been impregnated with lapping compound through a barrel . It is a very simple process, as you will soon see. It is important that you use lapping compounds that are made specifically for fire lapping. Homemade concoctions will result in serious and permanent damage to your barrel. I have direct experience with two different compounds. One is Lead Bullet Technology (LBT) compound and the other is a set of three different grits offered as the Wheeler fire lapping kit. When using the wheeler kit, I apply only the coarsest compound since it is all that is needed to get us where we want to go. If you want to go another step or two in finer grits, it will certainly do no harm.
The compound is applied to conventional lead conical slugs of a caliber that fits your barrel. When they are available, I use hollow base conicals. My thinking here is that the hollow base will more readily expand into the rifling. However, I have used solid base conicals with equal success. The compound is applied by rolling the bullet between two steel pads with a liberal amount of the lapping compound slathered on the pads. I use two flat pieces of cold rolled steel about 1.5 inches wide. Hardware stores and home improvement centers have the metal in stock. When I cast my own conicals, I use them bare with no lube. When store bought with lube already applied, I leave the lube on. It does not seem to make any difference. You will need a minimum of 10 lap bullets for one barrel. More, as in 15 or 20 is better. It is easier if you load the compound into the bullets before heading off to the range. You can roll the compound into 20 bullets in about ten minutes. This is not a time consuming process!
These photos show the bullets used, the metal plates and the lap compound. Also before, rolling lap in and after.
Once you are at the range, you proceed as in any other shooting session. Wipe your bore clear of grease and/or oil, maybe pop a cap or two to clear your ignition path and you are ready to begin. Drop 25 or 30 grains of powder down the bore and push one of your lap slugs down on top. Cap and fire. It's that simple! After each shot, wipe your bore with a damp patch and then dry it with a dry patch before reloading. When you have fired all of your lap slugs, you are done with this process.
If you want to add interest and create a baseline by which you can measure your success, try this; before you crown or fire your lap rounds, load your typical patch ball combo on top of the max charge intended for your rifle. Use a marker pen to put a distinctive mark on the patch so you will know which is which when you pick up the fired patches. Do this about five times. When your crown job is finished and lap bullets have all been fired, repeat this process, putting a different mark on the patch so as to tell the pre conditioning patches from the post conditioning patches. If you see absolutely no difference in the before and after patches,...well, your barrel did not need lapping! But, I assure you it is no worse for the procedure and will at the very least be easier to load and clean. On the other hand, you will most likely see a difference in the condition of the patches.
")
