• This community needs YOUR help today. We rely 100% on Supporting Memberships to fund our efforts. With the ever increasing fees of everything, we need help. We need more Supporting Members, today. Please invest back into this community. I will ship a few decals too in addition to all the account perks you get.


    Sign up here: https://www.muzzleloadingforum.com/account/upgrades
  • Friends, our 2nd Amendment rights are always under attack and the NRA has been a constant for decades in helping fight that fight.

    We have partnered with the NRA to offer you a discount on membership and Muzzleloading Forum gets a small percentage too of each membership, so you are supporting both the NRA and us.

    Use this link to sign up please; https://membership.nra.org/recruiters/join/XR045103

Another Traditions Kentucky Rifle kit Christmas

Muzzleloading Forum

Help Support Muzzleloading Forum:

This site may earn a commission from merchant affiliate links, including eBay, Amazon, and others.

DeoreDX

32 Cal.
Joined
Apr 6, 2016
Messages
22
Reaction score
0
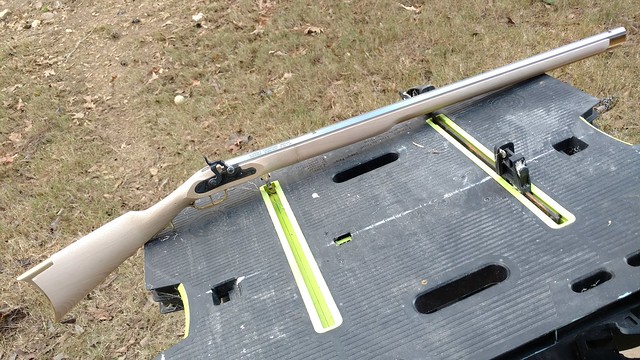
Wife got me the Traditions Kentucky Kit for Christmas. This is my first "traditional" style muzzle loader. My black powder experience before this has been limited to cap and ball pistols. I want to build a "Nice" southern mountain style long rifle but I didn't want to drop the coin to build a high quality setup as my first muzzle loader and possibly screw it up. I thought the Kentucky Rifle kit would be a good introduction to the processes, tools, and skills I will need to build my own rifle. I took some pictures while I was building and thought I would share my experience with the kit.

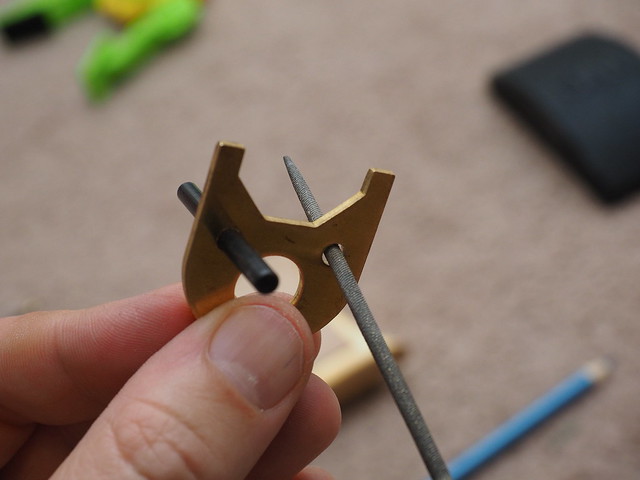
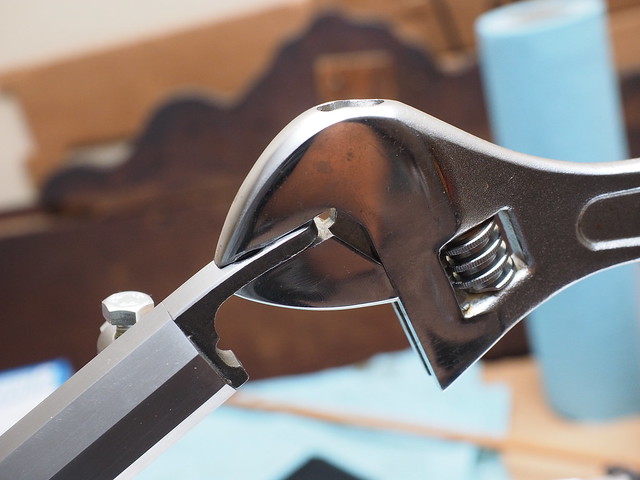
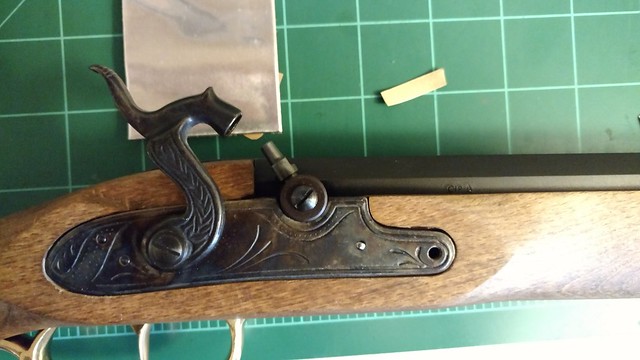
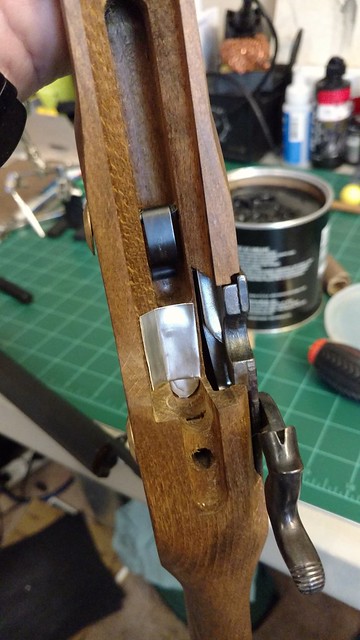
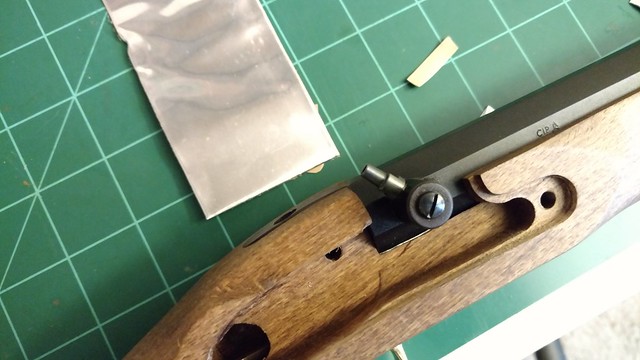
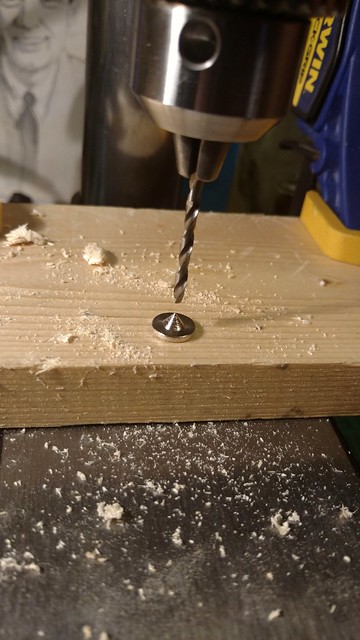
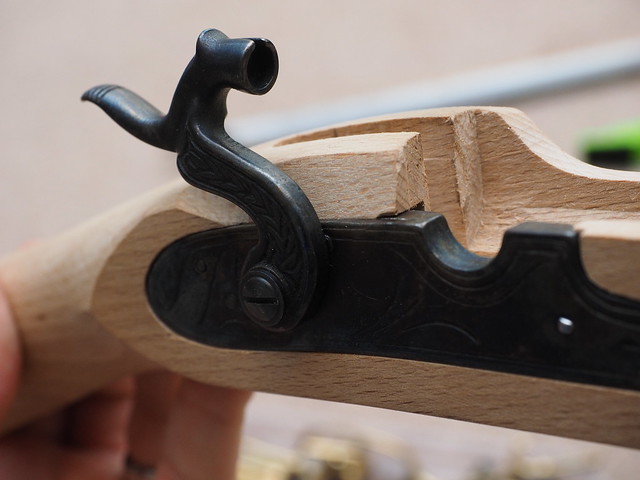
First thing I did was (attempt) to dry fit all of the parts. The lock didn't come close to fitting in the cutout on the stock. I lined up the holes through the stock through the lock to get an idea where I needed to removed material. I had to remove material on both of the front and rear of the inletting. If I had just tried to wedge in one side and only remove material on the opposite side it would have left the lock unaligned to the holes in the stock. You can see the part I screwed up because I started at first with a Dremel and sanding disc. It was going just fine until I started to sneeze and tried to pull the tool away too quick and buggered up the inletting a little. Learning from my mistake I quickly discarded the dremel and finished with 220 grit wrapped around the end of a pencil. It gave me much more control. So it took me 10 minutes to work an area instead of 1 minute. I learned an early lesson on patience and the dremel will never get near my work ever again.

31576391620_8b00fea482_z.jpg


31140312183_1574bd2b24_z.jpg


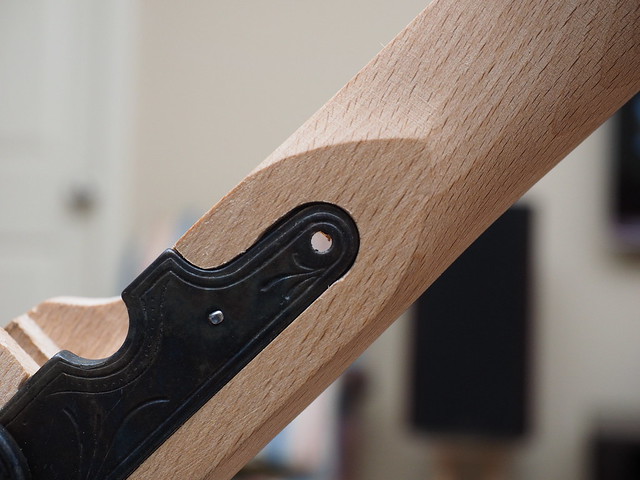
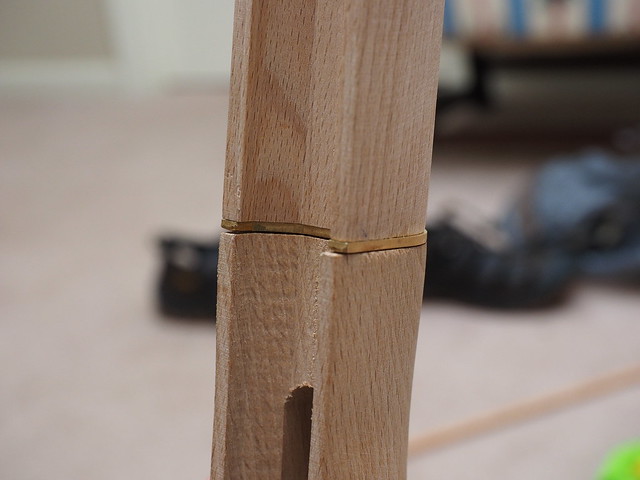
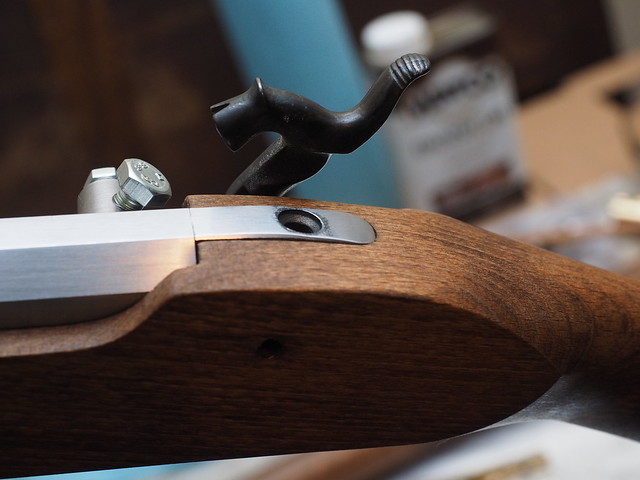
I did force press the lock into the inletting at one point and it caused a little chip to come out of the corner of of the stock. Lesson #2. Don't force things. I worked the material until the lock would easily press into place with just enough clearance that you can gently press it in but it still hold itself in place if let go.

31109561824_08eec0286c_z.jpg
 
Before I could join the two halves of the stock together I had to open up the holes in joining plate a hair. I gently hit it with a small file until the pins could pass through. My small cheap precision file set I bought at Harbor Freight eons ago came in really handy when assembling and fitting my rifle together. I scratched a "F" on one side of the brass plate so i would know the front from the back so I was assured of always placing the plate facing the same direction.

31576394900_fa5e40dd44_z.jpg


The alignment of the two stock pieces would best be described as unsatisfactory at best.

31576396710_8f23bfee78_z.jpg


I put the barrel in to hold everything in alignment. I then marked the brass plate to remove material so it was flush with the "lowest" edge of the two stock pieces. I removed the barrel worked on the brass and put everything back together to check alignment. I bet I did that 1000 times (at least it felt like it). After getting the brass plate where I needed it I worked on the rear stock pieces to get everything matched up. Unfortunatly you can really only check alignment with the parts assembled and you can only work on it disassembled.

31833088871_334e390488_z.jpg


Now that I had the top edges all aligned worked on the smoothness of the wood-brass-wood interface. I would use my small precision file set to remove material from the brass plate and 220 grit on a rubber sanding block to smooth everything out. Eventually I got everything nice and smooth so when you run your hand over it you just barely can notice any gap there.

The rear tang protruded quite a bit from the top of the stock. It is straight while the stock is angled towards the rear. I used a crescent wrench to gently tweak the tang until it fit the rear better.

This was actually a second fitup after the first bend. It was way worse out of the box.

31949402235_604930762e_z.jpg


Slowly bending it down.

31833076611_7b4e853313_z.jpg


I would have had to file/sand it down to get it to fit any better. I debated putting more work into it but I decided for this cheap kit I didn't want to put in that much work.

31576385670_c12727027f_z.jpg
 
The brass nose cap was a part I stared at and fretted about the most. Seems like such a simple part to put together.

First fitup you can see alignment was pretty horrible. The thin wood section needed to be worked down enough so the top of the brass would line up with the top edge of the front stock section. The problem was two fold. I believe the stock was machined when the wood was still wet so once it dried it shrunk in length. If the two stock pieces were pressed together so there was no gap at the wood/brass/wood joint the front hole doesn't line at the barrel. I had to elongate that hole in the wood stock just to get the rear nose cap screw in. Once you install the nose cap even when pushed back all of the way against the mounting screws it left an ever so tiny gap between the nose cap and wood. Even after slightly elongating the nose cap hole I can't push it back any further because the screw head hits the inside of the counter sunk hole for the head of the screw. So I will have to live with a small ~1/32" gap there.
31833073811_fd0b48d63d_z.jpg


31140303973_5aa15c8774_z.jpg


Once that was all lined up as good as I could make it there was still a gap between the nose cap and the barrel. The brass really needs to tighten down to the barrel. I started removing enough of that thin section of material so the nose cap could tighten down. Then I realized I had removed enough material that the top edge of the nose cap started to rise above the top edge of the stock (you can see that in the first picture) yet the front nose cap screw still wouldn't tighten down all the way. I would have had to removed another 1/16-3/32" of material to get the front screw to tighten the brass down to the barrel for a solid connection, that means I would have to remove that much material from the brass to get it to line up to the wood. This is where I stopped removing wood material. I added two small washers under the front brass nose cap screw instead.I debated this for a while as having to remove material from the top edge of the nose cap wouldn't be too bad, but then the ram rod groove would be way misaligned to the wood. So I decided I would rather have a gap between the brass barrel cap and barrel than to have a big gap between the barrel cap and ram rod.

31833079651_4723fc9f45_z.jpg


31109551844_016ed41f1a_z.jpg


At this point I broke out the 1/4 sheet sander and worked the wood down to match up with the butt cap batter and rounded off the wood material at the nose cap to smooth everything out. With the pieces installed I marked off what material I needed with a pencil and worked the material until the pencil lines dissapeared. Once the brass was reasembled the fit was 99% there and just a few finishing touches with the brass on got everything smoothed out.

31140354783_1da9c737a4_z.jpg
 
A few thoughts if you don't mind.

You learned a good lesson about the dangers of a Dremel.
They can be used but they can rapidly cause mischief before you know what happened.

The lock should not be a snug fit in its mortise. At this stage it should be just slightly loose.
When the finishing oil is applied, the wood will grow in size slightly making the mortise shrink a bit so the loose fit will disappear.

The area where the barrel tang seems to stand proud of the wood needs some work.

First be sure to check the bottom of the mortise for the tang to see if the underside of the tang is touching it.
When the gun is finished, the bottom of the tang should be touching the wood but from the looks of things, the wood is causing the top of the tang to project above the wood a bit.

To check this, borrow (or better, buy) a tube of lipstick. Coat the underside of the tang with a very light coating. While your at it, also coat the bottom barrel flat 1-2 inches from the rear of the barrel.
Now, carefully install the barrel as far into the stock as it will go and then carefully remove it.

If you see one small localized area where the lipstick transfered, use a small chisel to remove a small amount of wood.
Repeat this until the tang's lipstick leaves a large area on the wood.
Also, if you notice the lipstick on the bottom barrel flat transfering to the wood it indicates the barrel is as far down as it can go.
If this is the case, with a kit such as the one your working on with the lock already installed, call it good enough. (For a custom gun there is a lot more to it so a lot of additional wood work would be required.)

If the tang is seated nicely and the barrel is still standing proud of the area around it, use a fine tooth flat "mill" or "smooth" file to remove the excess steel on the tang so it matches the adjacent wood.
To keep things smooth, you may have to also file a little on the top barrel flat to make everything blend in nicely.
You should use the "draw file" method to do this filing. It is slow but it leaves a nice finish.

(If you don't know about files and filing, follow this link
http://www.muzzleloadingforum.com/.../9066/post/9066/hl/"Filing+101"/fromsearch/1/
)

You can even remove a bit more of the steel and then sand the wood down to match the contour on the tang. Just make sure the newly filed/sanded surfaces blend in smoothly with the areas around it.

I would do whatever it took to close the gap between the octagon in the nose cap and the barrel.
It should be a snug fit with the barrel.

Getting the cap up where it belongs may require removing a little wood on the underside of the stock where the cap should rest. If so, then do what's necessary.

If the top edges of the nosecap end up too high and they are above the stock wood then file them down to match the wood.

Remember, this is a kit so think of the parts as being the "rough material" that may need some modifying.

Have fun.

While I'm at it, your stock wood is Beech.
If you plan on staining it, use a alcohol or water based stain.
NEVER use a oil base "stain". The wood won't accept enough of it to darken before the wood becomes saturated and further coats of the oil based stain will do nothing but make a mess.
A alcohol or water based stain like Birchwood Casey Walnut or a leather dye will work nicely.
 
Last edited by a moderator:
Zonie' s comments are good and correct. I would add one thing about the tang, since you already bent it.

If you bent it in order to try to match the shape of the top of the wood on the stock, you may have created a situation where it is no longer touching the bottom of the tang inlet. The new arch in the tang may result in only the front and back of the tang in contact with the bottom of the inlet. In other words, if it was seated well in the bottom of the inlet before you bent it, then it won't be now after bending.

You want the breech area of the bottom flats of the barrel in contact with the barrel channel inlet, the actual breech of the barrel in contact with the breech face of the stock, and the underside of the tang in contact with the tang inlet.

Bending the tang may have affected the other two things I mentioned above. It's better to get the tang inlet well, and then file it to match the contour of the wood.

If you made the bend in order to match the bottom of the tang with the pre-cut tang inlet in the wood, then you are probably good to go. I would then just file the top of the tang as Zonie says.

Cheers,
Chowmi
 
Chowmif16 said:
Zonie' s comments are good and correct. I would add one thing about the tang, since you already bent it.

If you bent it in order to try to match the shape of the top of the wood on the stock, you may have created a situation where it is no longer touching the bottom of the tang inlet. The new arch in the tang may result in only the front and back of the tang in contact with the bottom of the inlet. In other words, if it was seated well in the bottom of the inlet before you bent it, then it won't be now after bending.

You want the breech area of the bottom flats of the barrel in contact with the barrel channel inlet, the actual breech of the barrel in contact with the breech face of the stock, and the underside of the tang in contact with the tang inlet.

Bending the tang may have affected the other two things I mentioned above. It's better to get the tang inlet well, and then file it to match the contour of the wood.

If you made the bend in order to match the bottom of the tang with the pre-cut tang inlet in the wood, then you are probably good to go. I would then just file the top of the tang as Zonie says.

Cheers,
Chowmi

On mine the tang slot in the stock is cut too deep. Not matter what I do you can look through the hole in the tang and see a gap between the wood and the metal (before bending). bending it down at leat gets a little contact at the rear of the tang. Which leads me to my first real issue with the instructions for the kit.

The first part of the instructions tells you to fit the lock into stock but they don't give you a good idea on where the lock should be at in relation to the rest of the stock. I indexed the lock plate to the mounting holes which required even removal of material on all sides of the inlet. Once the lock plate was set into the inlet I placed the barrel in place. The bolster on the barrel lines up nicely with the cutout in the lock plate but it contacts the plate which prevents the barrel from sitting down making 100% contact with the stock on the bottom surface. This pushes the barrel up and extra ~1/32" so there gap at the bottom of the barrel to stock which adds another 1/32" to the gap between the rear tang and where it should contact the stock. I've been debating on whether I should take some of my modern gunsmithing glass bedding compound and build up the stock to properly bed the tang and barrel. Or remove 1/32" more from the inlet which will make an unsightly gap around the lock plate and oval out the through holes for the lock mounting screws to get the barrel pushed down further. Even that would still require bedding around the rear tang which doesn't contact the stock.

If I had it to do over again I would place the barrel in place first then work on the lock plate inlet. I would have removed all of the material from the bottom of the inlet and would have still had to obround the mounting screws for the mounting plate, but that would have been covered up by the brass washers around the lock plate mounting screws. And the rear tang would still have to be properly bedded.

Any opinions on how to proceed?
 
Aha, I know understand your problem.
I think I would have filed or ground down the cutout in the lock plate instead of bending the tang. Doesn't help you much now, but may still be an option. I've done that once, and you have to go slow and make sure it stays nice and round.
That would let the barrel and tang seat correctly. Afterwards, a bit of cold blue would cover the exposed metal. If you do it right, nobody will see that the cold blue may or may not match the existing finish on your lock since it will be covered by the drum.

Sorry for the quick answer, but I gotta go to work.
Cheers,
Chowmi.
 
Remembering that the drum must fit against the lock plate cutout, I think you need to modify the cutout a bit.

You say when the drum is touching the lockplate cutout, the barrel is about 1/32" above the bottom of the barrel channel.

The answer to me is, remove about 1/32" of material from the bottom area of the lockplate cutout with a rat-tail file (or a LOT of sanding with the sandpaper on a stick). (By the way, for those who don't know, regular sandpaper doesn't cut metal. The black silicone carbide paper often called "wet/dry" paper will cut metal nicely.)

Once the cutout in the lockplate is lowered just a bit, the barrel and the rear tang will both be lower so this might give you the needed wood to allow the area under the tang to be adjusted for better support of the tang.

Properly done, both the bottom of the tang and the lower flats on the barrel will both be touching the wood when everything is put together.
 
I've done a little band-aiding.

I knocked about 15 mils (~1/64) from the bottom of the lock plate inlet. Gap doesn't look too bad since I already had the area I screwed up with the dremel. Your eye goes the the big screw up instead of the now tiny gap :redface:

31988312461_57e6587495_z.jpg


I have some vibration damping tape that is basically really thick aluminum foil with an adhesive liner. It's about 16 mills thick. I put a layer under the rear of the barrel. With that in place I could screw the barrel down and the bolster wouldn't put pressure on the lock plate any more. I could now remove the lock plate with the barrel installed. Told me I needed to remove about 16 mils from the lock plate. Before that the bolster was putting pressure on the lock plate keeping it from fully seating. If I remove that 16 mills from the lock plate the barrel should be able to sit down all the way. Will be my afternoon project.

31265235954_955e654953_z.jpg


31988330121_b233bc93bb_z.jpg


With the barrel sitting down further the lock would no longer fully cock. It would go to half cock. I used the aluminum tape to shim out the trigger so now it goes to full cock again.

I did install the tenons last night and plan on drilling them once I get the barrel fully seated. I didn't notice my small micro file roll off my work bench and I rolled over it and broke it :hmm: Made fitting the dovetails a much more involved process then it should have been. First dovetail towards the nose went in fine with a lot of filing. Second I thought I had fit it well enough but it stopped about 3/32" short of center :cursing: Wouldn't go in or out. Tapped on the center and then on each edge thinking it might have gone in a little crooked but it wouldn't budge. Continued knocking just deformed the aluminum rod I was using as a punch. Could the two materials have galled together? Luckly Traditions made a very generous inlet for the tenon so it can still fit in the stock. Lesson # 32 of my build. Be sure your dovetail is 100% correct before tapping it in. I already rust blued my barrel. I wished I had fit up the dovetails before I blued it not realizing how poorly their dovetails matched up. Mistake #52. Even through the directions say to not install the sights and tenons until after you blue the barrel at least do a fitup of the pieces before you blue your barrel.
 
Your having more than your fair share of fun with this project. :grin:

IMO, you should not have moved your lock down to allow the barrel to seat but what's done is done.

Just remember, when all is said and done, the underside of the drum must contact the lock plate.

If the drum is contacting the lockplate, the plate will absorb the force of the impact when the hammer hits the cap and nipple.
This prevents side loads from being applied to the drum threads.

If the drum doesn't contact the lockplate, every blow of the hammer on the cap and nipple will apply a sideways shear load to the drum threads.

Although the Traditions (and CVA's) drum is installed with a very large thread, it doesn't like severe side loads applied to it.

The tape between the trigger and stock will work but the other "fix" would eliminate the need for the tape.
The other fix is to file off a little metal from the top of the trigger blade. (The part of the trigger that rises when the trigger is pulled.
It pushes the sear arm upward when the trigger is pulled causing the sear to rotate slightly and release itself from the full cock notch.)

Remember, when the trigger is fully installed, the front trigger must always be a little bit "loose" when the hammer is in the full cock position.

If the front trigger (or the single trigger if this doesn't have a double set trigger) is not slightly loose when the hammer is at full cock it means the trigger bar is keeping the sear from fully engaging the full cock notch in the tumbler.
This can cause an accidental discharge if the gun is bumped or jarred.

If the front trigger is not just a bit loose when the hammer is at full cock, add some more shim tape or file a bit more off of the front trigger blade to get the needed looseness.
 
Deore,
what Zonie said, is again correct. By the way, he makes some really nice rifles and knows what he is talking about.

Looks like you did a nice job on the rust bluing of the barrel, at least from the limited view we get from your pictures. Just curious, what did you use to rust blue it?

On your issue with the dovetails, you encountered a common conundrum. I think the advice given in the instructions is not quite good. Make sure the dovetails are correct first, then treat the barrel. Also, the best way to work on dovetails is with a three cornered file that has at lease one safe edge. The file is used with the safe edge on the bottom, and the file edge expands the dovetail.

When you finish with the lock and breech area, I would look again at the fore-arm area all the way to the muzzle cap. I know you had issues with the two piece stock and the brass plate in between.
Folks who look at your rifle may or may not notice gaps in the join of the two pieces of wood or the muzzle cap, but they will notice steps or jumps in the line of the top of the forestock. By that I mean the top line of the wood from the front of the lock to the rear of the muzzle cap.
Make that a straight line if you can. Even if you have to file down the muzzle cap or the brass joining plate between the two pieces of wood.
You can plausibly expose 50-65% of the side flat of the barrel to achieve this.

You mentioned in your original post that you are interested in building more rifles after this one. If that is so, now is the time to document your lessons learned and look at what tools and techniques you will need for the next build.
Moving to a higher quality kit will alleviate some, but not all of the issues that you are having.

Depending on how far you want to go, some "kits" are more like parts sets, and will require a significant amount of time, skill and tools.
Now might be the time to work on those skills and get the right tools while you are working on a less expensive kit.

Edit: Just looked again at your pictures and it would appear that you already stained the stock. Have you put finishing oil on it already?
Also, with the re-positioning of the lock, it looks like the cock may or may not hit the nipple square-on. Have you worked the lock to see if it strikes square?
Cheers,
Chowmi
 
Taking Zonie's advice I checked my trigger and it was indeed not "loose" in the fully cocked position. I had previously smoothed out the top of the trigger bar removing the casting lines. A couple of extra hits with the file got it to where there was a very slight jiggle with the trigger once fully cocked with a 1/64" brass shim between the trigger assembly and stock.

31833071841_f0f4b2ee3e_z.jpg


I made a slurry of oak dust and epoxy to build up the wood under the rear tang and bed the rear tang.

You can probably tell I had already put a finishing oil on my stock. I thought I had all the metal parts finished but realized after my first posts I still had some work to do. My original plan was just a plain linseed oil finish. Wood finishing is a known weakness of mine. I've had really good luck with just plain BLO in the past but that can be a very time consuming process and I was eager to get the rifle assembled so I could learn to shoot. Also tested a small spot on the stock and didn't like the color just plain BLO gave me. I went with Watco Danish oil that was pigmented to "Dark Walnut". Worked with wood with 150, 220, and finally 320 grit. You can tell where I had to remove the most material because that area didn't pigment as well as the lightly sanded areas. I don't think it was skin oils as I wore nitrile rubber gloves as I worked on it. In the end I don't mind that much I think it gives it an aged appearance. But I would like to understand what I did wrong.

31772604852_ace3e50f21_z.jpg


I had originally planned on browning the barrel. Used Laurel Mountain Forge browning solution and I think the browning turned out great.

31935952216_33a80340bc_z.jpg


But.. even though my browning went well I decided I didn't like the look of the browning with the color of the stock and the case hardened lock plate. So I made a boiling trough and boiled the barrel for about 15 minutes. Still some red spots so I let it go for another 15 until I got an even blue/black color. Carded with damp strips of blue jeans pulling off a ton of black "soot" like rust. Dried it then flooded the surface with 3 in 1 oil and let it sit for a day.

32104590716_4545807a05_z.jpg


31241985534_5d6b146534_z.jpg


When I wipe my finger across the barrel I get a very faint dark oily stain on my finger. I flooded the surface with 3 in 1 oil again and I pulled off a lot more black soot. Even after several days I can flood the surface with oil and wipe the barrel with pull off some black soot. Not sure if this is a function of not boiling in between "passes" of browning solution or maybe I boiled it too long?

32104877956_62a71e3505_z.jpg
 
I searched the town looking for a #32 drill bit to drill the hole for the tenon pins. I ended up finding a 3mm drill bit at Harbor Freight. Found two other tools that helped me out while I was at it. I didn't want to screw up my nice Nicholson needle files grinding away the cutting faces to make a safe dovetail fire so I decided to get a cheap one at H.F. to grind away two cutting surfaces to make a "safe" dovetail file. Their cheap needle file set had a triangular file that only had one working surface. Worked great work working on the dovetails. That $2.99 investment was worth the trip to Harbor Freight.

31405252173_cb6c8695c5_z.jpg


I made a point to point drilling jig from a doweling jig set. I installed the doweling jig on a 1x4 and used some thing triangular window shims to shim up one side to use as a rest to keep the rifle steady while I drilled.

32146142525_e33160c6a4_z.jpg


I think it turned out great. Definitely learned a lot doing it.

32095670761_7c87ede4fc_c.jpg


Took it to the range and I had several people approach me and comment on the rifle. Now comes the problems :redface:

Ran a couple of dry patches down the barrel to get most of the oil out of the barrel. Fired off 3 caps to clear out the nipple. Loaded the rifle with 60gr of Pyrodex P put my cap on and.... nothing. Just a poof of smoke from the cap and nothing else. Waited a couple of minutes just in case. Tried another cap. Nothing. Waited some more. Didn't have a nipple pick so I dug throug the trash can found something with a staple and made an impromptu nipple pick. Tried another cap.... nothing. Pulled the nipple off. Looks like there was some oil in the drum and I didn't get that oil cleaned up before loading my BP :redface:

Used the top of a patch to try to dry up that area. Poured a little dry powder in the drum. Nipple goes back on. Cap on. Boom! Fire smoke and noise! Finally! Didn't really take careful aim so I swab the barrel reload cap and line up my target. Pull triggger.... hissss.... Boom! manure!

I take off the bolster screw and nipple. Use a patch and the end of an allen wrench to try to soak up all the oil in the drum. Get the bolster screw and nipple back on. Swab the barrel. This time after I pour my powder I tap on the side of the action with the heel of my palm to be sure that powder is getting where it needs to be. Ball-cap then line up my sights. Pull trigger... Boom! Yes! At 30 yards I'm hitting low and left. First three shots, one not really aimed one I picked my head up on a hang fire and one I took careful aim were all 3 in a line horizontally low of the bullseye. So I take out a file rub a little off the front sight. Shoot it two more times hitting just on the bottom edge of the bullseye and to the left both rounds touching. I'm running out of time now so my last shot I take aim at a 9" steel plate at 100 yards give it a little Kentucky windage and ring the 100 steel to end the day.

32065210072_f1c13a55f5_z.jpg


I'll work on windage when I have a little more time to shoot. I'll didn't want to take too much off the front sight until I work out my loads with different powders and volumes. Started off a little slow and scary with the miss fire and hang fire but the day ended in a good note.
 
Congratulations. :thumbsup:

Looks like your in for some real fun as you try to find the load combination your gun likes. (It will like one or two powder loads best.)

If your happy with the color of your guns wood then that's good enough.
You did ask what you might have done wrong though so I'll give you my opinion.

The Beech wood the old CVA's and the Traditions rifles use for their stocks is a close grained wood that easily fills with oil.
Once this happens, additional coats of a OIL based stain cannot penetrate the wood so there is no way of making the color darker or to even out light and dark areas.
That is the reason I say, never use a oil based stain on a Beech wood stock.

There are a lot of alcohol and water based stains on the market and they can color the wood with a light color (if the stain is first thinned with alcohol or water), or a dark color (if multiple coats of stain are applied until the "right" darkness is achieved).
Because alcohol based stains can be applied multiple times, it is also possible to change the color by applying a different stain.
For instance, a coat of Walnut might be too brown so if your looking for a red tint a additional coat of mahogany might be what your after.
(I've applied several coats of Walnut + one coat of mahogany to get the color I wanted for one gun and several coats of brown maple + one coat of walnut + one coat of mahogany to another.
It all depends on what I'm after.)

The catch here is, the stock wood must be bare, free of oils.

If you want to try this, you will have to totally resand the stock to remove all traces of your Danish oil stain.

Sometimes, a light sanding and then a total wash of the wood with a disk brake cleaner will "kill" the oil. Other times, it may do a half assed job.
If you do this, do it outside and stay upwind from the fumes.

By the way, the stock on this CVA 12 guage was stained with several coats of Birchwood Casey Walnut, a alcohol based stain.
It started out as blond as your stock was and I had to remove the original builders varnish he coated the stock with before I could stain it.
Like yours, the barrels on this 12 guage double were browned and then boiled to get the black color.

Anyway, as I said, Congratulations. You can be proud of your accomplishment. :thumbsup:
 
Deore,
congratulations on your build! It looks nice, and I'm glad you got to shoot it as well!

Zonie knows way more about wood finishing than me, so I'll not even comment on the finishing thing.

I think your rust bluing looks pretty good. It's hard to tell from the photo, and I don't know if the barrel photo still had oil on it. If not, it looks like you might could have carded more before you boiled it.

As for still getting some black when you rub the barrel, I think that is not unusual.
There are a million discussions on this and other forums about using LMF browning agent. Some people neutralize it after browning, some don't. some find that it will continue to rust for a while, some don't. It's so dry where I live that I have a hard time getting it to rust in the first place!
I rust blued a barrel just as you did, and it also rubbed off black for a while, but then settled down. People find the same thing with browning. I have heard guys say their barrels continue to rust for a few weeks, and some don't have that issue.

I suspect you correctly identified the issue with mis-fires, but you also mentioned that you had a hang-fire later.
I would urge you to get rid of the Pyrodex and use real black powder. (This comment might start an argument with guys who like Pyrodex....)
Pyrodex has a higher flash point than black powder, and is more prone to mis or hang-fires.
A lot of folks have a hard time finding real black powder, so end up using pyrodex. You can buy real black on-line and have it shipped to your house. Or, most muzzleloader clubs will buy in bulk and then allow members to buy from the lot. It can be a bit more expensive, but if you are going to get in this hobby, then you will eventually find that there is no substitute for the real thing. Especially if you get into Flintlocks. Believe me, I've done all that. That's my rant complete about substitute powders, and don't really want to start an argument.

Nicely done on the rifle and I hope you get to shoot it a lot!

Cheers,
Chowmi
 

Latest posts

Back
Top