• This community needs YOUR help today. We rely 100% on Supporting Memberships to fund our efforts. With the ever increasing fees of everything, we need help. We need more Supporting Members, today. Please invest back into this community. I will ship a few decals too in addition to all the account perks you get.


    Sign up here: https://www.muzzleloadingforum.com/account/upgrades
  • Friends, our 2nd Amendment rights are always under attack and the NRA has been a constant for decades in helping fight that fight.

    We have partnered with the NRA to offer you a discount on membership and Muzzleloading Forum gets a small percentage too of each membership, so you are supporting both the NRA and us.

    Use this link to sign up please; https://membership.nra.org/recruiters/join/XR045103

A Kibler Build

Muzzleloading Forum

Help Support Muzzleloading Forum:

This site may earn a commission from merchant affiliate links, including eBay, Amazon, and others.
Joined
Jun 22, 2014
Messages
2,708
Reaction score
272
Location
Ohio Valley
There has been much conversation on Jim Kiblers rifles, and for good reason. While much discussion has been had, I have not seen a post highlighting what is involved to complete one of these true "kit rifles" for others on the fence of purchasing one of these kits.  To start, if one has zero experience building a longrifle, stop and seek a good reference and read about the subject. There are many excellent references for beginners and I always have a copy of recreating the American Longrifle on my bench for reference purposes. Again, if you are new to building don't be scared of these kits, however I will say you absolutely will want to take your time as these are high quality kits that demand patience to be completed correctly, use your reference material!

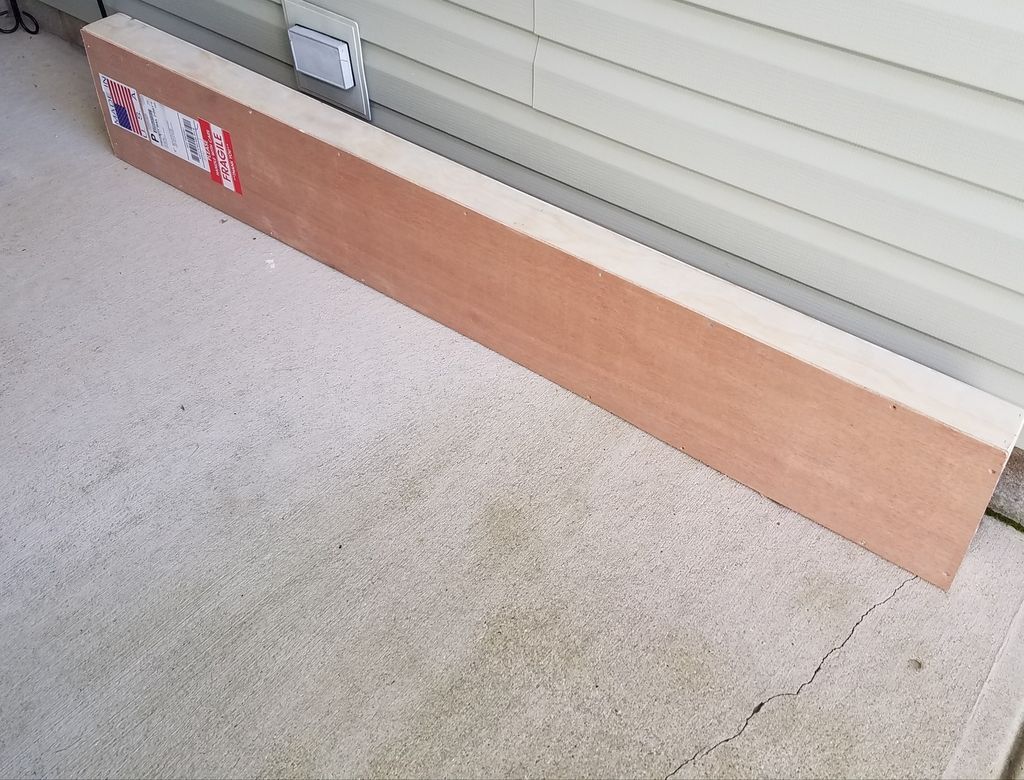
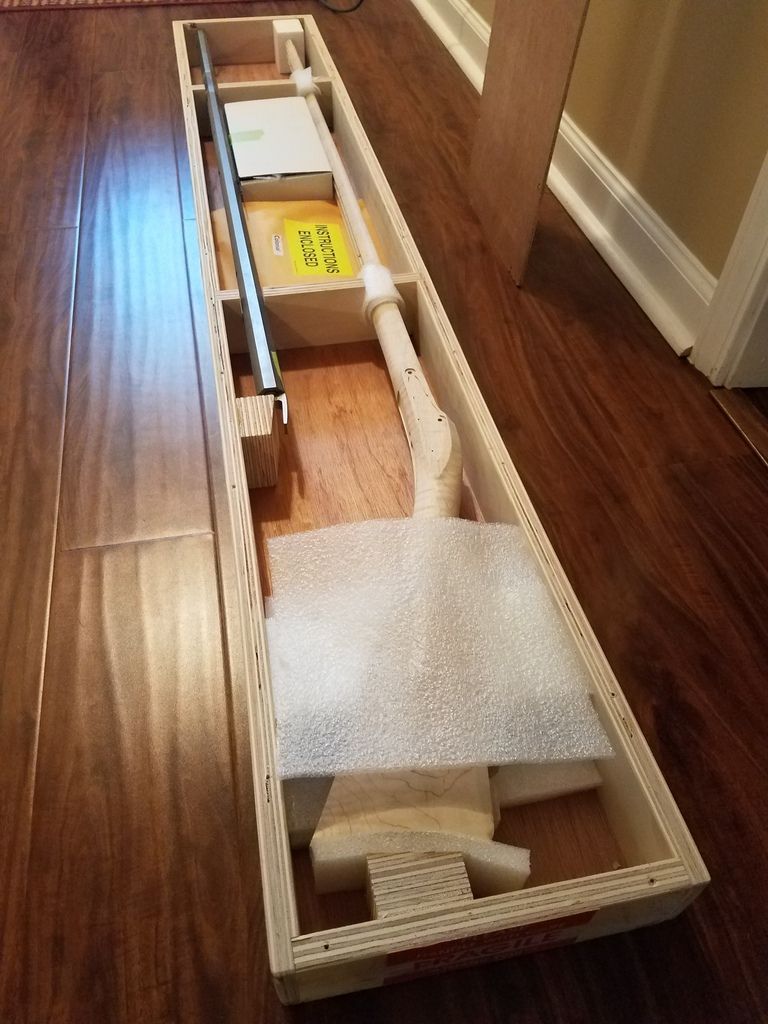
To start, Jim does a WONDERFUL job of securing the contents of the kit for shipping. Images will speak for themselves!


I started my .54 Smoothbore Colonial today, had a few hours to spare and hastily made way to the shop. I had requested extra fine and fancy maple at his extra charge. Very happy with the extra money spent.


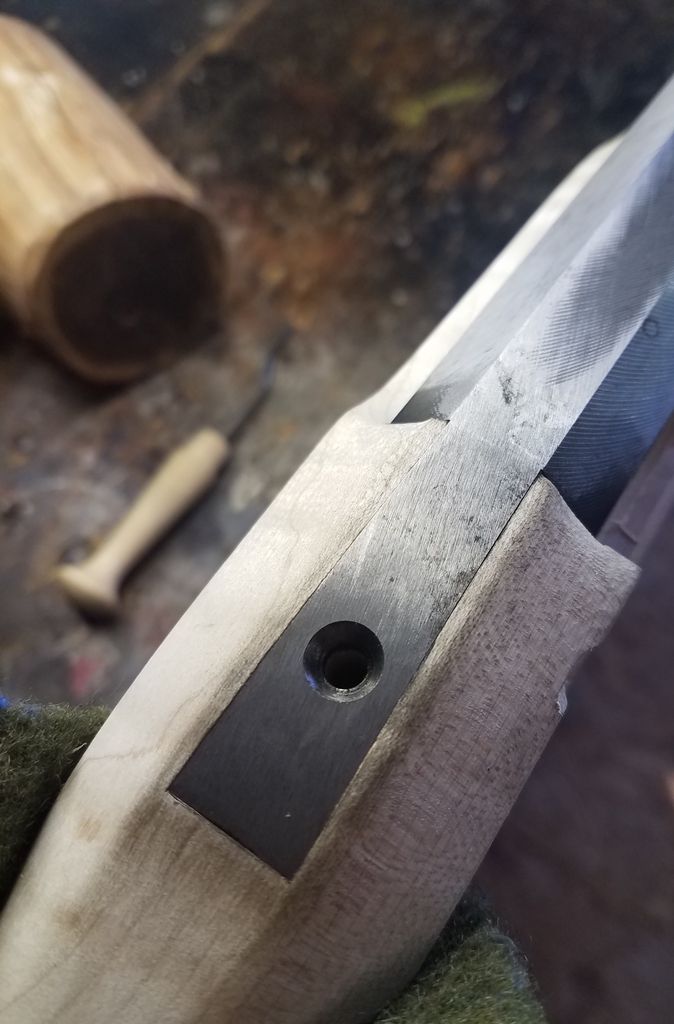
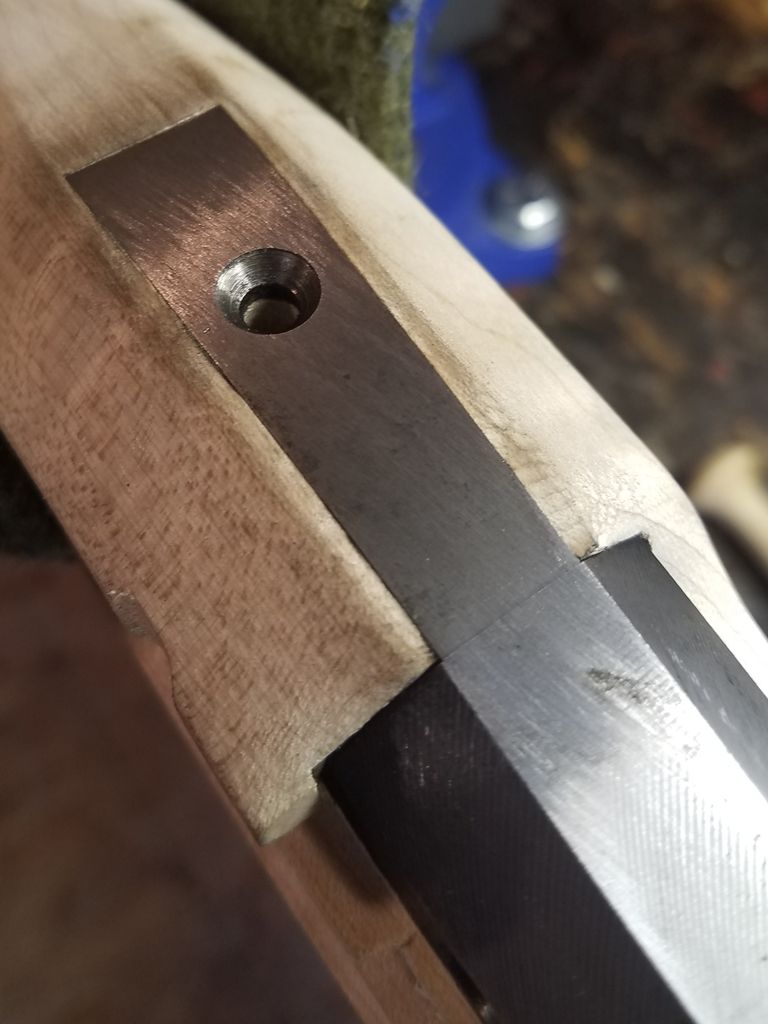
First step, barrel and tang were correctly set. Inlets were extremely tight, I did have to work awhile to properly seat the breech and tang. However, absolutely nothing compared to other "bag of parts rifles". Right away the CNC process used on these stocks is first rate and already worth the costs associated with the kit.


One thing to note, every corner were the cutter made a 90 degree corner you will find a slight radius from the bit that needs removing. Very easy to remove with a sharp chisel and one will continue to roll on.


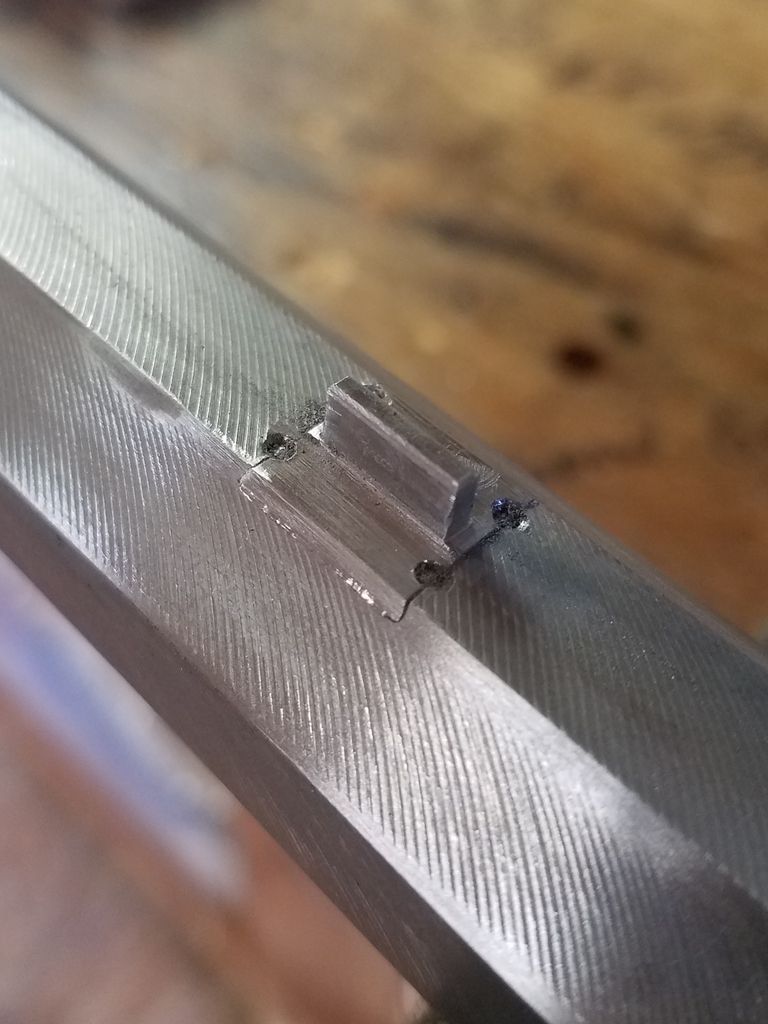
Next step was the installation of the barrel loops or tenons. This process was more tedious than I anticipated. Honestly would have preferred to cut the dovetails myself, reason being the doves are very shallow, I found my standard safe sided triangle file a tad to large for the pre cut slots. No fault of the kit, grabbed a smaller file and taped off a safe side, then proceeded to roll on with all four without issue. Lastly one doesn't need to stake the loops but I prefer to with a center punch for extra security. File flush with the barrel flats and your done. I'll cut relief slots in the tenons once they are drilled as well.


Last item on todays list was installing the trigger plate and tang screw. Tang screw hole is already drilled and tapped on the plate, as are 95% of the holes on the kit. Minus removing the radius on all four corners and filling a slight draft on the plate, no fitting required. A small wood screw is installed to hold the back of the plate, my first modification was to install a slightly larger screw than the one supplied. The plate is thick so I personally felt I'd sleep better with a larger screw. Countered the new hole and again... Rolled on!


Unfortunately I am awaiting my buttplate and patch box spring, therefore I'll be doing things out of order until those two items arrive.

Overall I'm extremely pleased with this kit, once completed I have a slight feeling she'll be a dandy rifle! Much more to come!
 
Wow!.... :thumbsup:

Are his guns really that precisely inletted or did you have to do a lot od chisel work.?

Those are some serious milling marks on the barrel.....are the top flats that bad too?
 
They are that tight... Yet you will have to inlet and use patience, certainly not a drop in fit as some think. One can certainly casue trouble if they are not careful and force parts. Especially the tang area, the pictures were before I cut a relief at the back of the tang. However, nothing hard as you just let the inlet black or soot in my case tell you what needs removing.

The breech required a decent amount of fitting, therefore removing the barrel a number of times. The stock MUST be supported, very thin and delicate which could be a problem to someone not familiar finessing a barrel from a stock. Stock however is very finely shapped, impressed with the CNC work again. Wood is left were it needs to be and there's enough room to shape as desired. May do some simple scrolling on the stock, haven't made my mind up!

The mill marks are without a doubt ugly. Honestly I'd have expected better but they are not deep, therefore they will be quick to remove when the time comes.

My only gripe so far are in regards to the tenons, I'd have rather cut the doves myself.
 
Hi CC,
I am speculating but milling marks on the barrel may be done by Jim Kibler rather than Rice. It may be that, despite Rice's profiling specs, there may be enough variation that Jim K. has to mill the barrels little in his shop to maintain exact precision matching to his CNC inlets. I don't know this, I am just guessing but I have never had a Rice barrel with milling marks like that. Another possibility is that Jim keeps the price down by having Rice not finish the outside of their barrels as they normally do. I am sure Jim would be happy to answer any questions about thing like that.

dave
 
Hi CrewDawg445,
Good on you for posting your build!!! I so admire folks who back up their comments and advice with photos of their work. I examined a number of Kibler kits up close and your post along with Tony Lalli's on his Kibler colonial really highlight how well these kits are made. I am constantly comparing Tony's and your posts with my Chambers "Little Fellas" kit rifle build and I conclude that Kibler's kits are the first true high-end muzzleloading gun kits ever made. When you are done, you will have a rifle made and shaped as well as those custom made by Jim Kibler. He has shared his excellent and historically correct architecture with us all. If you look at many of his high-end custom guns, you will see the same architecture as his kits, and Jim Kibler is recognized as one of the finest makers working today. If anyone aspires to build high quality and historically correct American flintlocks, building a Kibler kit will show you what good gun architecture looks like and help you avoid the usual novice mistakes.

dave
 
Good to hear from you Dave, I was hoping you would chime in!

Thank you for the words, the main reason for the post indeed was to hopefully spark and intrigue others who may be intrested in building a high quality kit. As you already mentioned they are top notch! I've spoken with Jim a few times over the phone and discussed his work. You are absolutely right that his attention to detail and craftsmanship is clearly evident in these kits.

Comparing the stock architecture to period examples in my literature, he is spot on. While I'm certainly no professional builder I can recognize quality and detail, these kits absolutely deliver! Indeed he has produced a first class kit that I'm confident anyone can build. It's a touchy subject when one examines their own skill sets, and that's what should be done here before even selecting his kits. While not hard, for the first time builder things could get tricky. However if one takes it slow, they will be rewarded in the end! I'm a firm believer in patience, attention to detail and doing it right the first time.

Jim's kit seems to eliminate all the negatives associated with other traditional parts kit rifles. While I enjoy building the other makers rifles, obviously more work is involved and I really feel a beginner has no idea what they are getting into, they then become discouraged. With a Kibler kit, it's a small block of the rock lock world! :thumbsup:

Also good point on the milling, I didn't give that any thought. I have Rices specs so I'll measure it tomorrow and see what the cailpers say.
 
Your killing me. I have been resisting the temptation to buy one of his kits from the very beginning.

I have seen a parts set from his first offering and they certainly are first class.

Look forward to seeing your progress, thanks for posting.

Fleener
 
My recommendation is to give in to the desire...

I was so impressed with the kit a order was placed for a SMR. I was going to build a SMR from TOTW but oh boy I'm glad I changed my mind!
I live just shy of 2hrs from Jim, when my SMR is ready I'll likely slink on over to pick it up!

Thank you for your interest, stay tuned! Won't get into the shop tomorrow on account of playing Mr. Mom. That will allow me to finish sewing up some breeches in the garage. My next plan is to inlet the lock, I can already tell it will require a tad bit of fiddling, but that is expected from a cast lock plate.
 
Take the tool marks out of the barrel before inletting it. Draw filing removes metal. The barrel will get smaller. If you fit the barrel before draw filing, it will be loose afterwards.
 
You are correct, filing removes metal, however the milling marks are insignificant due to how these kits are designed, barrel is 100% inlet. The milling marks have no relationship to how the stock fits the barrel as the top five flats are the ones you draw file due to them being visible.

Biggest thing to keep in mind a Kibler kit IS NOT like other parts rifles. These stocks are extremely precise being that they are CNC cut.

This is my first Kibler kit, certainly not a first build. Thanks for the information though. :thumbsup:
 
I believe it is mentioned in one Kibler’s videos that Rice’s barrel size variation is much tighter on the machined finish when compaired to the sanded barrel finish. This is not a cost savings exercise, but rather step to get a better fit between the barrel and stock. The CNC machined stock has to be toleranced such that the largest barrel fits. The more variation that has to be acccounted for creates a larger gap between the barrel and stock when the smallest sized barrel is installed. One just needs to be careful when draw filing to keep the tight fit.
 
Don't worry about the barrel. A light draw filing will take the marks out and not hurt the stock fit. Slow and careful, watch Jim's videos on the Colonial rifle kit assembly on youtube, and you will have an outstanding rifle.


Doc
 
There's nothing wrong with the barrel... the machining marks have absolutely zero impact on the fit or function of the barrel. Not to sound rude, at my young age this will literally be my fourteenth barrel I've draw filed, not new to building nor finishing. My goal here in this post was to share with others and new potential builder's what to expect and hopefully help them make their decision on selecting Jim's fine kit.

Draw filing takes literally ten minutes a flat, essentially a hours time on five visible flats. If it makes one rest easy by all means file all the flats... What will it gain you? Absolutely nothing but a warm and fuzzy feeling. Let me
be clear, I WILL be draw filing my barrel, however just the visible flats as mentioned by Jim and many other top notch builders. Again, this isn't my first go with a file.

I'm certainly not going to quibble over insignificant things. I have a wonderful Kibler kit that's worth every penny paid and will be worth more in the end.

SDSmlf, you are right on the tolerances, Jim does indeed mill down the barrels to properly fit his kit. That should make everyone very happy that a builder takes the time to properly fit a barrel to his kit, does me! :)
 
Hi,
Obviously, no worries about draw filing. In response to a previous poster, if filing the barrel to remove machining marks causes your inlet to be sloppy, your inlet was not very good to begin with. Moreover, if you put finish in the barrel channel, it will swell the wood sufficient to make the barrel tight again.

dave
 
I've done four Kiblers. The barrel is quite tight in the inlet before draw filing an a push fit after. This is a non issue. I'd suggest draw filing before fitting to make it easier to take in an out.

Yes, some make too much of this. I use a nice new 14" mill file. I find pining to be less of an issue with the big file and the finish is plenty good. After I rub it down with maroon scotchbrite. Then brown or blue. Too much polish looks fake, IMHO.
 
Dave Person said:
Hi,
Obviously, no worries about draw filing. In response to a previous poster, if filing the barrel to remove machining marks causes your inlet to be sloppy, your inlet was not very good to begin with. Moreover, if you put finish in the barrel channel, it will swell the wood sufficient to make the barrel tight again.

dave

Excellent Dave, thank you for mentioning that. Hit the nail right on the head! :thumbsup:
 

Latest posts

Back
Top