Ok folks, I've decided my next project is going to be a total makeover for my Renegade . I've ordered a drop-in 32" GM .58 caliber barrel - 1 in 70 twist, what else in the way of wood ( I'm leaning toward tiger striped walnut ) and steel would you suggest? The original TC lock and triggers will be used as well as the trigger guard with perhaps a bit of file work... Maybe some of Stumpy's tacks too??
-
This community needs YOUR help today. We rely 100% on Supporting Memberships to fund our efforts. With the ever increasing fees of everything, we need help. We need more Supporting Members, today. Please invest back into this community. I will ship a few decals too in addition to all the account perks you get.

Sign up here: https://www.muzzleloadingforum.com/account/upgrades -
Friends, our 2nd Amendment rights are always under attack and the NRA has been a constant for decades in helping fight that fight.
We have partnered with the NRA to offer you a discount on membership and Muzzleloading Forum gets a small percentage too of each membership, so you are supporting both the NRA and us.
Use this link to sign up please; https://membership.nra.org/recruiters/join/XR045103
You are using an out of date browser. It may not display this or other websites correctly.
You should upgrade or use an alternative browser.
You should upgrade or use an alternative browser.
TC Renegade upgrade
- Thread starter Liver eatin’ Johnson
- Start date


Help Support Muzzleloading Forum:
This site may earn a commission from merchant affiliate
links, including eBay, Amazon, and others.
I'd add a capbox if I had talent (and time).
To my eye tacks should be understated. Three ahead and three behind the forestock escutcheon on each side ( ooo O ooo) and then maybe a Star of Bethlehem or anchor pattern on the right side and an outline of a pseudo cheekpiece on the other (you don't want tack heads under your cheek).
To my eye tacks should be understated. Three ahead and three behind the forestock escutcheon on each side ( ooo O ooo) and then maybe a Star of Bethlehem or anchor pattern on the right side and an outline of a pseudo cheekpiece on the other (you don't want tack heads under your cheek).
Cap box - yes, nice touch. I was thinking a pewter nose cap and steel entry thimble maybe? Who does Replacement Renegade stocks?
To my eye tacks should be understated. Three ahead and three behind the forestock escutcheon on each side ( ooo O ooo) and then maybe a Star of Bethlehem or anchor pattern on the right side and an outline of a pseudo cheekpiece on the other
Too many would be, well, tacky... :haha: :haha: :haha:
"I was thinking a pewter nose cap and steel entry thimble maybe?"
I assume your talking about a Cast in place nose cap? If so, I may have to give my "how-to" post for that process.
Yes, I know.....Borrrrring but it does offer something more interesting that the standard old TC nose cap.
Tomorrow, I might post some of my Pecatonica TC pictures here for you guys/gals to laugh at.
Zonie - this being the place for how to... let the "Cast in place nose cap" class begin :shocking:
( any TC mod photos would be helpful too )
( any TC mod photos would be helpful too )
Well, the Cast Nosecap class will have to wait a little while while I try to recreate the set up and take some pictures.
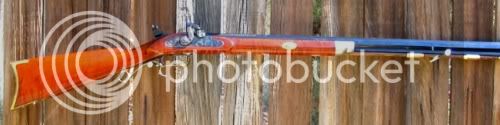
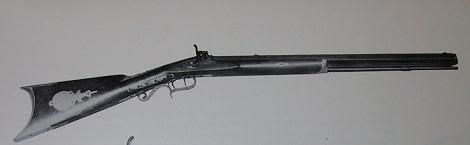
In the meantime, here are a few pictures of my TC.
I let my logic guide me so I ended up with a rather plain gun. My logic said, "Jim, the rifles carried into the Rockys wouldn't have been fancy maple so get some plain maple."
Being easily missled, I listened and ordered the #1 CM. Of course, after finishing it I wondered why I didn't order the #3 and get some stripes to look at, but that's the way it goes sometimes.
Anyway, this gun was bought at a gun show for about $175. It's only problem was a dinged up stock and a little rust in the bore. It shot well so I decided to restock it with Petaconica Rivers TC stock replacement.
That stock has about 3/4 of an inch more drop (as I remember).
I decided the TC Cap Box wouldn't be needed and used all of the TC hardware except the nose cap. It was just not "custom" enough for my liking so although I had never cast a nose cap I decided that is what I would try.
As the Pecatonica stock blank is cut for the TC barrel rib it doesn't have any extra wood on the forend length so rather than putting in a ramrod entry pipe and a nosecap, I went with the nose cap only.
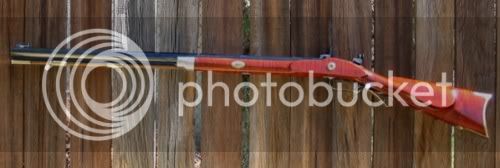
I used just the Birchwood Casey Maple for a stain so it is not as dark as it could have been.
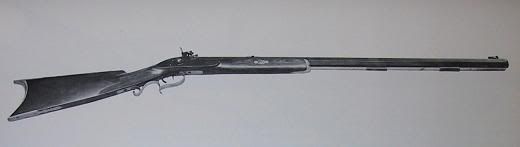
Below is a better view of the final casting.
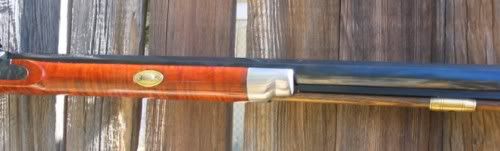
To cast a cap, you have to remove about 1/8 inch of wood (so the cast wall has some strength) and drill some holes thru so they intersect the barrel channel. 4 of these holes, which are countersunk from the barrel channel side are seen below. These help lock the casting in place.
When the cast metal is poured the barrel is in place to block off the barrel channel. Because of this, you may notice some of the cast material ran under the barrel before hardening. This in effect is the same as "beddeng" the area.
Now, I will say some words about what is envolved and why I did what I did.
To cast the cap, as mentioned above you have to remove the wood 1/16 to 1/8 below the stocks surface to give the cast wall some thickness and strength.
The stopping point for this relief should be cut sharp and clear because you want a nice crisp joint where the metal ends and the wood begans. This meeting place can be fancy and curved or straight as my TC is. That is up to you.
You will have to build several dams. One of these is simple. It just means you will have to place the barrel into the stock to block off the barrel channel.
One of these is the ramrod hole. To do this, I made a slightly tapered plug which fit fairly tightly in the pre-drilled hole. This should be tapered (have a draft angle) so it is a little bigger at the "top" of the cast metal than it is down in the metal to allow you to pull the plug out of the casting.
Some kind of outer wall or dam needs to be made to hold the metal in place while your pouring and while it is cooling.
To do this, I used cardboard from a cereal box and wrapped it around the wood forestock and the barrel.
This will leave gaps between it and the barrel flats. These must be dammed off too. To build these, I used a lot of masking tape. I have heard that some types of clay can be used but haven't tried that. I will say that if you use clay it must be the oil/clay type, not the water/clay if your using REAL pewter or a lead alloy Real pewter has such a high melting point it will cause the water to basically explode on contact.
When the dams are complete, you melt the alloy and with the guns muzzle pointing up, you pour it in.
DO THIS SOMEPLACE WHERE SPILLED METAL WONT BURN THE FLOOR OR SPLATTER ON SOMETHING YOU LIKE!!! The dams usually leak some. (Sometimes they leak a lot, and once you've started pouring you can't say "STOP DAM*ET while I get a plug". You can't stop because if you do and the metal cools, if you pour in more on top you will get a built in crack in the casting.)
When the metal is cooled, remove the barrel, the ramrod plug and all of the other dams. You will have a real ugly blob on the nose of the stock. This blob is easily filed down to the shape you want, and will be finish sanded right along with the wood. It will look good unless you have some air bubbles in it.
This raises the question of the alloy you want to use.
The originals used pewter or some sort of lead alloy. These melt well above 350 degrees F. Some of them are above 550 F.
Alloys at this temperature can char the wood and as you can imagine have some danger. This is why I broke with tradition in a big way.
The alloy I used melts at 185 degrees F.
Not only is this safer from a temperature standpoint (it won't burn the wood and it won't burn you quite as deeply) but it is fairly easy to "uncast" off of the stock if you screw it up during casting. If you were so inclined, you could just soak the faulty casting in boiling water for a while to remove it. (I just gently used a propane torch when my Schuetzen cap casting didn't come out right. Then built a better dam and recast it.)
I used a material called Cerrobend. It is a Bismuth based alloy which is used by manufacturing to hold parts while they are being machined. Brownells sells a product called Cerrosafe (which is about the same thing) for making chamber castings. (Would someone get Doc in here? TG has just passed out). The actual melting point is a function of the alloy and ranges from 160 to 190. Note this is cooler than boiling water. These alloys contain lead and cadmium so caution should be used to avoid ingestion.
The finished casting looks like pewter, it doesn't tarnish, it survives laying all day long in the hot Arizona sun without melting, and it looks as good today as it did when I cast it 5 years ago.
No one will be able to proove it's not real pewter without melting it or running a metallurgical analysis on it so IMO if you can live with yourself, then why not use it.
Well, that's about it for now. I will see what I can do to make a more presentable show and tell sometime in the future.")
In the meantime, here are a few pictures of my TC.
I let my logic guide me so I ended up with a rather plain gun. My logic said, "Jim, the rifles carried into the Rockys wouldn't have been fancy maple so get some plain maple."
Being easily missled, I listened and ordered the #1 CM. Of course, after finishing it I wondered why I didn't order the #3 and get some stripes to look at, but that's the way it goes sometimes.
Anyway, this gun was bought at a gun show for about $175. It's only problem was a dinged up stock and a little rust in the bore. It shot well so I decided to restock it with Petaconica Rivers TC stock replacement.
That stock has about 3/4 of an inch more drop (as I remember).
I decided the TC Cap Box wouldn't be needed and used all of the TC hardware except the nose cap. It was just not "custom" enough for my liking so although I had never cast a nose cap I decided that is what I would try.
As the Pecatonica stock blank is cut for the TC barrel rib it doesn't have any extra wood on the forend length so rather than putting in a ramrod entry pipe and a nosecap, I went with the nose cap only.
I used just the Birchwood Casey Maple for a stain so it is not as dark as it could have been.
Below is a better view of the final casting.
To cast a cap, you have to remove about 1/8 inch of wood (so the cast wall has some strength) and drill some holes thru so they intersect the barrel channel. 4 of these holes, which are countersunk from the barrel channel side are seen below. These help lock the casting in place.
When the cast metal is poured the barrel is in place to block off the barrel channel. Because of this, you may notice some of the cast material ran under the barrel before hardening. This in effect is the same as "beddeng" the area.
Now, I will say some words about what is envolved and why I did what I did.
To cast the cap, as mentioned above you have to remove the wood 1/16 to 1/8 below the stocks surface to give the cast wall some thickness and strength.
The stopping point for this relief should be cut sharp and clear because you want a nice crisp joint where the metal ends and the wood begans. This meeting place can be fancy and curved or straight as my TC is. That is up to you.
You will have to build several dams. One of these is simple. It just means you will have to place the barrel into the stock to block off the barrel channel.
One of these is the ramrod hole. To do this, I made a slightly tapered plug which fit fairly tightly in the pre-drilled hole. This should be tapered (have a draft angle) so it is a little bigger at the "top" of the cast metal than it is down in the metal to allow you to pull the plug out of the casting.
Some kind of outer wall or dam needs to be made to hold the metal in place while your pouring and while it is cooling.
To do this, I used cardboard from a cereal box and wrapped it around the wood forestock and the barrel.
This will leave gaps between it and the barrel flats. These must be dammed off too. To build these, I used a lot of masking tape. I have heard that some types of clay can be used but haven't tried that. I will say that if you use clay it must be the oil/clay type, not the water/clay if your using REAL pewter or a lead alloy Real pewter has such a high melting point it will cause the water to basically explode on contact.
When the dams are complete, you melt the alloy and with the guns muzzle pointing up, you pour it in.
DO THIS SOMEPLACE WHERE SPILLED METAL WONT BURN THE FLOOR OR SPLATTER ON SOMETHING YOU LIKE!!! The dams usually leak some. (Sometimes they leak a lot, and once you've started pouring you can't say "STOP DAM*ET while I get a plug". You can't stop because if you do and the metal cools, if you pour in more on top you will get a built in crack in the casting.)
When the metal is cooled, remove the barrel, the ramrod plug and all of the other dams. You will have a real ugly blob on the nose of the stock. This blob is easily filed down to the shape you want, and will be finish sanded right along with the wood. It will look good unless you have some air bubbles in it.
This raises the question of the alloy you want to use.
The originals used pewter or some sort of lead alloy. These melt well above 350 degrees F. Some of them are above 550 F.
Alloys at this temperature can char the wood and as you can imagine have some danger. This is why I broke with tradition in a big way.
The alloy I used melts at 185 degrees F.
Not only is this safer from a temperature standpoint (it won't burn the wood and it won't burn you quite as deeply) but it is fairly easy to "uncast" off of the stock if you screw it up during casting. If you were so inclined, you could just soak the faulty casting in boiling water for a while to remove it. (I just gently used a propane torch when my Schuetzen cap casting didn't come out right. Then built a better dam and recast it.)
I used a material called Cerrobend. It is a Bismuth based alloy which is used by manufacturing to hold parts while they are being machined. Brownells sells a product called Cerrosafe (which is about the same thing) for making chamber castings. (Would someone get Doc in here? TG has just passed out). The actual melting point is a function of the alloy and ranges from 160 to 190. Note this is cooler than boiling water. These alloys contain lead and cadmium so caution should be used to avoid ingestion.
The finished casting looks like pewter, it doesn't tarnish, it survives laying all day long in the hot Arizona sun without melting, and it looks as good today as it did when I cast it 5 years ago.
No one will be able to proove it's not real pewter without melting it or running a metallurgical analysis on it so IMO if you can live with yourself, then why not use it.
Well, that's about it for now. I will see what I can do to make a more presentable show and tell sometime in the future.
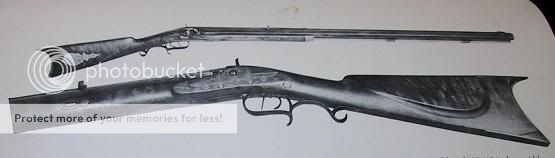
Zonie - great description of the casting process - I was shown the same technique by Ted Fellowes who used linotype metal which is still available for about $1 per lb. compared to the current Brownells price of $20.80 for a lb. of Cerrosafe. I'm a little leary about the low melting temp of that stuff but if you've not had any trouble with it the advantages probably outweigh the dangers of melting linotype. I pour the linotype just as soon as it is melted completely and also heat the barrel with a torch just before pouring. Never had any wood scorching problems but it is quite UGLY when you first take the cardboard off
Zonie, why did you use roofing nails to hold on the nose cap?
You all out of duct tape? :winking: :haha:
But really, you do like your shiney guns...
Bob: You build that TC with the fantastic superfancy well made stock and then say yours "Almost looks that good"? There is no doubt that yours is far better looking. That's no contest. (Remember, never BS a BS'er)
I show mine only to give folks an idea of what a cast in place nose cap might look like.
The Schuetzen I posted shown another cast fore end cap.
LEJ: The only way Cerrocast or Cerrobend would melt is if you dropped the gun in a fire or a pot of boiling water. As neither of these practices are done very often, the low melting point is not a problem.
Mooskeetman: Cause they are easier to hit with the hammer!!
Guest
Ya know,,I was gonna do that same thing just a few yrs ago.
Up-grade a T/C.
Till some true freinds sat me down and explained. What do ya do? new barrel,new stock,retro thimbles and entry,different butt plate and add a proper patch box,,what do ya get? ,,,,,,,500$ worth of gun that looks like it kinda should be a olde tyme BP gun but it represents nothing of period..nothing! It's a T/C. A quick glance at the lock will tell ya.(been there,,etc...)
A better shooter yes, and better looking gun,yes,but it's still a re-fab T/C. Everybody that knows ,,knows.
For the same money it's just as easy to up-grade the whole thing.
Thanks again too zonie for great details of pouring nose caps. But Pewter is pewter,,,more tin then lead. Linotype is lead, tin and zinc. It's cheap,, it's not pewter.
good luck in your endevor,,truley,, ::
(Remember, never BS a BS'er}
got me there i guess....lol....i tried................bob
Guest
I did a Google web search on...
"Petaconica Rivers TC stock replacement"
Got no hits!!!
Anybody else sell TC Renegade/Hawkens stocks???
"Petaconica Rivers TC stock replacement"
Got no hits!!!
Anybody else sell TC Renegade/Hawkens stocks???
Guest
Nevermind.... I found it!
It gotz' misspelled by our Moderator. It's an easy one to misspell.... that's for sure. Them-there Injuns...Civil War Heroes.. etc did have some crazy/mixed-up names.
Here's their site
Click Here For Pecatonia Rivers Longrifle Co.
It gotz' misspelled by our Moderator. It's an easy one to misspell.... that's for sure. Them-there Injuns...Civil War Heroes.. etc did have some crazy/mixed-up names.
Here's their site
Click Here For Pecatonia Rivers Longrifle Co.
sumtacks - you are absolutly correct - it's not worth it - except for the challenge of seeing what CAN be done with a TC. ( or CVA or Traditions etc. ) and maybe buying a new barrel or stock might indeed be taking this project beyond it's limits although I sure like Zonie and bob's results. :applause:
As for the "...gun that looks like it kinda should be a olde tyme BP gun but it represents nothing of period..nothing!" I respectfully disagree. When I got into BP in the 70's I was taken by the beauty of the lines of the TC but could not think of an original that looked like that. Then I came across the wonderful book California Gunsmiths 1846 - 1900 by Lawrence P. Shelton and suddenly it was OK to have a rifle that didn't look like a Hawken ( too bad so many manufacturers chose to market their guns under that misnomer ) or any other recognizable piece and it led me to experiment with changing kits into the type of guns that MIGHT have been produced during that period. I even went so far as to checker the wrist on a couple like what you see in some of the photos to follow. Anyway, I'm sure your friends were trying to do you a favor by sitting you down but they could have let you experiment for the sake of the challenge, just to see what you came up with.
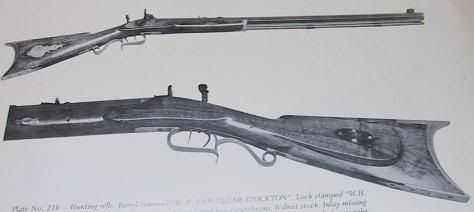
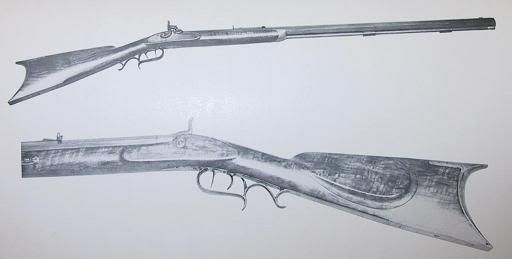
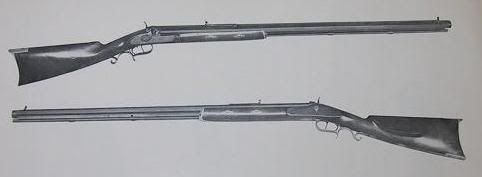
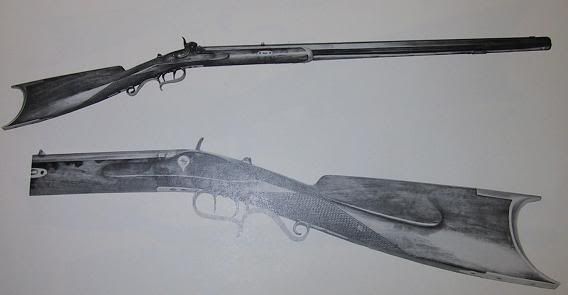
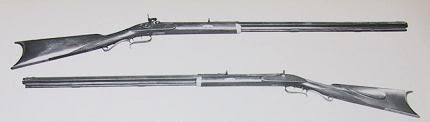
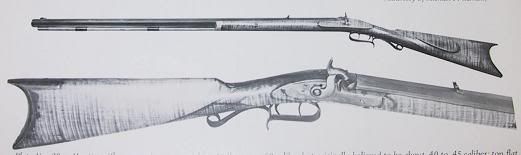
So... here are a few photos from that book to help justify this type of crazy project for you folks - they include gunmakers: W.H Van Vlear, Schneider, Nordheim, Browning ( not Jonathan ), Flohr and Buselmeier. :winking:

As for the "...gun that looks like it kinda should be a olde tyme BP gun but it represents nothing of period..nothing!" I respectfully disagree. When I got into BP in the 70's I was taken by the beauty of the lines of the TC but could not think of an original that looked like that. Then I came across the wonderful book California Gunsmiths 1846 - 1900 by Lawrence P. Shelton and suddenly it was OK to have a rifle that didn't look like a Hawken ( too bad so many manufacturers chose to market their guns under that misnomer ) or any other recognizable piece and it led me to experiment with changing kits into the type of guns that MIGHT have been produced during that period. I even went so far as to checker the wrist on a couple like what you see in some of the photos to follow. Anyway, I'm sure your friends were trying to do you a favor by sitting you down but they could have let you experiment for the sake of the challenge, just to see what you came up with.
So... here are a few photos from that book to help justify this type of crazy project for you folks - they include gunmakers: W.H Van Vlear, Schneider, Nordheim, Browning ( not Jonathan ), Flohr and Buselmeier. :winking:
Thanks for the neat pictures LEJ! There has never been any doubt in my mind that rifles similar to the TC existed. Your pictures tell me that if a person were into the flexable PC world he could take his TC, buy a Pecatonica River stock, go to TOW and buy a nice hooked buttplate and perhaps a non adjustable rear sight and create a pretty good recreation.
As for the idea about it ending up a $500 dollar gun, I would respectfully disagree. This is especially true if you already have a TC sitting around collecting cob webs (which equates with a total barrel/lock etc cost of $0.00).
If a person buys the cheapest Pecatonica River TC stock wood the cost adds up to $50.00 (Straight Maple Halfstock CM#1) plus $42.50 for cutting the barrel/lock/ramrod hole/trigger inlets), plus Postage. Allowing $15 for postage this adds up to $107.50 TOTAL.
If you opt for better wood (#2CM) the $50 goes to $70 for a $20 increase. If you go to #3CM the $50 goes to $100 for a $50 increase.
If I were to decide to do this to my other TC Hawken I would grab the pictures above and order the #3 CM for $100 plus $42.50 inletting, add in a TOW #BP-E-6-B (Plains STYLE)($7.95) or #BP-TN-1-B (Tennessee style)($16.95) Buttplate. These buttplates will fit the stock blank without much metal or wood removal. Adding about $25 for UPS that adds up to
$175.45 total if I bought the Plains style buttplate.
All I have to add is the time and effort to do the final fitting of the hardware and finish the wood to end up with the Damdest, almost Period Correct (coil springs, don't you know and a lumpy looking rear sight) TC you ever saw!!
::
Zonie, it looks like you got it together with nose caps, got a question. I will be doing this once everything gets in. Here is the question. After you cut the stock down a little, why can't you use a drimel tool ad make a small channel in the wood (a cavity so to speak) put your cardboard in and pour. Once the nose cap hardens drill through the wood on the inside into your cavity (that is now filled with pewter) and secure it with screws. Wouldn't that work and I wouldn't think it would be too difficult. The cavity would help secure the nose cap itself, just because it is there and the screws would add additional strength. What do you think?
Similar threads
- Locked
- Replies
- 7
- Views
- 452
- Replies
- 18
- Views
- 674
- Replies
- 70
- Views
- 4K
- Locked
- Replies
- 14
- Views
- 1K

Latest posts
-
 FOR SALE GM drop in barrel .40 cal MINT
- Latest: adkmountainken
-
 FOR SALE Excellent Ethan Allen by Hoppes .36 sxs Derringer
- Latest: BigSkyRambler
-

-

-

-
-

-
