• This community needs YOUR help today. We rely 100% on Supporting Memberships to fund our efforts. With the ever increasing fees of everything, we need help. We need more Supporting Members, today. Please invest back into this community. I will ship a few decals too in addition to all the account perks you get.


    Sign up here: https://www.muzzleloadingforum.com/account/upgrades
  • Friends, our 2nd Amendment rights are always under attack and the NRA has been a constant for decades in helping fight that fight.

    We have partnered with the NRA to offer you a discount on membership and Muzzleloading Forum gets a small percentage too of each membership, so you are supporting both the NRA and us.

    Use this link to sign up please; https://membership.nra.org/recruiters/join/XR045103

Reworking a Pedersoli Brown Bess Musket

Muzzleloading Forum

Help Support Muzzleloading Forum:

This site may earn a commission from merchant affiliate links, including eBay, Amazon, and others.
Hi 54 Ball,
The India pattern Bess is a bit different from the Pedersoli. It has an "L" shaped sideplate, shorter barrel (39" instead of 42"), and a few other cost saving features. The Pedersoli Bess has the older SLP lock with one screw showing behind the flintcock. It also has the "Grice" markings, none of which would be found on India pattern muskets or the pattern 1779 SLP musket that might have overlapped the war of 1812 in some units. It is not really accurate to talk about "models" of the Bess. The gun underwent changes in patterns that varied from long barreled (long land patterns) to short land patterns to sea service and marine patterns. Many of those patterns overlapped. The Pedersoli Bess best represents a pattern 1769 Bess, which was used until the pattern 1779 superseded it. It is not representative of the India pattern or "New Land" pattern muskets used in the early 19th century.

dave
 
the trigger plate is now almost flush with the wood, as it should be

When I bought my Navy Arms BB kit about 1970 I had no idea how to build anything or what a 'correct' BB should look like. I had read an article that claimed British soldiers urine browned their barrels to prevent them from shining and giving away their positions. Dubious info, I now know.
And, not being a skilled craftsman I dreaded the job of inletting the trigger guard. :shocked2:
Coincidentally, at the same time the NRA was holding it's annual convention in a nearby city. I went and was pleasantly surprised to find a display of Bess'es by a collectors society. They let me examine several. I found that some models had the trigger guard inletted, some did not. That satisfied my concern and I built my kit with the guard laying on top of the wood. Doesn't look too bad and nobody ain't shot me yet of deviating from what some consider 'correct'. BTW, if I recall correctly, the Navy Arms (Pedersoli?) Bess was/is sold as "representative" of the musket used in the AWI. Not meant to be a perfect reproduction.
 
Hi Rifleman and thanks for commenting,
Early 18th century English military muskets often did not have their trigger guards inlet. However, beginning with the King's pattern musket in 1730 (Brown Bess) guards were inlet. On that first pattern the inletting is extremely shallow. You are right about the objective Navy Arms had for the Pedersoli Bess. See Gus's post about that above.

dave
 
Hi,
The lock is almost done and I will post photos of what I did soon. All of the Pedersoli Besses I reworked are early production examples. That is understandable since the owners asked me to refinish them because they were old, abused, and very worn. When accepting the work, I urged the owners to let me upgrade them as well since I was going to refinish them. Everyone of course said, yes, do it. This last weekend I stayed with my brother, Nils, during my trip to Lewisburg. He has a Pedersoli Bess from the mid 1980’s. It was handpicked for him by folks involved with Navy Arms so it represents a really good example of a Pedersoli Bess at that time. There are some big differences between the guns I worked on and those later Pedersoli guns. I suspect there are more changes with respect to the current production. My impression is that they are gradually deviating more from the original prototype. The forestock is deeper such that the ramrod hangs below the muzzlecap by about 1/4”. On originals, the ramrod touches or almost touches the muzzlecap. But the biggest issue is the lock area. Look at the photo below. I have never seen an original SLP Bess with lock panels shaped like that but worse, the pin for the forward trigger guard lug is drilled through the lock panel. That pin should be hidden inside the lock mortice. What it means is that there is too much wood on the bottom of the stock, which is apparent when compared to any original Besses. Compare photos shown below with those showing the pins on the Bess I am working with. You can see the diffences in positions and also they shortened the tail of the side plate on the later Besses. So now, to even begin to get the profile right, you have to inlet the trigger and guard deeper, fill the pin holes, and drill them in the right spots. However, I suspect, because the ramrod is further from the barrel that you will hit the ramrod hole if you inlet the guard deeper. On original Besses, the ramrod hole sometimes almost breaks into the barrel channel, not the trigger guard inlet. That tells you something about the thickness of the wood web between the barrel channel and the ramrod hole on originals versus these Pedersolis. I mean, I could glue a dowel in the ramrod hole, cut the ramrod groove deeper and drill a new hole, then inlet all the thimbles deeper, drill new pin holes in the thimbles, take wood off the bottom of the stock, and inlet the trigger and guard deeper. Then do all the other stuff I described in this post. It could be done but it is a lot more work. The more recent Pedersoli Besses are morphing into the ugly German Potsdam muskets. If you have a pre 1980’s Bess, hold on to it because it apparently is a much better gun historically than later production.

dave
Bucks%20Pedersoli%205_zpsds7b7lfn.jpg

Bucks%20Pedersoli%206_zpscq5e5xpy.jpg
 
Dave,

I could not agree more that the Brown Bess was the most beautiful and elegant Military Musket of the 18th century. There is just something “right” about it that the French Muskets don’t have, even as you noted they were technically superior. I can see why the British Soldier favored it so much. In the hands of British Soldiers, it did very well against the “technically superior” French Flintlock Muskets in actual use for most of the period as well.

My very late 1990’s Pedersoli Bess also has the rammer too far from the barrel as you described in a recent post. I don’t think I will go to the additional modifications you described to correct that, but look forward to doing the other modifications you have shown.

It has occurred to me that your modifications would also make the Pedersoli very much more authentic as a Civilian Contract Musket made during the FIW and before the AWI. Of course the King’s Cypher and Broad Arrow would have to be removed from the lock plate. Lock Contractors’ names appeared on these locks and sometimes the dates, though in different positions, normally. At least the “Grice” contractor name would be correct. Granted with the thumb piece and Entry Rammer Pipe, it would have been an upgrade Contract Musket, though.

Maybe near or at the turn of the current century, Pedersoli decided to make their muskets more authentic as “Dutch Muskets” that British Ordnance had to buy in large quantities for the Napoleonic Wars as once again they did not have nearly enough good Muskets when that war broke out? Gee, I hope they don’t cut the barrels down to 39 inches and screw with the locks and furniture even more, though.

New questions, if I can continue to be a bother? I never really understood how to adjust the “tip over point” of the bottom of the Frizzen or adjust the Frizzen Spring to the Main Spring. Would you be so kind to offer some tips on these?

Gus
 
Hi Gus,
Thanks for the note. Fittingly, I am building an American militia musket that is made using older commercial contract musket parts. It will represent a pre F&I war commercial musket upgraded to a steel rammer and restocked in NY or NJ just before the AWI. It will look like a simplified long land pattern Bess stocked in curly maple.

With respect to your question, let me defer it until the next post on the lock. The photos I show will make answering your question easier.

dave
 
Dave,

That will be wonderful and I'm really looking forward to it.

Back in the 90’s, I purchased a number of original Main springs over the years that were made for the M 1842 Springfield. Their shape is very close to a Brown Bess spring, including the eye around the screw hole. However, I believe they are thicker than original Bess mainsprings in the body. I thought about using them in Brown Bess lock kits, but I have never been able to find out much of anything about balancing that spring to the Frizzen Spring.

So I await your upcoming post with extreme eager anticipation.

Gus
 
Knowing what you know now, and all the work you have gone through, and what materials are there to start with and what is not, would you recommend to someone that wanted a recreation of a Bess that looked authentic to go the modification route such as you have taken, or to just start from scratch, such as with currently available parts sets?
 
Hi Folks,
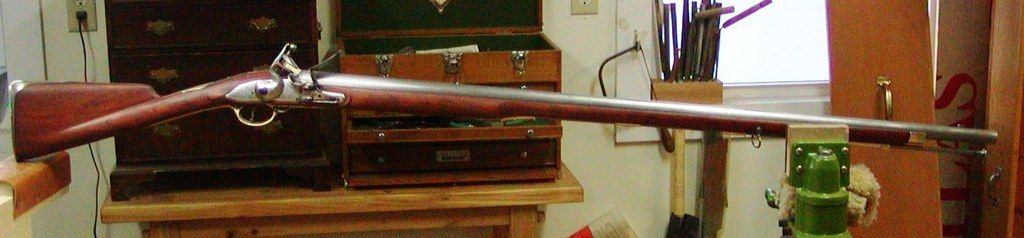
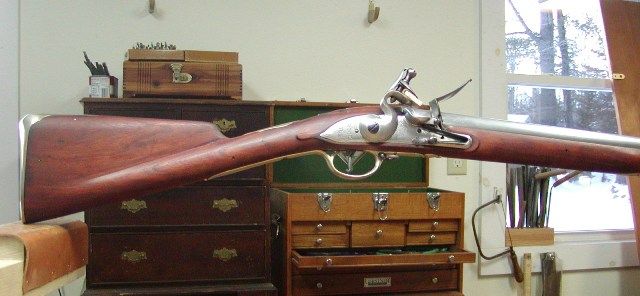
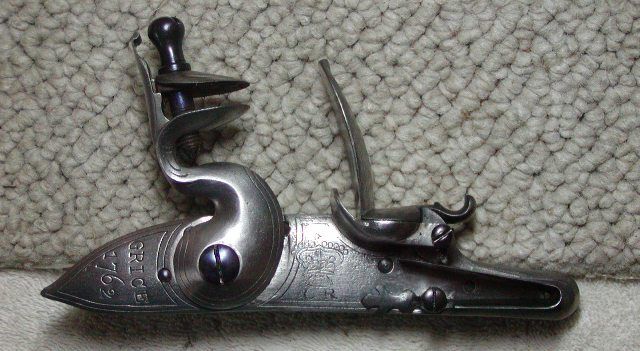
OK, a big post about the lock work. This will be a doozy. This particular Pedersoli Bess lock saw a lot of use and was abused. First, some history. The lock on the Pedersoli Besses are the style used on pattern 1756 and 1769 Besses with the wrong markings. It shows only one screw hole behind the flintcock because it has a long sear spring. Later Bess locks showed 2 screws because they shortened the sear spring and they added a hole to the top jaw screw. The Pedersoli Bess lock does not represent a late Rev War or Napoleonic War Bess lock.
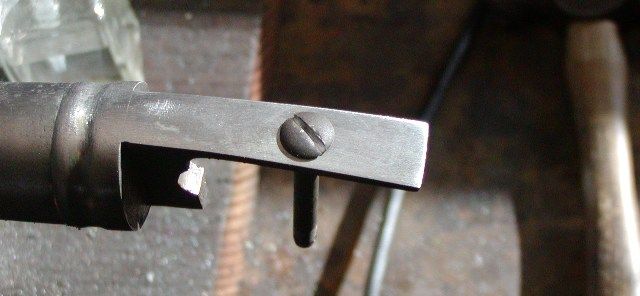
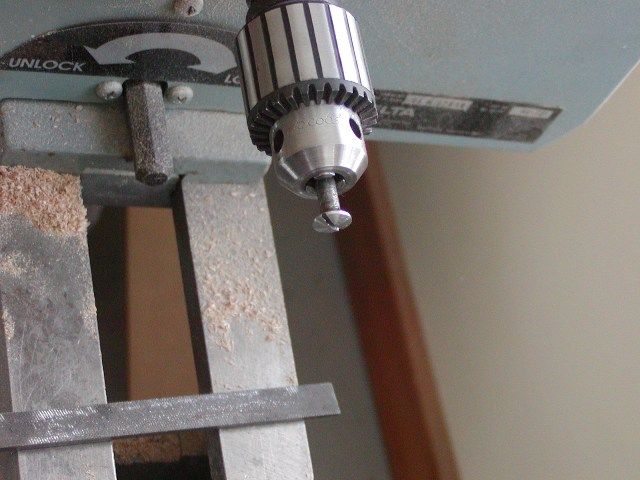
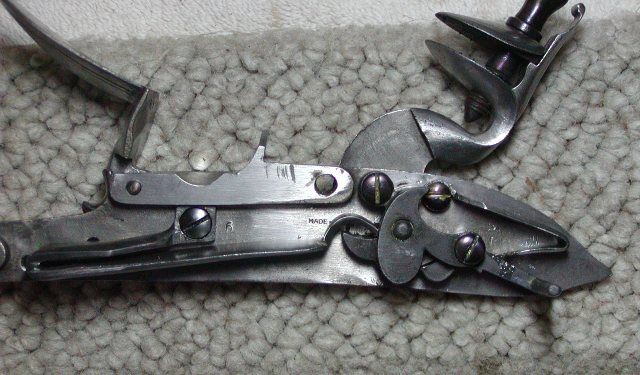
The frizzen was very worn, the plate and flintcock were very rust pitted, and the internal parts needed a lot of work. First, I had to clean it up. I washed it in hot soapy water and then sprayed it with Ballistol to disperse the water and clean off the gunk. I previously showed the problem with the sear screw hole. I annealed all the internal parts by heating them to bright orange with a MAPP torch and letting them cool slowly. To fix the sear, I annealed it and then filed the screw hole true using a rat tailed needle file. Once the hole was corrected, I cleaned it up by using a proper sized drill and my drill press to ream the hole. I then filed a slightly larger screw to fit the hole in the sear and threaded it to fit the lockplate. That solved the problem. Next, I straightened the lower leaf of the sear spring so it contacted the sear closer to the sear screw. I’ll discuss hardening and tempering springs later. Note the contact between the sear spring and the sear in the photo below.
Franks%20Bess%2064_zpsdbumbrvt.jpg

Franks%20Bess%2065_zps9xlpcsif.jpg


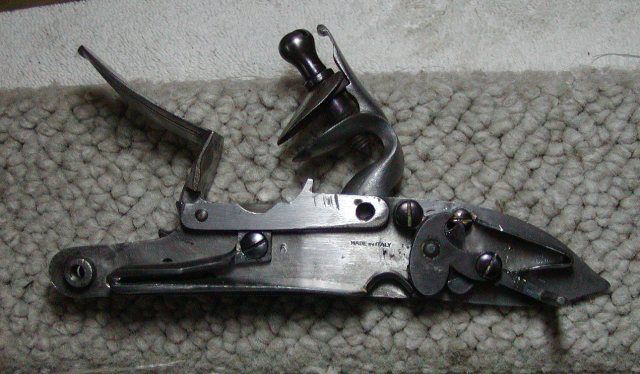
I also heated and modified the mainspring so that the lower leaf was almost straight at full cock instead of having a bend upward in the middle of the leaf. I added preload to it and I also opened up the hook so it engaged the tumbler a little deeper at rest. I harden springs by heating them bright orangy red and quenching in canola oil. Then I clean them up and temper them in my oven at 750 degrees F for 1 hour. That creates perfect springs.
Franks%20Bess%2066_zpsefc7xroo.jpg


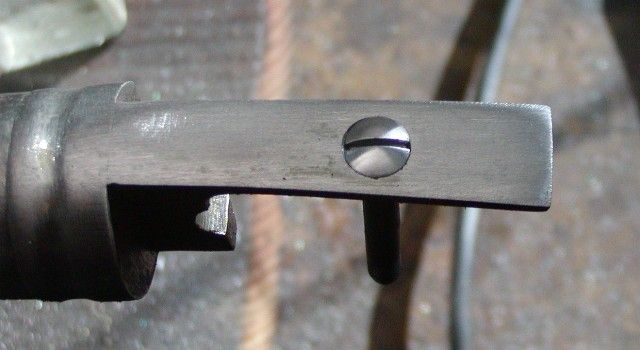
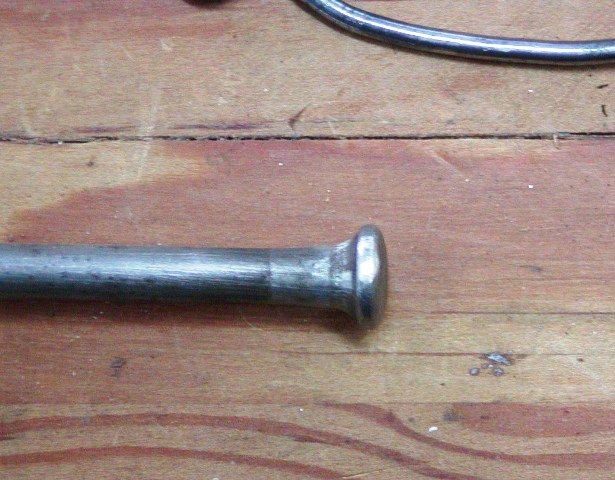
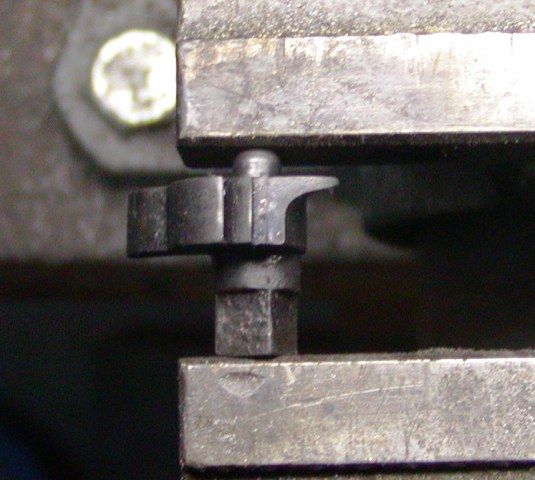
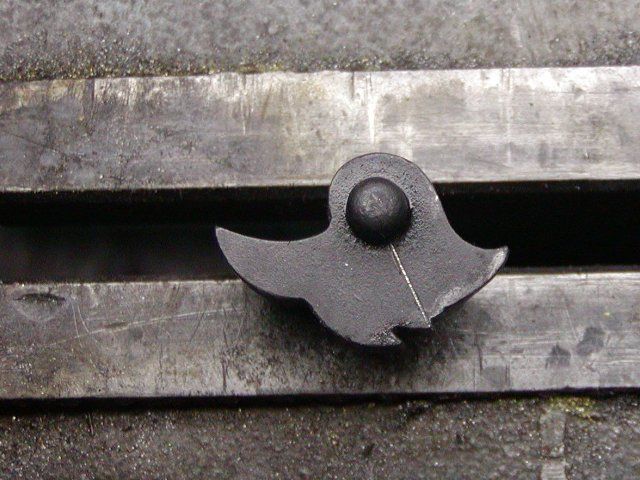
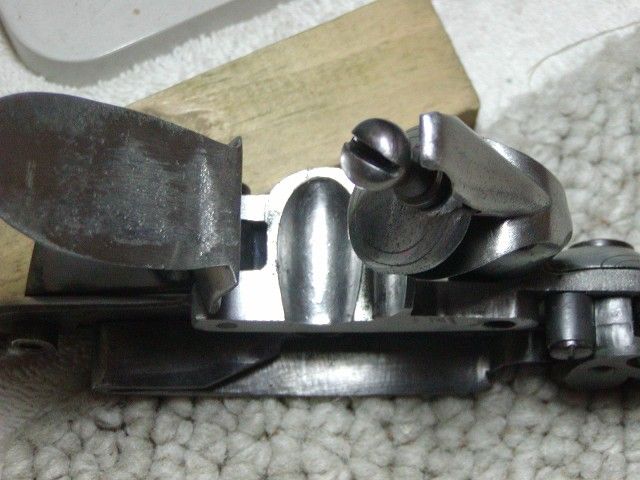
The cock on Pedersoli Bess locks have much too long a throw because the full cock notch on the tumbler is too far from the halfcock notch. I annealed the tumbler and then cut a new full cock notch about 1/16” in front of the existing notch. The old line of the fullcock notch is clear in the photo below.
Franks%20Bess%2061_zps6dosrjib.jpg


When changing the notch, the face of the full cock notch must be in a direct line with a radius drawn from the center of the tumbler pivot. After cutting the notch, I stoned it to match that geometry. The flintcock now has a shorter throw but a distance that makes the lock faster, less likely to fall into the halfcock notch during firing, and less damaging of flints. It is a better lock.
Franks%20Bess%2062_zpsp1yt5m5z.jpg


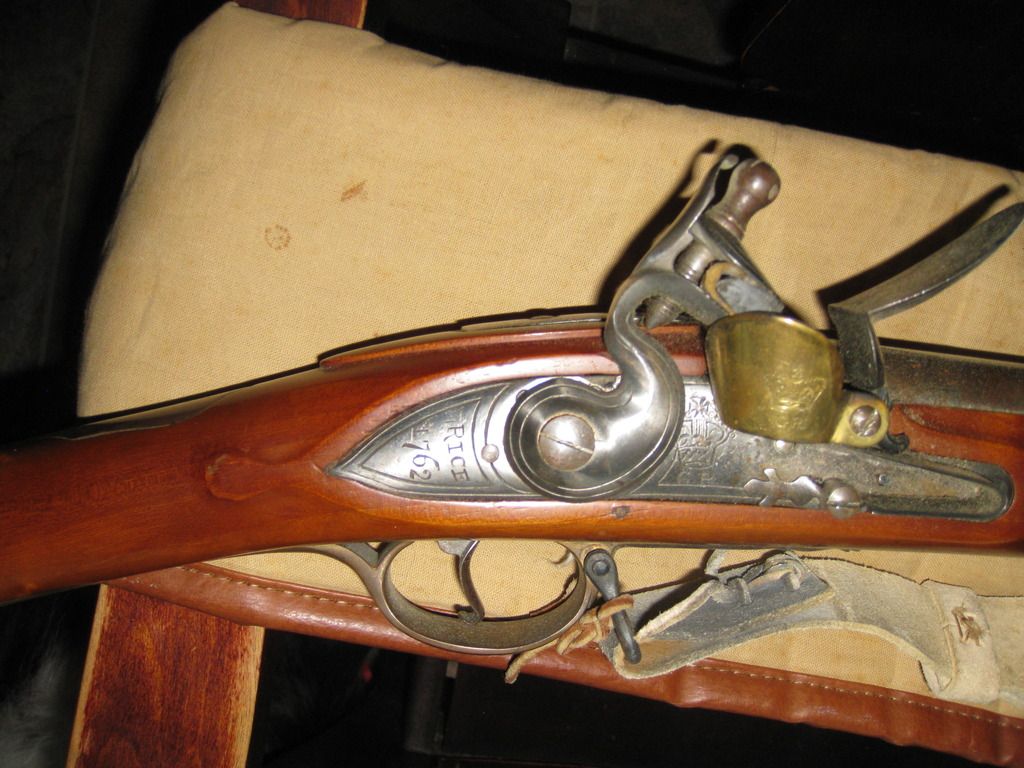
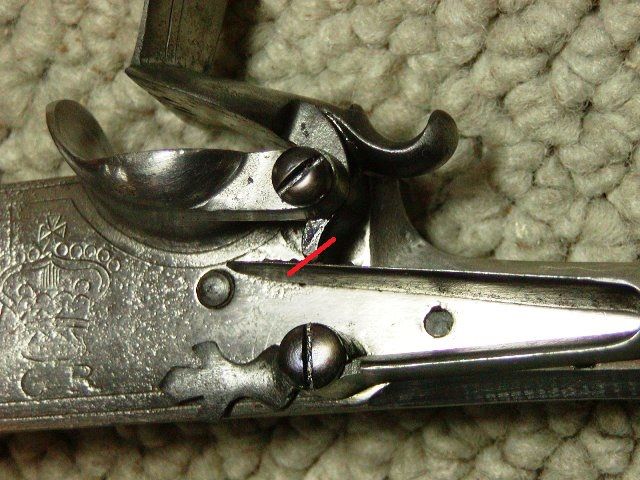
The next job was the frizzen. I polished the surface of the frizzen to remove most of the gouges and then modified the toe so it snaps open faster. The photo below shows the angle of the frizzen above the pan at the point at which it will snap open from the spring pressure. It is about 30 degrees above the pan. I adjust that point by grinding the toe of the frizzen at the angle shown by the red line in the photo. I also make sure the upper leaf of the frizzen spring is highly polished so there is little friction owing to a rough surface.
By grinding off the front edge of the toe at an angle, you create a cam in which the spring knocks the frizzen forward when pushed beyond that point. Keep in mind, that a good flintlock should produce great sparks even if there is no spring on the frizzen. The frizzen spring is really meant to provide a little resistance to the flint but more to keep the pan cover closed over the priming even if knocked about. I polish the inside of the pan so it is easier to clean and resist rust.
Franks%20Bess%2060_zpshpsvlvak.jpg

Franks%20Bess%2067_zpscvsfl64i.jpg


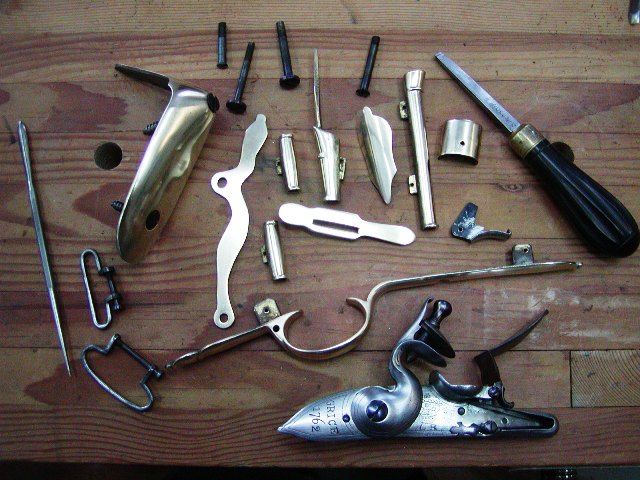
I cleaned up all the lock parts using 3-M bristle burrs mounted on my Dremel but then stoned them using stones lubricated with mineral oil to smooth and polish the surfaces. Then I rubbed the surfaces with a steel burnisher to create the authentic shine and polish.

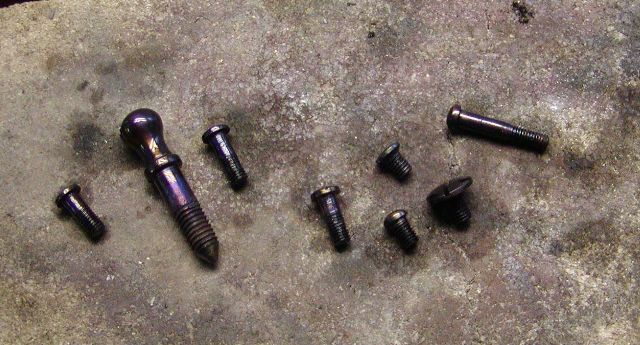
I polished the screws and cut the screw slots wider, and then hardened, and tempered all the screw heads so they resist rust and wear. I heat them with a MAPP torch to bright orange, dip them in KaseNit, heat them back to orange, and then quench in water. After hardening, I clean off the residue with 3M bristle burrs and then heat them with a butane mini-torch until they turn indigo blue. That tempers them. I dip them hot into Vaseline containing carbolic acid and let them smoke. That creates a very rust resistant surface on the metal. I get the Vaseline from Ron’s Apothecary in Juneau, Alaska. It is the same as “medicated Vaseline” that used to be widely sold. The original screws were not hardened but today’s reenactors may want to protect their investments as best they can.
Franks%20Bess%2063_zps7pp2infg.jpg


Finally, I pack all of the sear, bridle, frizzen, and tumbler into a box containing bone and wood charcoal, and then heat them in my oven to 1575 degrees for 1 hour. The pack is quenched in water and then the frizzen is tempered at 400 degrees for 1 hour and the other parts 575 degrees for 1 hour. They are let cool slowly. I heat treat the sear, tumbler, and bridle together so they achieve equal hardness. That way no part wears on the other. I polish all the internal parts with stones and mineral oil. After assembling the lock, it is done.
Franks%20Bess%2064_zpsdbumbrvt.jpg


Thanks for looking,
dave
 
Hi CB,
That is a great question. The owners of the Besses I've reworked just wanted their guns to be refurbished and improved. Obviously, they were keen to fix what they already owned. For me, the answer to your question is easy, I would build my own copy from suitable parts. However, for someone without that capability, you need to decide how important historical accuracy is. You cannot make a historically accurate Bess from a Pedersoli without totally restocking it, replacing the buttplate, and grinding or welding away the lock markings, and engraving the proper marks. But for many folks those deviations may be acceptable and a few changes I described may be feasible to make it better. If you really want an accurate copy, then you need to order a hand-made gun from someone like Mike Brooks. One more option, if you are willing to restock the gun, is to build a pattern 1759 marine and militia musket from the Pedersoli parts. You still need to replace the buttplate, but many marine muskets were marked "Grice" since he was a major contractor for them. You also have to dump the wrist plate and replace the bolt holding the plate on with a wood screw.

dave
 
Dave Person said:
When changing the notch, the face of the full cock notch must be in a direct line with a radius drawn from the center of the tumbler pivot. After cutting the notch, I stoned it to match that geometry. The flintcock now has a shorter throw but a distance that makes the lock faster, less likely to fall into the halfcock notch during firing, and less damaging of flints. It is a better lock.
Franks%20Bess%2062_zpsp1yt5m5z.jpg

Dave, thanks for taking so much time to document this transformation. I will probably never redo a Bess, but posts like this from Masters like you help the rest of us learn and apply other skills applicable to whatever we're working on.

Question on the above quote. When you cut that new notch do you just "eyeball" that it's on the line you drew or can you somehow precisely measure to be sure you are square across the face on the line? Also, how does one know how deep to make the notch? I assume there is a safety margin that needs to be maintained, but will that depth significantly impact the weight of the trigger pull? Also, how critical is the angle of the notch. Yours looks so shallow compared to what I normally see on locks. And lastly, if dealing with a lock that has a fly, I assume it's more difficult to make a change like this because of the interaction of that component with the rest of the lock geometry?
 
Hi Spikebuck,
Thanks for the vote of confidence. The photo of the tumbler was taken before I stoned the full cock notch square to that line. I eye ball it and it is not so critical that you need be any more precise. I keep the depth of the notch the same as the old one. The lumpy surface where I cut off the old notch is stoned down to an even surface and a clean angle at the base of the notch. The depth and angle of the notch absolutely affects the trigger pull. If the angle is too acute, the trigger actually has to push the tumbler back to pass the lip of the notch. Really heavy trigger pull! If the angle is too shallow, the sear slips out too easily or will not hold at full cock. If close to that radius line, the sear will act properly and the trigger force can be adjusted by stoning down the depth of the notch. However, because the lock has no fly in the tumbler, you have to be careful when going light on the trigger. A light trigger pull may allow the sear to drop into the halfcock notch when firing. Original Besses had fairly heavy pulls around 10-11 lbs. With that force, your finger will hold the sear away from the tumbler during the shot and it will not engage the halfcock notch when firing. If you want to create a light pull on a Bess, you may have to stone down the lip of the half cock notch. If you draw a circle on the tumbler centered on its pivot point and with a radius that just touches the lip of the full cock notch, the lip of the half cock notch may stick up a little higher than that circle. You need to stone the lip down until it is at or slightly below that circle.

dave
 
Artificer said:
I could not agree more that the Brown Bess was the most beautiful and elegant Military Musket of the 18th century. There is just something “right” about it that the French Muskets don’t have, even as you noted they were technically superior.
BAH! Sacre bleu, clearly a comment made by a stoopido Anglais, no? Pa-tooie ...

:surrender:

Hmmm, Springfield Armory early flintlocks, e.g., 1795 musket & 1816 common musket sure look to be fully 100% French forward of that low drop English-looking buttstock.

D'accord! But of course! They were copied from the technically superior French Charleville!

:)
 
Dave,

Just wanted to thank you especially for this last post because there actually were two points “where the lights came on for the first time” in this one post.

The angle you showed to reduce the foot of the Frizzen and thus ensure the Tip Over Point was at the right spot of 30 degrees, was most helpful. It finally dawned on me how extremely small Frizzen feet could work on some locks.

The other point was much more subtle, though still rather profound at least to me. I’ve had to cut the full cock notches on large Military Tumblers further forward to save them after they were damaged or someone did not know what they were doing had messed them up. Of course I noticed this shortened the throw of a Percussion Hammer or a Flint Cock.

What I never thought about was the fact this made it easier for the Sear to be held out of the way of the half cock notch on the tumbler, as you pointed out. Looking back, I find it absolutely did that, but I just never thought about it before.

Looking forward to more.

Gus
 
Flint62Smoothie said:
Artificer said:
I could not agree more that the Brown Bess was the most beautiful and elegant Military Musket of the 18th century. There is just something “right” about it that the French Muskets don’t have, even as you noted they were technically superior.
BAH! Sacre bleu, clearly a comment made by a stoopido Anglais, no? Pa-tooie ...

OMG, I almost spit coffee all over the screen, I was laughing so hard. :thumbsup: :rotf: :hatsoff:

I could not help but think of the French Man-at- Arms in the crenulations of a castle wall (in the middle of England, mind you) hurling insults at King Arthur in Monty Python’s “Holy Grail.”

Flint62Smoothie said:
Hmmm, Springfield Armory early flintlocks, e.g., 1795 musket & 1816 common musket sure look to be fully 100% French forward of that low drop English-looking buttstock.

D'accord! But of course! They were copied from the technically superior French Charleville!

:)

Well, you actually gave part of the reason for the British going to reinforced cocks and barrel bands on their Muskets and some other “French like” things, though you might not realize it?

The first time we fought the British, many of us had French Muskets. Well, to the British, that could have been bad luck. However, following the second time the British fought us while we were using “French Type” Muskets in the Second War of the American Revolution, perhaps it got them to thinking about improving the Brown Bess and future muskets? :wink: :grin:

Had the Brits not whipped the tar out of France so many times, they may have looked at the French Muskets earlier and made some of the improvements earlier to the Brown Bess?

I will never forget speaking to the Royal Marine Colour Sergeant who was on Liaison (yes, I know it’s a French word) Duty at Quantico in the early 1980’s. One of our Gunnery Sergeants kept playfully asking him what he thought about “the Frogs.” After the third time he was asked, the Colour Sergeant replied: “Well, you do realize they are our allies”¦”¦”¦ (long pause)?" Then he added, "Geographically speaking, France lies about half way between the UK and Germany and for the past 300 years, we have both been alternately kicking their Arses.” Now he said that with a humorous gleam in his eye and we all laughed heartily.

Gus

P.S. I got into an interesting conversation with a member of the British International Muzzle Loading Team on the Brown Bess at the World Championships in 1998. He had asked me if anyone on the U.S. Team might have an original M1816 or later Flintlock Musket for sale? (Now, U.S. Team Members had already informed me these were more accurate than original Brown Bess muskets for that competition.) Knowing that, I asked him why he just did not get an original French Musket to shoot from the European market, that probably would not cost him as much in the long run? He smiled and said, “Well, we consider it preferable to purchase one from a country whose people speak a proper language, even if they are no longer our colonies.” I thought I would choke to death of my coffee, I was laughing so hard. Noting this he also remarked, “You might not have that problem with a good cup of Tea?” I replied, “Well, you don’t seem to steep it long enough over here.” He looked puzzled and I said, “The Tea in Boston harbor has been steeped about right.” He got a good laugh out of that.
 
Spikebuck,

So many of the questions you wrote are almost identical to the questions I had when I first began doing “trigger jobs” on large Military Locks in 1974.

On my first dozen or so tumblers, I scribed a line perpendicular to the center of the Tumbler pivot like Dave’s photo shows. I actually did that on both sides of the tumbler and used both lines to check to see I re-cut the full cock notch correctly. (Cutting the full cock notch perpendicular to the center of the tumbler as well as can be done is more important on a lock without a fly to get a good trigger pull.)

Over 30 years later when I purchased “The Gunsmith of Grenville County,” they had a neat little homemade tool to help do that. It was a thin piece of brass or steel shim stock that had a hole drilled in it just a few thousands of an inch larger in size than the bridle pivot on the tumbler. There was a line drawn perpendicular to the center of the hole and then the shim stock was cut/filed along that line. This tool is placed over the bridle pivot on the tumbler and then you scribe along the line, to have the same line shown in Dave’s photo. If you want to get real technical, you make a second one to go over the other pivot on the tumbler for the other side of the tumbler.

To make this tool/gadget you use a small piece of graph paper, because it is easy to mark the center of the hole and the line perpendicular to it. Then tape that to the shim stock. Center punch through the paper onto the shim stock at the center of the hole, lay a steel rule or other straight edge on the paper along the line and use a sharp scribe or knife to transfer the line to the shim stock. Drill the hole and cut file the shim stock along the line.

Now, not having a gadget like that, I had to learn how to scribe that line by eyeball and using a steel rule and scribe to scratch the line in the tumbler.

Something I learned to do to keep the full cock notch square across the tumbler might help you. I rubbed black permanent magic marker on the bottom curved edge of the tumbler close to the full cock notch. I actually turned the tumbler upside down to do that and then tightened it slightly snug in the vise. Then I took a square and laid one edge along the length of the exposed part of the tumbler and with the other side of the square, scribed a line across the exposed part of the tumbler. This line should be close to but not on the actual line of the full cock notch. You just use it as an eyeball reference when cutting the full cock notch across the tumbler.

I once worried and kept working my full cock notches until they were as exactly square/parallel to that line as possible and often checked it with a square. Well, as Dave mentions, that is not necessary. As long as the face of the full cock notch is smooth/flat, it can be a little off square across the tumbler. This because there is enough “slop” or looseness in the holes and parts of the lock.

One thing I still do is use the magic marker on the face of my sear to see that I have pretty good contact across the face. The original gunsmiths might have done the same thing with lamp black or candle black. You don’t have to have perfect contact all the way across, but a major portion of the sear face is good. Actually, most of the time I found when I stone the face of the factory sear with a Hard Arkansas stone, it will contact a flat full cock notch very well.

As to how deep the full cock notch has to be on a Brown Bess or other large military lock, a very general rule of thumb is it is normally about twice as deep as it needs to be from the factory. Often it doesn’t need to be that deep. I normally soft solder steel or bass shim stock on the tumbler to take up this space and reduce the trigger pull.

I’m going to go out on a limb a bit here. I prefer a trigger pull on a Brown Bess or other large military locks to be about 4 to 4 ½ pounds as checked with trigger pull weights because this will last a long time. A 3 ½ to 4 pound weight is OK but will wear a little faster. NSSA rules state a minimum of 3 pounds on a rifle musket (and this may be TOO light for a Military Flintlock Musket), BUT I would NOT go that light unless you can properly harden and anneal the tumbler and sear after you finish the work. (Of course to do that, you have to take the soft solder shim off, harden/anneal it and then re-solder the shim back on afterwards). Some folks cut the heck out of the half cock notch and full cock notch and re-harden and anneal the parts, BUT this is far beyond the skills of most hobbyists and some gunsmiths.

A smooth trigger right around 4 pounds is an absolute joy to use after having shot a gun with a 10-12 pound trigger pull from the factory.

Gus
 
Hi,
Some final details. The main bolts and screws need to be cleaned up and in some cases better fitted. All bolts that likely will see wear from use or screw drivers benefit from having the heads case hardened. That was not done on originals but it will protect the owners investment better than if the heads are left soft and it doesn’t show. The tang bolt was badly fitted so I freshened out the countersinking and put the bolt in my lathe. Then I turned down the head with files and sandpaper until it fit better in the hole. I turned all the other bolts as well as the buttplate screws my lathe and cleaned them up with sandpaper. I also made sure the slots were deep and true, and widened those that were too narrow for a human sized screw driver.
Franks%20Bess%2070_zpsi5vq0wol.jpg

Franks%20Bess%2072_zpsw3xrzkb9.jpg

Franks%20Bess%2071_zpsjszhoyxk.jpg


I heated all the bolt and screw heads to orange with a MAPP torch and dipped them in Kase Nit, reheated them to orange, and then quenched in water. After cleaning them up after hardening, I heat them with a butane torch to a deep blue temper and quench them in carbolated Vaseline. That will help them resist rust and bad fitting screw drivers. All of the brass hardware was cleaned up with fine files, then wet sanded with paper or stones and oil, and then polished with a burnisher dipped in mineral oil. The photo shows the bolts, screws, and brass. The burnisher is shown on the left. I do not use a buffing wheel. I can tell hardware that was buffed using a wheel in an instant because the edges of the screw and bolt holes are dished out and rounded. Just look at any of the overly polished hardware and locks on India-made repros to see what I mean.
Franks%20Bess%2069_zpsamxi21s4.jpg


Finally, the tip of the ramrod on Pedersolis is too flat and flared. It does not look like the originals. I file the end into a shallow dome shape and then turn the edges of the tip against a grinding wheel or sanding disk to reduce the diameter of the tip a little and create a wider lip much more like the originals.
Franks%20Bess%2068_zpsqbqe2bol.jpg


Well that is largely it until the finish on the stock is done, which will take a few days or a week. I will post pictures of the finished gun when the finish is dried and I’ve assembled all the parts. Thanks for looking.

dave
 
Hi,
The finish so far has dried but I have to apply several more coats to build up a sheen. I decided to assemble the gun and test the trigger and lock operation, fit of the parts, and fit all the pins. The gun assembled very easily. I ran a 3/32” drill through all the pin holes to clean out finish and open them up. They often swell from the finish. After that, I measured each pin because after taking wood off the stock, many of the pins are too long. I want each to be just short of the correct length so they are slightly below the surface of the wood when installed. That way, if they need to be tapped out, the punch can use the lip of the hole as a guide to prevent it from slipping and gouging the wood. I turn each pin in my lathe to shorten both ends and round the ends off. That way they will not snag and chip out wood if they are tapped out again. That is particularly important for the barrel pins, which are removed the most frequently. I harden the pins and temper them to blue so they don’t bend under stress in the stock and the ends don’t mushroom from being tapped with a punch. Original pins were not hardened at least as far as I can tell but again, that treatment helps protect your investment and does not show. The trigger rattled badly regardless if the lock was at rest, half, or full cock. I hate rattling triggers and none of the original Besses I’ve handled had loose triggers. I don’t doubt many were issued that way, however. This Pedersoli had a lot of slop in the trigger so I increased the height of the trigger bar by adding some beads of weld. I filed the welded metal to shape and then gradually filed off the height, repeatedly testing it in the gun until it held snug against the sear of the lock at all lock positions. I then case hardened the trigger to carburized the mild steel of the weld. That solved the problem and the trigger pull measures 7.5 lbs, which is heavy but fine for a gun used for re-enacting. The originals were around 10 lbs. I included a few photos of the assembled gun, but will post more detailed ones when the finish is completed.

dave
Franks%20Bess%2074_zps6oafhxll.jpg

Franks%20Bess%2073_zpsw1fxs2kb.jpg

Franks%20Bess%2075_zpsiaqmrz1k.jpg
 

Latest posts

Back
Top