• This community needs YOUR help today. We rely 100% on Supporting Memberships to fund our efforts. With the ever increasing fees of everything, we need help. We need more Supporting Members, today. Please invest back into this community. I will ship a few decals too in addition to all the account perks you get.


    Sign up here: https://www.muzzleloadingforum.com/account/upgrades
  • Friends, our 2nd Amendment rights are always under attack and the NRA has been a constant for decades in helping fight that fight.

    We have partnered with the NRA to offer you a discount on membership and Muzzleloading Forum gets a small percentage too of each membership, so you are supporting both the NRA and us.

    Use this link to sign up please; https://membership.nra.org/recruiters/join/XR045103

Reworking a Pedersoli Brown Bess Musket

Muzzleloading Forum

Help Support Muzzleloading Forum:

This site may earn a commission from merchant affiliate links, including eBay, Amazon, and others.
Hi Gus,
You are right, the screw size is more like 12. I annealed the sear and straightened the hole. The original screw fits with a little slop but I want to make a bigger screw. Fortunately, the size difference won't be much. Also, on this lock, the mainspring barely catches the tumbler when the flintcock is at rest. I have to open up the hook a little and reshape the mainspring so it does not hang below the lockplate. This lock is a real hatchet job. Well, at least the frizzen fits on the pan without big gaps, so there is at least that going for it.

dave
 
Dave,

Well, at least the customer found the right guy to fix those deficiencies. :hatsoff:

I had to refit the frizzen to the pan on almost all the Miroku Besses and even many Pedersoli Besses in my Unit to ensure they didn’t lose the prime during “Cast About.” I’m not sure if my 1990’s Pedersoli Bess actually required it, but I refitted the frizzen before I used it the first time, just to ensure I would never have that problem. Shooters don’t prime their pan and then “smartly” move the musket around so much in the loading process, so it doesn’t require their frizzens fit the pans as tightly as for reenactors

Gus
 
Hi,
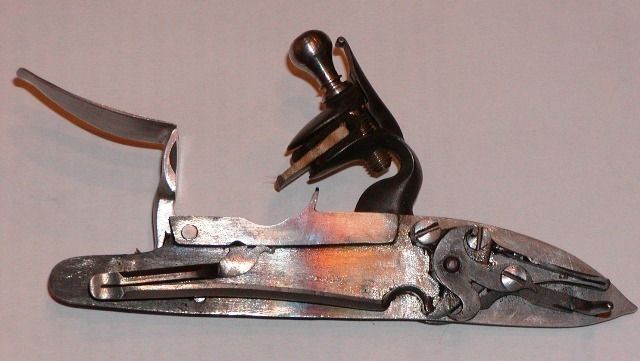
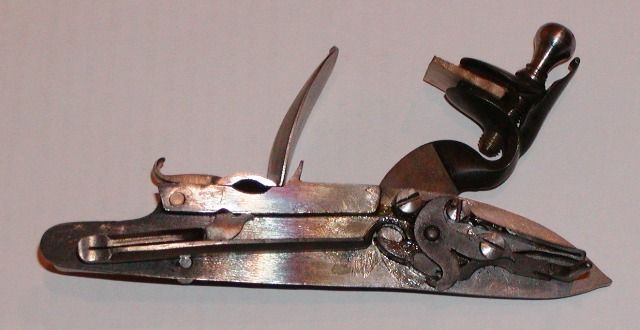
Well, I’ve been working on the lock. I fixed the sear by straightening the hole and installing a slightly larger screw. All of the lock parts were barely finished, showing mold lines and flashing. The mainspring just about disengaged from the tumbler when the flintcock was at rest. The full cock notch on the tumbler is so far from the halfcock notch that you almost pull the flintcock into the wrist before reaching the notch. I mean the throw is almost 120 degrees. Ridiculous! And to be even more annoying, all the screw slots are so thin it looks like they were sized for little pixies. The only good things I can say are the frizzen fits the pan pretty well and there is no slop in how the flintcock fits on the tumbler. After disassembling the lock, I started on the springs, all of them. First I annealed them. The sear spring on Pedersoli Besses are often too short so that the lower leaf hits the sear midway between the sear screw and the “L”. This is totally wrong and not how the originals were. The lower leaf should touch the sear just behind the sear screw for the proper leverage. Making things worse is the downward bend they put in the lower leaf of the spring. This is why many folks have trouble adjusting the trigger pull. Heat the spring and straighten out the bend. Open the main bend a little so the spring makes firm contact with the sear but now at least the contact point is closer to the screw. I filed and polished the spring to clean it up a bit. Next the mainspring. The geometry is poor resulting in the lower leaf bending upward from the middle when the flintcock is at full cock. Moreover, the hook barely contacts the tumbler at rest. I heated the main bend red hot and squeezed it closed a little. Then holding the spring by the main bend with pliers and the end of the hook with another pliers, I heated the entire lower leaf red hot and gently gave it a shallow even bend downward. Not much, just enough to compensate for closing the bend. That curve is called “preload” and gives the spring a whippy feel plus the changes I made result in the lower leaf being perfectly straight when the lock is at full cock. The photos below of a similar lock that I built illustrate preload and the correct spring geometry at full cock. You can also see the correct positioning of the sear spring behind the sear screw.
fowler%20lock%202_zps2jjcp52z.jpg

Fowler%20lock%201_zpscd0pmjwy.jpg


I opened up the hook a little so that it engaged the tumbler a little deeper at rest and cleaned it up a bit. The top of the frizzen spring was gouged by the frizzen and it also had a perfectly round little void on the surface. I ground the top of the spring flat and polished it while also filing and cleaning up the rest of the spring. Before hardening the springs, I check to make sure they all fit properly and then heat them to red hot and quench in canola oil. Then I clean up the oil and pop them into my oven at 750 degrees for 1 hour to temper them. They are cooking as I speak. I’ll discuss the other lock work tomorrow. Time now for a scotch (neat) and then some supper.
dave
 
Dave,

I was expecting this post would be a doozy, considering the problems you already mentioned on the lock, but you far exceeded my expectations. I’m taking notes from your points on the springs as you have brought up some great points.

One point I have is about the Sear Spring contacting the Sear near the Screw bolster. Over the years, I’ve seen about a half dozen Repro Sear Springs on Military Locks that fit very close to or actually butted up against the bolster and actually caused a worse trigger pull because they bound up the Sear at that point. Now I know that is not what you meant and the Sear Spring still has to keep pressure on the Sear and allow it to move readily throughout its path of movement without binding. So I really enjoyed your description of heating and bending the Sear Spring.

I did not have the time or the equipment to do that at the NSSA Nationals I worked at over the years. So what I wound up doing in the case of the Sear Spring binding the Sear that way was either to carefully shorten the lower leg of the Sear Spring that was close to the Sear Screw a little bit (when it still gave proper tension and allowed free movement of the Sear) or replaced the Sear Spring. Of course most of the Military Lock Sear Springs I had were cheaper than one for a Pedersoli Bess and a lot easier to get.

REALLY looking forward to more posts. :hatsoff:

Gus
 
I'm gonna have to be honest, and send Dave some $$ for this seminar on factory Bess correction. I'd pay money, plus burn gas and time to travel to get this information.

So far he's covered:
Stock corrections covering carving and dimensions
Simple hand tools to use during the correction
barrel polishing and correction for sling swivels
pins for hardware and the barrel
Stock staining
stock finishing
Lock problems and how he corrected them

(and he's not quite done yet)


:hatsoff:

LD
 
Hi Dave and thanks,
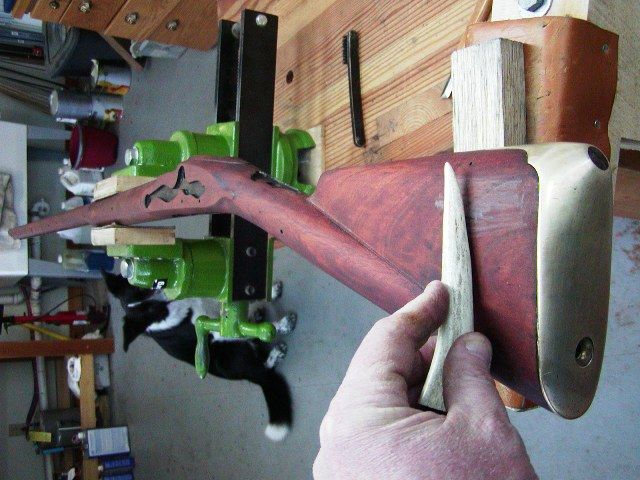
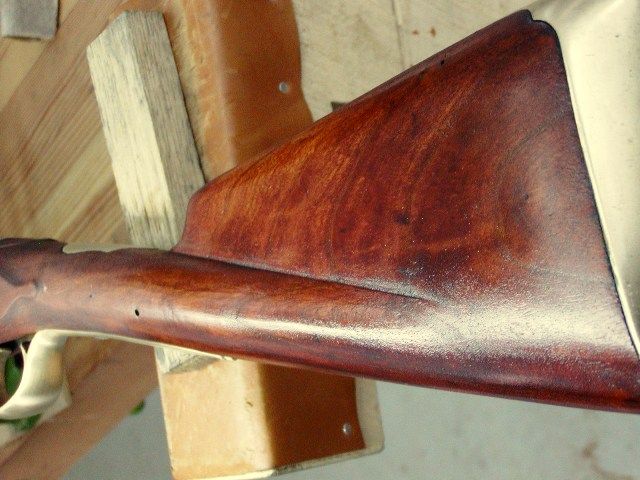
I hope to case harden the lock parts today. In the meantime, after a couple of coats of finish I burnished the stock with a polished antler tip. That pushes down the wood fibers but leaves a slight texture that is commonly encountered on military and utility arms. It also enables the grain to be filled faster. The glass smooth finish found on fine English sporting guns would not look authentic on a Brown Bess. After burnishing, I wiped the stock with turpentine and you can see the finished color emerging. Pedersoli Bess stocks can be made to look pretty nice. The stock requires quite a bit more finish to fill up the grain but it won’t take long.

dave
Franks%20Bess%2058_zpslhxezfic.jpg

Franks%20Bess%2059_zps60eayslo.jpg
 
Why do you suppose the people at Pedersoli chose to deviate from the dimensions of the originals? I can see why they leave extra wood on (thin lock panel margins are more prone to tear-out, which would result in a ruined stock). But the butt dimensions seem like either it aw deliberate (so they couldn't be modified so as to be confused with originals by knowledgeable people) or simply their designers not knowing any better. If I had to bet on it though, I would say the latter rather than the former.
 
Hi CB,
There is a third plausible reason - cutting costs. The smaller and straighter the stock the more that can be cut from a plank of wood. Smaller butt plate- less brass used. The long wrist may be the designers increasing the LOP to 14" but originals were 13 5/8-13 3/4" so they seem plenty long for most folks and they should have maintained the relative butt dimensions. It also could be the designers did not pay attention to details. For example, why mark the lock "Grice 1762" when there is no historical precedent for it with regard to pattern 1769 Besses. I suspect they mixed up a Marine and Militia musket in their design. I don't know the answers but I wish they would address the issues.

dave
 
Dave,

The story that I heard was that they "adjusted" a "Bess" that they got hold of in some respects, and because it was in the 1960's when they started the project, there wasn't much known about the Bess. What they used was apparently a piece cobbled together from a 1769 version but somebody selling it as an antique had put a lock on it from a different model musket, hence the screwy date. Just like the Japan made copy of the Bess was made by copying an original so it had "TOWER" on the lock BUT it had been damaged at the trigger guard so the Jap Bess have the "D" shaped trigger guard.

NOW, of course, it would cost them a lot of money to retool or tool-up to make a Bess that is compatible for the F&I in North America, so they still make their version of the SLP.

LD
 
I'd go with the cost thing if I could choose. But you point out some other things that just go to not having fully researched them when they were designed. Not so much for savings on brass, but that darn drop at the toe takes up a lot of wood with a blank. Look at the late war Japanese Type 99 Arisaka's. The toe of the butt (below the line at the bottom of the forestock) is a separate and glued piece of wood. They could make more stocks out of a blank when they did them that way.
 
Dave,

I purchased my old Brown Bess Carbine in I think it was the Fall 1974 Nationals of the North South Skirmish Association while working as a gunsmith in what was then known as "The Navy Arms Booth/Cabin." The Cabin actually belonged to Donald "Bucky" Malson who was one of Navy Arms' Distributors. Val Forgett, Jr. often came into the cabin at night, especially to raid the cookies sent by Mrs. Betty Higginson, CWO3 Frank Higginson's wife. Miss Betty's cookies were somewhat legendary.

After a few Nationals that I worked and had purchased my first copy of Dr. Bailey's first book, I asked Val Forgett, Jr. how the Navy Arms/Pedersoli Brown Bess had come to be made. He informed me that they had purchased an original and sent it to Italy to copy.

Val Forgett, Jr. was very knowledgeable on Civil War Guns and especially Civil War Cannon, but not that knowledgeable on Revolutionary War Arms at that time. Val was also always looking "for a deal" so the original Bess that was purchased was not necessarily the most authentic Bess that was available for purchase. Val did believe it was "correct" at the time it was purchased, though.

When that Bess was sent to Italy, it was not required that it was an exact copy, just as close as possible AND at a price that would sell in the U.S. This was the same way Val got the Repro Navy Colt revolver and “Zouave” Musket made in Italy. So none of the common Italian made Repro’s were exact copies and the quality was not as good as the originals.

In the mid 80’s at the SHOT Show in New Orleans, Sue Hawkins of EuroArms introduced me to Mr. Zoli of Zoli Arms, a huge maker of reproduction guns in Italy. Of course he was extremely busy at the Show, but took the time to answer a question that had been bugging me for years. I knew they could make more exact copies of the originals and of at least equal quality referencing their modern shotguns especially, so I asked him why they did not. He informed me that they surely could make exact reproductions and of better quality with modern steels, but they would not sell at the price that would have to be asked for that quality. He explained that a S&W Model 19 Revolver was then currently going for about $ 235.OO and almost NO ONE would pay that much for a Repro Colt Navy Revolver. So they built a gun that could sell for around $ 145.00 and they got complaints about that “high” of a price.

So when Pedersoli produced the prototypes of the Brown Bess for a price that would sell in the U.S., Val Forgett, Jr. said they were “close enough” for the price. I got the “Distributor Price” on my Brown Bess Carbine in the mid 70’s that was below Dealer Cost and Retail. I don’t remember exactly what I paid for it then, but it was around $ 340.00 or slightly more. Just three years or so before that, I had paid $ 175.00 Retail for my then brand new .50 Cal. T/C Hawken Rifle. The Brown Bess had cost me almost a Month’s Salary as a Single Marine Sergeant, even at the Distributor Price. So it was a pretty hefty investment to pay for a hobby.

So, bottom line, Pedersoli did not produce an exact copy of an Original Bess, just something “close enough” that could sell in the U.S. at a price it was worth making the reproductions to sell in the quantity needed to produce the guns for the U.S. market.

Gus
 
Wow Gus, thank you,
What a great bit of information and it all makes perfect sense given the objectives of the makers and retailers. I knew Bucky and Val through my brother John, who was a top NSSA shooter and a member of the International Muzzleloading Team for a short while. I got to see Val's barn in Sussex County, NJ where he had cannons and a Gatling gun. I have to tell you a story. Back in the early 1980s I was the deer management biologist for NJ Fish and Game. I was in charge of managing deer for the state north of Monmouth county. John brought me over to meet Bucky at his home in Lake Hopatcong, NJ. John introduced me and mentioned that I was a state biologist and Bucky responded "Well, we don't much care for biologists". I answered, "That's OK because we don't much care for puffed up pricks like you". He laughed so hard I thought he was going to have a coronary. We got on famously after that. Buck got me my Parker Hale Whitworth, which he personally selected for me as well as my brother, Nils's Pedersoli Bess, which is a really nice one.

Gus, I really appreciate your and Loyalist Dave's contributions to this thread. I think we are providing folks with some real meat here that they can use to understand the reproduction musket in their hands and how it can be improved to be a better ambassador of history. Thanks Gus and Dave,

dave
 
Hi Folks,
I will be taking a little hiatus here to go south and attend the 18th Century Artisan’s Show in Lewisburg, PA. The Bess bridal, tumbler, sear, and frizzen are in my oven packed in bone and wood charcoal for case hardening. I am case hardening the parts at 1575 degrees for 1 hour. They will be quenched in 10-12 gallons of water in about 1 hour. Then I will temper the internal lock parts at 575 degrees and the frizzen at 400 degrees. After tempering, the toe of the frizzen will be heated to indigo blue with a hand held torch. The tumbler on this Bess lock has too much space between the half cock and full cock notches. If you intend to keep the trigger pull at the very heavy 10-11 lbs typical of British muskets, that spacing is not a problem. But if you want to lighten the trigger pull to make the gun a better shooter, you have a real problem. The light trigger pull allows the sear to drop back against the tumbler and slide into the halfcock notch during firing. With a heavy trigger pull, you are strongly drawing the sear up and keeping it away from the tumbler while it travels forward. With a light pull, the sear may engage the halfcock notch as the tumbler moves forward. This possibility is much worse if the travel between half cock and full cock is large. To reduce that distance and to make the throw of the flintcock shorter, I annealed the tumbler and recut the full cock notch about 1/16” closer to the halfcock notch. I used a jewelers saw to cut down and in to the notch and then cleaned up the cut with files and stones. If you do this keep in mind the face of the fullcock notch must be in a direct line with the pivoting center of the tumbler. If undercut, the trigger pull will be excessive, if overcut, the lock will not hold at full cock. I cut the tumbler on this lock and reduced the throw of the flintcock substantially but more than sufficient to kick over the frizzen every time. With the improved mainspring geometry and strength, the tumbler modification, and changes to the sear spring, the lock performs very well and the potential to adjust trigger pull effectively is much better. Nonetheless, this gun will be adjusted to meet historical parameters, which means the trigger pull will be heavy, about 10 lbs. Time to go pack and take a break. See you in a few days.

dave
 
Dave,

You are too kind. You are providing the "feast of information" in this thread and at most I am offering to hand you the salt, pepper or other condiments to go with it.

Just wanted to wish you a fair journey and a good time and we will be looking forward to more when you come back.

Gus
 
Hi Jeff,
I usually don't do anything special about the swell other than I remove about 1/16" of wood all over the forestock from the lock forward.

dave
 
Thanks just seems to come up a bit short.

This would make an excellent sticky, many thanks for taking the time to share this.

:hatsoff:
 
Hi Folks,
Thanks to all of you that commented. I am happy to do this thread because I understand that many folks simply cannot afford the $2-3K for a custom and hopefully accurate Brown Bess copy. I get that. I also get the fact that the F&I and Rev War living history population is aging and declining. One of the impediments to a young participant is that after spending a lot of money on uniforms, clothing, camp and military accoutrements, he or she often cannot afford an historically accurate rifle or musket. It may be the single most expensive item they buy. So they get a Pedersoli if they have a $1000 or perhaps an India-made Bess if they can afford less. What bothers me about all of this is that it is the gun that tends to attract the public and is often the hook that enables a re-enactor to teach the public history. I have watched this for many years because both of my brothers were involved in living history since the 1980s. It is great to demonstrate a wonderfully hand sewn and historically accurate uniform, but then hold up a Pedersoli or India-made Bess as an accurate example of 18th century arms? Total manure. I cannot salvage the India-made guns, but I can make the Pedersolis look more like what they should be as products of the British ordnance system and that is the point of my thread. I want to be clear: I believe the Brown Bess musket to be the most beautiful military firearm ever made. The French muskets of the time were technically superior but not as elegant and beautiful. I love the Brown Bess. It served with minor changes for over 100 years. Can you imagine the “03” Springfield rifle being issued to troops sent to Iraq in 2003? I love the Brown Bess and I admire, despite all its faults, the ordnance system that produced it. Anyway, my goal is to help folks make their Pedersoli Besses as historically accurate as they can and this is what I do to make that happen. I also want to make clear that I talk the talk but I also walk the walk. I build rifles and muskets that I donate to living history groups so they can educate the public about the quality of work done by hand in the 18th century.

dave
 
Dave,

I think I'll be speaking for a great many of us on this thread when I reiterate my thanks and say that your comments, and indeed your works, are among the most magnanimous I have ever had the pleasure of coming across.

Three cheers for a right, honorable fellow :hatsoff: :hatsoff: :hatsoff:
 
Dave I'm not meaning to Hijack your wonderful thread. Hopefully my question will add to it.

In your opinion is the Second Model also a good 1812 musket?
Reading Red Coat and Brown Bess it mentions the India pattern being produced for the EIC at the same time frame as the Second Model was for the armories. That procurement and production system was so convoluted I use armories for simplicity.
After the War of Independence Britain reduces her military in much the same fashion as she later did after the First World War. The Napoleonic Wars caught her unprepared and they rushed the simpler Indian Pattern into general production, it becoming the Third Model. I assume that 2nd and 3rd models were issued together, at least for a while. This makes me think the Pedersoli may be a good 1812 gun, maybe more so than Rev War.

Anyhow Mr. Person thanks for your wonderful thread. It's one the best by far. :hatsoff:
I would love to see you get a hold of their 1795.
 

Latest posts

Back
Top