• This community needs YOUR help today. We rely 100% on Supporting Memberships to fund our efforts. With the ever increasing fees of everything, we need help. We need more Supporting Members, today. Please invest back into this community. I will ship a few decals too in addition to all the account perks you get.


    Sign up here: https://www.muzzleloadingforum.com/account/upgrades
  • Friends, our 2nd Amendment rights are always under attack and the NRA has been a constant for decades in helping fight that fight.

    We have partnered with the NRA to offer you a discount on membership and Muzzleloading Forum gets a small percentage too of each membership, so you are supporting both the NRA and us.

    Use this link to sign up please; https://membership.nra.org/recruiters/join/XR045103

Making a Pattern 1756 Long Land British Musket

Muzzleloading Forum

Help Support Muzzleloading Forum:

This site may earn a commission from merchant affiliate links, including eBay, Amazon, and others.
Hi Bob,
Yes they are. You have talent to make them so including paying attention to details. Not everyone does or sees what the finished gun should look like within their pre-carved stocks. Often they end up looking unfinished with respect to shaping and architecture.

dave
 
Hi Folks,
I am starting this thread a little earlier than I planned to help a member who is actively building the same gun. The first thing for me is always context. The gun I am building is a British pattern 1756 long land musket and inspired by an original Tower assembled musket issued to the 63rd regiment of foot during the American Revolutionary War. It may have served at Bunker Hill, Long Island, New York, New Jersey, and Pennsylvania. I will use direct measurements from that gun to guide this project. I ordered the parts set in June and received it at the end of September.

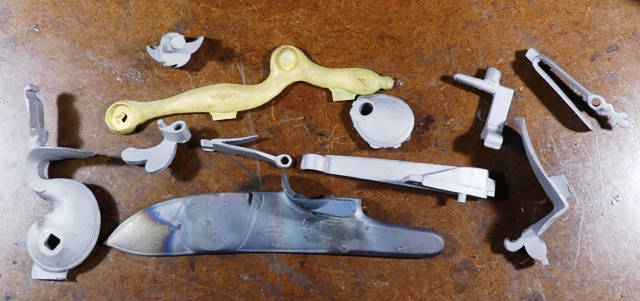
The parts were generally of excellent quality with a few caveats. The lock plate was warped and had to be straightened. That reqy=uired heating the tail and nose to red hot and hammering it straight. A MAPP gas torch is sufficient for that purpose. Then file the inside surface of the plate to see if there are high and low spots. I use a coarse single cut lathe file for that purpose and use it to flatten the inside of the lock. The rest of the lock parts and components seem to be fine.
WjpZoHz.jpg

7ZTR2cw.jpg

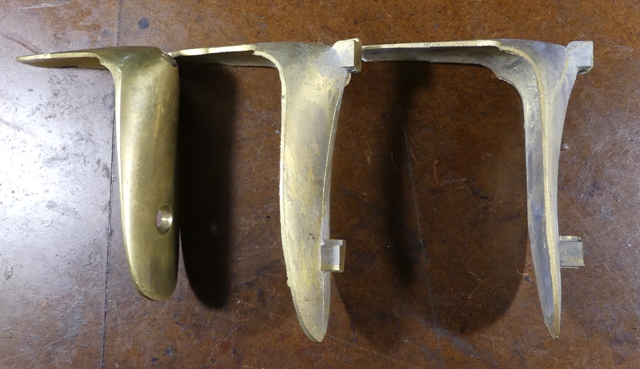
I arranged several cast butt plates to show you why none of the commercial reproductions can ever be considered authentic reproductions of the Brown Bess.
5Y2iGlc.jpg

BDw8UzG.jpg

The first butt plate to the left is from a Miroku Bess and is the same size as butt plates on Pedersoli Besses. The second is a casting from an original short land Bess, the gun the commercial repros purport to be, and the last is from a long land musket. The commercial butt plates are way too small and will never produce an accurate copy of the gun.

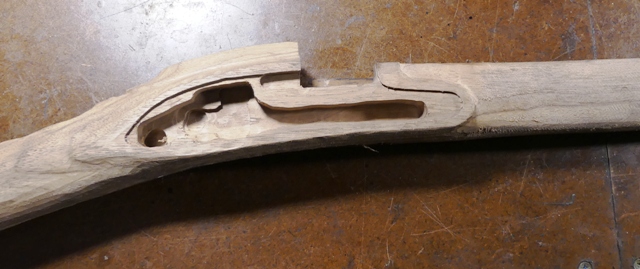
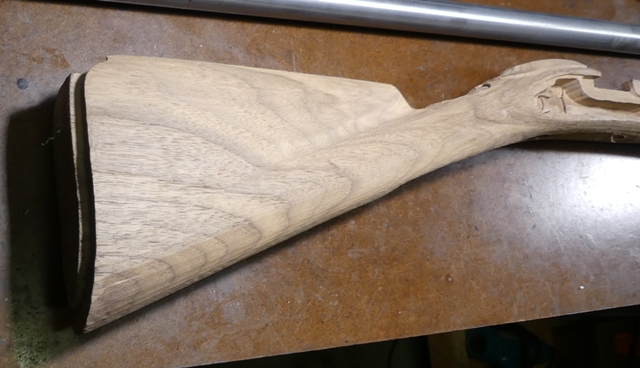
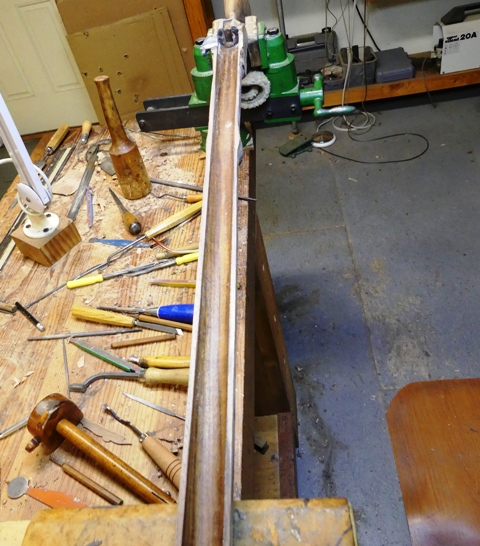
The TRS stock is pretty good. Fortunately, it falls within the dimensions of the originals.
Phb6phq.jpg

ZQhhKlQ.jpg

UJUjUnU.jpg

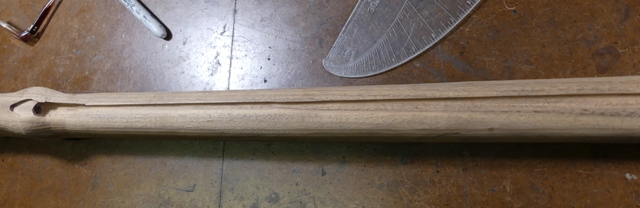
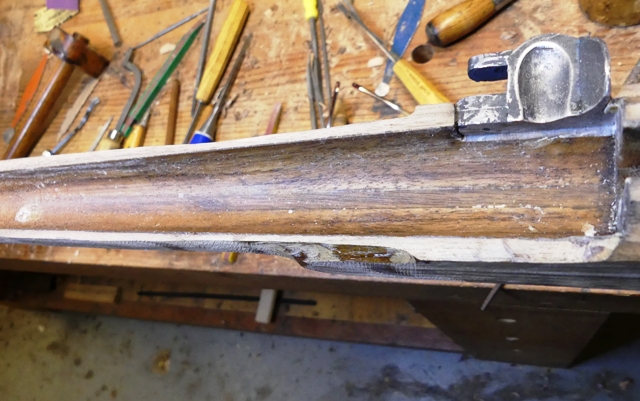
Unfortunately, the routed (not drilled) ramrod channel is off center.
K5yXcm2.jpg

I'll fix it and I will not let that routed mortise show. It will be covered over with a walnut strip and the barrel channel coated with a varnish thin layer of AcraGlas.

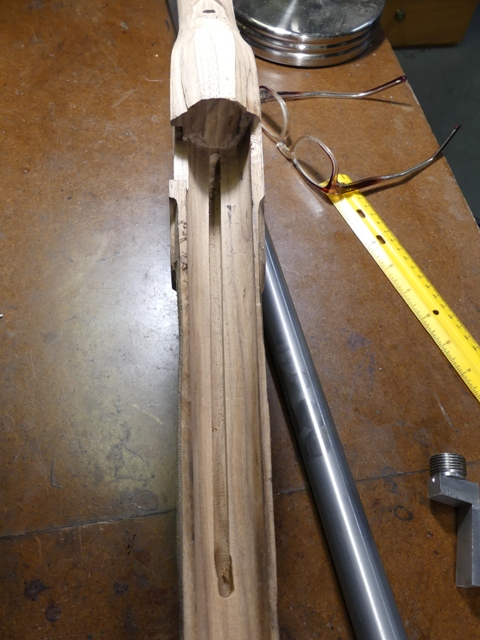
The first job is to fit the barrel in place. First it must have a flat filed on the lock side. To do that you need to make sure the breech plug is well fitted. Remove the plug and put blacking or Prussian blue on the face of the plug and screw it in all the way. Then take it out and hopefully the marking on the face of the plug is wipe off indicating the plug is snugging against the shoulder in the barrel. If it doesn't, file off some of the breech end of the barrel and install the plug until it butts against the shoulder. When it does, measure the depth of the threads in the bore and mark that depth on the outside of the barrel above where you will file your flat. Next file the flat just enough so the full length of the bolster on the lock fits the flat. Don't go overboard. Also file off the decorative rings at the breech on the underside of the barrel.
vLiLn4D.jpg

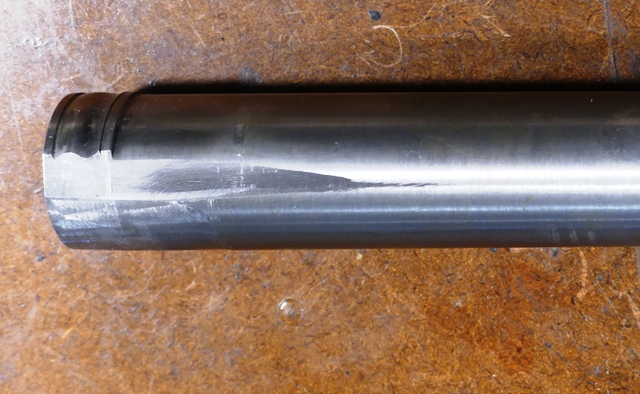
Those rings were hand filed into the top third of the barrel. They were not turned like the modern repros. Now you are ready to initially fit the barrel. File away the closing cap of wood at the muzzle end and using scrapers, barrel floats, and sandpaper, seat the barrel. You will need to clean up all the corners at the breech with flats and gouges.
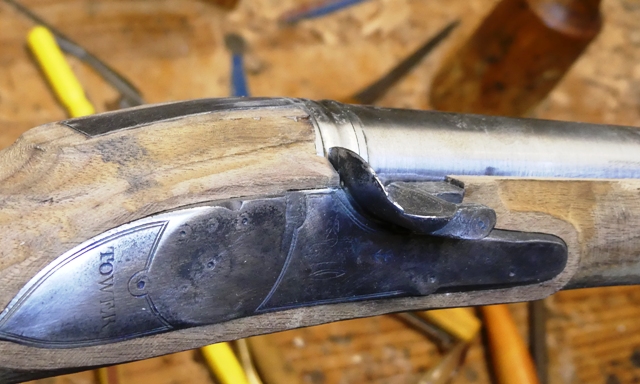
Once down and in place, you get to see how the lock lines up with the potential vent hole location. I cover that in the next post

dave
Thanks Dave! This is very useful! I'm following every step!
 
Hi Bob,
The wood is inferior but its problems are made so much worse by the machine inletting. That removes so much supporting wood. Working from a squared blank eliminates so many of these problems. However, I am so experienced and have the skills to fix this stuff, and I post those fixes all the time. Folks who only build from pre-carved stocks are fooling themselves thinking their builds will be easier. They also rarely succeed in making a historically credible gun or even one that is aesthetically pleasing. The exceptions are Jim Kibler's kits but those end up looking the same endlessly, particularly when the finishers do nothing but sand and put on finish. There are no short cuts to knowledge and skill.

dave

Oh well, I thought some of my pre-carved numbers were aesthetically pleasing. To me, at least. :(

I think part of the problem with some of the pantograph stock carvers is the tolerances are wider than carvers think, that and the quality of the wood that is being purchased whole sale.

There is absolutely a drought in good quality walnut cuts in the United States, with much of it being sent to Europe for furniture and veneer cuts.

A lot of gunstockers like Dunlap are leaving the gunstock copying industry because theres more money to be made using high quality wood on other things like cutting boards.

For the rifle shoppe i usually talk with them a few times before they send out a stock, but i’ver had one that was absolutly perfect.

Time to start rolling my own !
 
Pantograph stock carving is dated technology at best. As far as wood goes, there is plenty available if you look for it and are willing to pay. We really have no problem finding enough wood now. We do cut some ourselves from logs and have developed quite a number of sources over the years.

I remember hearing another kit producer make the comment that "Walnut just isn't available". I think this was largely to try to explain long delivery times. My point is that if you work hard to run a good business the above complaints aren't an issue.

I have trouble finding walnut blanks for the thickness i need them to be, around 2 7/8 thick, 2 1/2 at a minimum. I often make a trip out to Lancaster PA, the Amish produce some really good cuts of walnut, and maple but just never what i need it to be.

At least the story I’m told at some of the stock cutters is that they have no walnut, can’t get it, Dunlap, knob mountain to name a few.
 
Hi Guys,
More done. The AcraGlas bedding went very well. You can see it is varnish thin not a thick bedding. It is just to strengthen the stock.
fGwH1P2.jpg

23vU68o.jpg

You can see the underlying wood and the cover we made for the routed ramrod hole.

After cleaning up the epoxy overflow, I also shaped the spline I glued in place to fill the gap behind the pan fence. I made the piece of wood such that it lays on top of the stock at the breech with a tab that extends down at a right angle to fill the gap. That gives it a larger surface area for gluing than just having a little nose of wood glued between the pan and stock. As you can see, you cannot see the splice.

eQnoNyU.jpg


More later,

dave
 
Regarding touch hole location landing wrong........I got a couple of parts sets from TRS. Both were the same. It appears that TRS intends for you to heavily notch breech and use a drilled touch hole. I suspect they expect you to make a copy of the original, design flaws, original's damage, and all.

I did the first rifle like that, heavily notched. I think it stinks to have the touch hole in the plug threads and a large uncleanable notch. I know it was once common. OK. I did not enjoy building the first parts set due to many problems that I had to work around. When I get up the motivation to restart the second one I will do the plug and touch hole different.

Anyway, touch holes? On the second rifle I turned the barrel and plug to make the plug threads a little shorter. That moves the plug face and touch hole back and makes the lock inlet work as made without heavily notching the plug. On my rifles you can not move the barrel back due to a stud on the standing breech that goes through the stock and attaches to the trigger guard.

The original stock on the second gun was no good so I bought a second stock. The second stock has the same flaws as the first. Apparently they make them all badly. This is all common stuff with precarve pantograph stocks. I am over them and will never buy another precarve stock with the lock mortice started. Really, I find it easier to start with a board. I can lay it all out precisely and make all the parts work together. Eyeballing parts alignment and lack of reference surfaces is not conducive to how I work.

Anyway, I look foreword to seeing the progress on the musket.
 
You can request the lock mortise to not be cut. I go down to TRS about ever 2-3 months. They got a 1766 pistol stock in the que for me, I took them the EW pistol blank.
 
They had what they had in stock when I was there. I would not order anything from them based on how they typically do business.
But they cut stocks to order. They don’t keep those in stock. They do usually have a pile of various English parts in stock.
 
Hi,
One thing to remember about touch hole location is the original breech plugs had fewer threads. They were about 1/2" deep not 5/8". That allows the hole to clear the plug and the pan butt against the breech of the stock. I think on the next Bess, and Maria and I have a pile of them to do, we are going to shorten the breech of the barrel and shorten the plug. The amount necessary will almost eliminate the first decorative ring on the barrel breech but we will hand file new bands, which will look much more authentic anyway.

dave
 
But they cut stocks to order. They don’t keep those in stock. They do usually have a pile of various English parts in stock.

CNC cut stocks are the way to go, while the set up is costly, you can sell more stocks faster.

Pedersoli CNC cuts their stocks, would be nice if they tightened things up a bit though.
 
I'm just catching up on this excellent thread. Every time I read one of your threads I pick up on another technique or tool I can adopt for my own builds. Thanks for continuing to educate us Dave!
 
The Baker stocks, all three, had insufficient wood around the front trigger guard extension on one side. It appeared that the master was damaged. That makes the edge of the trigger guard sit proud of the wood. No biggie except the depth it can be inletted it limited by the ramrod hole and stock profile. So a little deeper and material taken off the trigger guard and it looks fine from the outside. A bit of bondo on the master pattern would fix that.

The stocks all had the barrel channel offset to one side making the stock loop sided. The thumb escutcheon was located wrong for the hole in the triggered guard. The cast in screw hole indicators, in the lock parts are in the wrong places due to shrinkage. All castings were extremely crude.

Understand that the part sets from TRS are very rough and require a ton of work from an experienced builder. They have an old school system for making parts sets. These are not at all like Kibler or Chambers. Understand that going in.

Jess Melot, his wife and son are wonderful people. I enjoyed meeting them. I could learn a lot from them about building guns. Please do not think I am making personal attacks on them.
 
Regarding touch hole location landing wrong........I got a couple of parts sets from TRS. Both were the same. It appears that TRS intends for you to heavily notch breech and use a drilled touch hole. I suspect they expect you to make a copy of the original, design flaws, original's damage, and all.

I did the first rifle like that, heavily notched. I think it stinks to have the touch hole in the plug threads and a large uncleanable notch. I know it was once common. OK. I did not enjoy building the first parts set due to many problems that I had to work around. When I get up the motivation to restart the second one I will do the plug and touch hole different.

Anyway, touch holes? On the second rifle I turned the barrel and plug to make the plug threads a little shorter. That moves the plug face and touch hole back and makes the lock inlet work as made without heavily notching the plug. On my rifles you can not move the barrel back due to a stud on the standing breech that goes through the stock and attaches to the trigger guard.

The original stock on the second gun was no good so I bought a second stock. The second stock has the same flaws as the first. Apparently they make them all badly. This is all common stuff with precarve pantograph stocks. I am over them and will never buy another precarve stock with the lock mortice started. Really, I find it easier to start with a board. I can lay it all out precisely and make all the parts work together. Eyeballing parts alignment and lack of reference surfaces is not conducive to how I work.

Anyway, I look foreword to seeing the progress on the musket.

The shorter plugs on British guns were normal, British and american military muskets were required to have 5-6 threads, with a shorter plug. If it was too close , the filed the face back slightly, on a slight 30 - 40 degree angle. The musket assemblers complained that long plugs broke their drill bits, well documented information. French and Prussian muskets liked having the vent behind the plug, here is a french breech plug.
 

Attachments

  • 71E3A166-535D-4446-8959-B6261F7B7A44.jpeg
    71E3A166-535D-4446-8959-B6261F7B7A44.jpeg
    251.5 KB · Views: 0
Yikies! I see four complete threads. At least one is useless at the base of the plug.

By contrast, 1/2" of 18 TPI is 9 threads. Take away one at the base and we have 8. I'd rather have that than a notched breech plug with 5/8" of threads.

In the next Baker I am going to try to use a liner. I was not happy with the drilled touch hole.
 

Latest posts

Back
Top