• This community needs YOUR help today. We rely 100% on Supporting Memberships to fund our efforts. With the ever increasing fees of everything, we need help. We need more Supporting Members, today. Please invest back into this community. I will ship a few decals too in addition to all the account perks you get.


    Sign up here: https://www.muzzleloadingforum.com/account/upgrades
  • Friends, our 2nd Amendment rights are always under attack and the NRA has been a constant for decades in helping fight that fight.

    We have partnered with the NRA to offer you a discount on membership and Muzzleloading Forum gets a small percentage too of each membership, so you are supporting both the NRA and us.

    Use this link to sign up please; https://membership.nra.org/recruiters/join/XR045103

Finishing the Lock

Muzzleloading Forum

Help Support Muzzleloading Forum:

This site may earn a commission from merchant affiliate links, including eBay, Amazon, and others.
Joined
May 27, 2006
Messages
2,528
Reaction score
189
So,

I started working on this lock awhile back, this lock is for a Chambers Penn. Fowler in 20ga that our gun makers guild put together for a raffle.

This was my first go around using stones instead of sand paper of various grits backed with solid objects.

I started out with files to clean up 98% of the metal, I am not a fan of the perfect look on the rifles I build as it kind of takes away from the overall feel of the project.

I bought some stones in 320 and 600 grit and went to work on the lock plate, cock and top jaw. Once I had gone as far as I wanted with the 600 grit stones I engraved the lock plate and mounted it to a blocking plate and proceeded to color case harden it, the cock and top jaw, as this lock is only available from Chambers assembled there was no need to harden the internals.

I ended up needing to go thru the process of hardening the parts twice as I was just a bit to cool on the temp the first time and the parts did not get hard, second time thru it went perfect.

Once hard I tempered the parts back to relieve the brittleness, went back over them with the 600 grit stones again and hit it with OOOO steel wool and called it good.

Here are some pics for your perusal
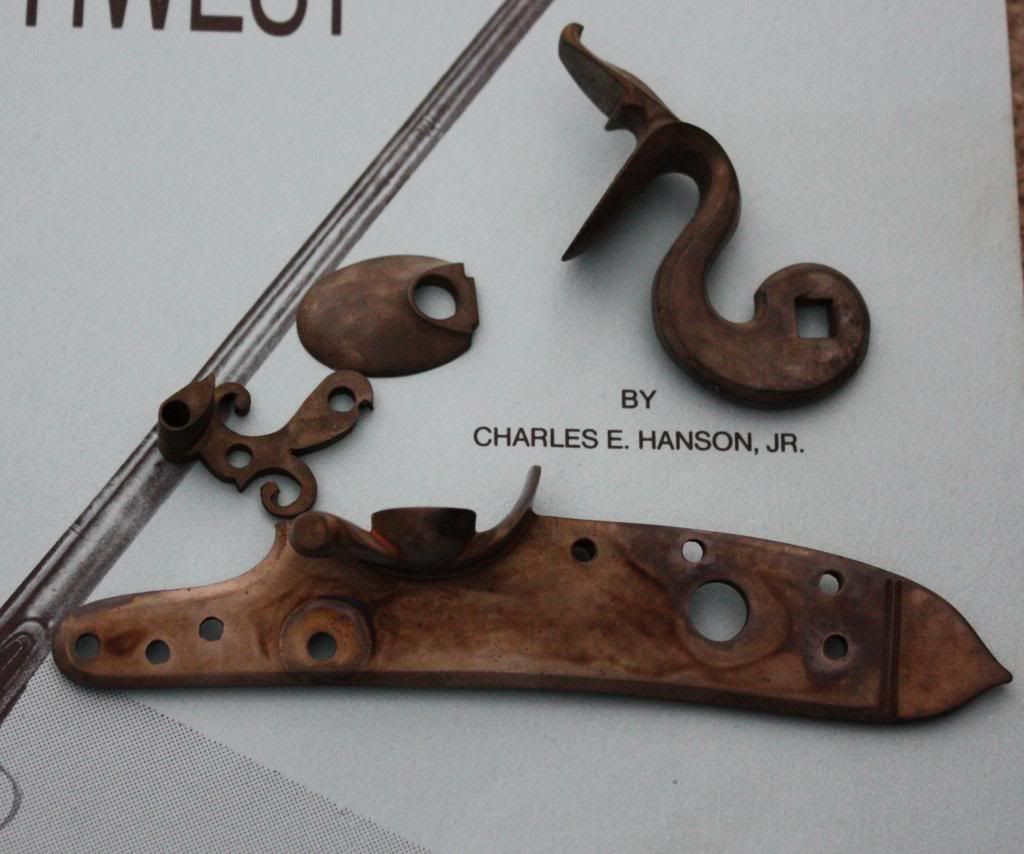
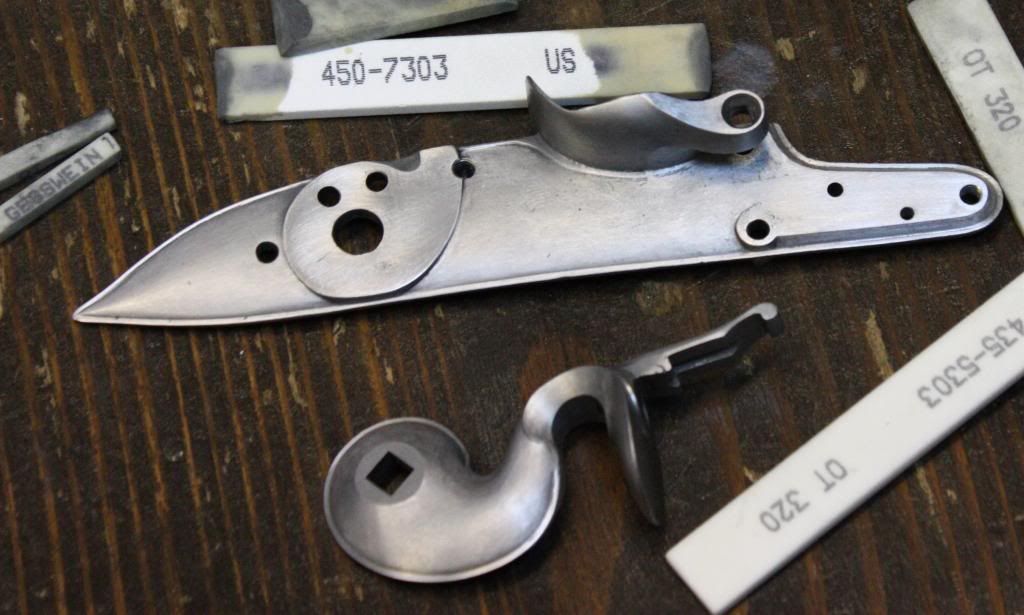


Started the process
IMG_3797.jpg


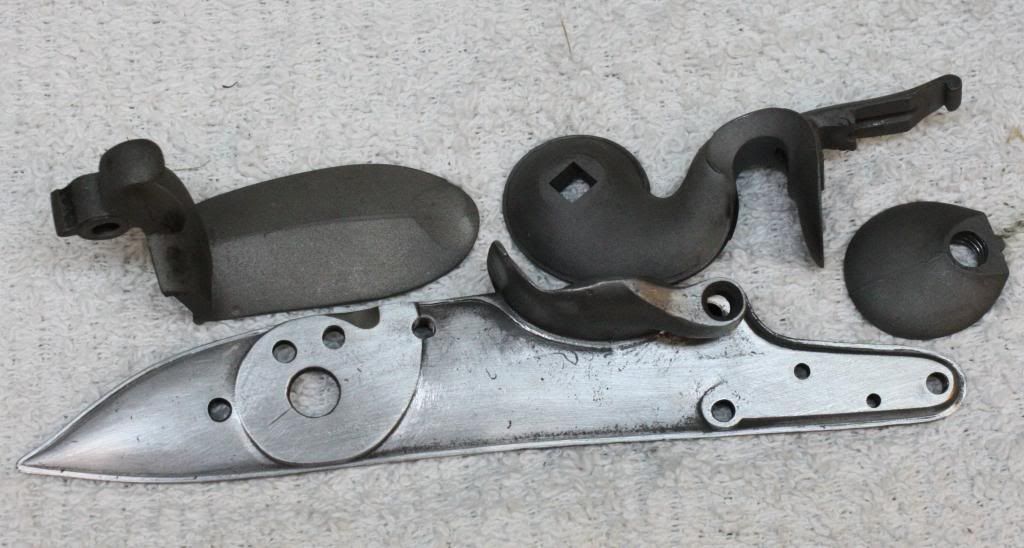
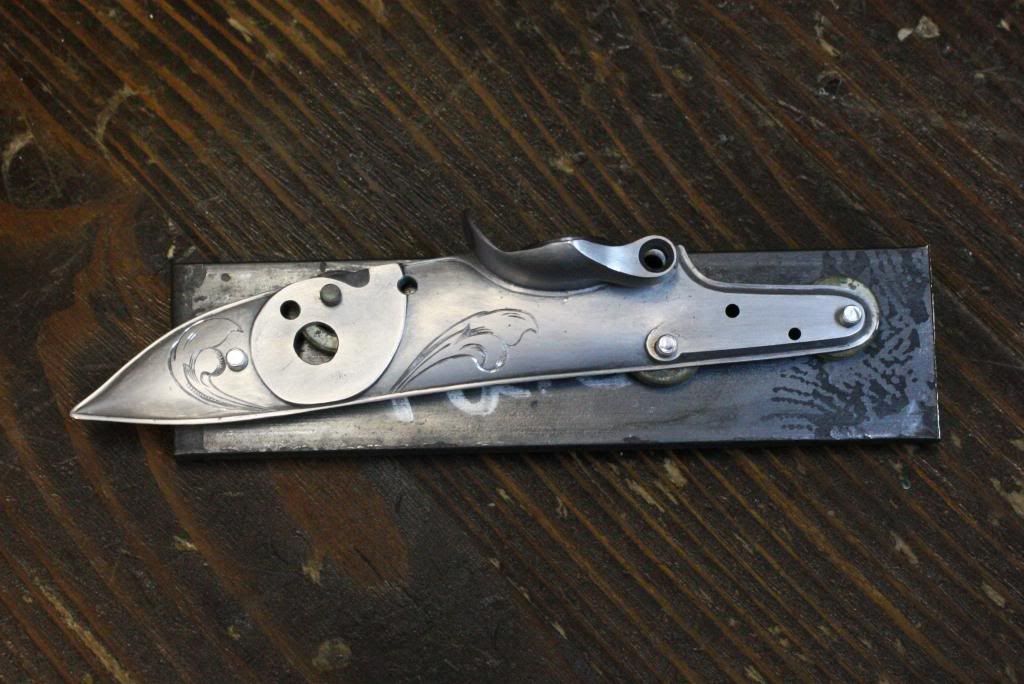
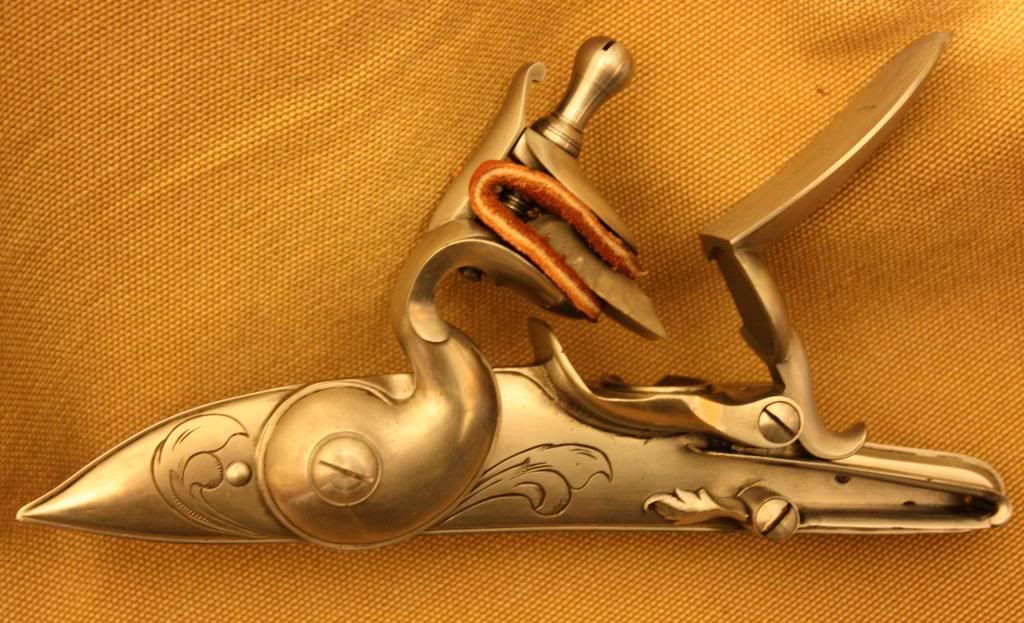
Here we are finished with the filework
IMG_3802.jpg

IMG_3813.jpg


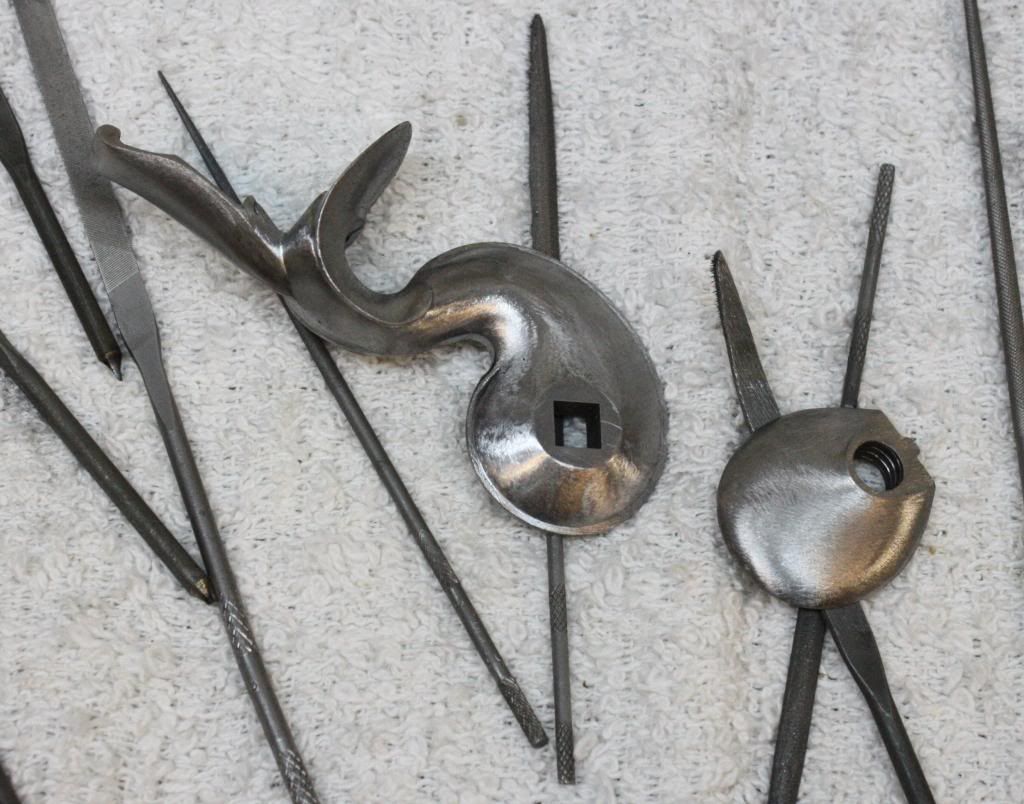
I am pleased with the stones and the finish that they left, worth the investment for me.
IMG_3818.jpg

IMG_3832_zps3f23640e.jpg


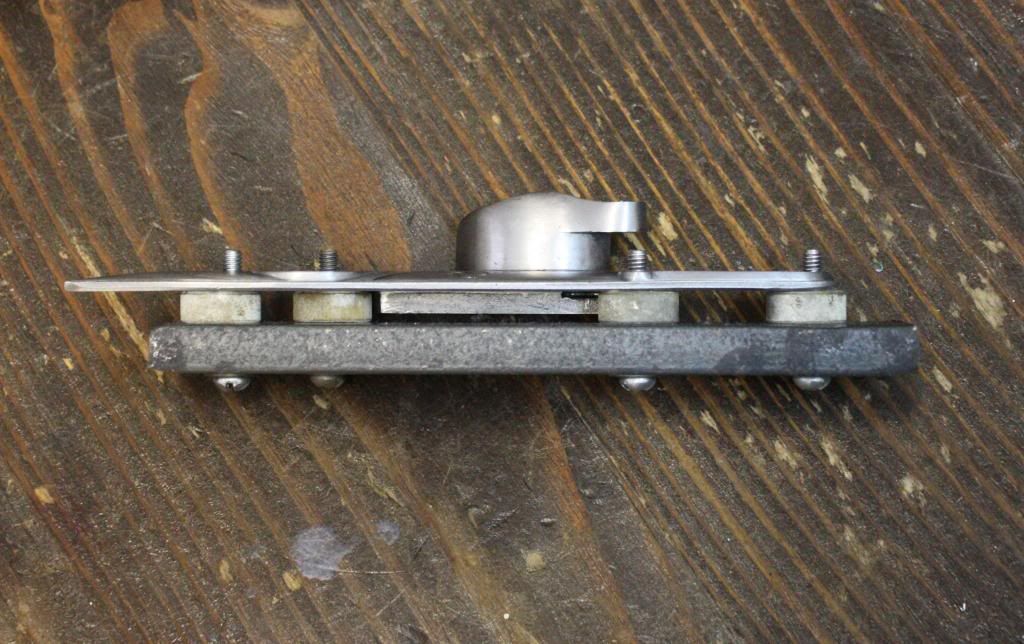
Here is the lock plate mounted to the backing plate, kinda missed on my layout a bit but it still fits my crucible so no worries.
IMG_3844_zps3aa45567.jpg

IMG_3845_zps30456984.jpg


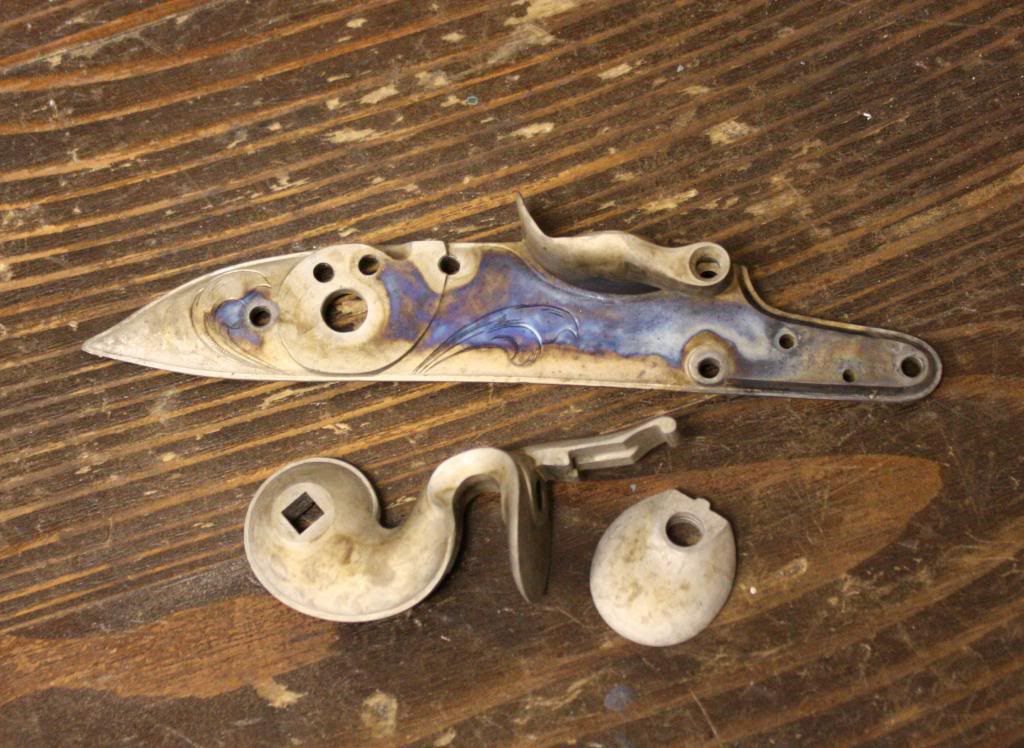
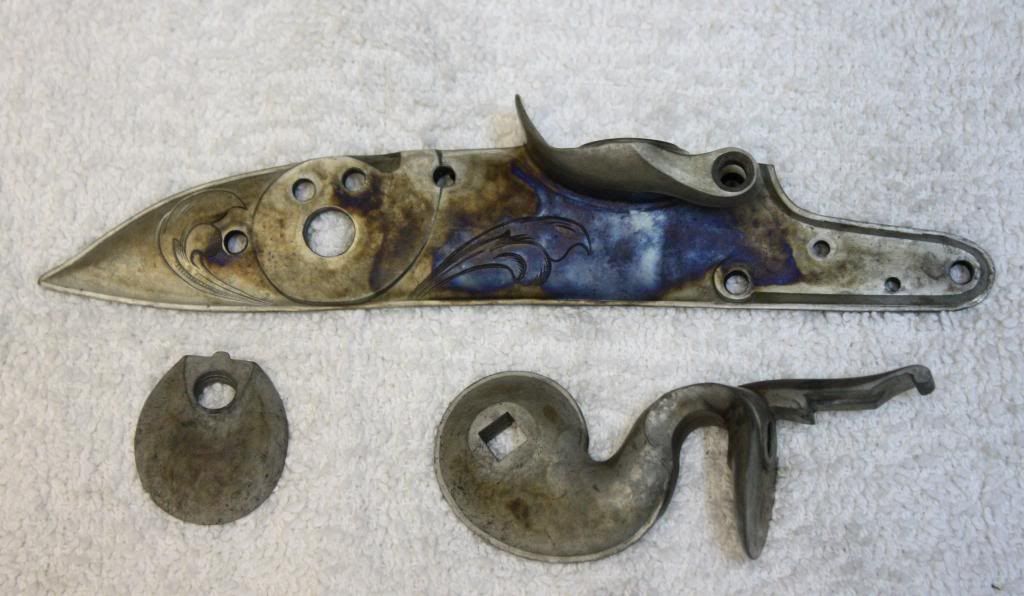
First quench, the blue is quite irridescent in the light, the parts were still soft at this point.
IMG_3848_zps551377e9.jpg


This is the second pass, I raised the temp of the parts at the time of quench another 50* and got the hardness I was looking for. Still got acceptable colors.
IMG_3855_zps3ae58c0a.jpg


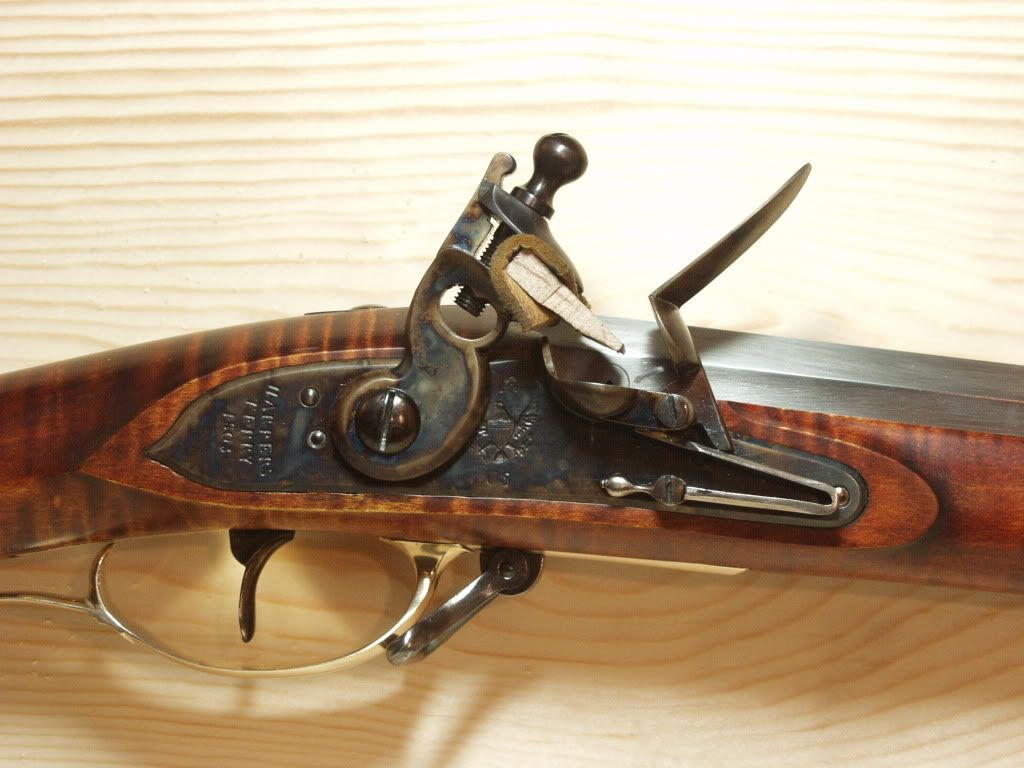
Finished assembled lock.
IMG_3924_zpsc893362c.jpg


Open to critique, critisizm, opinions, etc.
 
Hi Tom,
Although you are not trying to get colors and are polishing the lock bright, the reason your colors are not quite right is probably the way you quenched. To get good colors, the case-hardening pack must not be exposed to air before entering the quench. Therefore, you lower the container with the pack and parts low over the water and flip it quickly to empty it as a solid pack into the water. Do not pour like a stream. You must protect your face and upper body from the explosive blast of the quench. That is how to obtain colors such as this:

PC180611-1.jpg


and this:

duelingpistolobliquevew.jpg


dave
 
Hey Dave,

Nice colors.

I think my lack of correct color contrast is more related to the portions of the charcoal mixture and temp of the quench tank vs the technique in which I quench the parts.

I designed my crucible in a manner that once packed I invert the crucible before it goes into the furnace, this places the lid on the bottom.

When I remove the crucible from the furnace I set it on a platform that places the crucible 1/2" above the surface of the water, at this point I slide the crucible off the lid over the water and the contents drop into the tank from the bottom, I never liked the idea of turning the crucible over and dumping the contents I did it that way the very first time and found a better way for me.
 
Hey, You did a super job on the lock regardless of the color outcome. I think I would have left it how it came out of the quench for a while, that had a nice look to it but the contrast with the bright and the dark engraving looks good as it sits.
Theres always browning, that would look beautiful. I think the artfull work you did on it would have got lost in the black and blue anyway. This probably won't be your last lock so I'm sure you'll get it next time. :)
 
Your technique for the quench sounds about right, this is the same method that I use. I do keep the water level touching the surface of the lid in my quench tank however so the air gap is pretty much nil. My favorite mix for wood to bone is 50/50. Though you did not show it, my guess is the back side of your lock plate up against the block had much better colors. Areas where the charcoal is left in contact with the part the longest tend to show the most vibrant colors in my opinion. I often use the method I first heard from Jerry where you wrap the parts in soft iron wire before putting them into the pack. This definitely creates more colors on the part in my experience. I have also found better results when using cold distilled water that has been freshly poured so as to keep the oxygen content up in the water.

You didn't say what your temperature was, however, I would gather that based on your first results you were either something under 1350 F, or you did not leave the parts in the furnace a sufficient length of time to have reached the proper temperature. When I am going for colors I try for about 1450 F, but not much higher as above 1500 F the colors start getting very dark. If I am going strictly for hardness and depth of case I generally work upwards of 1500+ for longer periods of time (3 hours +). Also, remember that you can always do a post temper on your parts which will soften them slightly (425-450 F) and will also bring out the colors a bit better. Keep up the good work, it is a fun process.

Alex Johnson
 
For what it's worth, I've no historical evidence to support the browning of locks. Barrels yes, not locks and other hardware. Now if one is simply browning to empart age, that's another thing.

If someone has some documentation, please share.

Enjoy, J.D.
 
Thanks Joe,

As this is a donated project for the Guild I am only limited by historic reference, I was told to not bother with the case hardening but I insisted, there are far too many reasons to case harden with longevity, corrosion resistance, speed, and authenticity being the main purposes and the only reason I can think to not put parts thru the hardening process is initial cost outlay for the furnace.

As far as browning a lock I have to disagree and refer to "eye of the beholder" For me the bright lock has all of the characteristics for beauty.

This is at least the 5th case hardened lock I have completed and since I only do spec work I will probably never do a lock any other way.
 
Alex,

I remember your posts from the old ALR board (under a different handle though) when all of this information was passed along, as an educator you have access to top notch equipment and your work emulates that, am sure that I gleaned the inverted crucible from your pics then.
Have used the wire and other various mixtures to work at the colors, varying heat, quench temps, bone vs. wood etc. and I do appreciate the colors but they are from a different era as far as firearms are concerned. Typically I cook for 2 1/2 hrs with the cold packed crucible in the furnace at start up, this seems to give plenty of depth for the intended purposes.

The first quench on this latest set of parts was at 1375* out of the furnace, so I'd have to say that Jerry is spot on with his low side quench temps, on the second quench I had bumped the temp up to 1425* and achieved the results I needed, I temper about 25* lower than you do for the non-fragile parts.

This lock went into the quench at 1550 or so just to see where it would end up at and again Jerry is right on as far as color wash at higher temps as well as your observations about going dark at the higher temps.

I do enjoy the process a lot.
IMG_2334_zpsbb6ffa52.jpg
 
Back
Top