• This community needs YOUR help today. We rely 100% on Supporting Memberships to fund our efforts. With the ever increasing fees of everything, we need help. We need more Supporting Members, today. Please invest back into this community. I will ship a few decals too in addition to all the account perks you get.


    Sign up here: https://www.muzzleloadingforum.com/account/upgrades
  • Friends, our 2nd Amendment rights are always under attack and the NRA has been a constant for decades in helping fight that fight.

    We have partnered with the NRA to offer you a discount on membership and Muzzleloading Forum gets a small percentage too of each membership, so you are supporting both the NRA and us.

    Use this link to sign up please; https://membership.nra.org/recruiters/join/XR045103

New Traditions Build

Muzzleloading Forum

Help Support Muzzleloading Forum:

This site may earn a commission from merchant affiliate links, including eBay, Amazon, and others.

DjPorkchop

32 Cal.
Joined
Nov 29, 2015
Messages
52
Reaction score
10
Location
Southern Illinois
Hello all!

After a very long time away from the forums, I am back. I have the Hawken that I posted about before some time back that I got from my father, whom I a sad to report passed away this past August.

Now that said, I know the old coot would be madder than a tornado in a trailer park for me sitting being sad so I got my self a kit and started it in his honor and will do some brass inlay work as well with the number 76 themed into it. Only a select few of us understand that. He retired from Unocal 76 1/1/2000

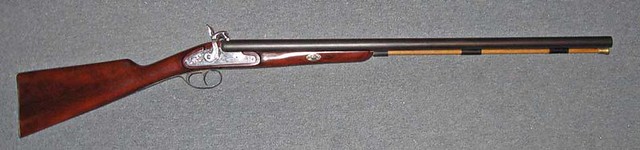
I picked up a discontinued Traditions Shenandoah kit to build. I have it dry fit as we speak. As soon as I can get some pics uploaded to Imgur and will post back today after Dr visit.

Take care all and good to be back!
 
Doing a special build to honor someone is always a heart warming endeavor! Very best...look forward to seeing the pics! :thumbsup:
 
Sorry about your Dad, that kit should keep you busy. Looking forward to see your inlays.
 
Thanks guys. I appreciate the kind words.

I am going to the shop now to tinker around for a bit. I have some draw filing I need to do and some other odds and ends. So I will be stripping it back down tonight.

I am trying to figure out what finish I want to do to it. The stock is of the European Beech species. I am not really sure what would work the best on it. I am going to be doing some researching soon. Too bad I just couldn't get lucky and take my time and sparingly applying boiled linseed oil. The wood is so blonde that it will not look good with boiled linseed oil only. I'm having issues going with the old standard look. I don't want to be the same. It is just too cliche'. I have a general idea. I will post an image of it as well.

Coffee in one hand and a VZOR50 in the other. I have some mag work to do to it. Out to the shop, I go!
 
I've built two traditions kits. A Kentucky pistol in percussion cap (50 cal.) and a Kentucky rifle flinter (45 cal.) both fun kits both shoot more consistent then I do. I am no where near an expert but i do have fun with what i'm doing.

Enjoy the build and the thoughts of good days gone and good ones to come.

Jay
 
Because the stock is beech, do not use a oil based stain.
Also, do not use anything to "seal" the wood.
Seals will prevent the stain from penetrating the wood like it should.

The reason for not using an oil base stain is, after the first coat of a oil based stain, the surface of the wood will be saturated and will refuse to accept additional coats of stain that is always needed to darken it.

If you use a water based stain or better yet, an alcohol based stain, repeated coats can be added to darken the color if needed.

This CVA 12 guage double was stained with a Walnut water based stain from Birchwood Casey.

As I recall, it took 3 coats to get from the blond beechwood to this color.
The final finish is Birchwood Casey Tru-Oil.

9325409516_b9fc7a0da7_z.jpg


Both of these Birchwood Casey products are available at most gun stores or from suppliers like Track of the Wolf.
 
Thanks for the info Zonie. I really appreciate it.

I am still quite aways off from staining it but it is helpful to have all my ducks in a row before I get started on the process. I had to do some more draw filing on it tonight and little odds and ends things here and there.

I do have a bunch of action shots of it in progress but will only put up a few. I think the images are huge so if it is to much, please feel free to delete them. Ill understand.

This took some work to get from this point to what it is now.

J3nWsQZ.jpg


Damaged stock while in transit to me. This was a jim-dandy to fix.

bTd4PBV.jpg


Nose cap. I hate the blocky square look. It is just not pleasing to my eyes but I am afraid to take any off and weaken the nose cap area and front thimble. What say ye?

N6j84qM.jpg
 
I have learned a lot from this build. So far I have learned that I know nothing of woodworking. I also learned that in spite of the previous fact, I love working with wood and building these nice fitting kits. :wink:

I am going to attempt a video of the process and include images of the during and after once it is all done.

And with that, I will bid you all a good night.
 
Very awesome!

Much of my kin is from Pinkneyville. I am looking forward to your build. I too know nothing about woodworking!! :) Regardless, I am sure your father would be proud no matter how it turns out, and you are having fun which is the most important thing!
 
They leave way too much wood on the fore stock of their kits. All that extra wood needs to come off. You want the shape of the fore stock to blend into the shape of the nose cap. The top of the barrel channel needs to taper into the barrel. Nothing says kit more than seeing the flat fore stock against the barrel. Yes, that weakens the fore stock somewhat but the steel of the rifle barrel will impart all the strength you need.
 
DjPorkchop said:
I hate the blocky square look. It is just not pleasing to my eyes but I am afraid to take any off and weaken the nose cap area and front thimble. What say ye?
Ya gotta take that wood off, with these long rifles it's the barrel that holds the wood in place not the other way around.
The pins hold the wood too,, so ya gotta take the wood down to the brass nose cap and all the way back.

It is scary because they leave so-so much wood on with these kits,, don't be afraid to use that rasp you have.
Check into the Gunbuilders section of the forum, that's a better place to share and get info about a kit build.
 
You don't say if it is percussion or flint.

If it's flint, you may be able to lower the barrel in the barrel channel. Most webs are WAY too thick on these things. If it's keyed rather than pinned, if you lower the barrel you'll have to move the slots in the lugs closer to the barrel too.

In my current build I have 1/16" in the rear, and 1/8" in the nose. The wedge key lugs wound up with grooves in them by the barrel) to accommodate the keys. I had to weld up the (outboard portion of) key slots to make sure I had good contact.

The nose caps on these kits are solid brass, correct? A thinner web will mean you'll have to file that down too. Don't worry about making the stock too thin. Wood is incredibly strong, and particularly so when reinforced by a big hunk of metal, like a barrel. Under my nose cap I bet I have only slightly more than 1/32" of wood holding the nose cap. It's not a stress area, and 99% of the time there is also a ram rod there as well to help hold it all together.

Of course, since the lock is where the lock is going to stay, lowering the barrel is going to lower the touch hole too. That said, a touch hole 1/32" below the bottom of the sole of the frizzen won't affect ignition reliability to any substantial degree. Flint locks are remarkably forgiving that way.

These kits are really a good way to understand how the guns are put together, and how they work. Most builders that build from blanks got their start in building with them.
 
You might want to check in to getting one of the many "how to" books on building a rifle. These will answer many questions along the way and help give you a build to be proud of.
 
DjPorkchop said:
Thanks for the info Zonie. I really appreciate it.

I am still quite aways off from staining it but it is helpful to have all my ducks in a row before I get started on the process. I had to do some more draw filing on it tonight and little odds and ends things here and there.

I do have a bunch of action shots of it in progress but will only put up a few. I think the images are huge so if it is to much, please feel free to delete them. Ill understand.

This took some work to get from this point to what it is now.

J3nWsQZ.jpg


Damaged stock while in transit to me. This was a jim-dandy to fix.

bTd4PBV.jpg


Nose cap. I hate the blocky square look. It is just not pleasing to my eyes but I am afraid to take any off and weaken the nose cap area and front thimble. What say ye?

N6j84qM.jpg

What you can do is relocate the forward pipe. There is no room to have any kind of a smooth transition of the ramrod groove into the nose cap.
With that pipe moved back about 1 1/2 inches you'll have enough room to terminate the ramrod groove into the cap.
Also look how much the stock hangs over the cap on the sides. You can slim the stock to match the nose cap.
https://flic.kr/p/223dsUz
 
Thanks for all the helpful replies everyone and sorry so dang slow to reply back. Life is hectic with health issues.

I do love that idea of moving that pipe back and shaping the foreend down to the nosecap. I hate that blocky look so dang bad. And the flat top rails running down the length, YUCK! It feels horrible on my hands. I want to blend them down but the flat of the lock is well, flat. to go from flat to round might be tricky. Let me grab a shot of it and point out my observation about that. Speaking purely from a point of asthetics, flat to round might look bad.

Ill go grab an image here in a minute and try to edit it down some.

Oh and sorry about the lock. Someone mentioned I forgot to say what it is. It is percussion cap.
 
Smokey Plainsman said:
Very awesome!

Much of my kin is from Pinkneyville. I am looking forward to your build. I too know nothing about woodworking!! :) Regardless, I am sure your father would be proud no matter how it turns out, and you are having fun which is the most important thing!
.

Hi Smokey. My wife has a load of family over that way as well. She was born in good old Murphysboro.

I got some more of the build done. It is all dry fit right now but I need to grab some cash to pick up some supplies to finish it up. I had way to much month left at the end of the money. :grin:
 
When working down the sides of the forestock a 12 inch steel ruler is a must have tool. With the edge laid along the wood it will show you the high and low spots. When rasping, work an area, not a spot. I use the edge of the steel rule as a gauge for thickness of the wood at the top edge of the barrel channel.

My brother the cabinet maker thins his stains two parts of thinner to one part stain, then uses multiple applications to get a nice even tone.

Take your time. The best advice I have received about building rifles was along the lines of "When you feel like really leaning on the chisel and moving some wood, set the tool down and take the dog for a walk."
 
Some great info in there Whitefox and everyone else! I appreciate the replies thus far. I love the chisel quote!

I hadn't forgot about this project or thread. I just got surgery done on my back and the project is sidelined for a few weeks. Once I can get back on it, I will be taking that wood off the nose cap area and thinning down the side walls bu the barrel.

More info to follow!
 
Howdy boys and gals (if any are here).

I am back on this project and I was overly excited when I sanded down the base of my barrel tenons in a figure 8 pattern to get even sanding. Needless to say they are looser than most of my teeth.

I am striking out finding any. Does anyone at all have any laying around for a Traditions Shenandoah 50 cal? They look like this:

s-l1000.jpg


If so and you can part ways with them, I can buy them off of you. They must be undrilled or base sanded. I am trying Traditions but am striking out. As soon as I say Shenandoah, they shut down and say sorry that is a discontinued gun. So it's discontinued means I can't get parts?

I would appreciate any help and or pointers. I can be reached by PM here or email if it will allow us to email each other from here.

P.S.

Just for the sake of doing so, I found a part number for another rifle I am going to call and talk very super nicely to them and see if the parts will interchange and if so can I purchase said tenons. My pins are good. I just need the tenons.
 

Latest posts

Back
Top