• This community needs YOUR help today. We rely 100% on Supporting Memberships to fund our efforts. With the ever increasing fees of everything, we need help. We need more Supporting Members, today. Please invest back into this community. I will ship a few decals too in addition to all the account perks you get.


    Sign up here: https://www.muzzleloadingforum.com/account/upgrades
  • Friends, our 2nd Amendment rights are always under attack and the NRA has been a constant for decades in helping fight that fight.

    We have partnered with the NRA to offer you a discount on membership and Muzzleloading Forum gets a small percentage too of each membership, so you are supporting both the NRA and us.

    Use this link to sign up please; https://membership.nra.org/recruiters/join/XR045103

Reworking a Pedersoli Brown Bess Musket

Muzzleloading Forum

Help Support Muzzleloading Forum:

This site may earn a commission from merchant affiliate links, including eBay, Amazon, and others.
Joined
Nov 26, 2005
Messages
5,020
Reaction score
9,978
Hi,
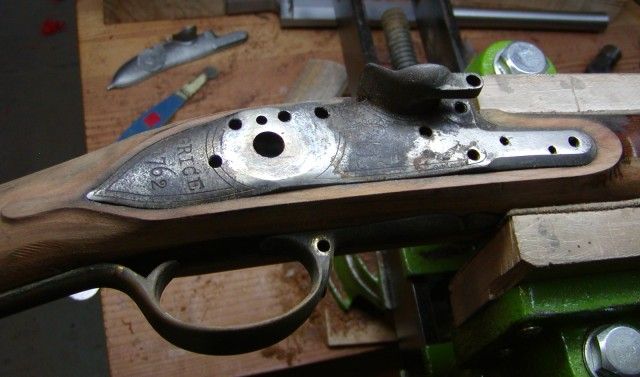
There is a current thread asking about what to do to refurbish a Pedersoli Brown Bess musket to make the gun more historically correct. After contributing to that discussion, I thought I would add this separate thread that describes how I go about historically upgrading those guns. I will document a refurbishing job that I am currently doing and I will post photos and text as I go. First and foremost, you have to know the historical details for the different musket patterns. The Pedersoli Bess is essentially a 1769 short land pattern. There are 2 major issues that are very difficult or impossible to correct on the Perdersolis. First, the lock is incorrectly marked “Grice 1762”. By the time the pattern 1769 was issued, musket locks were no longer engraved with the lock contractor’s name and the date of lock manufacture (not the date issued or date installed on a musket by ordnance). If you have an original short land pattern Bess with a lock marked “Grice” or some other contractor, you likely have a 1759 Marine and militia musket. Pattern 1769s that made it to America should be engraved “Dublin Castle” or “Tower” with no date. Second, the buttplate is 1/4”-3/8” too small in height. That does not sound like much but it makes a big difference in the lower profile of the buttstock making the butt stock too small. That is why Pedersoli Besses always look like the butt is disproportionately small relative to the lock area compared with original Brown Besses. These are items that you normally have to live with. What you do not have to live with is the fact that Pedersoli and all other mass reproduced Besses are like ¾ completed kits with respect to the stock and fittings. This is where I will begin and eventually I will work on the lock, barrel, and swivels.
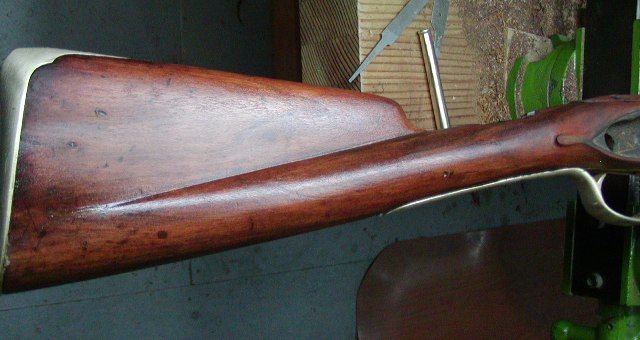
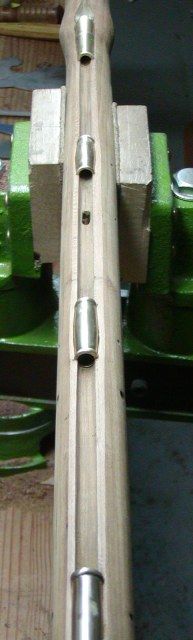
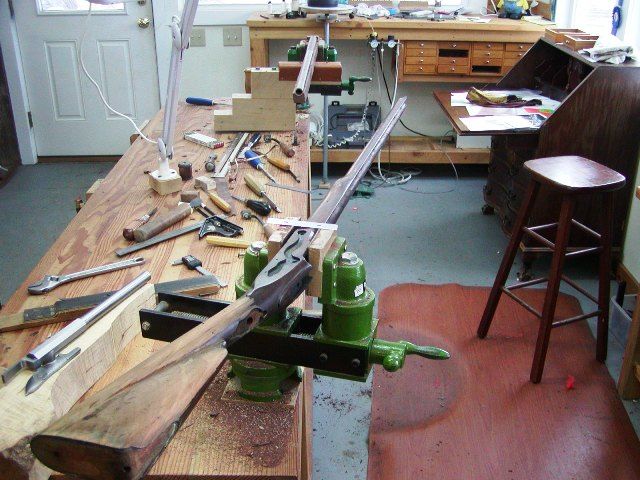
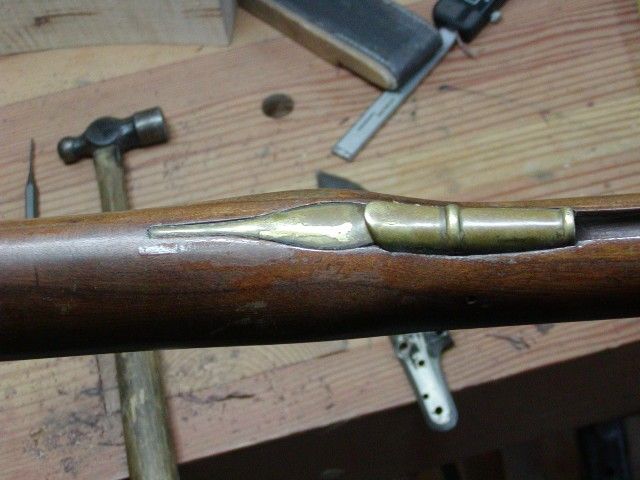
Below, I have a Pedersoli Bess made during the 1970s. It is definitely one of the better guns historically because they did a better job shaping the lock area and reducing wood along the forestock. This is a re-enactors gun and it clearly was not well cared for. I will clean up all the metal parts and barrel. A previous owner obviously believed Brown Bess barrels should be browned. That will be removed when I derust and clean up the barrel. So my first job is to disassemble the gun completely and correct the inlets. This particular gun came apart OK but the tang screw, flintcock tumbler screw, and screw holding on the wrist plate were all badly corroded. I used penetrating oil where I could and then used an adjustable wrench on the shafts of my good fitting screw drivers to give me extra leverage. That did the trick because with one hand you can push down the turnscrew so it does not slip and with the other you turn the wrench. Be careful when removing the barrel, ramrod thimble, trigger guard, and trigger pins. My rule is that they all are tapped out from the lock side and reinserted from the sideplate side. That is consistent with other British sporting guns at the time. The exceptions are the trigger pin and the front trigger guard pin. Those I tap from the side plate side so they exit within the lock mortice. The pins were usually filed flush with the wood and may have a burr that can chip the stock as they are removed. The rest of the gun should come apart easily. When removing the lock, back out the bolts all the way and then tap them to push the lock out. It is wise to place the lock at halfcock when removing it for the first time to prevent the mainspring from catching in the mortice should it be close to the edge of the lockplate when at rest.

Franks%20Bess%202_zps8fy7j3wt.jpg


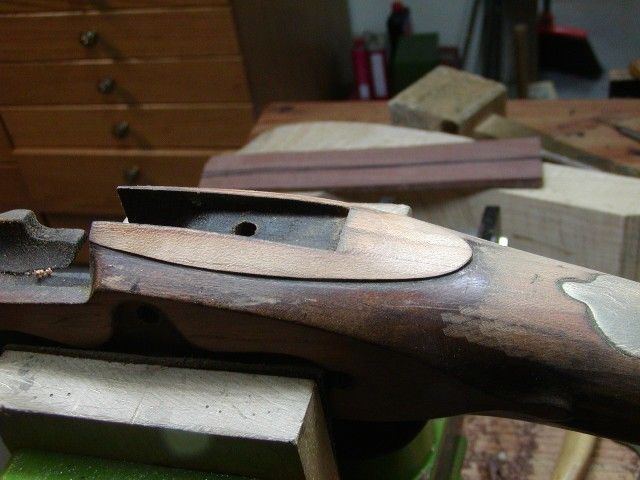
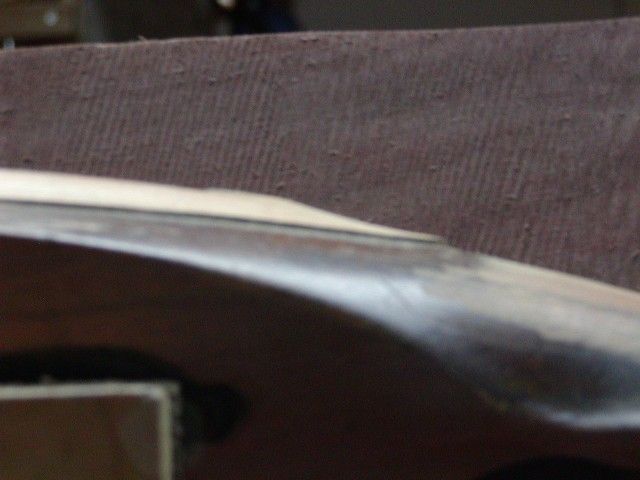
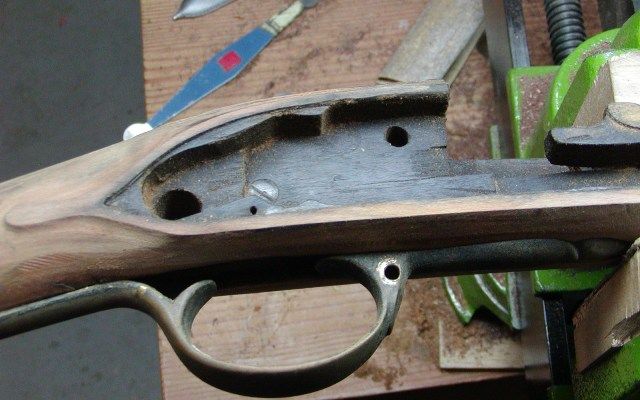
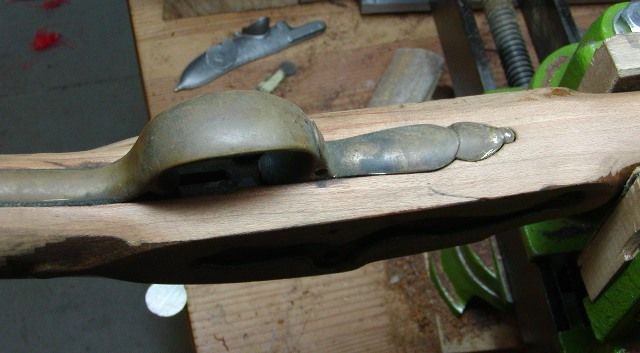
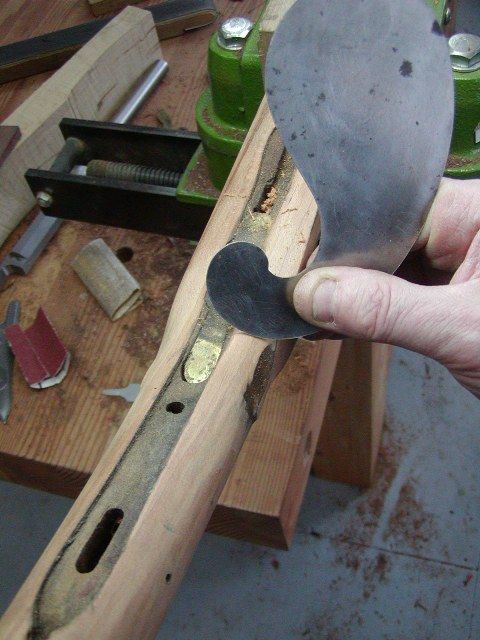
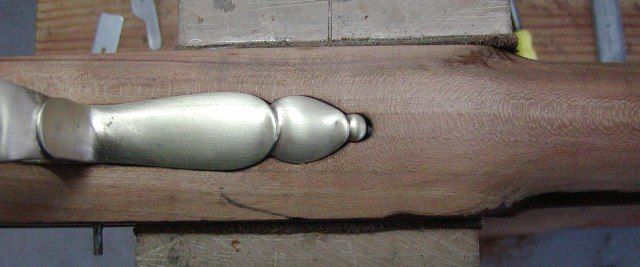
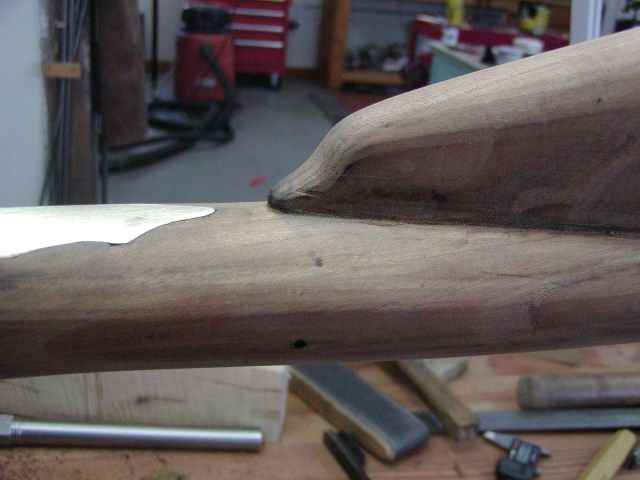
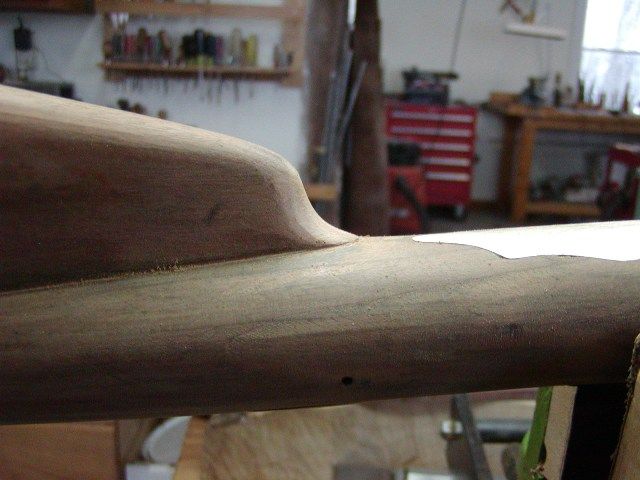
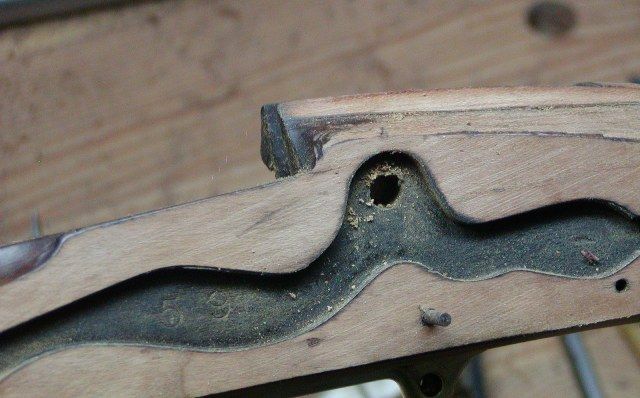
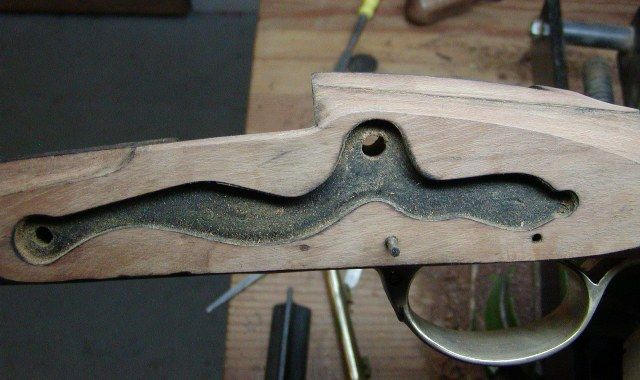
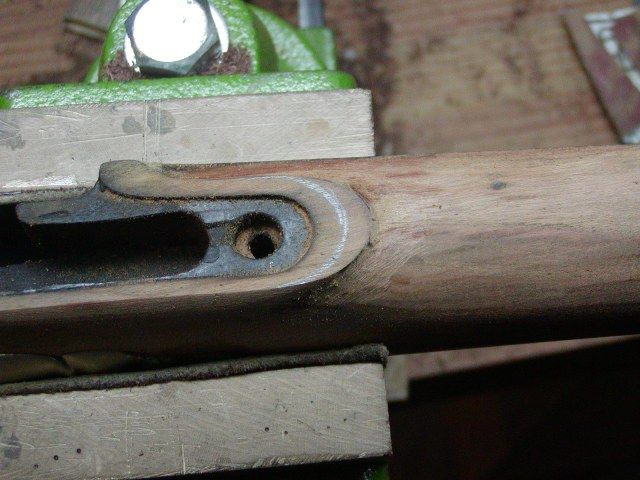
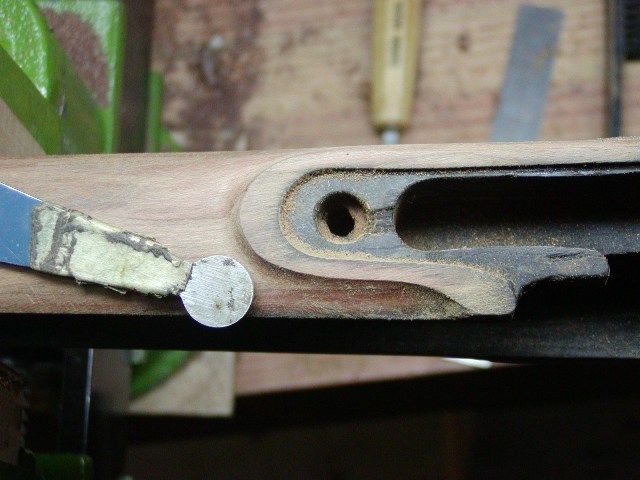
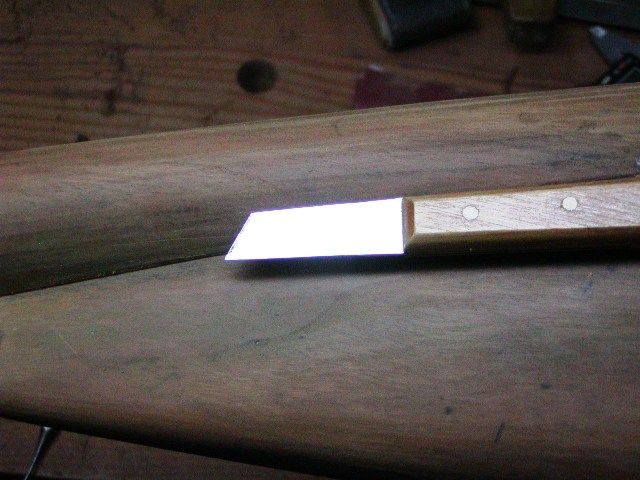
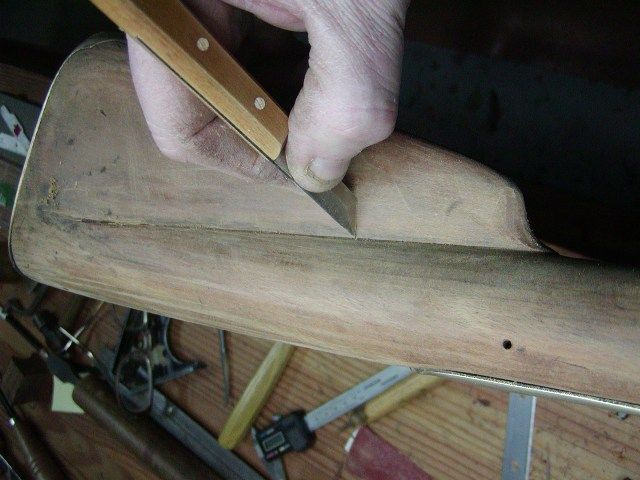
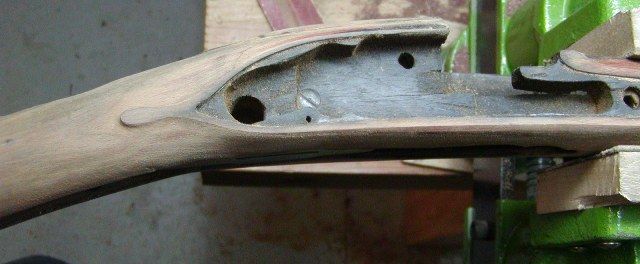
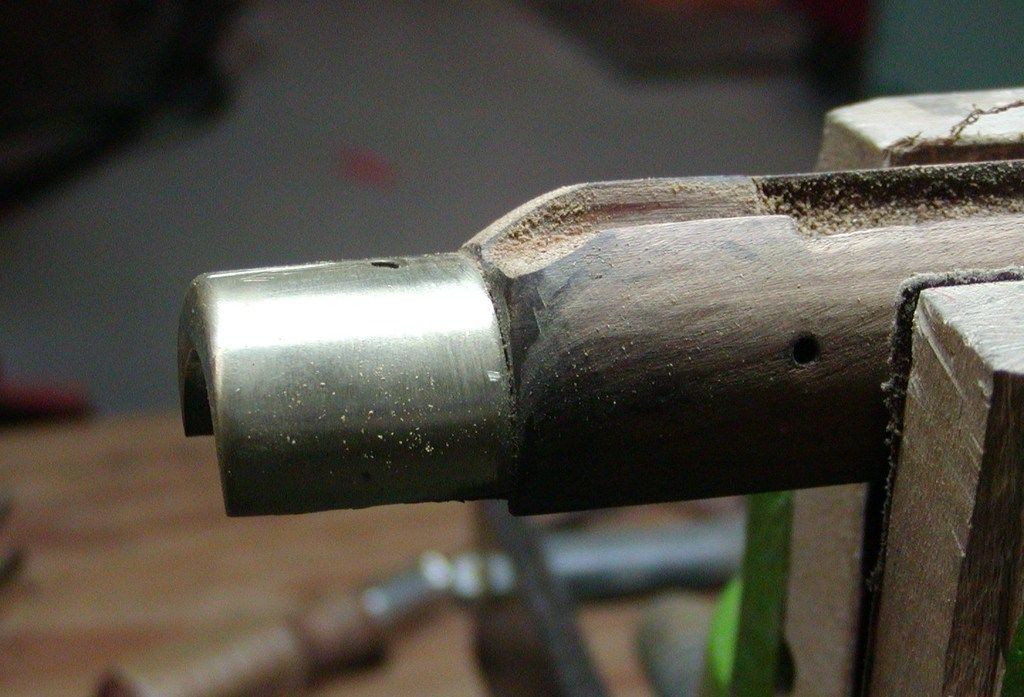
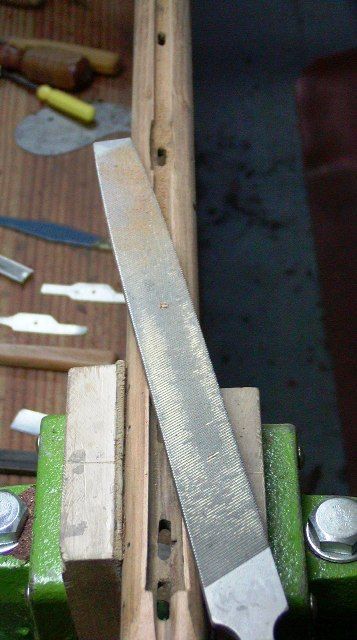
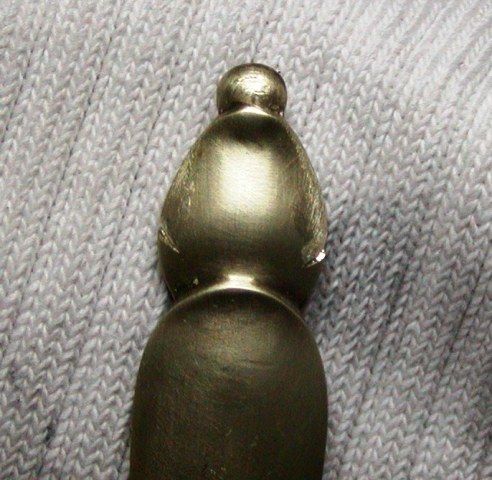
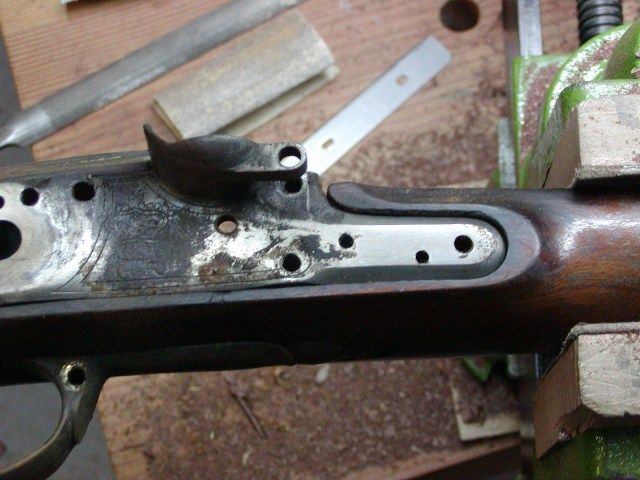
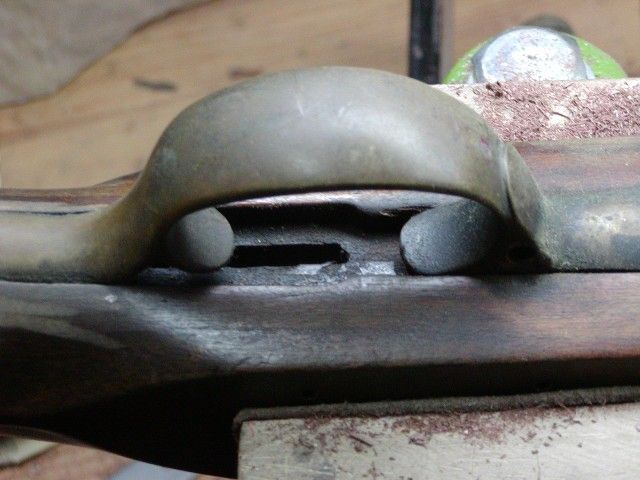
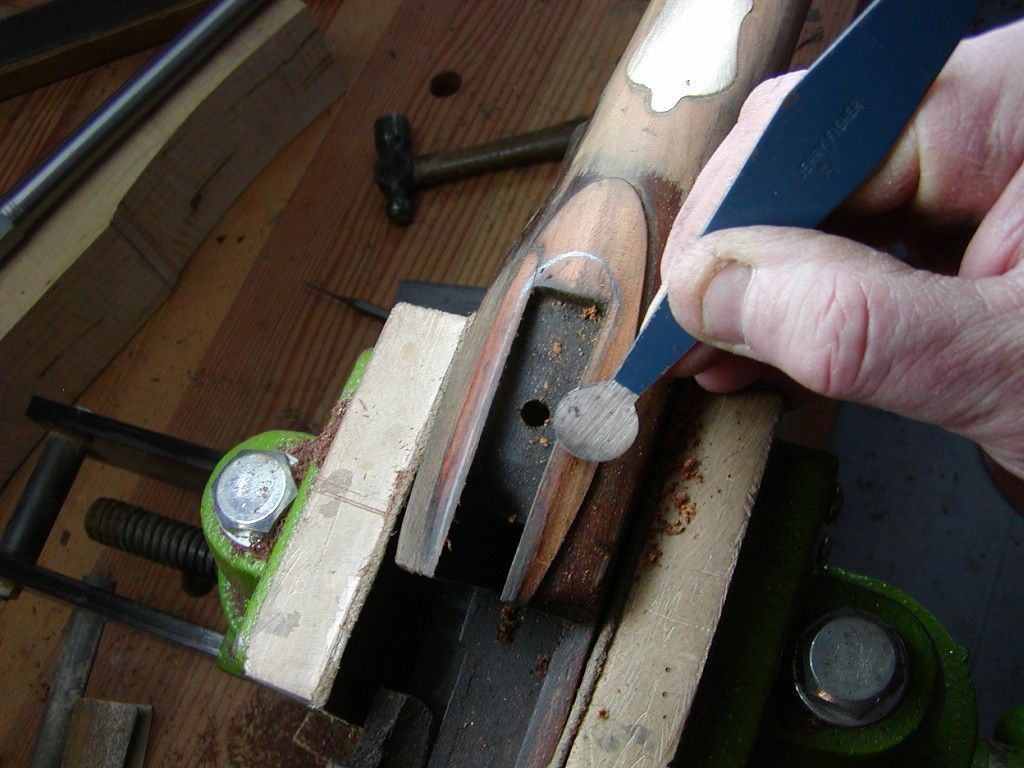
I’ll start by reshaping the barrel tang apron, the lock panels, and fixing the inletting of the hardware. Note in the photos below, that the trigger guard, trigger plate, lock, and rear ramrod thimble are all set in the wood too deeply. Actually, they are fine with respect to their correct positions in the stock, it is just that the stock has too much wood left on. The barrel tang apron sits up too high and does not have the correct concave surface. I draw a border around the tang that will remain untouched and then start filing and scraping to lower the apron and give it a concave surface.
Franks%20Bess%207_zpsvrgxda6u.jpg

Franks%20Bess%205_zpscnajxcaj.jpg

Franks%20Bess%206_zpsbadhiphb.jpg

Franks%20Bess%209_zpsgfbjtiqr.jpg

Franks%20Bess%2010_zpsydvuqboi.jpg


I'll add more soon.

dave
 
Hi,
I shaped the apron with round scrapers, a half-round file, and a carving knife.

Franks%20Bess%2012_zpspnk4bz8p.jpg


The concave surface is gentle as seen in the fuzzy photo below.
Franks%20Bess%2011_zps6lmlznux.jpg


The lock panels on this Bess were pretty good and narrow but they were higher than the lock plate. The edge of the lock should be flush with the wood so I took off wood with a large coarse flat file and a flat scraper. In the end, note how shallow the edges of the inlet are. That may scare some folks but that is how it is supposed to be done. Also note the impression of the sear screw head inside the mortice. I will relieve that contact. After taking off wood, the flat area surrounding the lock is wider and eventually, I will narrow it almost to the point of disappearing except on the bottom and around the nose of the lock.
Franks%20Bess%2013_zpsyywczpzp.jpg

Franks%20Bess%2014_zpsbaqhoihz.jpg


I am almost done with the trigger guard inlet.
Franks%20Bess%2015_zpseiqpy4aa.jpg


That is all for tonight. More later.

dave
 
Dave,

This is GREAT!!

OK, here’s the first of probably many questions. When you lower the height of the lock panels and the wood around the trigger guard, do you somehow mark inside the inletting to show you how far down you should cut the wood and not go too far? I’m thinking a sharp pencil mark around the inside of each inlet along the top of the lockplate, perhaps? Or perhaps do you use a depth gauge as you work? Or do you do this by eye?

Gus
 
Dave Person said:
Also note the impression of the sear screw head inside the mortice. I will relieve that contact.
dave

Is this done to relieve the pressure from the side lock screws on the sear screw head that will bind up the sear screw? Or is it done to ensure the bottom of the lock plate contacts the wood supports in the mortise correctly? Or is it something else?

Gus
 
Thanks Dave,
I have a Pedersoli Bess which I would like to work on as well. I will be following this thread and copying it into my files if you don't mind.

I had posted quite a while back about also reducing the trigger pull. Artificer gave me some great input on that. I have yet to do it, but it is on my list. My trigger pull is at about 16 pounds right now (as measured by a bucket of lead suspended on a string to the trigger). That pull makes me not want to shoot the gun.

Cheers,
Norm
 
Hi Gus,
I do it by eye. Take a little off and then check the part. That is where scrapers are great because you can remove a little wood at precise locations until the depth is right and even. Drawing a depth line would be hard for the lock because the eventual inlet is very shallow around the edges and the thickness of the edge of the lockplate is not even. They are thicker in some places than others.

dave
 
Hi Gus,
I want to make sure the lock sits all the way in the inlet. The sear screw could be interfering. I will simply cut it out leaving a shallow round hole for the screw head. The original Besses I have disassembled had much finer lock inletting than the Pedersolis. You see the outlines of the bridle and holes for the screw heads.

dave
 
Hi,
As you remove wood around the lock, side plate and trigger guard, you may find that the nice curves at the throat and bottom of the stock are getting flattened. A French curve scraper and half-round coarse file are very useful to keep the stock concave at the throat merging to convex as you move forward toward the front of the trigger guard.

Franks%20Bess%2016_zpsvibfqqqu.jpg

I just about finished the area around the trigger guard. Note how the trigger plate is now almost flush with the wood, as it should be. The front of the guard has a gap in which you can see the ramrod. Not acceptable even by ordnance standards. I will eventually fill the gap with colored AcraGlas or a chip of English walnut but not yet.

Franks%20Bess%2017_zpsboyr6pfo.jpg

Franks%20Bess%2018_zps2psbe5kr.jpg

Now for this globular whumpus that looks like it was cut with a chain saw. The nose of the comb on Besses did not have that big shoulder, they merged nicely with the wrist. A few swipes of a half round file and then a little carving and scraping with a knife and whumpus is gone.

Franks%20Bess%2019_zpsabd3anlz.jpg

Franks%20Bess%2020_zpshzivzz9g.jpg
 
Dave,

Got a real kick out of your term “globular whumpus.” :grin:

Do you pencil in the distance from the lock plate to the edge of the lock plate panel before you rasp/scrape the edge of the panel closer to the lock plate or do you do this by eye?

Another question on both lock and side plate panels. After you get the distance from the lock plate to the edge of the panel the way you like it, do you or have you ever made a tracing of it to use to shape the outer edges of the side plate panel to keep both panels similar? The reason I ask is mostly because of the way you shape the wood from the bottom of the stock to the new edges of the lock plate panel.

BTW, I admire your eye in doing this work to the stock.

Gus
 
Hi,
The step at the breech on the sideplate side is usually too angular and abrupt. It needs to be rounded a little. A few swipes of a file and then scraping with a carving knife rounds it off and cleans it up nicely.

Franks%20Bess%2022_zpssdwqpvk3.jpg

Franks%20Bess%2023_zpssrq6ds4r.jpg


The lock molding or surround in the front of the lock is too big. I draw out the appropriate curve and gouge off the excess wood. Then a small round file and my round scraper finishes the job.
Franks%20Bess%2024_zpsddvxwblm.jpg

Franks%20Bess%2025_zpsviirzr7y.jpg


This is one of my favorite scraping tools. It is a 3-edged chip carving knife. All 3 exposed edges are razor sharp so you have to be careful with it, but it is ideal for scraping and cleaning up sharp inside corners.
Franks%20Bess%2026_zpsfslzhxj6.jpg

Franks%20Bess%2027_zps6rvbtcdt.jpg


Most of the old finish is scraped off so I wet the stock to get an idea of its intrinsic color. I will enhance the color with a medium chocolate brown water-based dye and then rub it back. It should look really nice.
Franks%20Bess%2028_zpsfb1yaktv.jpg

That’s it for tonight.
dave
 
Hi Gus,
I like the word "globular". When I was a kid, I used to call those shiny balls mounted on pedestals seen in people's yards - "globular woodchuckian shiners" because they looked like a woodchuck standing up with a shiny head. I really wanted to shoot at those damn things but my parents would not let me. Go figure?

When I am building a gun from scratch, I always make drawings. From those drawings I can trace the shape of the lock molding on some cardboard. Once the lock is inlet and the lock bolts drilled, I cut appropriate holes for the bolts in the card stock. Then, using the bolts to hold the cardboard in place, I trace the outline on the stock, turn the card board template over and use the bolts to hold it in place on the other side of the stock. That way I start out with the panels being even on both sides. From there on out, however, I do everything by eye and those outlines are always modified by eye during the build. Also I do not worry overly about making sure both panels are even. They rarely were even on originals and makers knew that you cannot see both panels at the same time. On the Bess I am working on, I just eyeball the moldings. One thing to consider, Gus, Besses were hand made and not by machine. There was no "Blanchard lathe" then. My upgraded Pedersolis all look better and more authentic if there are minor inconsistencies and asymmetries. It says the gun was made by hand.

dave
 
Dave,
I remember those shiny “garden globes” and remember thinking they were some kind of communications devices from Martians. Another thing from the 50’s Sci Fi movie genre.

I understand the lock and side plate panels were not uniform in the period and you can only look at one side at a time. I also like your idea of making a cardboard transfer pattern with holes in it for the side plate screws. For some of us who don’t have your eye for stock shaping, making a transfer off the inside of the lock plate with holes and flipping it over to use for the side plate panel could help us to lay out pencil lines to correct the side plate panel?

I noticed you cleaned up the brass of the trigger guard, thumb piece, etc., to remove the dullness/stains from the brass. May I ask what you used to do that?

It looks like the round ended scraper you are using is a Jerry Fisher scraper. What size is your favorite from this work from the link below? https://www.youtube.com/watch?v=REtXimdbOmc

Also, may I ask where you got the three sided chip carver knife that is your favorite scraper?

I am really enjoying and appreciate this tutorial of yours.

Gus
 
Last edited by a moderator:
Hi Gus,
One way to transfer a lock panel design to the other side is to shape the lock side, then make a rubbing of the panel using thin paper and a pencil. You have to remove the lock to do this so the rubbing will pick up the outline of the lock too. Place the lock plate in its outline on the rubbing and mark the bolt holes. Then glue the paper on a piece of card board and cut out the outline. Punch the bolt holes through the card board and you have a template. If you use the same kind of lock again on a different gun, you have a ready made template. The brass was first cleaned with comet and hot water because of the gunk. Then I polish off the patina with 100 grit 3-M radial bristle burr mounted on a Dremel. I cleaned all the brass in about 20 minutes. Later, I will polish it a little with finer bristle burrs and then burnish the brass with water and pumice stone. It will have a nice mellow burnished look. I have 2 sizes of Fisher round scrapers. The smaller has 1/2" and 5/8" disks, and the larger has 3/4" and 1" disks. The chip carving chisel is the #9 Pfeil chip carving chisel from Woodcraft.

dave
 
Hi,
I am mostly finished with the lock moldings. Note how narrow the molding is at the back of the lock. I will eventually round off the edges a little, which is more authentic.

Franks%20Bess%2034_zpsqhrdt96y.jpg


Now for the forestock. The muzzle end is too bulbous and needs to be rounded down. It should not abruptly narrow down to the muzzlecap. There should be a gradual curve that tapers all the way through the long trumpet ramrod thimble.

Franks%20Bess%2029_zpsvabes5pa.jpg

Franks%20Bess%2033_zpsmrpiwdga.jpg


About ½ of the ramrod thimbles should be exposed above the wood so you have to remove wood from the bottom of the forestock. I use a wide and long coarse file held long ways along the ramrod groove to file away wood but to keep the profile straight and even. The second photo shows how much wood needs to be removed, often 1/8”-3/16”. I will then taper in the forestock using scrapers to create the proper profile. I also suggest that at least 1/16” of wood be removed on all surfaces of the forestock from the lock panels to the muzzle ”“ at least! On some more recent Pedersoli Besses, they leave a flat ledge along the barrel. That is a no no! The stock must taper into the barrel or it will not look authentic.
Franks%20Bess%2031_zpsfbjxtelp.jpg

Franks%20Bess%2032_zpsjgtyowao.jpg


I am almost done with the wood so I am going to move on for now to the metal work. After cleaning up the brass, I wanted to add an historically correct detail to the trigger guard. The hazelnut finial should have a decorative line on both sides. I cut those lines with a graver and hammer and then blend the cuts with a tiny triangular file.
Franks%20Bess%2030_zpskedk7fjv.jpg


That's it for tonight. Thanks for looking.

dave
 
Hi,
For comparison with what I am doing here go check out Loyalist Arms website and click on their "short land 2nd model Brown Bess" or "Dublin Castle brown Bess".

dave
 

Latest posts

Back
Top