• This community needs YOUR help today. We rely 100% on Supporting Memberships to fund our efforts. With the ever increasing fees of everything, we need help. We need more Supporting Members, today. Please invest back into this community. I will ship a few decals too in addition to all the account perks you get.


    Sign up here: https://www.muzzleloadingforum.com/account/upgrades
  • Friends, our 2nd Amendment rights are always under attack and the NRA has been a constant for decades in helping fight that fight.

    We have partnered with the NRA to offer you a discount on membership and Muzzleloading Forum gets a small percentage too of each membership, so you are supporting both the NRA and us.

    Use this link to sign up please; https://membership.nra.org/recruiters/join/XR045103

Dove Season is Upon Us

Muzzleloading Forum

Help Support Muzzleloading Forum:

This site may earn a commission from merchant affiliate links, including eBay, Amazon, and others.

4575wcf

40 Cal
Joined
Jul 16, 2021
Messages
414
Reaction score
423
Location
Pacific Northwest
Hey All
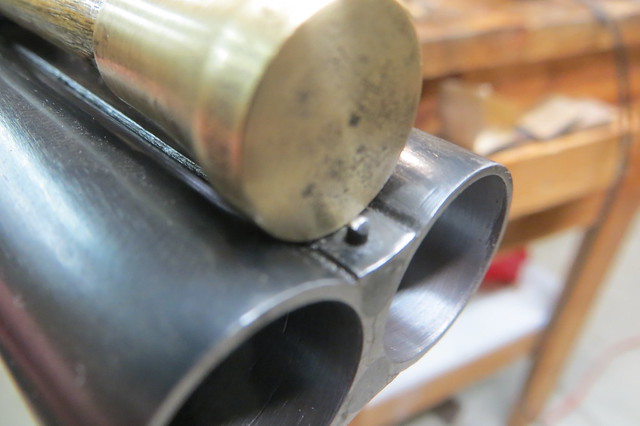
Making a few last minute repairs and adjustments to the new to me Pedersoli, and my kit. I bought an Italian Zouave flask to go with the first BP double in 1976, and it has been in continuous use off and on since. In the interim, my wife got an original flask and hunting dog horn for me from an elderly lady she worked for, but they are too nice and interesting to use in the field. My old flask finally developed some openings in the seams these last couple of years, and I really did not know how to address these, so I bought a similar vintage flask one online. Then there are the minor repairs to be made to the Pedersoli itself, one hammer bent backwards a slight amount to clear the fence, the new ramrod stop soldered on and finished, and a new and a slightly larger powder/shot measure to be made since this new gun is not shooting quite hard enough with the charge that always worked so well in the old one.
 

Attachments

  • DSC03315.JPG
    DSC03315.JPG
    122.1 KB · Views: 50
  • DSC03316.JPG
    DSC03316.JPG
    129.8 KB · Views: 50
  • DSC03317.JPG
    DSC03317.JPG
    115.8 KB · Views: 48
  • DSC04059.JPG
    DSC04059.JPG
    179.3 KB · Views: 54
My gun was made with stop--it sheared away first shot and was never heard from again. I had to fabricate this one working from the "hole" that was left behind. So, do you think I can fixture the offending hammer up and bend the nose back off the fence without snapping anything? I prefer to not use heat, but I will if it shows no sign of bending fairly easily a little, I may have to. We also have free year round reign on the collared doves, but they are not as tasty as I would prefer them to be.
 
We have scads of Mourning Doves, unfortunately the city takes a dim view of hunting them within the city limits.............. My neighbors would probably take issue with it also.
 
I never seem to do anything the easy way, I’d take the hammer off and make a pattern on a piece of wood showing the way it is and drawing what I want it to be. Then heat and bend to shape checking on my pattern. Once I’m happy a bit of polishing then recolor case hardening. Do it once, do it right, and be done.
Well the LC Smith project will take me through the color hardening process one way or another, but I was hoping to skip it with this simple job. I guess I'll heat it, only needs to go 1/8 inch straight forward off the fence for now. If I destroy the colors I can put them back on while I am practicing.
 
To heck with the city limits. The only view of those you want to see is in your rear view mirror. Get yourself a 4wd birdmobile and go round up some doves.
 
The more restrictions on your life, the less desirable your zip code.

The fewer restrictions in your zip code, the more likely your neighbor is to build something ugly. F--k it. Don't look at it. Just smile and take hours to sight in your swivel gun. :)
 
Ah--Dove Wyatt Earp in the dutch oven. Or cooktop dove stew. Or just roast the little birds whole with long grained rice. The collared doves are a bit bigger, but they lack something in the culinary department. We are pretty thick with them this season, hopefully no cold snap to send them packing before Sept. 1.
 
Last edited:
This evening I soldered the ramrod stop on. I wrapped the muzzle with wire and drove finish nails in under the wire to hold the ribs in place just the way Mr. Brockway says to do it. I introduced the heat via propane torch, and used an acid core solder to cut some of the crud I could not get cleaned out of the pocket. Once I got the parts tinned and the solder melted I poured the paste flux to it and clamped the stop in place. Seems I did alright, the only damage was I melted the filler solder out of the center of the upper rib. Once cool I clamped the barrel on end and using a big screwdriver as a soldering iron, I packed the top rib end back full, then dressed the works out. She looks good and seems solid, if the stop leaves me again in a few shots, then at least I did no worse a soldering job than Pedersoli did. By the time I get the stop filed and finished to form, if it is going to come off, it should have. I made a sliding copper barrel to go over my shot/powder measure and set screwed it in place with a brass screw. Later I will build in some adjustment to give 1 1/8, 1 1/4 and 1 1/2 oz for now she throws 1 1/4 on the money. Next up to get ahold of some solid brass screws and get the flask strap mounted. My brother contacted me today, he has a real gold mine dove field located down there where he lives.
 
Last edited:
I never seem to do anything the easy way, I’d take the hammer off and make a pattern on a piece of wood showing the way it is and drawing what I want it to be. Then heat and bend to shape checking on my pattern. Once I’m happy a bit of polishing then recolor case hardening. Do it once, do it right, and be done.
Thanks for the advise. I think you are probably right. Trying to cold bend the hammer, even a little is probably a recipe for disaster. The more I look at the offending hammer the more it occurs to me that opening up the radius between the neck and the hammer tip is probably the best solution. I will turn up a proper diameter small round of tool steel, clamp the separate hammer in the vise with surface protection, then heat the radiused area behind the hammer nose and press the larger diameter round into place. I do so wish Pedersoli had gotten this gun working right out of the chute, detailed soldering and bending hammers I can do, but it is a bit nerve wracking on a finished gun.
 
Okay, here we are. I hooked a small oxygen cylinder up with my propane torch and got a bit of heat and a little bend in the radius between the neck and nose of the hammer. I did not get carried away, just bought enough clearance to get the hammer nose off the fence. Now caps pop with authority on both barrels, and move some dust and weeds around at the muzzle. I dressed out the ramrod stop but I did not get a good look at the original before it departed. I hope this looks somewhat the same, I quit dressing when it looked about right to me. Incidentally, I owe Pedersoli a huge apology, cause this shotgun is a Pietta. Take all the nastiness I have laid on Pedersoli please, and place it on Pietta. My first gun was/is a Pedersoli however; and and it had just as many issues. I picked up some nice solid brass pan head screws for the flask now I will go about putting the linen strap on it. By George, we might be running by Sept 1 after all.
 

Attachments

  • DSC04060.JPG
    DSC04060.JPG
    108.2 KB · Views: 33
  • DSC04061.JPG
    DSC04061.JPG
    147.2 KB · Views: 43
  • DSC04062.JPG
    DSC04062.JPG
    142.7 KB · Views: 38
This Pietta lock work is not the equal of Pedersoli, now that I have had a lock apart. They are not badly done locks, but there are some issues. The tumbler to hammer assembly, through the lock plate is pretty sloppy. There is room to bush the tumbler hole with a bronze thrust washer behind the tumbler, which job I will do eventually. That will tighten up the hammers to the face of the lockplates and slick things up at the same time. The bridle screws are not counterbored into the bridle itself, that needs to be done, and said screws shortened a little. Then just a bit of deburring here and there on the component parts, the heat treat and spring action seem good enough. I paid $200 for this gun in like new condition, I think it might be one of Navy Arms magnums, or a similar gun, but the locks are cased, not bright. The grip area around the trigger plate is left pretty square, not a function point, but in the event of an oil stained refinish, I will take a bit of wood off there.
 
Last edited:
Okay. Got my two semi retired work days in, headed out early AM to do battle with the doves. It has cooled off in the AM considerably this last week, but still plenty of doves hanging around on the power lines along my commute. Hopefully we will get some good shooting in and the new muzzle-loader will get on track a bit more. Not expecting miracles with a new to me gun, but hopefully when the lead and the hold looks right the doves will start to fold up.
 
Hey All
Just got home after a days shooting with the older brother. The doves did the all too common thing--baled out on us 3 days before the season opened. The temperature went down to about 40 degrees at night down around Craters of the Moon where the brother lives and the birds coming into water dropped from about 60 to 16 in a few days. We got in some good shooting anyway, but we had to work to find them. The white tailed jack rabbit offered himself up as a test for the shotgun load first pop, and I clobbered him at about 25 to 30 yards. The two doves were the only decent shots I pulled off with the new gun, one was a tough left swinger, I got out in front of him with the right barrel. The other came out behind me, a climbing straightaway. I missed some, broke my ramrod and had to go get a dowel and get one out. Forgot to crimp my caps, lost one in recoil that cost me an easy bird. The gun went off splendidly and seems to shoot where I point it. I was using some old #6 shot I had left in the shot flask, should have reloaded it with #7 1/2, of which I have gobs. Looks like the gun is going to work on chukar partridge okay, I will continue to fine tune it here and there. A fun day with the big guy at any rate. Finished the day with an unmentionable, an antique Remington pump, made some good shots, muffed some easy ones.
 

Attachments

  • 20210901_142136.jpg
    20210901_142136.jpg
    322.6 KB · Views: 46
  • 20210901_091044.jpg
    20210901_091044.jpg
    200.9 KB · Views: 44
Last edited:
Back
Top