I thought it was done, but I was wrrrrrroooo...wrrrroooo...wrrrrrrooooonn..mistaken.
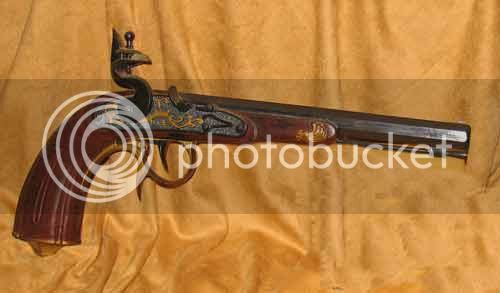
This is the pistol I've been working on for a few months. Some of you have seen it when it looked more like a big block of wood with a barrel sticking out of it, and many of you have seen later stages of it.
As I said, I finished it dark but the curl shows thru.
This is a .40 caliber Rayl barrel with a small Siler lock on a Curly Maple stock.
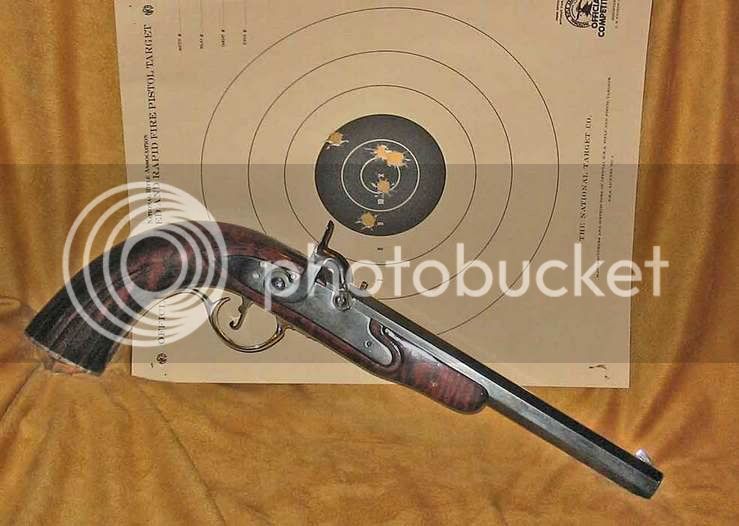
I shot the target today with a .395 ball patched with .012 pre lubed patching. The powder charge was 24 grains of Swiss FFFg, the caps were RWS.
After 4 shots at 15 yards, with me squinting at the target the guy next to me says "Dam nice shooting!" I said "where are they hitting?" He said "All in the Black!" I look again and sure enough, 4 shots in the black.
I then admitted I was shooting at the top target.
Yup, it was 11 inches between bulls eyes and it was shooting exactly 11 inches low.
I ended up firing a total of 7 shots, all of them from the bench with my hand resting on a padded block.
I used the rear tang screw slot, which is just visible at the rear of the barrel for a rear sight, figuring that the recoil would bring up the muzzle before the ball had left the barrel. I guess it did some, but obviously not enough.
Oh well, I was looking for something to do.
I was pleased with the trigger pull. Although I don't have a scale, I would guess it is somewhere between 1 and 2 pounds with a very crisp let off.
By the way, it was tearing the hell out of the patches. I think it is because they are "Pre Lubed" patches about 6 years old. I'll have to see about getting some newer ones.
No, I don't want to try my WallyWorld Pillow ticking yet. The .012 thick patches were tight enough with the .395 balls so I am sure the .018 thick material even it I used a .390 diameter ball would be just about impossible to load.
Finding the right combination of balls and patches is part of the game.
I'll let you know how things turn out.
Zonie (Jim)
This is the pistol I've been working on for a few months. Some of you have seen it when it looked more like a big block of wood with a barrel sticking out of it, and many of you have seen later stages of it.
As I said, I finished it dark but the curl shows thru.
This is a .40 caliber Rayl barrel with a small Siler lock on a Curly Maple stock.
I shot the target today with a .395 ball patched with .012 pre lubed patching. The powder charge was 24 grains of Swiss FFFg, the caps were RWS.
After 4 shots at 15 yards, with me squinting at the target the guy next to me says "Dam nice shooting!" I said "where are they hitting?" He said "All in the Black!" I look again and sure enough, 4 shots in the black.
I then admitted I was shooting at the top target.
Yup, it was 11 inches between bulls eyes and it was shooting exactly 11 inches low.
I ended up firing a total of 7 shots, all of them from the bench with my hand resting on a padded block.
I used the rear tang screw slot, which is just visible at the rear of the barrel for a rear sight, figuring that the recoil would bring up the muzzle before the ball had left the barrel. I guess it did some, but obviously not enough.
Oh well, I was looking for something to do.
I was pleased with the trigger pull. Although I don't have a scale, I would guess it is somewhere between 1 and 2 pounds with a very crisp let off.
By the way, it was tearing the hell out of the patches. I think it is because they are "Pre Lubed" patches about 6 years old. I'll have to see about getting some newer ones.
No, I don't want to try my WallyWorld Pillow ticking yet. The .012 thick patches were tight enough with the .395 balls so I am sure the .018 thick material even it I used a .390 diameter ball would be just about impossible to load.
Finding the right combination of balls and patches is part of the game.
I'll let you know how things turn out.
Zonie (Jim)