• Friends, our 2nd Amendment rights are always under attack and the NRA has been a constant for decades in helping fight that fight.

    We have partnered with the NRA to offer you a discount on membership and Muzzleloading Forum gets a small percentage too of each membership, so you are supporting both the NRA and us.

    Use this link to sign up please; https://membership.nra.org/recruiters/join/XR045103

Lock Inletting problem

Muzzleloading Forum

Help Support Muzzleloading Forum:

This site may earn a commission from merchant affiliate links, including eBay, Amazon, and others.

WindLaker

36 Cal.
Joined
Mar 11, 2006
Messages
64
Reaction score
1
I'm inletting the lock in my "Leman - sort of" project, and I've made a little mistake.

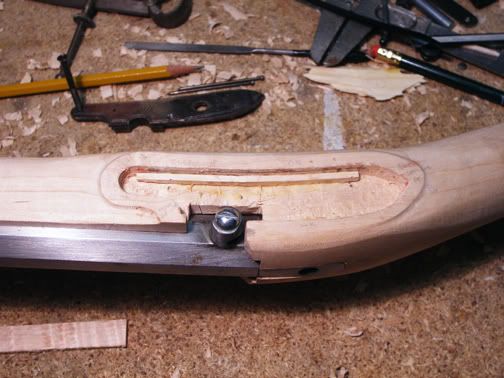
I've inletted the lock opening too deep on the bottom of the lockplate. When the plate hits the bottom on the inletted area, it's not perpendicular to the barrel face. The top is fine, because it rests against the barrel.

Lock_Diagram.jpg


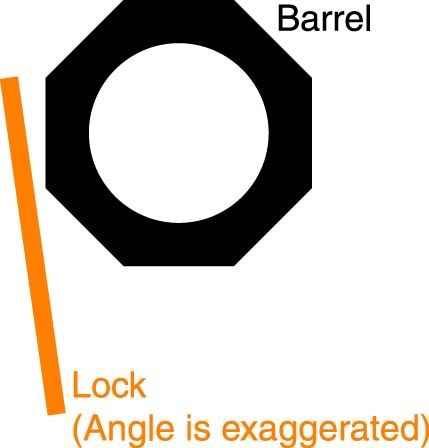
How can I raise the area at the bottom of the inletted area? I only need to kick it out about 1/32" or so.

Thanks in advance,

WindLaker
 
I think I would just glue in a little strip of wood on the inside of the lock mortis along the lower edge.
 
Professor,

After walking away for a while posting my question, and forgetting about it for an hour or so, I started playing with the strip of wood idea.

Very simple, very effective.

I gotta learn to take more breaks, I guess.

Thanks,

WindLaker
 
cut a sliver of wood & shape it to fit in the bottom of the inlet. Glue it in with some Elmers Stainable wood glue, put a piece of saran wrap over it & then a block of wood & clamp it down. Leave it sit for 12+ hours & then reinlet the lock.

If you have to, glue in several strips.

:thumbsup:
 
Taking breaks is good. :)

It is so easy to get involved with doing something that it's easy to overlook how the "whole" area is affected by what your doing.

Often problems come up and they can seem overwhelming at the time.

Just walking away to think or just looking at the gun when you return can often reveal answers that are fairly obvious to a clear, fresh mind but cannot be seen while your concentrating on doing the task.
 
Strip of wood is traditional. If you can't do that use a small wood screw in a location that won't interfear with the lock.
 
Windlaker: Grab yer draw knife & a good straight grained piece of maple & slab off some thick shavings & save them. Then pick a shaving a lil thicker than ya need, cut it to shape & glue it in, then reinlet it. I have a bag each of Maple, Cherry & Walnut set aside just for those :doh: unfortunate days where things just don't go as they are supposed to go..... :shake:
Like this morning !! :rotf:

Dsc09057.jpg


Notice this gallon bag is only half full now......... :grin:
 
I did the shim yesterday. Glued in a strip a little less than 1/16" square. I'll trim it, I should be good to go.

Lock_Plus_Stick.jpg


My next step will be re-shaping the lock panel. I have to "lower" it a good 3/32". I'll be taking off a lot of wood, but I'll be taking more breaks :grin:

Thanks again,

WindLaker
 
Leave that lock panel about 1/16" proud while you are finishing the rifle. Take that down Last, that way if you ding it you have a comfort zone. :thumbsup:
 
No problem. After ya ding up about 20 of them & realize one day "here I am again sweating out dings..... why did I do this again" :doh: next time ya make sure to leave a comfort zone on the lock panels. It eventually sunk in....... :shake:
You have a tendency as you built to "See how it looks" and you don't need to see that edge now. You know how it will look. It will look trimmed & finished. Just leave it be & wait, you may be glad ya did. And if ya don't ding it, so what.

Like having a spare tire on yer truck. You may not need it but it is dang nice to have if ya do. :thumbsup:
 
Sure hate to be the one that dirties your punch bowl. Where's the pride in gluing a chunk of wood like that..We all make mistakes but the art is knowing how to fix them..

Now if that was my rifle the way I would fix that mistake of mine is by taking my block plain and make whole lots of thin slivers from like wood.. Next I would lay them one at a time and cover the entire lock bottom even the good area. I would keep stacking them beyond the height I needed..
hen I would begin over by using a utility knife to cut out the outside perimeter of the lock. Then I would make me a scraper if I didn't have one out of a 1/4" flat screw driver and bend the shaft where you can make long pulling strokes. First in one direction then from the other direction... Use inletting black if you don't have that go buy yourself a tube of artist mixing tint ,brown,black red, anything that will show on the type of wood you are using . Brush it on hen lower your lock down .scrape the high spots the inletting black has shown you.. Keep doing that until the inlett black shows up even and your lock is totally eased.And I mean eased..

Like I said , I hated to be the one,but some ones got to do it. :haha:

Oh, by the way crazy glue is the stuff to glue your strips down with and stack few stops along the sides anywhere you have a gap ..

Twice.
P.S. I forgot to mention what you will have to do getting the slivers ready for gluing . You want them perfectly flat with the springiness out of them. Soak them in water for few minutes then place them on a smooth flat surface with a couple pounds of weight on them over night or until they are completely dry.....
 
If it was mine I'd make a thin patch large enough to cover the entire area of the lock mortise.

First make a pattern, tape a piece of paper taught over the lock mortise. Using an exacto knife follow the lock mortise. Take this cut out and lay it in the bottom of the lock mortise.

You may have to trim it some. When you have a good fit, take this an transfer it to your patch. Cut it out and slighlty bevel the edges.

Now using transfer color, slowly work the patch down till it bottoms out. Put a wood screw in the center of the patch to act as a handle to help remove it. When you got a good fit clean up the transfer color and glue it fast.

Now reinlet the lock plate.
 
Twice Boom & Ehoff,

Those are ways that never even crossed my mind. They'll go in the memory banks for future projects.

This is my first build without a kit, and I'm doing it kind of on the cheap (CVA metal parts, new stock). If this were a higher quality kit, or a gun for someone else (which I'm nowhere close to doing), I'd something like what you suggest. Plus, the strips are already Crazy Glued in, and I don't want to rip apart the inletted area to get them out.

Thanks for the ideas, though.

WindLaker
 

Latest posts

Back
Top