• Friends, our 2nd Amendment rights are always under attack and the NRA has been a constant for decades in helping fight that fight.

    We have partnered with the NRA to offer you a discount on membership and Muzzleloading Forum gets a small percentage too of each membership, so you are supporting both the NRA and us.

    Use this link to sign up please; https://membership.nra.org/recruiters/join/XR045103

Tip Curtis Lancaster Kit Part II

Muzzleloading Forum

Help Support Muzzleloading Forum:

This site may earn a commission from merchant affiliate links, including eBay, Amazon, and others.

stuartg

40 Cal.
Joined
Jan 6, 2014
Messages
378
Reaction score
0
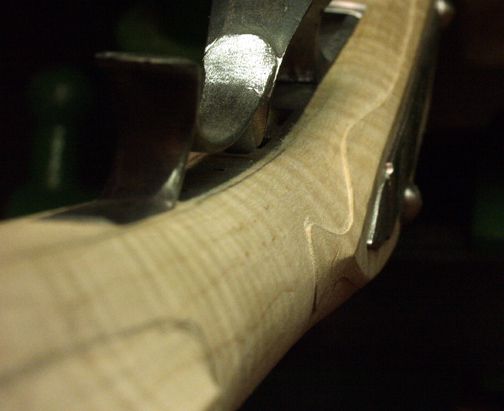
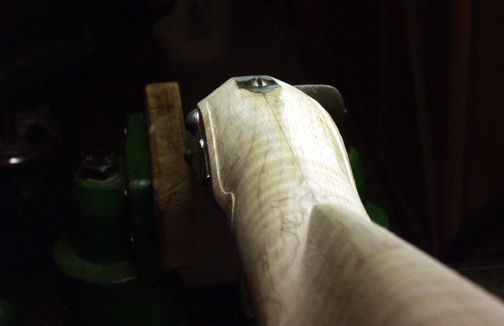
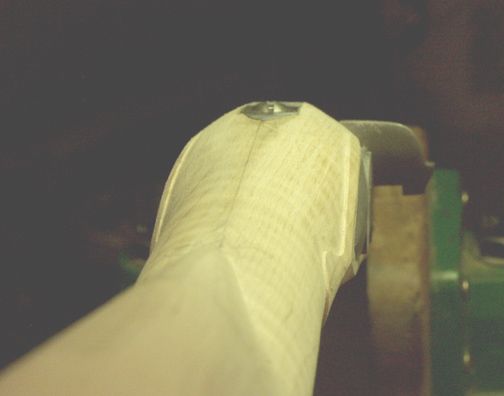
Okay thought the last thread was getting pretty lengthy so here's the part 2. Thanks for everyone's input on the forearm profile. I'm pretty happy with it now. I've started to shape the lock panel now and here's what I've got so far:

Keep in mind I haven't started to blend the molding lines. I just have the outlines carved. So yes, I know the front point is pretty drastic, it will be more suttle soon.


That's looking real nice! :thumbsup: . Get her "in the white" and we'll take her shooting!. Have you thought of a name for her yet?. I'm still waiting for a name to come to me for my SMR .40 cal.
 
The areas on both sides of the TG should be flat....this will make the lock panel outlines more positive. Below are a couple of pics that display the flatness and the more positive lock panel outlines.

Otherwise you're doing good and moving right along.


Good start, but still too square, nothing looks worse than a 2x4 look when finished. Look at Freds example......take off more wood, get rid of that box look.
A famous builder explained it this way..... Take off wood till you get scared, then take off a little more!
 
I see what you mean! Thanks for the pictures. The angles were they were taken really help.
 
Can you inlet your trigger guard any deeper? I*t looks like you still have a lot of wood under the lock.

On my current one I inlet the trigger guard until I started breaking through to the RR channel, and left the tab long enough that it could be blind pinned through the lock.
 
There is an original Matthew Gillespie rifle on the Contemporary Makers site today. There are multiple photos from every angle to show contours. While this is a totally different style, the principals are the same.
Great set of photos that could be most helpful.
 
Thanks I'll check that out.

I've been using birddog6's website, custom muzzleloaders, as reference. He's got some great looking rifles and pictures. I'm sure you'll see a lot of the similarity in the lock molding - I really love his rifles, so that's kind of what I'm going after.
 
don't be fooled about keiths rifles.....he has a golden retriever tha is the REAL maker of those guns...... :haha: :rotf:
marc
 
Looks good, Its sometimes hard via photos due to light and angles to really get a good look at it as a whole. Remember blend, blend and blend. What I see is the wrist might be a little thick. Again, its hard to tell with photos. It looks nice though.

Beaver T.
 
It is hard to tell in a picture exactly what it looks like. I had armakiller over at the house last night to compare one of his rifles with mine firsthand, and this helped quite a bit where I need work. I was able to get the hump out of the tang, but the biggest area is the underside of the lock needs to be put on a diet - a little chubby from what I can see. She's gettin' there though.
 
Hi Stuart,
It is coming along well. Below are some photos that may help. Form your lock panels with rasps, scrapers and files before ever cutting in the moldings. You actually should not need the moldings at all to define the lock panels. The lock panels come naturally from shaping the entire lock area. Molding are the last thing you form before carving and getting ready for finish.

dave
Jimsriflelockpanels3.jpg

Jimsriflelockpanels2.jpg

Jimsriflelockpanels1.jpg
 
yes she is looking nice for sure. I will look forward to seeing the type of finish your going to use. Should be a pretty piece when done. Remember not to rush.

beaver t.
 
Dave, thank you thank you thank you! Very helpful! It's very clear to me after seeing those.
 
Okay, so I started working on slimming down the lock panel last night. I was only able to do a small portion of the bottom of the lock panel. Anywho, is this heading in the right direction? I have a feeling ya'll will say, "take more wood off!" :grin:

 
Stuart,
Much better, but you're right, keep going. Get rid of all that wood that your molding is on. Finish that down to the final dimensions, sanded down and ready to finish, then the moldings go on. Moldings are part of carving, not shaping.
You're well on your way! Looks much better!
 
Thanks for guiding me on the lock area, and giving me that tip. Dave, I looked at your rifle and see what you mean about thinning the top molding a bit more than the bottom - very sharp. I tell ya, the lock area has so many optical illusions when looking at pictures! It's not until you really slow down at look a rifle over that you see some of them.
 
After slimming the lock panels down, I'm at the point of whiskering/scraping and notice that when I apply water there are areas with a slight "blackish" tint to them - even after scraping and sanding...here is a pic of the stock wet. You have to look really close to see it, but at least I notice it a bit. Is this normal? Does it get covered up when I stain or exaggerate it?(doing a reddish brown Danlger stain). I've spent a couple days whiskering and scraping. When it's dry, it looks perfect. How do your stocks look before staining? Thanks!


Latest posts

Back
Top