• This community needs YOUR help today. We rely 100% on Supporting Memberships to fund our efforts. With the ever increasing fees of everything, we need help. We need more Supporting Members, today. Please invest back into this community. I will ship a few decals too in addition to all the account perks you get.


    Sign up here: https://www.muzzleloadingforum.com/account/upgrades
  • Friends, our 2nd Amendment rights are always under attack and the NRA has been a constant for decades in helping fight that fight.

    We have partnered with the NRA to offer you a discount on membership and Muzzleloading Forum gets a small percentage too of each membership, so you are supporting both the NRA and us.

    Use this link to sign up please; https://membership.nra.org/recruiters/join/XR045103

WOOD you help ?

Muzzleloading Forum

Help Support Muzzleloading Forum:

This site may earn a commission from merchant affiliate links, including eBay, Amazon, and others.
Joined
May 3, 2014
Messages
20
Reaction score
0
Location
On the breaks of the Ohio river southern Indiana .
Man I really have the heebie jeebies. :surrender: Never really built a kit other than a CVA percussion, if you wanna call that a kit.

Bought TOTW's Early Tennessee Kit and have started with draw filing the barrel flats (Colerain).

Next step is removing the breach plug and locating the barrel in the 90% pre-inlet stock.

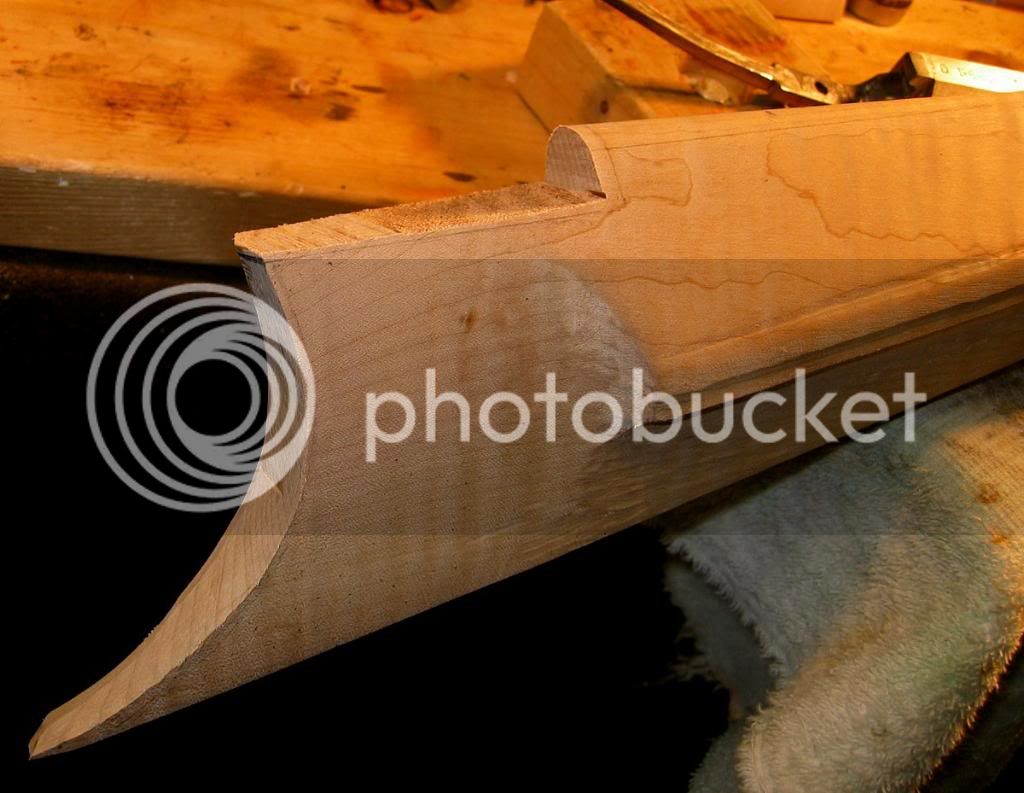
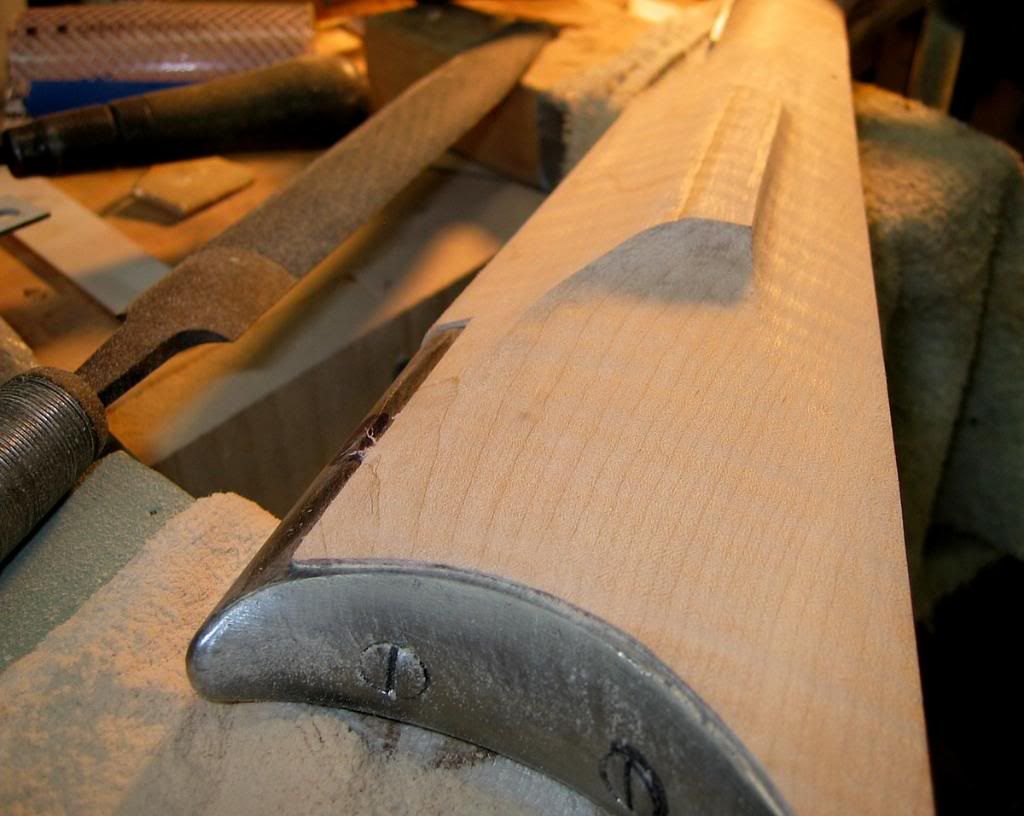
I really have been having nightmares thinking about fitting the Bean butt plate with is very curved profile. :confused:


I'm fairly proficient with the metal work, but the wood work is got me shaking, especially the locating of the barrel in stock to get the vent in the correct spot so I can drill and tap for the liner.

Any tips on cutting those square shoulders in the barrel channel that the breech rest against ?

Is sooting preferable to some type of inletting black, or is there any home made recipes for inlet black.

Many more question to come, have been reading as many tips and tutorials as possible, but it's great having the accumulation of knowledge that this forum has to offer ! :bow:
 
Get your barrel set in....I use SHARP chisels and gouges....
Put the plug back in after getting the touchhole done.
Start the tang curve AT the junction of barrel/plug.....it will avoid Hump wrist syndrome "....

Inlet the lock, get the triggers in and placed......

Then that crazy butt plate.......draw data lines so that the BP comb is parallel with the wood comb......and start you whittling and cussing and crying.....n :youcrazy: :haha:
SMR are cool with iron......but real tuff is to inlet....

Hang in there...take your time...it's a hobby!

Marc
 
Get the touch hole marked & barrel inlet in place. DO Not drill the touch hole or vent liner now, do it later.
That way if you have to make an adjustment, you can do so.


This is how I usually do them, & it works well for me & many others.

Lock 75-85% of the way
Inlet bare Barrel to proper depth into breech area of wood, with respect to the Vent liner aligning to the flashpan
center. This is VERY Important.
Shape Tang, install back on barrel, inlet tang into stock so now barrel is completely inletted
& takes no pressure to hold any part down..
Install the Underlugs on barrel & inlet them to the stock & pin the barrel to stock
Finish Lock inlet & Inlet Sideplate.
Remove barrel & drill for touchhole or install vent liner.
Inlet & install Trigger. Get it working close to how you want it to be right now, before continuing. (This way
if you have to move something, you do it now, not after the rifle is built)
Tang to trigger screw
Mark LOP, inlet & install Buttplate.
Glue the sights on & go shoot the rifle to insure the barrel is OK. I have had 5 defective barrels in the past,
need to know it is OK Now, not later.
Inlet & install Toeplate
Inlet & install Triggerguard
Inlet & install Nosecap
Inlet & install Entrypipe & RR pipes
I do the sights dovetails last, so I don't have the dovetails or sights snagging my
hands all the time.

Keith Lisle
 
Sooting is about the best way of fitting things when doing a gun build. I have used Prussian blue but I found it to stain the wood and require additional sanding to remove it.

The correct way to inlet the breach is with a very sharp chisel and a lot of care.

I found the easiest way for me to cut the stock for the buttplate was for me to Xerox the buttplate, cut out the image and use it as a template for cutting the stock.
 
Do an archive search and reference the video series (15-16 I think) on building a Buck's County rifle from a ToTW parts set. Lots of good information in there. With the exception of the lock internals, there is almost NO place for a Dremel or power tools near the wood. They can ruin a stock faster than I can. The other exception to power tools is a drill press or hand drill for your pins.

When you are doing your temporary screw thing, I tend to use phillips head screws, knowing they'll be coming off and on a zillion times. The slotted ones are for much later in the build, like at the end.
 
Col. Batguano said:
When you are doing your temporary screw thing, I tend to use phillips head screws, knowing they'll be coming off and on a zillion times. The slotted ones are for much later in the build, like at the end.


now you tell me! :(
:rotf:
marc
 
good advice, especially from Keith ... by way of my two cents: get your chisels as sharp as is humanly possible: shave ready won't do it - you want them neurosurgery sharp ... get a good piece of leather for stropping ...

good luck with your build, and send pictures ... we love pictures!
 
Can't agree more on recommending the Bucks Co TOW videos, free on youtube. They've helped me out a ton through my first build.
 
Dog - couple ideas to consider when you get after the buttplate.
Initial layout, before any wood is cut, is critical.
Know your final comb top-line, lay buttplate on stock at correct LOP, and make dang sure the BP return top-line lines up with comb top-line! Check it, check it again, then check it again.

The closer you can trace your final buttplate profile on the stock IN THE CORRECT LOCATION & ANGLE, and then cut close to that line, the easier the whole job is - at least thats what I 've found.

a wrong angle on the top cut is a real bugger to correct.
Get that right, and cut the concave curve close, and its a 2-4 hr job settling the buttplate down a hair and then straight in with no gaps.
I use a 2" sanding drum in my cordless drill in long smooth sweeps.
And then chisels and files when it get close to done.
Works slick.
Dont spare the inletting transfer marker of your choice.
I use lipstick.


Once you have that thin pointy toe in your stock, leave the buttplate or toeplate, or both, on at all times thereafter.
Its real easy to have that thin wood toe laying on the shop floor otherwise.


Ask questions. Dive in. Go slow.
/mike
 
First a big thanks to all that have replied so far !

And so it goes, the barrel is down and solid, the breach plug has been removed and the pre inlet for the lollipop tang is too short, so I'm resetting the tang and will have to fill a small gap and set the angle so the wrist doesn't have a hump. The barrel has 3 staples for keys and I've cut the mortises for them, used a very small drill 1/16" and my jewelers saw.

The barrel sets into the stock with ease, and I have plenty of extra wood to remove as the fore stock just about covers 3/4 of the side flats on the barrel, and a good 1/8- 3/16" deep at the breach and tang.

Disassembled the lock (L&R Durs Egg) and just starting to set that into the pre inlet. I tried the soot but wimped out and asked the Mrs. for some old war paint.

So many great tips helped take the butter flies away and am getting into the routine of haste makes waste and starting to enjoy the carving and filing. Sometimes I find it hard to stop, but give in anyways, knowing it's best.

The You Tube Bucks County Build is GREAT, pic's are worth 10,000 words in my book !

Will try to post a few photo's soon, I haven't used a upload host and will try to figure out how the system here works so be patient please.

More to come.
 
Stop right there. :shocked2:

If you inlet the barrel Before you inlet the Lock...... You are about to make a BIG mistake. :shake:

Bo back to my post about sequences of the build.

Keith Lisle
 
Took Keith's advice and got the lock plate set then went back to the barrel used masking tape where the pan sets against the barrel removed the breach plug and outlined the flash pan on the tape and center punched, drilled, tapped and installed the White lightning vent. It came out great.

Checked the chamber for burrs, anti-seized the plug and installed it (for the last time I hope).

Drilled, sawed the key way slots in the stock, and heated the keys cherry red and pushed them through. So now I have to reassemble the lock and inlet the internals for clearance.

Have a few wood mistakes but nothing I can't hide, or work around, gives you a lot of respect for the old timers.

Still trying to get the photo's uploaded (yeah I'm dense).

More to come.

 
I have bedded allot of breeches & tangs, but never had any reason to bed a lock. :idunno:

If you do the tang & breech carefully & your inletting is good, you will never see it is bedded from the outside.

Keith Lisle
 
Why? :idunno:
Once all of the pieces are bolted and screwed together, it has more strength than you think!...besides, IF you have drilled the front lock bolt correctly, it will be between the barrel and RR hole....no room for a pillar in there!
And the tang bolt will pull the plate and make the wrist strong by being in compression.......

Do what makes you happy......but excess work.....

Marc
 
When I was taking custom orders, allot of the guys wanted the breeches & tangs bedded, just as an extra measure. I don't know if they had previous issues, or had seen issues there or what.
Personally, I never have had an issue with a crack or barrel movement at the breech, but bedding one there doesn't hurt anything. However, I don't want to see the bedding when finished.

If I messed up in a lock inlet, I would match grain & glue a piece of wood in, rather than bed it. But that is me. :idunno: Everyone builds differently. If I built one so in need of allot patches, I would cut the stock up & start over. But again, that is just me. Over the years I have cut several up for kindling that didn't not satisfy me.

Keith Lisle
 
Birddog6 said:
When I was taking custom orders, allot of the guys wanted the breeches & tangs bedded, just as an extra measure. I don't know if they had previous issues, or had seen issues there or what.
Personally, I never have had an issue with a crack or barrel movement at the breech, but bedding one there doesn't hurt anything. However, I don't want to see the bedding when finished.

If I messed up in a lock inlet, I would match grain & glue a piece of wood in, rather than bed it. But that is me. :idunno: Everyone builds differently. If I built one so in need of allot patches, I would cut the stock up & start over. But again, that is just me. Over the years I have cut several up for kindling that didn't not satisfy me.

Keith Lisle

Well that's just about what I'd like to do make kindling out of this stock.

A MAJOR mistake, as in drilling the rear stock lock bolt, made my own point to point jig for the press and was still 3/16" low on the lock.

I have a good straight tap into the rear lock but the lock plate was inlet to low.

I don't know if I should make an over size lock plate to cover up my mistake, or Acraglas the mistake and live with it, come back later once my skills are better and do a new stock.

I'm really disgusted with my skills and had to stop with the build.

Suggestions ?
 
shouldn't be too hard to find the correct sliver of wood to cover this problem ...

I'd be hesitant to convert an otherwise serviceable stock into kindling.

free advice, and no doubt well worth the price!
 
Back
Top