• This community needs YOUR help today. We rely 100% on Supporting Memberships to fund our efforts. With the ever increasing fees of everything, we need help. We need more Supporting Members, today. Please invest back into this community. I will ship a few decals too in addition to all the account perks you get.


    Sign up here: https://www.muzzleloadingforum.com/account/upgrades
  • Friends, our 2nd Amendment rights are always under attack and the NRA has been a constant for decades in helping fight that fight.

    We have partnered with the NRA to offer you a discount on membership and Muzzleloading Forum gets a small percentage too of each membership, so you are supporting both the NRA and us.

    Use this link to sign up please; https://membership.nra.org/recruiters/join/XR045103

Stripping a factory GPR stock?

Muzzleloading Forum

Help Support Muzzleloading Forum:

This site may earn a commission from merchant affiliate links, including eBay, Amazon, and others.

bullterrier

32 Cal.
Joined
Apr 28, 2012
Messages
12
Reaction score
0
I've been having great fun with my GPR percussion kit - browning, sanding and what not.
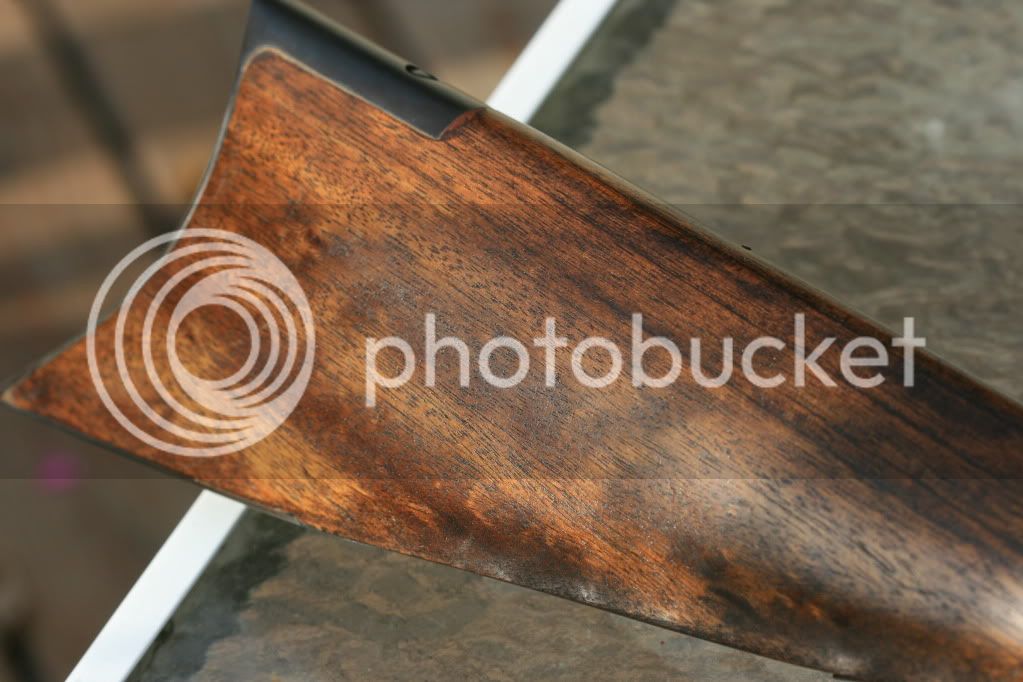
Until I dropped the stock without the toe/butt plate - disaster. Argghhh! I knew I couldn't do anything about the massive chunk of toe that had detached itself and I ordered a new one from Lyman.

It has arrived and of course it is the finished, stained and oiled article. It actually feels slightly waxy.

I am thinking about removing the stain, or something, for the personalised finish I am after.

Anyone done this on a factory stock? Pitfalls?
Got to get it right!!!
cheers
 
You can use a piece of glass to carefully scrape the heaviest part of the finish off and then use a stripper like Formby's paint and poly remover or forgo the scraping and just use the remover but it may take several applications to get the finish removed. This has always worked for me.
 
Now most facory stocks benifit from thinning here and there. With that said you may want to try the stock as is.

My factory GPR looked dead when new. Over the years I have done many things to it. It now has a very pleasent look and feel.
A lot of this was done before I was "educated" in stock finishes.
The first thing I did was simply clean the stock and use hardware variety linseed oil in very thin hand rubbed coats. When it finally dried I buffed it whith a soft cloth. That really brought out the gold highlights and the wood no longer looked dead.

A few years later I did the same with tung oil. Again it looked much better and the gold highlights had much more "pop".
The past couple of years I have used carnuba car wax on the stock with excellant results. I repeat the waxing and buff before every hunting season. I have never stripped it down to bare wood. Keep in mind this has been done over a period of 16 years.

With a new bare factory stock that I was happy with fit I would consider degreasing it with acetone or alchohol. After wiping clean a lot of the finish or glaze will come off but for the most part it is still stained.
With a damp cloth I would try to raise the grain or whiskers. I would sand and wipe with damp cloth several times with fine grit 200 or so until it is pefectly smooth. Use backed sand paper if not you can round the sharp edges which ruin the look of a rifle. You're trying to remove any whiskers that rise not sand off the factory stain. So sand lightly.
When the stock is baby smooth you have options here. The first is to fill and seal the grain with a light coat of real shellac. Use the real flake stuf or button lac mixed in alchohol. This will provide a more water resistant finish. You can skip this and just use final finish for this step. Apply a thin coat an lightly sand it smooth. The following coats can be buffed when dry with burlap or a soft cloth. I recomend Jim Chambers stock finish from flintlocks.com. Apply in thin coats. When finished I would wax and buff.
Even if you decide to strip it you can use the same methods above to finish your stock.
 
Last edited by a moderator:
bullterrier said:
Cool - will this remove any staining evenly? I don't want a blotchy finish.

I've quite a few modern stocks this way and staining evenly was never a problem. :thumbsup:
 
I stripped a factory Lyman Trade rifle stock a few years back. I've used chemical strippers to strip furniture with ease but it didn't touch the Lyman finish. I ended up using sandpaper to get the color out. While doing so I reshaped the forend and added a few molding lines on the lower butt.
 
All of the Lyman GPR's I've seen come with a Walnut stock so they aren't stained.

The finish might leave a bit to be desired and if you want to remove it try using one of the commercial Paint Removers.
You can buy them at most local hardware stores.

Most of these removers are pretty nasty stuff so wear rubber gloves and be sure to read the instructions closely.

After removing the old finish the wood will need to be sanded.
Speaking of sanding wood, in my opinion using a sanding grit finer than 220 is a total waste of time.

Wood finish sanded with a 180 grit paper will look just as smooth as wood that was sanded with 220.

If you want a "natural oiled" finish with the open pores of the walnut showing, first wet the stock to be sure it is the color you want.

If it is, after it is dry, start applying a good finishing oil.

If it's lighter in color that what you want you can stain it darker using a alcohol or water based walnut stain like Birchwood Casey makes.
 
Any of the commercial strippers will remove the GPR finish. I have done several and the finish is so poor it almost falls off! I like to use the garden hose to remove the stripper residue and what little finish remains. Be careful and don't let it splash on you.
Calling that wood walnut is a very loose use of the word in my estimation. But it can turn out pretty nice if you stain it properly or dye your oil finish. I like Minwax Tung Oil Finish.
My suggestion is to stop with 150 grit sandpaper and burnish each coat with 0000 steel wool.
I, too, think there is too much wood so you may want to trim it down some. Plus tidy up the fit of the iron parts.
 
Here is my last one. It is an unremarkable piece of “walnut” but it turned out pretty nice.

IMG_4679.jpg
 
I found that ACETONE strips off factory finishes the fastest. Do this out of doors, and sit up wind of it. Wear gloves to protect your skin.

After removing all the metal furniture from a stock, I put the butt in a shallow aluminum pan, and then start washing the stock from the front end( top) down, using a brush with liberal amounts of acetone. The stuff cuts through the finish as it drips and runs down to the pan under the butt.

When all the finish is removed, I first dry it with paper towels, then take it to the sink and flush the whose stock vigorously under the rap, to remove and neutralize any remaining acetone.

The stock is put out some place with good air, to dry for several hours. After that, I begin a close examination for whiskers, and any flaws that need to be fixed. I learned the hard way NOT to stain Walnut- its dark enough, and stain, covered with an oil finish, will hide much of the beauty of the natural walnut, IMHO.

The only time I have used stain on any part of a walnut stock was on a piece of utility grade wood that showed some "blond" growth wood. I stained the lighter wood to hide it, w/o much success, I might add.

Do as you wish, of course. :hatsoff:
 
Been reading this thread and I was wondering: is it dificult getting the lock and trigger mechanism back togather after taking it apart to work on the wood?
Would a person need any special tools to put it back togather?
Looks simple enough, but looks simple enough has turned out to be rediculously dificult when I asked other questions.
 
cynthialee said:
Been reading this thread and I was wondering: is it dificult getting the lock and trigger mechanism back togather after taking it apart to work on the wood?
Would a person need any special tools to put it back togather?
Looks simple enough, but looks simple enough has turned out to be rediculously dificult when I asked other questions.

Depends on the gun. You need some screwdrivers, and if the barrel is pinned you will want something to drive out the pins (I use a piece of 1/16" music wire). The problem is finding screwdrivers that fit the screws used on guns, since the slots are usually narrower for their width than other screws. Nailed parts (mostly inlays) I would just leave in the stock if possible.

Disassembling a gun isn't too difficult - just be gentle and keep track of all the screws and where they go.
 
If you are only removing the lock or trigger assembly to work on the wood you do not need to take them apart.

The lock is only held in place by the one or two large screws passing thru the stock from the side opposite the lock.

Triggers are often held in place by the tang screw that comes from the tang on the barrel.
They also will have a wood screw or two that holds them in place.

Usually, to remove a trigger assembly the trigger guard must be removed.

On factory guns they are usually held in place by a couple of wood screws.

On non-factory guns the trigger guards might use screws or pins or a combination of both.

If the gun uses pinned trigger guards, the pins can be driven out by carefully using a slightly smaller diameter pin and a small hammer or mallet.
Look at the wrist of the gun and the area just in front of where the trigger bow meets the stock to find the usual pin locations.

You should be aware of the fact that many trigger guards won't fit freely into their mortices.
They often were "flexed" slightly to make them align when they were installed.

If this is the case, don't try to bend the guard so it can be a "drop in". It's better to just flex it like the original builder did to get it to slide down into place.

As for actually taking a lock or set trigger apart, I think that is the subject of another post and there are a number of them that have been made over the years.

Here is a link that talks about removing a hammer from a lock.
In order to do this properly the entire lock should be disassembled so it pretty much covers doing this task.

It is written about a lock with a leaf type mainspring rather than a coiled spring but the basic ideas still apply.
http://www.muzzleloadingforum.com/...p?tid/248082/post/874782/fromsearch/1/#874782
 
Last edited by a moderator:
I had an interesting experience stripping the stock on my factory GPR. It was pretty dark, and uniformly so. I just used a chemical stripper from the hardware store. Wish I could remember which it was, because the finish lifted right off.

I'm convinced that at least in the case of my stock they stained it, and the stain was IN the finish. I say that because after stripping I discovered that about the front third of the stock was yellow sap wood! Yet you couldn't tell before stripping. I played heck darkening that sap wood to come even close to the rest of the stock. Then I just gave up and experimented with adding hardware store oil based stain to the tung oil finish I got from the hardware store. Presto. You can still spot the sap wood if you look close, but I bet I could make it disappear completely with a couple more coats of finish. Presto again, and dark stock again.
 
bullterrier said:
I am thinking about removing the stain, or something, for the personalised finish I am after.
Anyone done this on a factory stock? Pitfalls?
Over several years I gradually acquired a number of 1970's vintage T/C Hawken stocks for 2 reasons...the 70's vintage had a much longer LOP which I liked, and the quality of the wood at that time routinely had much more beautiful figure than late 80's and 90's vintage. Stripping and refinishing them with only Tru-Oil brought out that beautiful figure most of which had been covered up with the factory spray on stain/finish.

The simplest, most complete / thorough stripping job which changed no dimensions, was to simply remove all the components and drop them off at an antique furniture place that had a chemical stripping booth for refinishing old furniture...pressure spray only, no brushes, no sanding.
No pain, no strain, no chemicals or fumes to fool with at the house, no sore joints, LOL.
Picked them up the following week for $20...took them home and started applying coats of Tru-Oil.
 
You bring up a very good point. Each piece of walnut, or any wood for than matter, should be evaluated to determine which method of finishing is best for it.
A blanket statement such as, “I never stain walnut” just shows a lack of experience in finishing wood.
Some walnut is best with just a tung oil or Tru-oil or even wax. Some need further attention, such as stains or dyes and such.
 
"Black Walnut" is the only kind of "walnut" I can buy here, or has appeared on the dozen+ guns I have finished. I saw a piece of fancy "California" walnut on an expensive shotgun a friend owned, which was considerably lighter in color. The factory did NOT stain the wood, and left it in its natural state. It stuck out like a candle light in a dark night, compared to the (black)walnut stocks commonly seen here.

I guess I should have qualified my comment about "never staining walnut" by adding the word, " Black". :thumbsup: :doh:

Frankly, I thought my comment about staining cambium walnut wood explained the extent of my personal background, experience, and judgment.

I have seen, but never worked on " French" walnut stocks, and " Circassian " walnut, and some other more obscure varieties of walnut when visiting gunstock wood providers, including Pecatonic River, and Dunlap. None I have seen would be "enhanced" by being stained darker, IMHO-- at least NOT at the prices one pays for such wood today! :shocked2:
 

Latest posts

Back
Top