• This community needs YOUR help today. We rely 100% on Supporting Memberships to fund our efforts. With the ever increasing fees of everything, we need help. We need more Supporting Members, today. Please invest back into this community. I will ship a few decals too in addition to all the account perks you get.


    Sign up here: https://www.muzzleloadingforum.com/account/upgrades
  • Friends, our 2nd Amendment rights are always under attack and the NRA has been a constant for decades in helping fight that fight.

    We have partnered with the NRA to offer you a discount on membership and Muzzleloading Forum gets a small percentage too of each membership, so you are supporting both the NRA and us.

    Use this link to sign up please; https://membership.nra.org/recruiters/join/XR045103

Soldering barrel lugs and sight, success!

Muzzleloading Forum

Help Support Muzzleloading Forum:

This site may earn a commission from merchant affiliate links, including eBay, Amazon, and others.

Noeyebrows

36 Cal.
Joined
Jul 8, 2011
Messages
80
Reaction score
83
I’m building a Chambers New England Fowler in 10ga and I wanted to share my experience with soldering the barrel lugs and front sight. I am new to building guns and had very little experience with soldering, so it took me quite a while to piece together the information from related posts and to learn the terminology related to these soldering jobs. I am by no means an expert, more like barely competent, but I learned a lot. Hopefully this will help other new builders along the way.

My first task was determining what kind of solder to use. I read a lot about “silver” solder but it was a little confusing figuring out what that meant. The consensus seems to be that this means low temp silver bearing solder as opposed to wire used for high temp silver brazing. I picked up some Harris Stay-Brite solder which is 94% tin and 6% silver which melts at 430 deg F. The set I bought on amazon came with a liquid flux that I found to be difficult to work with (will discuss later).

I started by preparing the round steel barrel lugs by cleaning up the casting blemishes with a file. Then I sanded the bottom of the lugs by wrapping sand paper around the barrel in the general location of the lug and sanding the bottom of the lug so that it will conform to the same radius of the barrel. I think I used 150 and 220 grit paper. Next I sanded the barrel with 220 grit where the lug was to go. There are good topics you can easily search here on how to mark center lines on a round barrel.

My next task was to “tin” the lug and barrel separately with a thin coat of solder. Being a newbie, I had no idea what “tinning” meant. It is simply applying a thin layer of solder to each surface (easier said than done!) this video helped a lot on youtube: I found that the liquid flux I was using would turn brown and burn at nearly the exact temperature that the solder would melt, resulting in a poorly and unevenly tinned surface. I had to approach the melting temp very carefully by feathering the propane flame around the area and checking the solder for melting frequently. It is important to try and NOT heat the area you intend to solder with direct flame. I want to mention that I first held my lug to be tinned in a c-clamp and vise. It seemed like the clamp was acting as a heat sink and drawing heat from the lug, cooling it before it could be tinned. I switched to some small hemostat clips (locking forceps) for holding the lugs and had much better luck.

After parts are tinned, you want to add a bit more flux and clamp your lug to the barrel. I used a bent piece of hack saw blade that I notched on the end that holds the lug and clamped it to the barrel with spring clamps. I had to heat the hack saw blade red hot to get it to bend without breaking.
Heat the 2 parts with indirect heat until they fuse together and you see melted solder around the lug. Use a wet shop rag and clean up the flux while the part is still hot or it will be hard to remove later.

For the front sight, I used basically the same process, only this time I tried a flux paste recommended by muzzleloader builders supply website. It’s called Rectorseal C-Flux. It has some powdered solder in the mix. This seemed to have a much higher burning temp and resulted in a beautifully tinned surface. 100% easier than the liquid flux. I might also mention that I used MAP gas instead of propane, which got the parts up to temp quickly. Everything was cleaned up with the file to finish.

I’m sure this post seems very elementary for the experienced builders, but I thought it could help the new folks like me. I’m curious to hear any suggestions or different ways you all do it.
20F1D37D-E621-4C4F-B4B2-7DA78138D925.jpeg
ADE88148-7BE8-4484-AA9A-8EFB70E9D2C0.jpeg
9D847C98-33A5-4864-8F39-D3977A788BF1.jpeg
EB919BBB-9FF6-4118-81AF-48FE798BDF02.jpeg
2238E547-8031-4EA6-ABB4-5A126A811093.jpeg
BBEE6979-91C0-48B2-8DCF-B8AF54ECE490.jpeg
 
Last edited:
I suck at soldering. glad you had a good go at it. I use metal banding that is meant to secure items to pallets for a spring to hold parts for soldering. same idea but is more flexible and free.
 
I’m building a Chambers New England Fowler in 10ga and I wanted to share my experience with soldering the barrel lugs and front sight. I am new to building guns and had very little experience with soldering, so it took me quite a while to piece together the information from related posts and to learn the terminology related to these soldering jobs. I am by no means an expert, more like barely competent, but I learned a lot. Hopefully this will help other new builders along the way.

My first task was determining what kind of solder to use. I read a lot about “silver” solder but it was a little confusing figuring out what that meant. The consensus seems to be that this means low temp silver bearing solder as opposed to wire used for high temp silver brazing. I picked up some Harris Stay-Brite solder which is 94% tin and 6% silver which melts at 430 deg F. The set I bought on amazon came with a liquid flux that I found to be difficult to work with (will discuss later).

I started by preparing the round steel barrel lugs by cleaning up the casting blemishes with a file. Then I sanded the bottom of the lugs by wrapping sand paper around the barrel in the general location of the lug and sanding the bottom of the lug so that it will conform to the same radius of the barrel. I think I used 150 and 220 grit paper. Next I sanded the barrel with 220 grit where the lug was to go. There are good topics you can easily search here on how to mark center lines on a round barrel.

My next task was to “tin” the lug and barrel separately with a thin coat of solder. Being a newbie, I had no idea what “tinning” meant. It is simply applying a thin layer of solder to each surface (easier said than done!) this video helped a lot on youtube: I found that the liquid flux I was using would turn brown and burn at nearly the exact temperature that the solder would melt, resulting in a poorly and unevenly tinned surface. I had to approach the melting temp very carefully by feathering the propane flame around the area and checking the solder for melting frequently. It is important to try and NOT heat the area you intend to solder with direct flame. I want to mention that I first held my lug to be tinned in a c-clamp and vise. It seemed like the clamp was acting as a heat sink and drawing heat from the lug, cooling it before it could be tinned. I switched to some small hemostat clips (locking forceps) for holding the lugs and had much better luck.

After parts are tinned, you want to add a bit more flux and clamp your lug to the barrel. I used a bent piece of hack saw blade that I notched on the end that holds the lug and clamped it to the barrel with spring clamps. I had to heat the hack saw blade red hot to get it to bend without breaking.
Heat the 2 parts with indirect heat until they fuse together and you see melted solder around the lug. Use a wet shop rag and clean up the flux while the part is still hot or it will be hard to remove later.

For the front sight, I used basically the same process, only this time I tried a flux paste recommended by muzzleloader builders supply website. It’s called Rectorseal C-Flux. It has some powdered solder in the mix. This seemed to have a much higher burning temp and resulted in a beautifully tinned surface. 100% easier than the liquid flux. I might also mention that I used MAP gas instead of propane, which got the parts up to temp quickly. Everything was cleaned up with the file to finish.

I’m sure this post seems very elementary for the experienced builders, but I thought it could help the new folks like me. I’m curious to hear any suggestions or different ways you all do it.
View attachment 149215View attachment 149225View attachment 149228View attachment 149229View attachment 149230View attachment 149231

Thanks, this answered a lot of questions for me as I have a fowler coming from Jim Chambers in awhile.
 
One tip trick for tinning parts, especially the barrel. Dry clamp your part in place on the barrel and draw a line around it with soap stone (found in the welding section anywhere that sells welding stuff).

Then once you have your line drawn around your part, color the barrel with the soap stone right up to your line and make sure you go all the way around the barrel. Go out to the sides about an inch from your part is enough.

Why the soap stone?

Because solder won't stick to it under any circumstances and clean up is much quicker.

Nothing more aggravating that cleaning solder runs and drips off the part of the barrel that you want to blue or brown. Using the soap stone trick the only place that will tin up is the place where the part sits.
 
They practiced a lot and learned how to do it quickly - joining metals to each other is nothing new.
Anybody who could wrap a strip of steel around a rod and make a barrel out of it without it kabooming would consider soldering stuff together a cake walkin' easy day........
 
My solder flux likes to burn, too, right about the time the 6% silver-bearing solder melts. I just brush on more flux.

I solder brass parts with rosin core electrical solder, MUCH easier to use, and less messy. Dies not make a strong joint on steel though.
 
Hi,
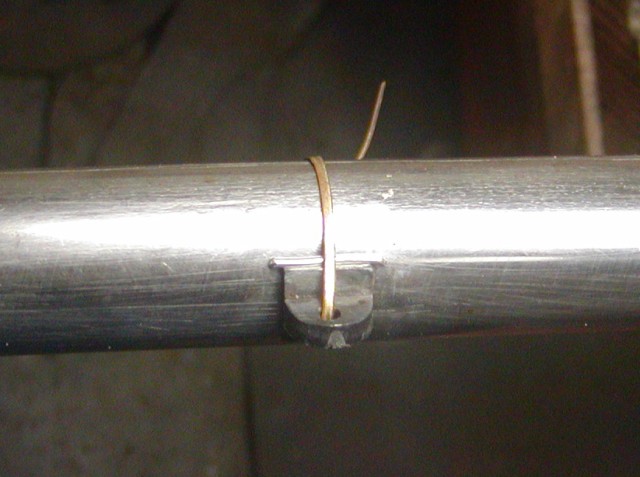
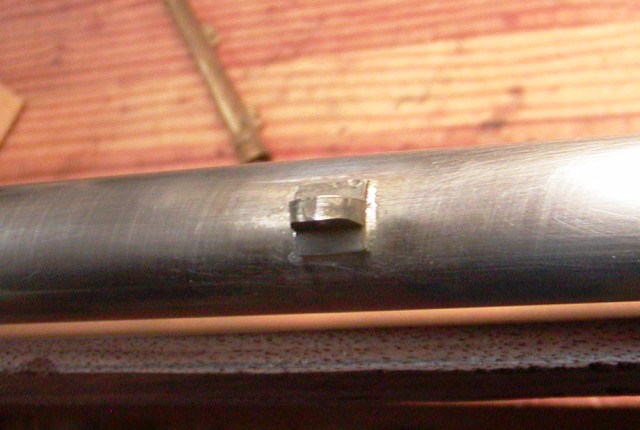
Nice job. I don't tin the lugs and barrel. I sweat the solder under the base. I simply clean the joints with acetone, flux the barrel and lug, hold the lug in place with wire, and tilt the barrel over a bit to the side so gravity helps the flow of the solder. Then I lay a piece of solder on the top edge of the base and heat from below, drawing the solder toward the heat. Clean-up is easy.
FDySS7b.jpg

tivV7mx.jpg


dave
That look so much easier. Thank you Dave!
(I am mulling between either soldering the lugs on, dovetailing them into the round British musket/carbine barrel, or both.
I am leaning towards dovetails.)
 
Hi Bob,
Use both because the dovetailed slot will by default be very shallow. Here is how to do that. Cut the slot just deep enough so the bottom of the base of the lug can be flat and fit on a flat surface on the barrel. So make the flat on the barrel just wide enough for the base of the lug and no more. Then file in the dovetails on the barrel and angle the ends of the lug base to match. Because of the round barrel, the dovetail in the barrel will be deepest in the middle and disappear at the edges of the flat. That is just fine. Then clean the surfaces, flux them, and tap the lug into the barrel. Tilt the barrel over a little on its side so gravity aids flow of the solder, place a piece of solder on the upper edge of the base and heat from below, sweating the solder under the base toward the heat.

dave
Thank you Dave. I have copied and saved the pic and instructions in a folder for referencing. I think I can do this.
 
Hi Bob,
Use both because the dovetailed slot will by default be very shallow. Here is how to do that. Cut the slot just deep enough so the bottom of the base of the lug can be flat and fit on a flat surface on the barrel. So make the flat on the barrel just wide enough for the base of the lug and no more. Then file in the dovetails on the barrel and angle the ends of the lug base to match. Because of the round barrel, the dovetail in the barrel will be deepest in the middle and disappear at the edges of the flat. That is just fine. Then clean the surfaces, flux them, and tap the lug into the barrel. Tilt the barrel over a little on its side so gravity aids flow of the solder, place a piece of solder on the upper edge of the base and heat from below, sweating the solder under the base toward the heat.

dave
I just bought some Sta-Brite Silver Solder to do the barrel lugs. Will liquid flux work ok?
 
Back
Top