


Greetings fellow M/Lers, from a "NEW" old timer.
I was informed of this forum by ZONIE at the Western Regional in Phoenix. this year. I think that I’ve been through every forum and post, many 3-4 times, the symptoms of relapsed addiction for sure. I can see that a person needs a computer just to keep track of all the vendors. It wasn't that way back in '56 when I first held and fell in love with a caplock rifle. The feeling I had holding that rifle, was about the same as the first girl I held, "I just gotta get me one of these!"
I built my 1st M/L exactly 50 yrs ago this summer. It was and is the original Dixie Squirrel rifle kit, the 40 X 40 X 40. That is 40 cal, a 15/16 40 inch barrel and a finished rifle that feels like 40lbs. When you get it propped up and pointed in the right direction it will drive tacks all day. The kit didn't come in a nice box with all the parts & instructions laid out. That’s another long story for another time.
Since then I've built a flinter from scratch, and a couple of Hawken kits, nothing earth shattering. I am now semi-retired and have been doing some stock carving and wire inlay work. I'll post some pics on that some other time.
A couple of months ago my daughter Phyllis told me her neighbor Don had an old M/L that had been in the family for many yrs, from one attic to another across the country.
He said there was a break in the wrist and wanted to fix it enough to hang on the wall.
He had tried to repair it with gorilla glue but that hadn't worked out too good.
Would I be willing to take a look?--why I'd be happy to!
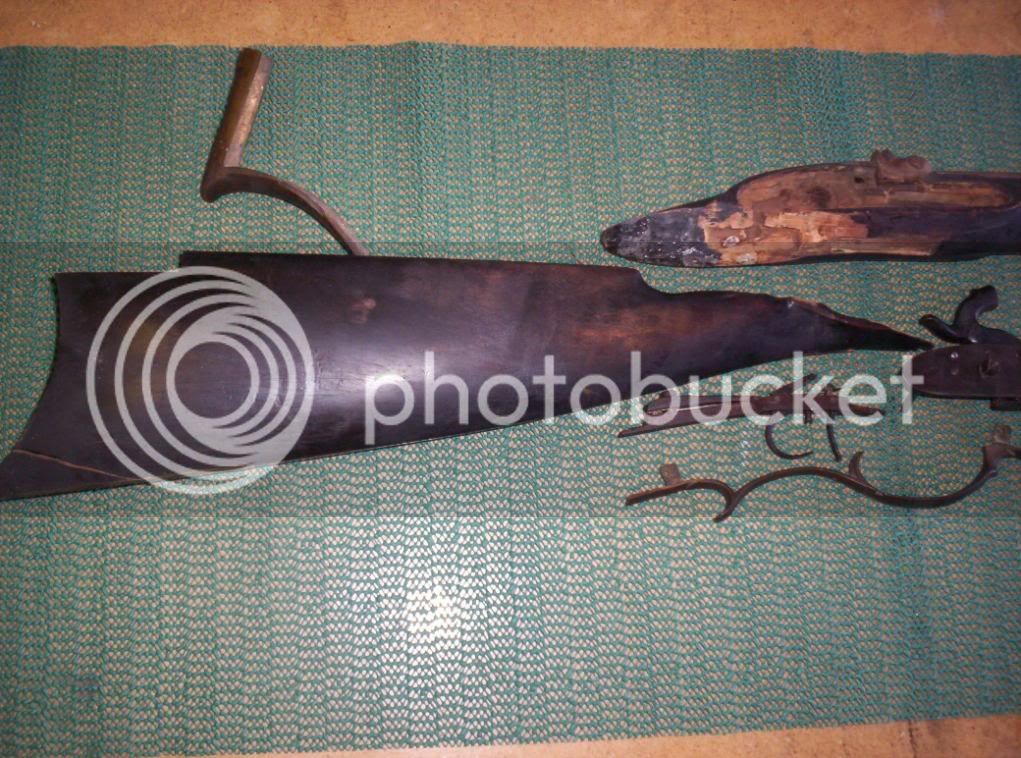
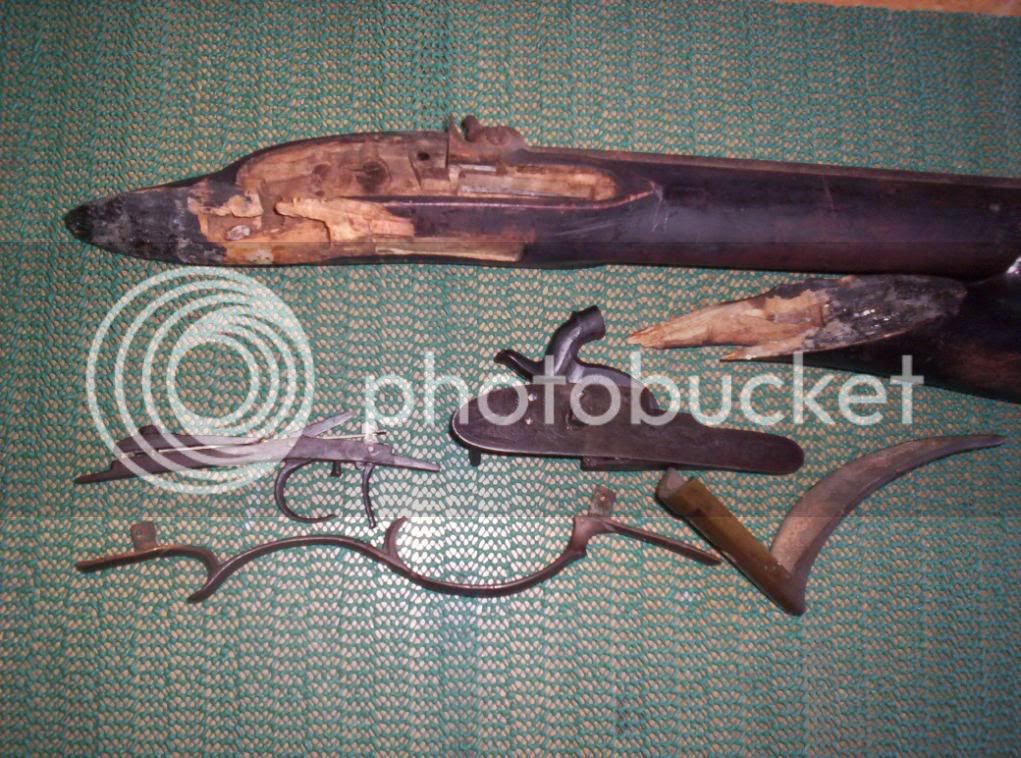
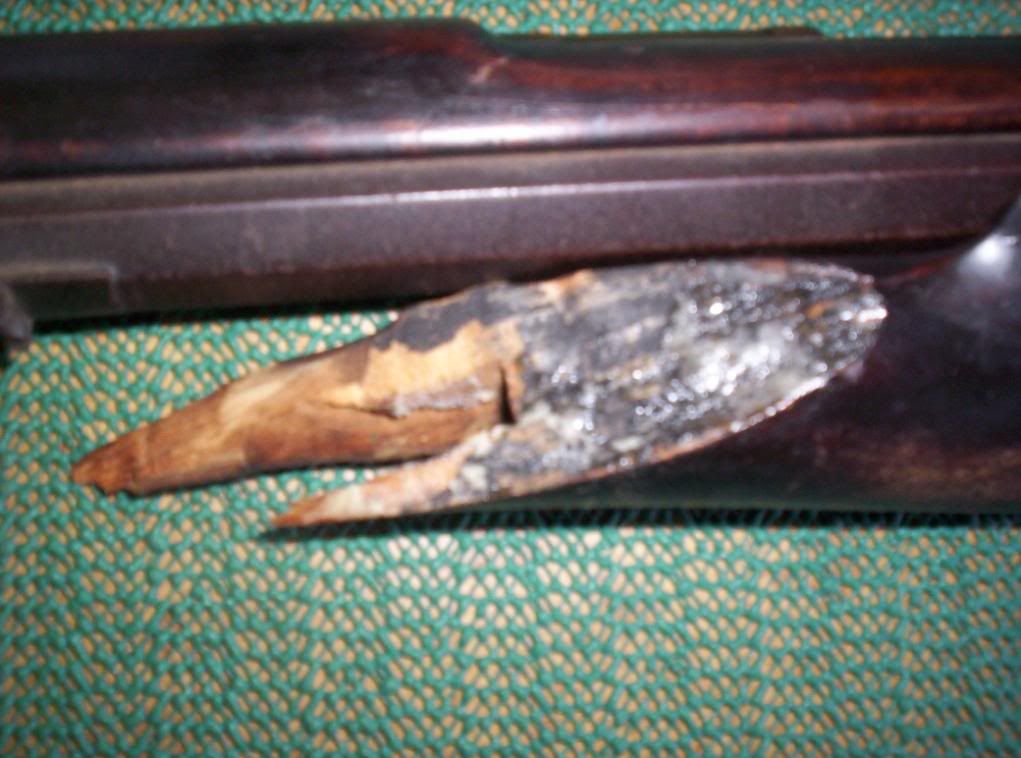
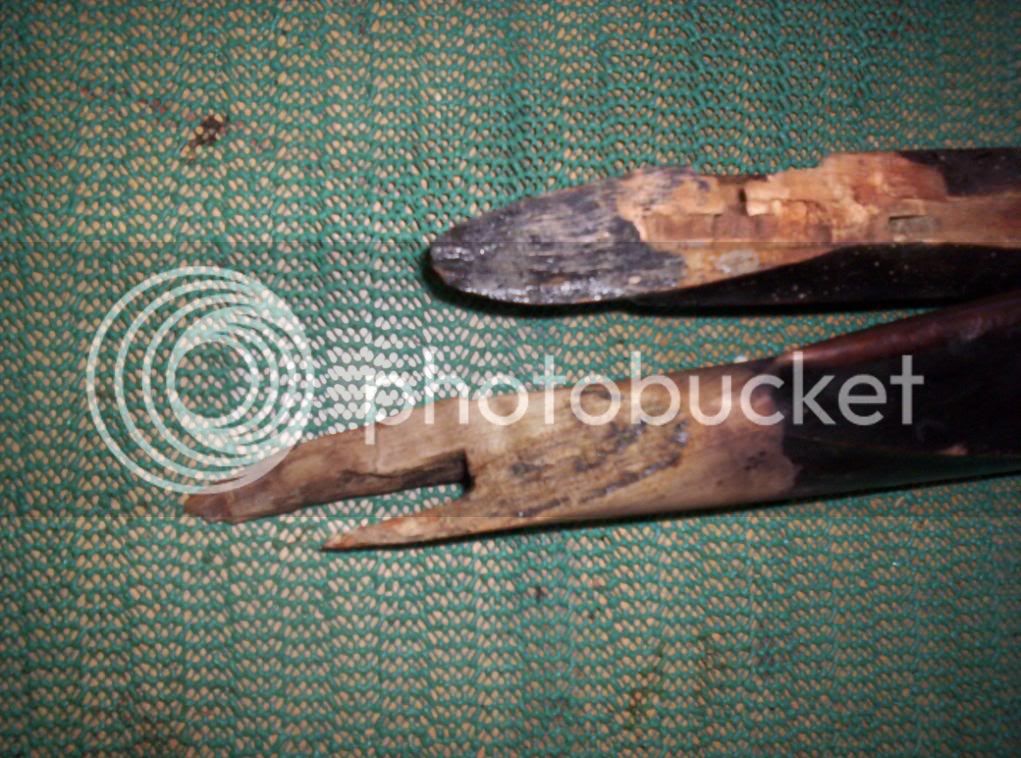
What I saw on Dons countertop was beyond anything I could have imagined. There were two black and I do mean black pieces of what resembled an M/L rifle held together by the pins of a badly twisted triggerguard. Both sides of the gapping break showed this white foam from the Gorilla glue and it had also engulfed the set triggers. There was another open split in the stock at the lower butt plate screw.
The first silly thing that passed thru my mind was, "Who the hell was the stupid idiot that painted that rifle black?" Even the metal parts, butt plate, nose cap, etc. were black. Even the barrel was half black and half rust.
Don sez, "I tried some gorilla glue and clamps but couldn't get it together. Think you can fix it enough to hang it on the wall? I'd hate to pitch it out; it's been in the family a long time."
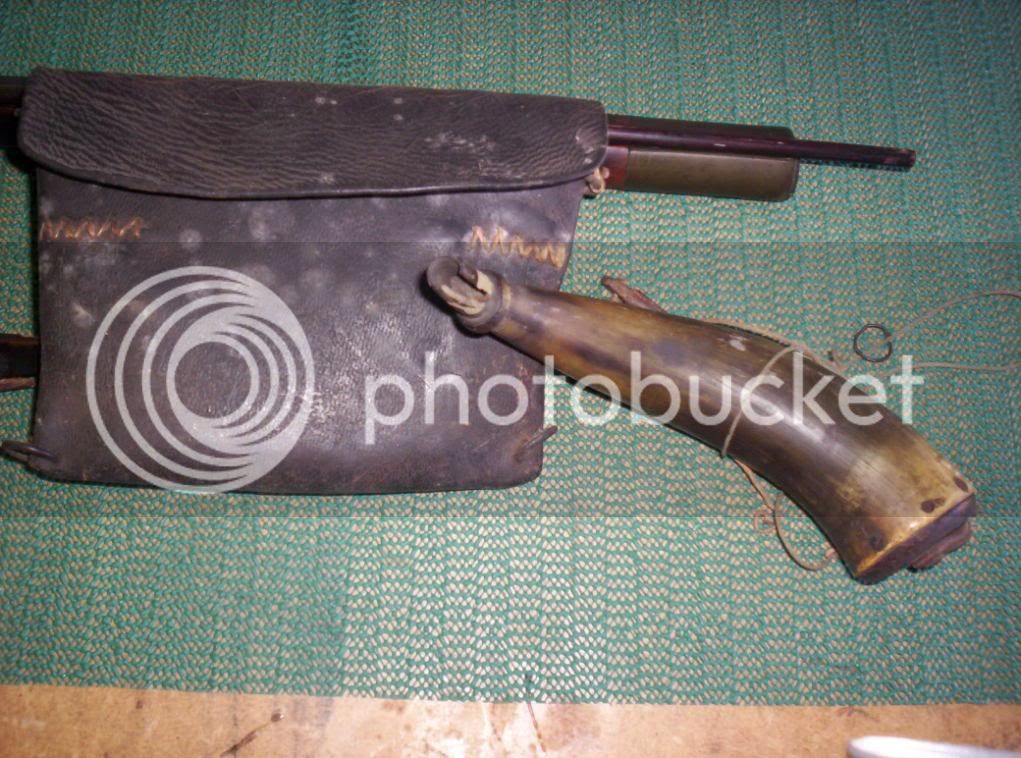
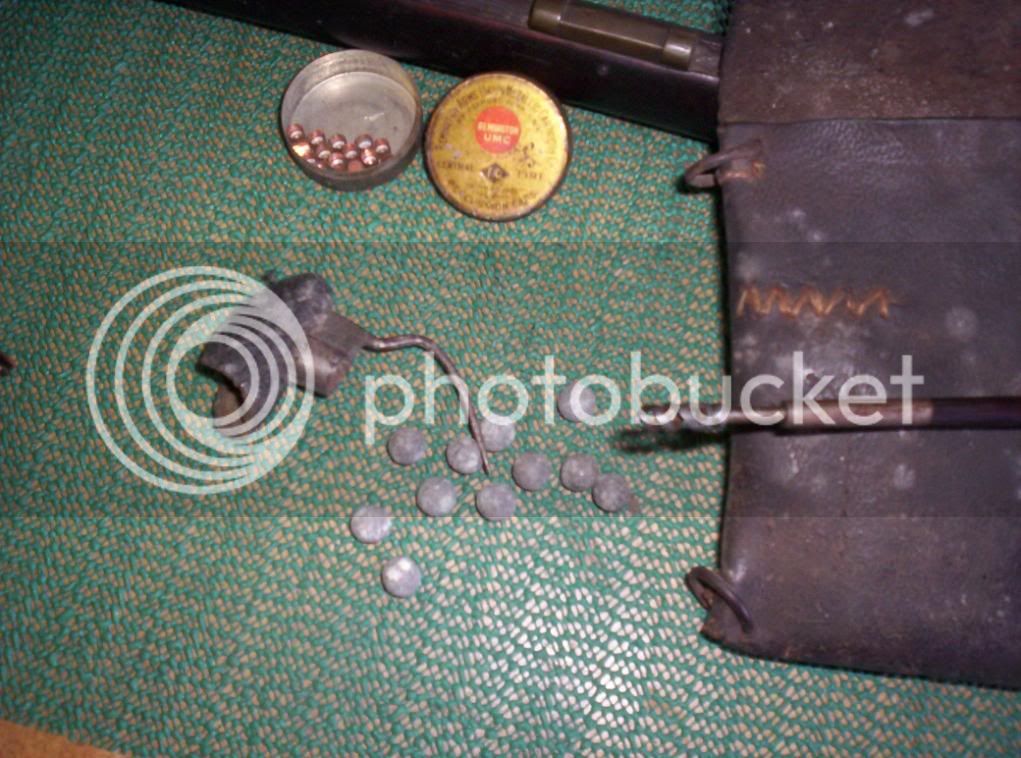
Another surprise, Don brought out this small pouch and powder horn. The leather was stiff as a board, but the contents were a joy to behold. Some old out of round lead balls that miked .32 to .38. Some old Rem. foil lined caps; you guys remember those, that’s why you needed that home-made nipple pick, to fish out the foil. That little horn still had about 3-4 ozs. of 3F inside. Look at that handmade, reversible worm on the ramrod, can't get those anymore.
I’ve been addicted to this forum for the past 7-8 mo now. From the many comments made and sentiments expressed, I know one thing for sure, all over this country and even abroad there is a host of you, who like me, have this unexplained, maybe even unreasonable LOVE for the AMERICAN LONGRIFLE. No way in the world was that poor old broken gun going out in the BIG BLACK BARREL.
So I sez, "Don, I don't know how I'm going to do it, but I'd like to give it a
try."
Don sez, "Okay Frank, lets talk money."
I sez, "all I've got on me is $100, will you let me do it for that?"
Don sez, "Well, If that's all you can come up with, I'll take it!"
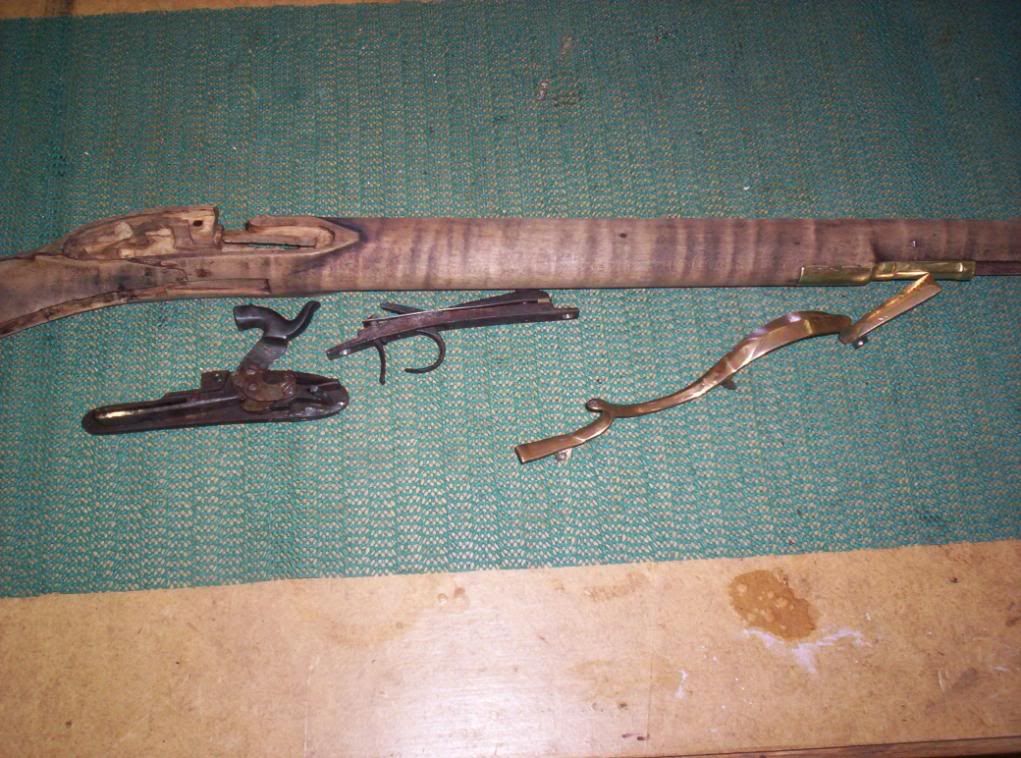
I'm sorry now that I didn't think of taking pics until I had already started some of the repair. I think most of you can visualize the 2 pieces held together by the trigger guard pins.
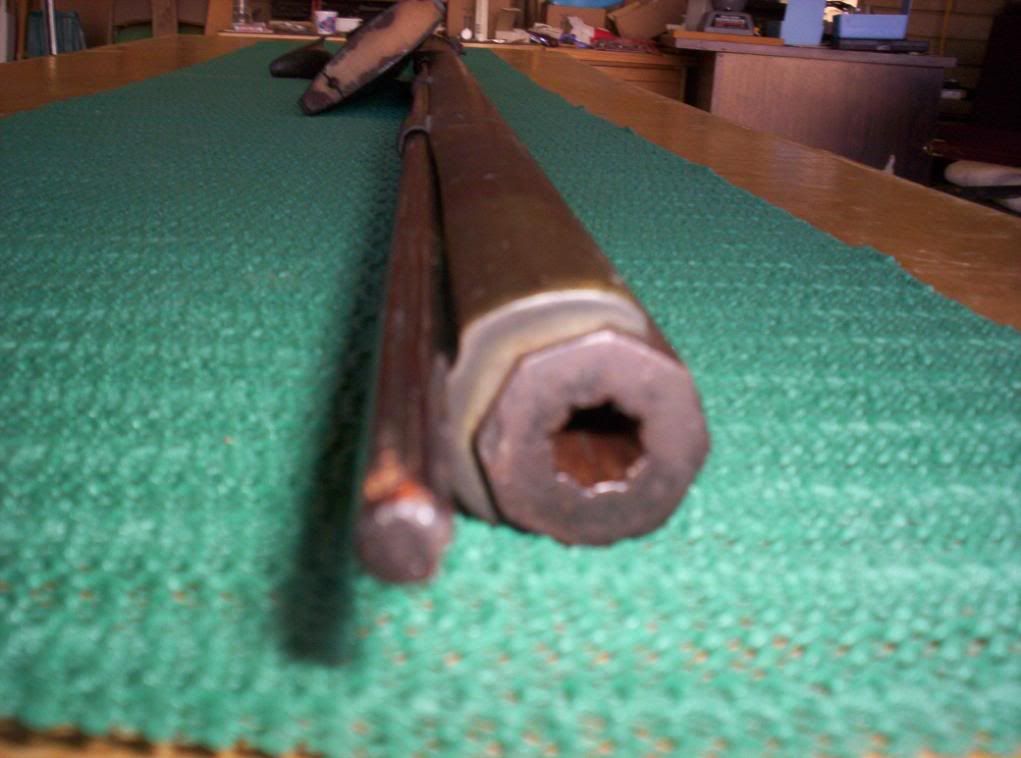
I clamped the barrel upright in my vise, plugged the nipple, and poured it full of Hoppes copper solvent cleaner. I'd pour it out, scrub with a brass brush, fill again and repeat many times over the next few weeks. When the bore felt very smooth on a tight patch I did the soap and hot water bit, then greased the bore with RIG. The outside was carefully scrubbed with oily steelwool””looking for some ID, there is none. There is some nice line engraving aft of the front sight and fore and aft of the rear. The sights are right down on the barrel, 1/8 to 3/16 high. The only ID I could find is on the cheekpiece inlay, "W. Potts" in script. There is a very fine braze line from snail to barrel which is 37 1/2 in. ID and .36 cal.
To remove the glue, I first tried a lye solution, Easy-Off oven cleaner. It would soften the gorilla glue somewhat, so with MUCH patience, dental picks, and a toothbrush, the glue was removed and at the same time the black stain was that was in the break came out. It finally dawned on me, what some of you pros probably knew right off the bat, linseed oil turns black when its been in someone’s attic for the last 150 yrs! There must have been a split in the wrist that was never repaired, and the oil seeped into the crack which also turned black. So it was very simple to spray some Easy Off on a rag and wipe down the stock. All the black came off with a few swipes. The brass just gleamed, all except the trigger guard which is red, good old copper; maybe you can see the difference in the pics. It's much too soft for bronze, can be bent very easily which was a help when putting everything back together. Yes, Zonie, I did remember to neutralize the lye with vinegar. Things were starting to look up!
The wood itself had no sharp memory left after getting off the glue; it would just slide with any pressure applied. The only accurate memory was with the triggers and lockplate in place. I had cleaned-up the set triggers with an Xacto and dental piks. With the trigger installed in the butt section and the lock in the fore end I could hold the rifle fairly solid. The old smith had counted on the trigger guard to hold up the front of the trigger plate, so I drilled and countersunk a hole there. Then I eased out the football shaped thumb inlay in the top of the wrist.
Now, I needed some help. I collared Tom Slaughter the head shotgun instructor for the Scholastic Clay Target Program sponsored by our Chandler Rod and Gun Club in conjunction with the Az. Game & Fish Dept. Tom has a 12 gauge Pedersoli. When we start a new SCPT in the fall Tom loads up the 12 gauge and shows the kids how it use to be, there's nothing like a BOOM-BOOM and six drams of black powder smoke hanging in the air to get the new kids attention.
I held the 2 pieces together; Tom drilled a pilot hole in from the trigger plate flange, then ran in a wood screw. I carefully turned the rifle over, same thing in the inlet of the wrist inlay, pilot hole, countersink, wood screw. It felt solid; I cocked the hammer, set the back trigger, touched the front trigger, BINGO hammer hits dead on.
The glueup was straight forward. I marked a pencil line about 1/4 inch in from the edges of the break and cut opposing dovetails in front and back with a 37 inverted cone dental burr. This would give an epoxy dovetail lock to the pieces top to bottom. To be able to do the glueup the metal had to be in place, so I covered the set trigger mechanism with beeswax to keep out any glue overrun on the inside where I couldn't see. Some 3 hr. epoxy with some burnt umber for shade, screw it together and PRAY! This project had me praying quite a bit more than normal.
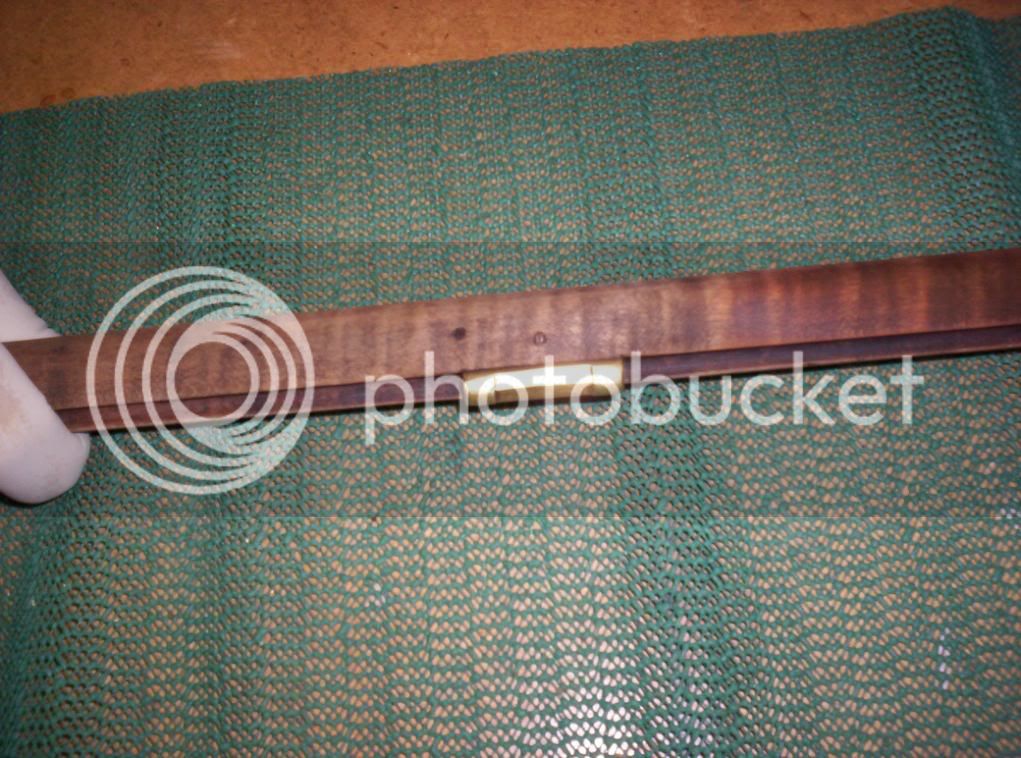
I was patient enough to actually wait 5-6 hrs to check it out. After cleaning off all the wax and putting everything back together, everything worked great. Look at that notch in the butt plate for a patchbox lid. The old smith must have bought his parts from various vendors just like we do. After rubbing in 4-5 coats of Tru Oil I knocked off the heavy shine with a light wipe of steel wool. I just wanted the old rifle to look like it was shot hard and put away oiled.
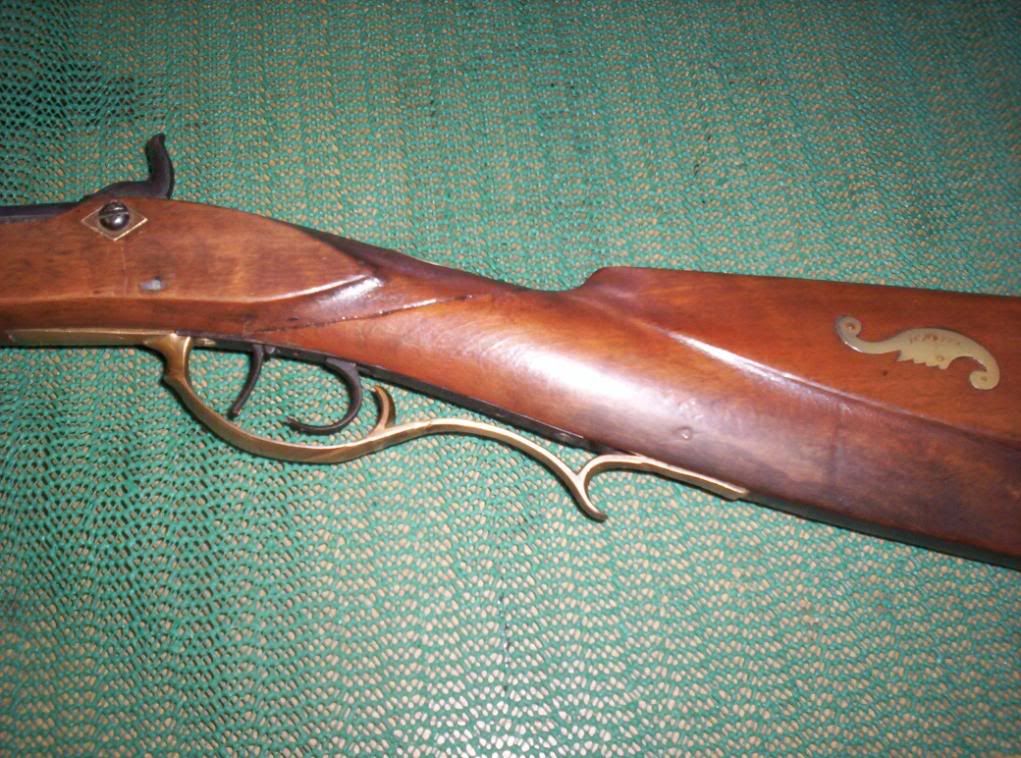
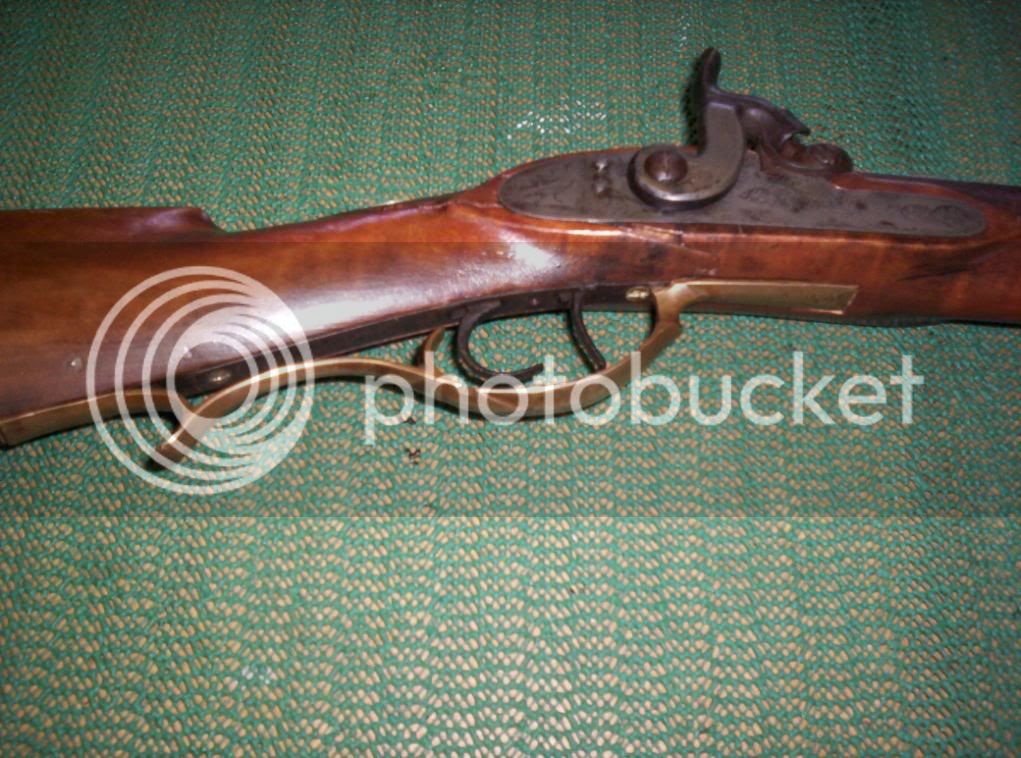
The lockplate has 2 turkeys engraved behind the hammer and some classic scrolls on the front flange. The hammer has scroll engraving and was gilded somehow. IMHO it looks like hell and out of place. I didn't try to polish any of the metal or attempt to disguise any of the repair, in fact I engraved my name and date on the bottom flat of the barrel, also in the wood under the breach. Maybe some of you know of a W. Potts, Don thinks his people originally came from the Southern Ohio or West VA area.
Don was very surprised and happy the way his rifle turned out, he even gave back my $100. He worked the triggers a few times and said "boy I'd like to shoot that thing a few times." Uh-oh!!! The deal was to fix it enough to hang on the wall, getting it to work enough for show and tell for neighbors and friends was my idea but I never thought about shooting it when I was soaking the barrel with Hoppes copper solvent. I don't know what that might have done to the braze joint. I never did try to remove the nipple, it's still nicely rusted in.
Maybe Don will forget about the shooting part. It's intriguing though, getting the old rifle to drop a few more squirrels before it's hung on the wall for good. I’ve never had to work on an old barrel, give me some advice folks, I need some good reasons to discourage Don from blowing up all my hard work.
Sincerely, Wirewiz
I was informed of this forum by ZONIE at the Western Regional in Phoenix. this year. I think that I’ve been through every forum and post, many 3-4 times, the symptoms of relapsed addiction for sure. I can see that a person needs a computer just to keep track of all the vendors. It wasn't that way back in '56 when I first held and fell in love with a caplock rifle. The feeling I had holding that rifle, was about the same as the first girl I held, "I just gotta get me one of these!"
I built my 1st M/L exactly 50 yrs ago this summer. It was and is the original Dixie Squirrel rifle kit, the 40 X 40 X 40. That is 40 cal, a 15/16 40 inch barrel and a finished rifle that feels like 40lbs. When you get it propped up and pointed in the right direction it will drive tacks all day. The kit didn't come in a nice box with all the parts & instructions laid out. That’s another long story for another time.
Since then I've built a flinter from scratch, and a couple of Hawken kits, nothing earth shattering. I am now semi-retired and have been doing some stock carving and wire inlay work. I'll post some pics on that some other time.
A couple of months ago my daughter Phyllis told me her neighbor Don had an old M/L that had been in the family for many yrs, from one attic to another across the country.
He said there was a break in the wrist and wanted to fix it enough to hang on the wall.
He had tried to repair it with gorilla glue but that hadn't worked out too good.
Would I be willing to take a look?--why I'd be happy to!
What I saw on Dons countertop was beyond anything I could have imagined. There were two black and I do mean black pieces of what resembled an M/L rifle held together by the pins of a badly twisted triggerguard. Both sides of the gapping break showed this white foam from the Gorilla glue and it had also engulfed the set triggers. There was another open split in the stock at the lower butt plate screw.
The first silly thing that passed thru my mind was, "Who the hell was the stupid idiot that painted that rifle black?" Even the metal parts, butt plate, nose cap, etc. were black. Even the barrel was half black and half rust.
Don sez, "I tried some gorilla glue and clamps but couldn't get it together. Think you can fix it enough to hang it on the wall? I'd hate to pitch it out; it's been in the family a long time."
Another surprise, Don brought out this small pouch and powder horn. The leather was stiff as a board, but the contents were a joy to behold. Some old out of round lead balls that miked .32 to .38. Some old Rem. foil lined caps; you guys remember those, that’s why you needed that home-made nipple pick, to fish out the foil. That little horn still had about 3-4 ozs. of 3F inside. Look at that handmade, reversible worm on the ramrod, can't get those anymore.
I’ve been addicted to this forum for the past 7-8 mo now. From the many comments made and sentiments expressed, I know one thing for sure, all over this country and even abroad there is a host of you, who like me, have this unexplained, maybe even unreasonable LOVE for the AMERICAN LONGRIFLE. No way in the world was that poor old broken gun going out in the BIG BLACK BARREL.
So I sez, "Don, I don't know how I'm going to do it, but I'd like to give it a
try."
Don sez, "Okay Frank, lets talk money."
I sez, "all I've got on me is $100, will you let me do it for that?"
Don sez, "Well, If that's all you can come up with, I'll take it!"
I'm sorry now that I didn't think of taking pics until I had already started some of the repair. I think most of you can visualize the 2 pieces held together by the trigger guard pins.
I clamped the barrel upright in my vise, plugged the nipple, and poured it full of Hoppes copper solvent cleaner. I'd pour it out, scrub with a brass brush, fill again and repeat many times over the next few weeks. When the bore felt very smooth on a tight patch I did the soap and hot water bit, then greased the bore with RIG. The outside was carefully scrubbed with oily steelwool””looking for some ID, there is none. There is some nice line engraving aft of the front sight and fore and aft of the rear. The sights are right down on the barrel, 1/8 to 3/16 high. The only ID I could find is on the cheekpiece inlay, "W. Potts" in script. There is a very fine braze line from snail to barrel which is 37 1/2 in. ID and .36 cal.
To remove the glue, I first tried a lye solution, Easy-Off oven cleaner. It would soften the gorilla glue somewhat, so with MUCH patience, dental picks, and a toothbrush, the glue was removed and at the same time the black stain was that was in the break came out. It finally dawned on me, what some of you pros probably knew right off the bat, linseed oil turns black when its been in someone’s attic for the last 150 yrs! There must have been a split in the wrist that was never repaired, and the oil seeped into the crack which also turned black. So it was very simple to spray some Easy Off on a rag and wipe down the stock. All the black came off with a few swipes. The brass just gleamed, all except the trigger guard which is red, good old copper; maybe you can see the difference in the pics. It's much too soft for bronze, can be bent very easily which was a help when putting everything back together. Yes, Zonie, I did remember to neutralize the lye with vinegar. Things were starting to look up!
The wood itself had no sharp memory left after getting off the glue; it would just slide with any pressure applied. The only accurate memory was with the triggers and lockplate in place. I had cleaned-up the set triggers with an Xacto and dental piks. With the trigger installed in the butt section and the lock in the fore end I could hold the rifle fairly solid. The old smith had counted on the trigger guard to hold up the front of the trigger plate, so I drilled and countersunk a hole there. Then I eased out the football shaped thumb inlay in the top of the wrist.
Now, I needed some help. I collared Tom Slaughter the head shotgun instructor for the Scholastic Clay Target Program sponsored by our Chandler Rod and Gun Club in conjunction with the Az. Game & Fish Dept. Tom has a 12 gauge Pedersoli. When we start a new SCPT in the fall Tom loads up the 12 gauge and shows the kids how it use to be, there's nothing like a BOOM-BOOM and six drams of black powder smoke hanging in the air to get the new kids attention.
I held the 2 pieces together; Tom drilled a pilot hole in from the trigger plate flange, then ran in a wood screw. I carefully turned the rifle over, same thing in the inlet of the wrist inlay, pilot hole, countersink, wood screw. It felt solid; I cocked the hammer, set the back trigger, touched the front trigger, BINGO hammer hits dead on.
The glueup was straight forward. I marked a pencil line about 1/4 inch in from the edges of the break and cut opposing dovetails in front and back with a 37 inverted cone dental burr. This would give an epoxy dovetail lock to the pieces top to bottom. To be able to do the glueup the metal had to be in place, so I covered the set trigger mechanism with beeswax to keep out any glue overrun on the inside where I couldn't see. Some 3 hr. epoxy with some burnt umber for shade, screw it together and PRAY! This project had me praying quite a bit more than normal.
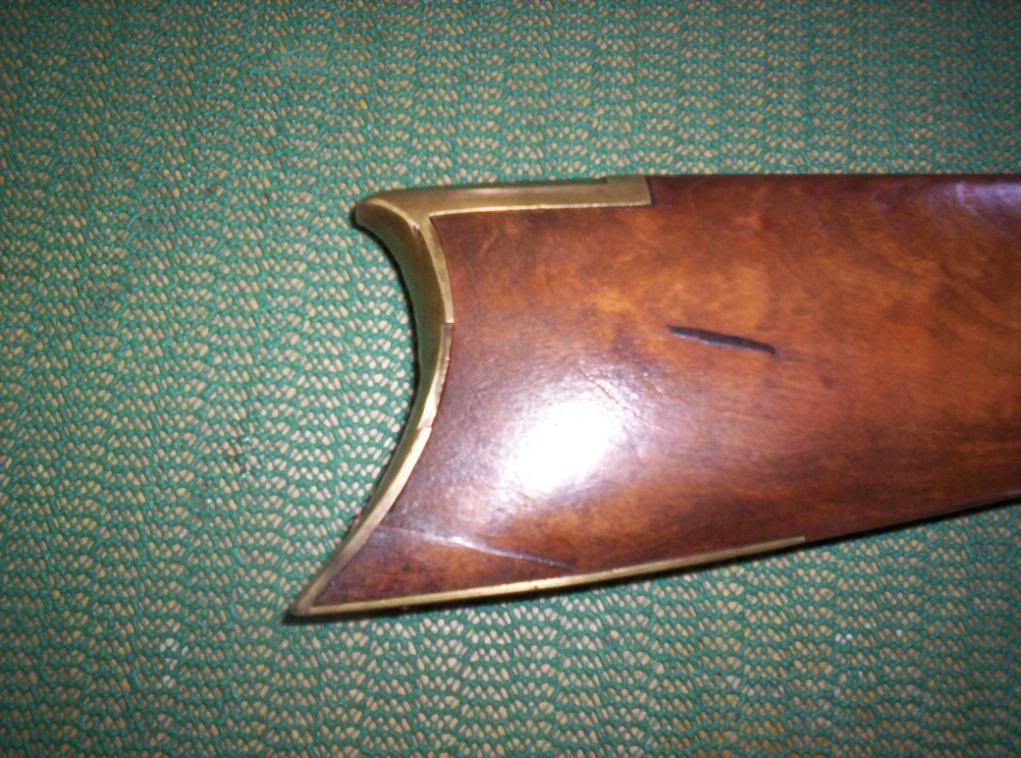
I was patient enough to actually wait 5-6 hrs to check it out. After cleaning off all the wax and putting everything back together, everything worked great. Look at that notch in the butt plate for a patchbox lid. The old smith must have bought his parts from various vendors just like we do. After rubbing in 4-5 coats of Tru Oil I knocked off the heavy shine with a light wipe of steel wool. I just wanted the old rifle to look like it was shot hard and put away oiled.
The lockplate has 2 turkeys engraved behind the hammer and some classic scrolls on the front flange. The hammer has scroll engraving and was gilded somehow. IMHO it looks like hell and out of place. I didn't try to polish any of the metal or attempt to disguise any of the repair, in fact I engraved my name and date on the bottom flat of the barrel, also in the wood under the breach. Maybe some of you know of a W. Potts, Don thinks his people originally came from the Southern Ohio or West VA area.
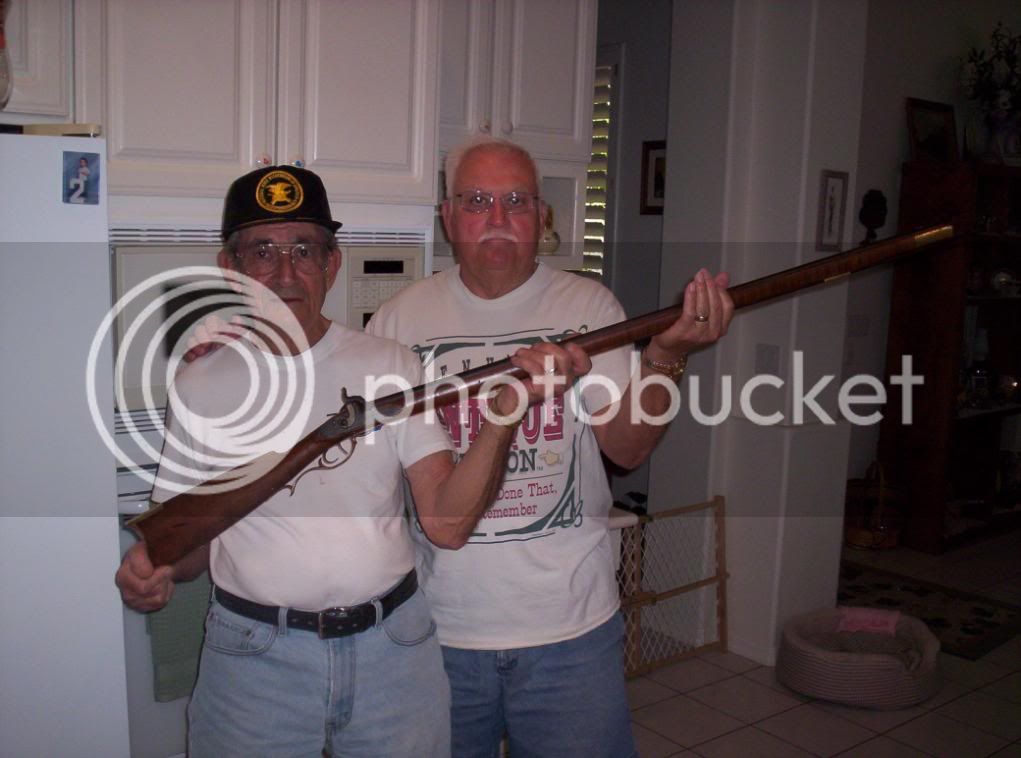
Don was very surprised and happy the way his rifle turned out, he even gave back my $100. He worked the triggers a few times and said "boy I'd like to shoot that thing a few times." Uh-oh!!! The deal was to fix it enough to hang on the wall, getting it to work enough for show and tell for neighbors and friends was my idea but I never thought about shooting it when I was soaking the barrel with Hoppes copper solvent. I don't know what that might have done to the braze joint. I never did try to remove the nipple, it's still nicely rusted in.
Maybe Don will forget about the shooting part. It's intriguing though, getting the old rifle to drop a few more squirrels before it's hung on the wall for good. I’ve never had to work on an old barrel, give me some advice folks, I need some good reasons to discourage Don from blowing up all my hard work.
Sincerely, Wirewiz
")
