• This community needs YOUR help today. We rely 100% on Supporting Memberships to fund our efforts. With the ever increasing fees of everything, we need help. We need more Supporting Members, today. Please invest back into this community. I will ship a few decals too in addition to all the account perks you get.


    Sign up here: https://www.muzzleloadingforum.com/account/upgrades
  • Friends, our 2nd Amendment rights are always under attack and the NRA has been a constant for decades in helping fight that fight.

    We have partnered with the NRA to offer you a discount on membership and Muzzleloading Forum gets a small percentage too of each membership, so you are supporting both the NRA and us.

    Use this link to sign up please; https://membership.nra.org/recruiters/join/XR045103

Real basic engraving tool on steel.

Muzzleloading Forum

Help Support Muzzleloading Forum:

This site may earn a commission from merchant affiliate links, including eBay, Amazon, and others.
Joined
Jan 30, 2014
Messages
799
Reaction score
15
I am building an muzzleloader with iron furniture. How is it to engrave steel versus brass.

I am a bit lost what engraving tools to buy. I am making pretty much straight lines just to add a bit more detail. It'll kind of look like this.

------------------
//////////////////
------------------

If I can make the trigger ends look like that OK. I may make a pin stripe like outline around the lock plate. The width and depth of the engraving will more or less be as thick and deep as the lines of the letters I am typing.

The longer horizontal line I will make with a jewelers file. The angled short lines is where the engraving tool will come into play.

Should I pass it all together and wait until I build a brass rifle to start engraving.

Also, can I build the rifle, brown the metal parts, and then go back and engrave a year or two later once I start building the skill on other things.
 
Mild steel is a lot easier to engrave than brass.
Not all mild steel is equal neither is brass.
 
Get some practice on same steel scraps. Sharpen a triangle or 4 side file on diamond stone and try some cuts.....Or buy some gravers from Track or ?????
 
That's the question, what are a few good engraving tools to get. All different shapes and sizes.

Let's say just two or three different types.

Also, what kinds of metals accurately depicts the cast iron furniture on a typical muzzleloader.

Can I use brake rotors, mild steel stock?
 
I was thinking about doing some engraving, myself, and ordered some from TOW. I went to talk with an experienced builder. He said, those are fine for tiny finish detail work, but I just make my own from lathe tools or whatever is laying around, that I can sharpen and shape into a tool that I can use. I came away, with nothing, and gave up on the whole idea. You can research, some engravers on-line, and then you'll just have to practice on scrap. I gained a whole new respect for engravers,... they are true artist.
 
I will second your comments, hadden. I bought some Geshwein (sp?) gravers of different sizes.
The first thing you need to learn is how to properly sharpen the darn things. I bought Schippers book and it provided some good insight. I have practiced some on a sheet of brass. It's going to take ALOT of patience and time to get to where I will feel comfortable working on a gun. But I think it is worth the effort.
Like you said, I have a whole new and huge respect for those that are accomplished at the art of engraving. :bow:
 
Get yourself some books on the subject. Schippers book is a real good start. The web site the engravers cafe is a good forum to cruise too. Along with learning how to sharpen your tools, three of the most important elements to good engraving are; an ability to see your work up close, good lighting, and a comfortable working position. After that, patience and practice. You need to be able to draw what you are going to engrave too. Mild steel is easier to engrave than brass because tools don't have the tendency to dig in it, and the metal seems to cut more cleanly than brass, which has a tendency to bend more. A case in point is that you break off far more drill bits in brass than you do in steel. Getting evenly spaced chicken tracks of a border is a little more tricky than you think it is, (as is any symetrical design) so give it some practice first. Learning how to cover up mistakes well is the hallmark of any artist.
 
You should get Jack Brooks DVD on beginning engraving. Track has it, or others. He breaks it down simply AND shows how to make gravers from files. I went by it and now I can sign my name---sort a. Don't be intimadated--Early colonial engraving is/was not European guild class work. ...Tom
 
If you want to make a V cut (actually for me it would be a nail nick on a folding blade), what would be the correct engraving tool? Who sells them, Brownells? Some one else?
 
Tom Knight said:
You should get Jack Brooks DVD on beginning engraving. Track has it, or others. He breaks it down simply AND shows how to make gravers from files. I went by it and now I can sign my name---sort a. Don't be intimadated--Early colonial engraving is/was not European guild class work. ...Tom

As far as gun makers maybe, but look up Paul Revere's work for super fine engraving.
 
A square, or triangular graver of 3/32" to 1/8" stock. You could go heavier if that is all you'll use it for. Mount it in a hardwood or metal cylindrical grip. Use a very light weight hammer. I believe mine weighs 3oz total weight, with an added 1" face. A graver from an old tri-corner file may cut a better nail notch, as it won't cut as wide a crescent on the low side. You will have to cut and guide the graver at a slant. If you use a file, you may need to very lightly temper it to reduce chipping. FDJ Jewelers Supply, very near you, carries good graver blanks, ready to shape and use.
 
Buy a #9 Die Sinker Chisel. Send it to someone on here & have them sharpen it for you. Then take a Closeup photo of it,
so you know what to bring it back to. Then start practicing on metal.

That will do ALLOT of basic engraving & they are tough chisels.

Sharpening any of them is the difficult part, for me anyway. Takes patience & I run short on that when sharpening them.
Which is why I don't do much of it.

Keith Lisle
 
I want to thank both you and Wick. I have some old triangular files that I can fit with a wood handle and I have a very lightweight hammer from Brownells that ought to work fine. I never thought about canting a triangular file so that you get a straight cut into the metal on top and the slanted angle on the bottom. That ought to work out fine.
Because my skills don't gravitate towards being artistic I am thinking about making a circular template and clamping that on the blade and then engraving against that. The idea being in cutting a curve I don't want the tool to slip off the curved path at a tangential angle. I was thinking to first use a scratch awl to make a light line on the surface of the metal and then multiple passes with an engraving tool to deepen as desired. I'll practice on scrap steel before working on the blade.
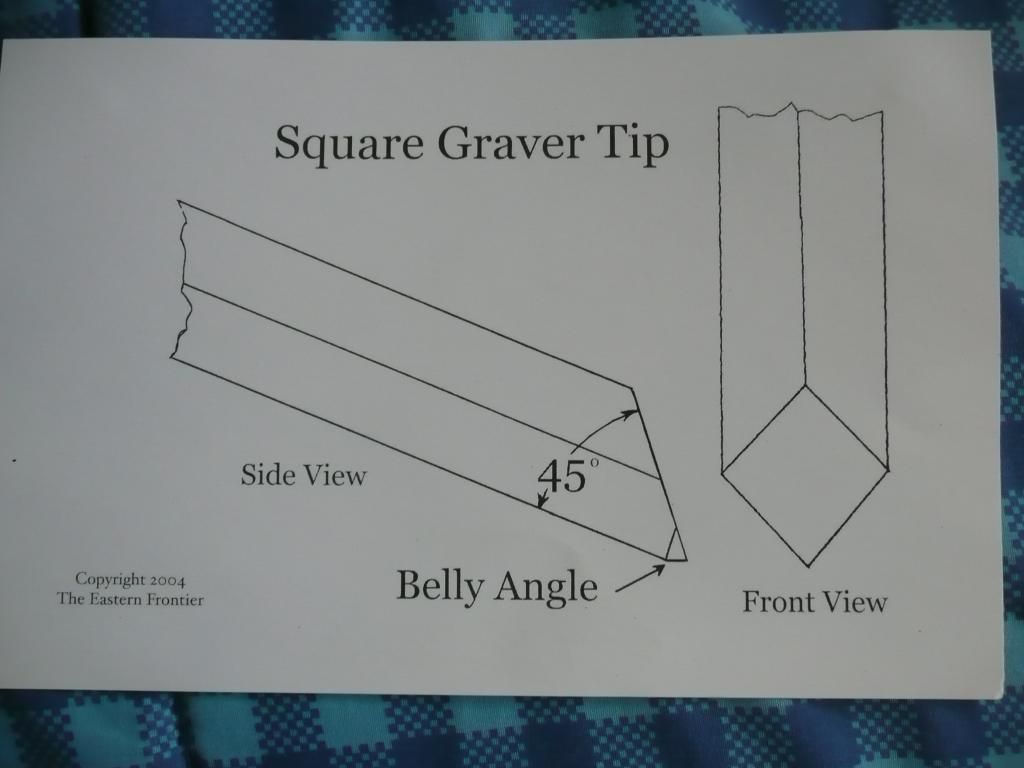
On the triangular file- should the tip be ground flat to create a 90 degree cutting surface or should the tip (end-face) be ground at a slant? I would do the grinding on an electric grinder but use water every few seconds to keep the metal from overheating and losing its temper.
I appreciate all the help. First I thought I could grind in a nick with a Dremel. I did that on my first folder and it is "okay" but I wasn't really happy with it. Then I was thinking about a metal stamp but I have read stamping can impact the blade and I could possibly screw up the effort. This idea of engraving- I think (for me) that is the answer.
 

From Jack Brooks DVD, put a slight bevel on belly so graver won't dig straight down and come out at end of cut....Tom
 
Yes to the above on knight's post. The length of that heel need not be more than .015 long. Some say a 50° angle on the face is stronger. Polish the angles to at least 600 grit, and keep them true and flat. Finer grit would be even better, followed by stropping with green chrome rouge embedded in a piece of flat hardwood. I'd forget the jig, and just scribe and practice. On the 45° face, after getting the angle established true, you can cut away the upper portion, 2/3's to 3/4's, then you have less area to keep polished. Just grind a scoop out of it. However, if the graver is of small stock, I wouldn't bother.
 
Thanks. I know I can spend a lot of $$$ and just buy tools but any $ you save on one item is money saved that can be used on something else. I made a lathe using ball bearing epoxied into a wood box and homemade socket for mounting the work, powered by a hand drill clamped down- all for about $20 and it works fine for turning base plugs for powder horns. I've made drilling jigs, a whole bunch of stuff.
 
Thanks for the replies;

Although I see a lot of nicely engraved rifles online, even what seems simple ones. I think I am going to pass on doing this on gun parts.

I got enough to do and enough of a task not screwing up anything right now.

I will pick up that engraver and do some metal widdlin' sometime soon.
 
IMO, you've made the right decision.

Engraving is an art that must be learned and it takes time. It also takes some artistic talent to get the smooth, flowing lines we all admire.

I learned on my second rifle that an engraving tool can rapidly frinkle up a otherwise perfectly installed patchbox on my Reading rifle. :redface:
 
I have never seen a book or a video that explains why a graver has to be the way it is. In order to fully understand how to sharpen a graver a person should know why it needs to have that geometry. When I teach engraving that is a main concern. Everybody I have taught became a good engraver and some could even qualify for master level. Another thing important is to know metal and it's properties. Think. When you make a cut you are lifting the metal out of the cut. What happens when you try to cut too deep with a wood chisel. Most beginners try to cut too deep with a graver. One pass like that and the tool needs repair. It usually takes me about three days to explain sharpening gravers. 5 minutes doesn't get it done.
 
Back
Top