• This community needs YOUR help today. We rely 100% on Supporting Memberships to fund our efforts. With the ever increasing fees of everything, we need help. We need more Supporting Members, today. Please invest back into this community. I will ship a few decals too in addition to all the account perks you get.


    Sign up here: https://www.muzzleloadingforum.com/account/upgrades
  • Friends, our 2nd Amendment rights are always under attack and the NRA has been a constant for decades in helping fight that fight.

    We have partnered with the NRA to offer you a discount on membership and Muzzleloading Forum gets a small percentage too of each membership, so you are supporting both the NRA and us.

    Use this link to sign up please; https://membership.nra.org/recruiters/join/XR045103

Purveyor of Sheaths, Crudely Made

Muzzleloading Forum

Help Support Muzzleloading Forum:

This site may earn a commission from merchant affiliate links, including eBay, Amazon, and others.

SgtErv

50 Cal.
Joined
Nov 30, 2015
Messages
1,338
Reaction score
19
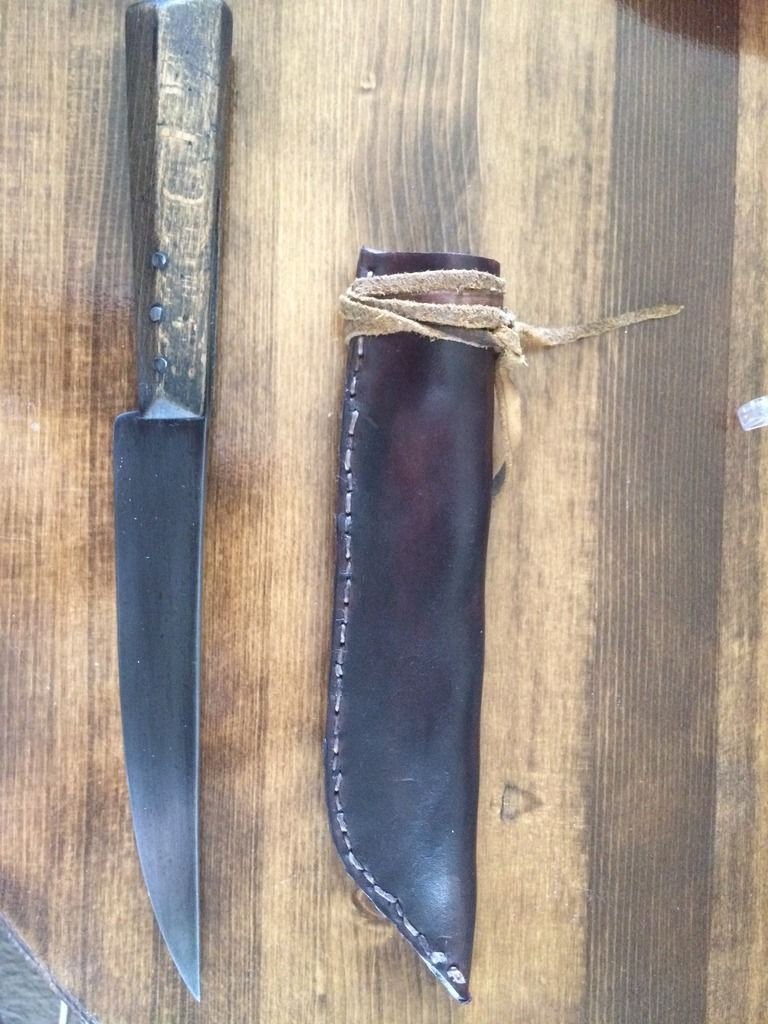
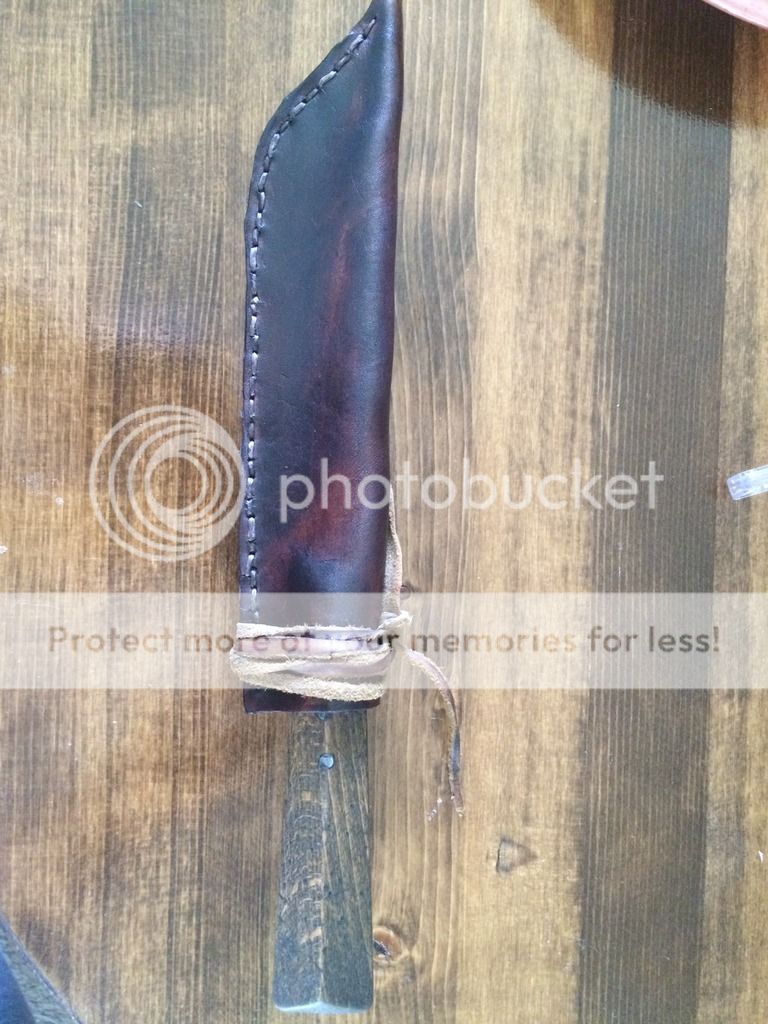
This is my third knife sheath Ive ever constructed. I did my eat, as the Old Dominion Forge English Trade Knife deserves a nice sheath. Mr. Willard makes a fine blade!

SgtErv, however, makes an indiffernt sheath!

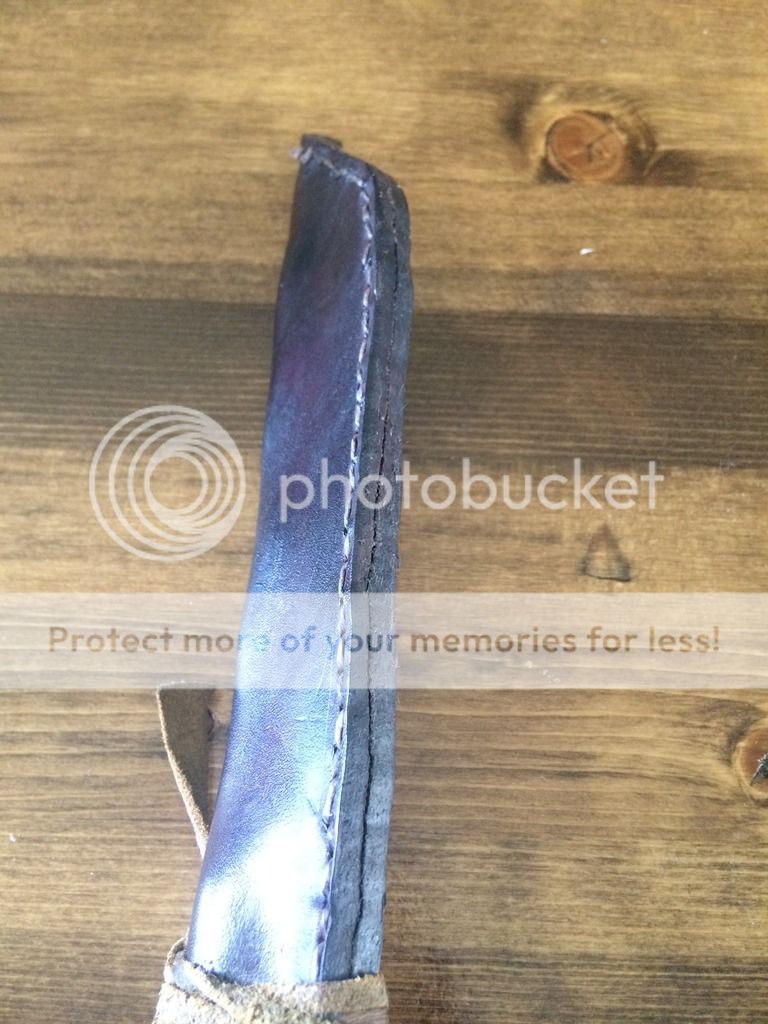
I used very thick veg tan leather (I think 7-9 oz), 5 ply waxed linen thread. I then trimmed the edges are burnished, but they separated a bit once it fully dried. It's dyed with Feiblings Walnut and sealed with Feibling's Leather Balm with Atom Wax.

The blade has some clearance so that it is not grazing the stitching, and the stitching is very tight. I cinched it down even tighter with a buckskin wang. Might be a fatal mistake though, eventually.

Lots and lots of room for improvement, but with every piece I learn some important things about technique. Biggest lesson for this one was that adequately punched holes are the key to even stitching.


It does indeed. I like the heavy, heavy leather for sheaths. With the edge on Mr. Willard's knife, it's necessary.
 
I like the knife and the sheath "kind of" fits the knife style :wink: . I take a piece of paper and draw my knife in the middle of the paper then I sketch a sheath 1/4" all around the blade - this will be my "stitch line" and fold line at the spine of the blade. I then add another line 1/4" at the blade's cutting edge. I then fold the paper at the line I drew at the spine of the blade. I then figure out what style of cover I want around the handle and draw that in. Then I cut out the paper pattern. The paper pattern is then tried on the knife - if it covers the knife the way I want I transfer the paper pattern to my leather which is from 7-8 oz to 9-10 oz veggie tanned. I wet and fold the leather around the knife - rub the leather to mold it to the knife while the leather is still very damp - let it dry - glue the two edges closed then stitch it shut.


That type of sheath really requires a welt. The welt protects against cutting the stitches. Nothing wrong with being a little crude. I would think most sheaths made by woodsmen of the period would not be a product of neatness, but rather of utility.
 
I could probably add one in when it's needed. Would a thinner leather for the welt be preferable or the same as is sued for the sheath?

Appreciate the comments everyone. Mr. Ellerbe, Zug - youre quite the craftsman!
 
:thumbsup: I was thinking that as I looked at the photos.overtime your knife will cut the stitches. However, it's no biggie. It will be some years before it happens. After my first one or teo(or dozen) I've learned to welt my seams.
 
I have used raw hide dog chews as a welt. Soak them in water to soften,then sew it up. When it dries you're good to go. :thumbsup:
 
I would suggest the same thickness, or more on sheaths using really thin leather. You could also use a few strategically placed, home made iron rivets, or staples along the seam. When the time comes again for need of a sheath, you might consider a center seam type. They are made about the same as you did, but are wet formed after sewing to have the seam up the center where the cutting edge of the knife cannot come in contact with the stitching.
 
I use a welt out of the same piece of leather.

I also use rubbing alcohol to wet the leather for molding to the knife. It drys faster than water.

For finish I heat the sheath in the oven to 170, apply with a small paint brush a melted mixture of 50/50 neats foot oil and bees wax, let it soak in, put sheath back in oven on tin foil. Do this a few times. I also shove the brush into the sheath to get some inside.

This will give the sheath a nice dark brown color, I never use dye. Makes it very water resistance with the bees wax soaked into the leather.

fleener
 
It's funny that a lot of these tips wouldn't have made sense before doing a few sheaths. Leatherwork is one of those things you can read a lot about and not grasp until you try it.

I'm going to guess that with such thick leather, a center deal may be more doable with my limited skills. Funny enough, that's how this one started. I did not transfer my paper pattern to a thicker cardboard and so didn't have enough leather to meet up. Lessons learned!

Appreciate the advice, fellows. I have learned more on this forum than anywhere else, as it has made my venture into traditional shooting and living history quite the well informed one. There's research to know what was, but sometimes the "how" it came to be escapes me.

I bet the beeswax/neatsfoot oil application looks pretty great, Fleener!
 
Wick Ellerbe said:
I would suggest the same thickness, or more on sheaths using really thin leather. You could also use a few strategically placed, home made iron rivets, or staples along the seam. When the time comes again for need of a sheath, you might consider a center seam type. They are made about the same as you did, but are wet formed after sewing to have the seam up the center where the cutting edge of the knife cannot come in contact with the stitching.

SgtErv,

I agree with Wick that if you leave that sheath as a “side seam” sheath, you need a welt in it. Yes, use the same thickness leather for the Welt as the rest of the sheath BECAUSE a thick leather welt is always preferable even when using thinner leather for the rest of the sheath. Just gives a little more protection when you draw the knife or return it.

I am definitely in agreement with Wick on the next sheath, trying wet forming the leather so the stitched seam runs down the middle of the back of the sheath. That style sheath was much more prevalent as the construction method for Trade/Scalping Knives.

Now, what we usually don’t talk about is WHY the sheaths were made that way. I have not found original documentation for it, but I believe it was to make the sheaths faster and actually cheaper than side seam sheaths with a welt.

As LaBonte and others have shown in the past, these sheaths were made in large numbers back in Britain and the Continent and were usually made on forms.

Now, by wet forming and turning the stitched seam in the center of the back, there was no requirement for a welt to keep the blade’s edge from cutting the stitches. The blade’s edge goes against the leather, instead. Further, by wet forming/mashing the edges of the leather on the outside of the stitches and down over the stitches, that protects the linen thread from abrasion without having to make a groove in the leather.

It is true that in the period they normally made these sheaths from about 5 oz. leather, but as Wick and others have suggested, a thicker leather like you used is going to be safer because it will be harder for the blade to cut through.

Looking at the sheath, here are two great videos I would suggest you study.

The first is on sharpening your awl, which it seems you are having a problem with because of how tough you have mentioned it is to go through the thick leather.
https://www.youtube.com/watch?v=CLsQTEZQaDE

This is one on Saddle Stitching. To get even/good looking stitches, you have to uniformly put one thread over the other and do it from the same side and same way each time. https://www.youtube.com/watch?v=TGuiha5S2oE

Neal Armitage has more great leather working instruction videos on YouTube and almost everyone can learn more by watching them.

Gus
 
Last edited by a moderator:
I use an awl made from a piece of music wire (or broken harness needle) set in a handle that is sharpened to a triangular point and the tip honed on a stone. The triangular point will easily go through thick leather and makes a hole that doesn't close on itself. Get rid of your round awl for leatherwork...
 
I use a drill press to drill out my holes for stitching when going through 3 pieces of thick leather.

fleener
 
Art, I just used that technique on a holster. Ran my stitching wheel down the seem to get my spacing, then chucked a small finish nail in the drill press and punched the holes. Made saddle stitching a piece of cake. Now if my puppy just hadn't chewed the Hades out of my spool of waxed linen ...

:doh:
 
I do add a welt to my sheaths as well and it is the same thickness as the leather I use for the sheath - the pattern for the welt is shown in the cardboard pattern picture. I also add two sheets of the pressed spacer material(?) - I think that's what it's called, on the inside of the sheath where the blade slides into to prevent the blade from cutting through the sheath when the knife is inserted.I glue this material to the leather where the blade rests. In the picture below it is the black stuff & it comes in 12" X 12" sheets of different colors & thicknesses. I also use it as spacer material as seen on the two knives (one black & one white handle knives). I transfered my paper pattern to a thin carboard so that I can use this pattern over & over without the pattern getting "buggered-up". NOTE: on the carboard sheath pattern in the picture the odd shaped cut-out is for a lock that I needed a pattern for in a hurry - it is not part of the knife sheath :grin: .

 
The use of a drill press is a must for me when I glue in the fiber spacer material on the inside of my sheaths -- you will NEVER get an awl or needle through it otherwise.
 
A triangular awl will easily go through 1/8" rawhide.

With an awl, I can position the hole exactly where needed and can "cheat" the hole a little to make it line up properly with equal spacing. Drill bits tend to wander. To me, drilled holes look messy/ragged and rarely line up properly.
 
Wick Ellerbe said:
That type of sheath really requires a welt. The welt protects against cutting the stitches. Nothing wrong with being a little crude. I would think most sheaths made by woodsmen of the period would not be a product of neatness, but rather of utility.

Agree. The sheaths I have made are pure utility. Nuttin' pretty about them. I use scrap leather for many projects. Leather jackets, boots and belts from resale shops are a good source. I cut and glue together with rubber cement and small clamps used for paper. Like others I make holes on the drill press. The holes can be smaller than the needle and don't even show after the stitching is done. BTW, I use a double needle stitch for strength.
 
Black Hand said:
A triangular awl will easily go through 1/8" rawhide.

With an awl, I can position the hole exactly where needed and can "cheat" the hole a little to make it line up properly with equal spacing. Drill bits tend to wander. To me, drilled holes look messy/ragged and rarely line up properly.

Definitely agree with Black Hand,

When I first started out sewing leather, I drilled holes in one sheath and punched 1/16 inch holes with a Star Punch in another. It did not look too bad, but drilled or punched holes always look like drilled/punched holes and they just did not do that in the 18th century.

When I visited Warwick Castle in the Midlands, UK in 1998 for the second time, they had a Medieval Faire going on. I watched a guy using an Awl to go through FOUR thicknesses of leather to sew up the handle of a Drinking Jack. That leather was 10-12 oz thick per piece and the awl went through it easily because it was polished and sharp. I have never sewn that many thick pieces together, but I have sewn three thicknesses of 8-9 oz using an Awl for the holes. It was easier and faster than using a drill or punch.

I used to think that drilled or punched holes were weaker than Awl pierced holes, but that is not true. The one thing Awl pierced holes do is close up better around the stitches, so the end result looks much better than drilled or punched holes.

I also made my first two Awls out of Drill Rod and they worked well, but the time it takes to make them is just not worth it compared to the cost of a high quality awl you can buy for not much money at all.

James Dixon arguably makes the best leather working tools with Osborne being a very close second, though some folks like Osborne better.

Here are awls by Dixon. I will NEVER again make an Awl when you can buy the correct size for different cord threads of linen thread for under Eight Bucks each!! http://boothandco.com/shop/item.php?prodID=16

Here is an Osborne Awl, http://boothandco.com/shop/item.php?prodID=173

BTW, the Booth website shown in the above links is the American distributor or James Dixon tools.

Gus
 
Last edited by a moderator:
Back
Top