


- Joined
- Mar 7, 2007
- Messages
- 648
- Reaction score
- 2,003
With every new ML catalog or magazine I have received over the years, I have anxiously looked for new products. But what I was looking for was very specific in that I wanted traditionally styled, well made parts, tools, and accouterments but also something new. I suppose that this was a bit unreasonable since we all enjoy a hobby centered around weapons and gear that was the cutting edge of technology 200 + years ago. Nonetheless, I never find as many new things as I would like. So, over the years, I have made many of the items I was looking for or that occurred to me along the way. Some of them were easy to devise and make, others took a fair amount of time and thought. This shooting tool was one of them.
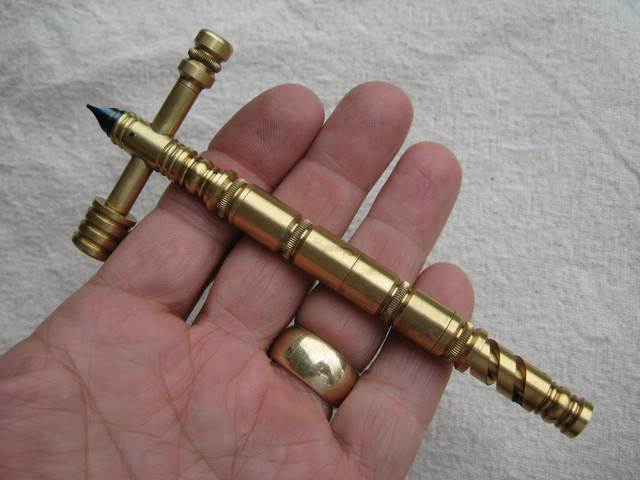
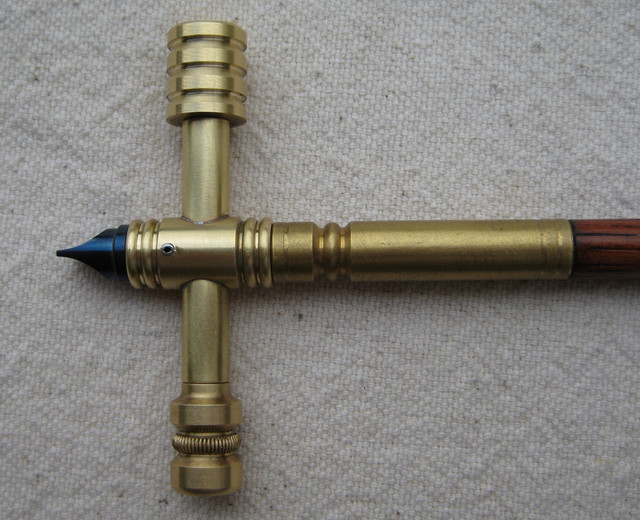
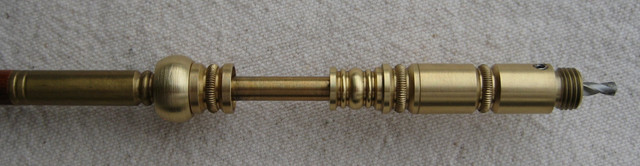
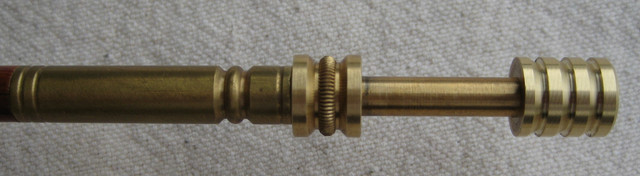
I have received several e-mails about this thing over time recently and have been asked to show how some of the features of the tool are used. The first photo shows the whole tool disassembled. The second shows it assembled and the third shows the "T" handle installed on one end of a ram rod. This has been the best and most useful addition I made to the original versions I built. You can put it on the rod when you need it and put it back in your pocket when you don't. And I tried to design it to be in keeping with the rest of a nice rifle. With cold hands or a rod slippery with patch lube, it makes pulling and pushing the rod a lot easier - especially trying to pull a ball. The vent pick is inside one leg of the "T" and, when not installed on the ram rod, the entire tool can be used like a hammer (very lightly) to knapp the edge of a flint. The end of the vent pick handle forms the face of the knapping hammer. The screw driver blade is permanently attached to the end of the "T" handle and the jag is stored on the opposite leg.

On the other end of the rod, various pieces are assembled as follows: To pull a ball, I use a ball drill first. This may seem like an unnecessary step to some, but wooden ram rods are not very stout in torsion. I have broken three (one a 5/16" and two 3/8") trying to drive a ball puller screw directly into solid lead. So, I added a ball drill - it takes very little torque to drill the ball with a few twists of the rod and the "T" handle is a huge help. The bore adapter (the little rounded collar) keeps the drill centered in the bore.
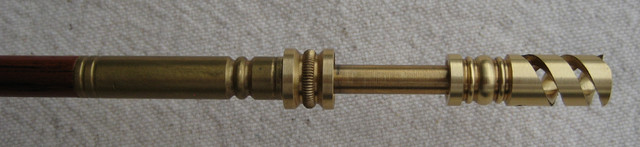
After a few twists with the drill, the rod is withdrawn and the ball drill unscrewed from the body of the tool. This exposes the ball puller which can be twisted into the drilled ball with a lot less torque. The added step and 20 grams of ball drill weight are well worth not ruining a day in the field by twisting a rod into jagged pieces.

The jag and the worm can be installed where the ball drill and puller were on the end of the ram rod adapter any time they are needed. These photos show the bore adapter still in place, but it is not needed when using either the jag or the worm.
I have received several e-mails about this thing over time recently and have been asked to show how some of the features of the tool are used. The first photo shows the whole tool disassembled. The second shows it assembled and the third shows the "T" handle installed on one end of a ram rod. This has been the best and most useful addition I made to the original versions I built. You can put it on the rod when you need it and put it back in your pocket when you don't. And I tried to design it to be in keeping with the rest of a nice rifle. With cold hands or a rod slippery with patch lube, it makes pulling and pushing the rod a lot easier - especially trying to pull a ball. The vent pick is inside one leg of the "T" and, when not installed on the ram rod, the entire tool can be used like a hammer (very lightly) to knapp the edge of a flint. The end of the vent pick handle forms the face of the knapping hammer. The screw driver blade is permanently attached to the end of the "T" handle and the jag is stored on the opposite leg.
On the other end of the rod, various pieces are assembled as follows: To pull a ball, I use a ball drill first. This may seem like an unnecessary step to some, but wooden ram rods are not very stout in torsion. I have broken three (one a 5/16" and two 3/8") trying to drive a ball puller screw directly into solid lead. So, I added a ball drill - it takes very little torque to drill the ball with a few twists of the rod and the "T" handle is a huge help. The bore adapter (the little rounded collar) keeps the drill centered in the bore.
After a few twists with the drill, the rod is withdrawn and the ball drill unscrewed from the body of the tool. This exposes the ball puller which can be twisted into the drilled ball with a lot less torque. The added step and 20 grams of ball drill weight are well worth not ruining a day in the field by twisting a rod into jagged pieces.
The jag and the worm can be installed where the ball drill and puller were on the end of the ram rod adapter any time they are needed. These photos show the bore adapter still in place, but it is not needed when using either the jag or the worm.
")
 I really like it.