• This community needs YOUR help today. We rely 100% on Supporting Memberships to fund our efforts. With the ever increasing fees of everything, we need help. We need more Supporting Members, today. Please invest back into this community. I will ship a few decals too in addition to all the account perks you get.


    Sign up here: https://www.muzzleloadingforum.com/account/upgrades
  • Friends, our 2nd Amendment rights are always under attack and the NRA has been a constant for decades in helping fight that fight.

    We have partnered with the NRA to offer you a discount on membership and Muzzleloading Forum gets a small percentage too of each membership, so you are supporting both the NRA and us.

    Use this link to sign up please; https://membership.nra.org/recruiters/join/XR045103

Making a 1770s British Rifled Officer's Fusil

Muzzleloading Forum

Help Support Muzzleloading Forum:

This site may earn a commission from merchant affiliate links, including eBay, Amazon, and others.
Hi,

Here are the original wrist plate and 2 copies. I cast the copies using the Delft clay casting system, which is essentially sand casting with a fine clay. I've described the method in other threads and it really gives me a lot of freedom because I am not restricted to the few designs available from commercial sources.
Ruqrhj7.jpg

I cleaned up one of the copies and readied it for inletting. That process involves cleaning and truing up all the edges and cutting and polishing some of the detail. The plate requires more detailing but I've done enough for inletting. Note that this plate has deep lobes shapes along the edge that flare. This is not an easy inlet and that process is harder because your are inletting on a round surface. As you cut the mortice in, the plate goes in but those features wrapped around the sides go in and down. Anything flared feature risks creating a gap behind the flare as the plate goes in and down. The trick is two-fold. First, cut the mortice in at the top of the wrist first so the plate moves down. Second, any feature, like the bugle on the lower right, that flares and wraps down the side, gently bend it up so you can inlet the top without that feature interfering. That is the way to also inlet pistol butt caps with long stirrups on the sides.
twHObjn.jpg

This shows the mortice outlined by my inletting chisel. I undersized the outline for the bugle flare at the lower right anticipating it will move down a little as I inlet the plate. This is a point of no return. I cannot fix it if I botch the job and all my previous work is wasted.
hHG98ou.jpg

Great relief!! The job ended very well. I have to file and detail the plate a bit in spots to bring it flush with the wood because the curvature did not match that of the wrist exactly. The blacking is from inletting black. I cannot handle the plate without getting it on my hands and spreading it to the wood. It really shows the checkering. Regardless, from here on out I have no fear. I am beyond that now and it feels great!!! The plate is anchored with a bolt through the wrist and into the threaded boss on the back side of the plate. The closeness of that bolt to the trigger guard lug emphasizes how important drawn plans are to prevent problems.
M5XozQb.jpg

DCKOhV5.jpg

LSWhQF9.jpg


dave
 
Hi,

A few details I wanted to share. The first photos shows the mortice for the wrist plate. As you can see, it is somewhat complicated. I had to file away some details on the plate to bring the metal down flush with the wood at some locations. This is because the radius of the plate differs a little from the wrist. I will cut those details back in later and it will look exactly like the original casting.
UR6aHMA.jpg

I did some drilling chores today. First, I drilled the rear pins anchoring the trigger guard. I use 5/64" spring steel rod for the pins.
woj8RX5.jpg

Next I drilled and installed the cross pin for the butt plate tang. The tangs were anchored either with a cross pin or the lug under the tang was filed into a hook that slid under a stud installed in the mortice. Rarely, if ever was a screw used like in long rifles. The only exception of which I am aware is the pattern 1757 marine and militia musket.
fCwctUn.jpg

zHso7LF.jpg

The next thing I did was drill for the cross pin anchoring the bottom of the standing breech. These breeches always had a cross pin on the bottom or a bolt threaded into the bottom of the breech that was hidden under the trigger guard or was used to anchor the front extension of the guard. The latter design was a feature from the 19th century.
s1t69mq.jpg

J4uIWFO.jpg

Unfortunately, most modern made standing breeches lack the under lug because modern manufacturers and many builders are ignorant of the correct design. The pin or bolt holds the breech down securely so a snug fitting hook on the barrel, which you should want, does not lever breech up during installation and removal of the barrel. Finally, I filed a decorative molding along the forward edge of the standing breech. The design is similar to one used by John Twigg and will be refined as I finish the gun.
ar2hxmU.jpg


dave
 
Hi,

Thanks for looking and kind comments. I put a brass rivet in the nose band to hold it in place and final detailed the stock. After sanding the stock with 220 grit, I finished the breech tang carving. Then I stained the stock with alkanet root infused in mineral spirits and double checked details and for scratches. Finally, I applied Sutherland-Welles polymerized tung oil that was thinned with mineral spirits and alkanet root stain. I applied the oil with 220 grit sandpaper. Sanding creates a slurry, which I will let dry overnight. Tomorrow, I will sand the stock smooth with 320 grit paper and the slurry will have filled the open grain of the walnut. After that process, I will assemble the rifle and check that everything still fits and works. Then I will apply unthinned tung oil until I build up a nice satin sheen. While the stock is drying, I will polish the brass, finish the wrist plate, mount the sights, polish and heat treat the lock, and engrave the hardware.

dave

9n11eOV.jpg

7Yxdc22.jpg

3z4y3qQ.jpg

k0hJp3d.jpg

ti0ja5W.jpg
 
Hi,

I stained the stock with alkanet root and a little golden maple oil soluble aniline dye. The color will be very nice and bring out the grain in the wood. I am still putting on coats of finish but am waiting until the current coat really cures. Then I will go back and refresh the checkering and add the 4 tiny dots in each large diamond. Lots, and lots, and lots, of dots....... After staining and the first coat of finish, I decided I did not like the way I shaped the bottom of the fore stock where it merges with the lock panels. I left it too flat looking and wanted a narrower curve that made a more pronounced knuckle at the front of the lock panels. So, I got out my rasp, files, scrapers, and sand paper and shaped it better. Then I stained and sealed it with finish. I am happy now. Today I finished detailing and polishing the wrist plate. I show the rough castings along with the original and then the finished plate on the left with the 255-year old original. It came out OK! There are a few minor differences but I think it is a keeper. More to come.

dave
Ruqrhj7.jpg

fbtPC38.jpg

bjIpEr3.jpg
 
Hi Folks,

Got a lot done on several projects. The wrist checkering is finished. I added a dot to each quadrant within a large diamond. That amounts to over 1,020 dots. It is a style used by Twigg, Durs Egg, Henry Nock and others during the last half of the 1770s and into the next decade. Eventually the little quadrants became stand alone diamonds and the dots were abandoned evolving into the flat topped checkering we associate with British work from the end of the 18th and throughout the 19th centuries. I have an original gun from the period with a simpler version of this checkering. The dots looked to me simple awl pricks that swelled and filled when finished and barely show. However, many guns with this checkering show prominent dots that still have depth despite finish. So I decided to make mine more than just awl digs. I marked each location with an awl and hand pressure, then deepened the hole with a pin punch and hammer. Then I made the hole larger with a larger punch. The result are dots that actually create a rough surface.
TMojGy1.jpg

rwAmrNL.jpg

tpURSTe.jpg

I finished engraving the side plate. It came out well. I engraved a twisted rope border around the shield and an "embowed arm holding a sword" on the shield. That is a heraldic symbol meaning courageous leadership in battle. It is perfect for an officer's fusil.

dave

68kGwj3.jpg
 
Hi,

I finished engraving the butt plate and fitting the screws. I think I captured the look and feel of English engraving from the mid 18th century. The rococo elements such as asymmetry, exaggerated leaves and scrolls, and shells are pronounced. Only small square and round gravers are needed. I engraved a thistle in the little frame near the heel of the plate. Perhaps the rifle was owned by a British officer from Scotland. The mounting screws were countersunk and then file flush with the brass. After fitting, I case hardened the heads and temper blued them. Tomorrow I finish the trigger guard.


dave
Kl8eHkq.jpg

g9HMsWT.jpg
 
Hi,

I got a lot done. The finish on the rifle is done and much of the engraving. I am working on polishing the barrel and installing the sights and bayonet lug. I have to use an existing repro British bayonet, cut off the blade, and weld it to a new socket that fits the barrel. I've assembled the rifle and checked all the parts. The trigger pull is 1.5 lbs with absolutely no creep. I still have to engrave the standing breech and trigger guard. I finished polishing, tuning, and finishing the lock. I case hardened the plate, cock, top jaw, and frizzen. During that process, I temper the frizzen to 375 degrees F but the rest to 600 degrees. I left the blue tempering colors on the plate, cock, and top jaw and when they were still warm, I rubbed them with boiled linseed oil and rottenstone. That fine polish deepens the color and gives a nice finish. It will eventually fade to a polished silver gray. I put a sole on the frizzen using a piece of 1095 spring steel, which was hardened. After cleaning up the cast frizzen and getting rid of rough areas on its face, it was too thin for my liking. It needed more mass. So I cut a sole, tinned the surface of the frizzen with Stay Bright low temp solder, and clamped the sole on top and heated until the solder flowed again. When cooled, I ground all the edges flush and clean everything up. Then I clamped the sole and frizzen and heated it all again to 375 degrees in my oven. That assures the sole is not too hard so that a flint does not cut it. I assembled the lock and tested everything. Even with flints too large (as in the photos) it showers the pan with abundant sparks over and over and over again. The over sized flint (I don't have any the right size) is held securely by the teeth I cut into the cock and top jaw. They are far superior to those useless ridges you see on some manufacturers flint cocks. The bend I put in the frizzen spring where the frizzen toe touches it acts to some degree like a cam. It creates good resistance to the frizzen moving until the toe goes over the hump and then that resistance diminishes. It is a bit like having a roller bearing on the spring or toe of the frizzen. The inside photo of the lock shows the crisp and precision fit of the parts. The lock is smooth as silk. I cut the edge molding around the lock plate and the flint cock. I have a lot of experience doing that and the molding is not a flat bevel. It is ovois in profile, which is much more difficult to produce but historically correct.

More to come.

dave
bmVPC9E.jpg

VPW3nOS.jpg

Y7pTsFe.jpg
 
That is very nice work indeed. I have been struggling with making a butt plate of approximately the same design. Struggling, because I have been trying to make it out of flat bronze plate.
But there is a lot to like about your rifle. The engraving particularly looks "period".
 
Hi,

Finished! The barrel is a D-weight Colerain Griffin fowler rifled in 62 caliber. It was shortened to 39". The breech is almost 1 1/4" across and it balances very well. I browned it because during the 1770's browning started to become popular in Britain and it is a nice feature for a rifle. I plan to get another Griffin barrel in 16 gauge to drop in as a smooth bore and that barrel will be polished bright and more typical of surviving officer's fusils. The stock is English walnut stained with black dye that was rubbed off, and then alkanet root. The finish is Sutherland-Welles polymerized tung oil. I built the lock from TRS series 569 parts. It is a copy of a lock from an officer's fusil by John Twigg from the 1770s. All the engraving was adapted from original guns by Twigg, Jover, and William Bailes. The thumb piece is a copy of an original made in the 1760s. The rifle represents a high end gun that might be purchased by a wealthy officer for service in North America during the 1770s and 1780s. The architecture copies features of fowling guns from the 1770s with a little military influence as well. It was a challenge to make but I am happy with the end result. I'll shoot it this week. Enjoy the photos.

dave

KIsn15S.jpg

iPNst7m.jpg

ZCXhR4S.jpg

tDrqvPt.jpg

wmfwxzk.jpg

MjhOD0I.jpg

MCplaIf.jpg

ptBse1j.jpg

zumneJN.jpg

dhCs9dx.jpg

6GekDfr.jpg

A0G9EuZ.jpg

7ZwL7fa.jpg

lNPrv8i.jpg

5ROOKHx.jpg

65ch8zc.jpg

fHhLYeJ.jpg
 
Dave, Could you post an image of tools you used for the metal engraving? A source of medium price adequate tools. And perhaps a few words of caution of advise or tricks of the trade? Carbide? Stone to sharpen? I want to try something simple on a large flat lockplate surface. Such as following the outer curve with a line (I dont know the terms) Do you use a guide? I maybe asking a lot but; appreciate a little start and I can research the web for more. Maybe the key is good tools?
 
Hi,

Finished! The barrel is a D-weight Colerain Griffin fowler rifled in 62 caliber. It was shortened to 39". The breech is almost 1 1/4" across and it balances very well. I browned it because during the 1770's browning started to become popular in Britain and it is a nice feature for a rifle. I plan to get another Griffin barrel in 16 gauge to drop in as a smooth bore and that barrel will be polished bright and more typical of surviving officer's fusils. The stock is English walnut stained with black dye that was rubbed off, and then alkanet root. The finish is Sutherland-Welles polymerized tung oil. I built the lock from TRS series 569 parts. It is a copy of a lock from an officer's fusil by John Twigg from the 1770s. All the engraving was adapted from original guns by Twigg, Jover, and William Bailes. The thumb piece is a copy of an original made in the 1760s. The rifle represents a high end gun that might be purchased by a wealthy officer for service in North America during the 1770s and 1780s. The architecture copies features of fowling guns from the 1770s with a little military influence as well. It was a challenge to make but I am happy with the end result. I'll shoot it this week. Enjoy the photos.

dave

KIsn15S.jpg

iPNst7m.jpg

ZCXhR4S.jpg

tDrqvPt.jpg

wmfwxzk.jpg

MjhOD0I.jpg

MCplaIf.jpg

ptBse1j.jpg

zumneJN.jpg

dhCs9dx.jpg

6GekDfr.jpg

A0G9EuZ.jpg

7ZwL7fa.jpg

lNPrv8i.jpg

5ROOKHx.jpg

65ch8zc.jpg

fHhLYeJ.jpg
Stunning work and priceless information for those of us attempting similar projects. Your technique, talent and research always produces pieces of art that I and Iā€™m sure many others appreciate.
 
Hi,
Thanks for looking and commenting. It was a fascinating project and it shoots well to boot. I hope to have an identical smooth 16 gauge barrel as a drop in. That will be polished bright and be more representative of typical officer's fusils.

Fourbore, describing and explaining the tools required to even do simple engraving would take too long because half the discussion is about sharpening. Poorly done engraving can ruin a gun even when it is simple and you cannot engrave well without having the components needed for sharpening. Click on the link below and scroll down until you get to "Kentucky Rifle" engraving sets put together by my good friend, Tom Curran. Tom uses these sets during his engraving classes.

AirGraver Engraving Sets

The "deluxe" set shows about what you need. You can leave off #10 but I would add a leather strop to replace it. Rather than a 2000 grit diamond stone, I use 1500 and 3000 grit ceramic stones. The key tools are the square high speed steel graver blanks, the chasing hammer, the chisel handle, and the sharpening template. The Lindsay sharpening templates are the way to go to grind the correct angles quickly on your gravers. Without that sharpening, engraving will be a frustrating and defeating endeavor. You can make a chisel handle from steel or hardwood but buy the the HSS graver blanks. Don't go on Track of the Wolf and buy any of their gravers. You just need a square graver with 90 degree cross section to do almost 90% of the engraving found on original long rifles. In addition, you will need a good vise or pitch bowl to hold the work, magnification so you can see the tiny tip of your graver, and good lighting. The problem for many folks trying to start engraving is they are not sure they can do it so don't want to spend any money. Then they buy or make the wrong stuff, don't know the basics of sharpening, struggle with even the simplest engraving and give up in a self fulfilling prophecy. If you are serious about engraving, John Schipper's book "Engraving Historic Firearms" is a good resource.

dave
 
Hi Folks,
This is an informative essay I wrote years ago about learning to engrave. I think it is still useful advice.

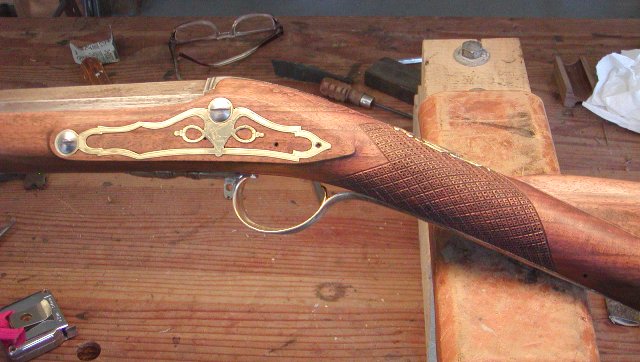
"A couple of recent threads posed by folks trying to get started with engraving motivated me to start this thread. For most people, engraving probably is one of the most intimidating skills to learn. You get everything just right on your gun, the inletting, architecture, inlays, carving, and finish, and then risk it all trying to scratch in a few attractive lines. Unfortunately, the books and videos available are somewhat helpful but their value is pretty limited. If you are lucky to have access to a class with a good instructor, that is probably the best option. If you are like me, your options for training are limited and you end up mostly teaching yourself. Also, the intimidating nature of engraving tends to make folks reluctant to spend much money on it when they begin because they are not sure they can do it and they donā€™t want to waste limited funds. Consequently, the perceived difficulty of engraving becomes a self-fulfilling prophecy for some because they donā€™t invest money in the critical rudiments and thus find it too hard to do and give up trying. With that in mind, I thought I would share a few observations about the process of learning to engrave:

Donā€™t get hung up on the tools. You only need a large square graver for outlining and borders, a small square for shading and details, and a small flat for removing backgrounds. You can make chisel handles and a lightweight chasing hammer will do. Spend some money on a good setup for sharpening. I recommend stones and the Lindsay templates but there are other options. Just make sure you have a system that does the job well and is easy to do. You must sharpen your graver very, very often and the last thing you need is some awkward setup that makes sharpening a tedious chore. It should just take a few moments with little fuss or you simply won't do it when you should.

Spend some thought and money on lighting and magnification. You cannot engrave what you cannot see. You must see the tip of the graver clearly or you will never engrave details very well. In addition, create a vise system that allows you to spin the work and tilt it as needed. Lighting, magnification, and a vise system are very important and unless you spend the time and resources on obtaining some workable version of them, engraving will be intimidating indeed.

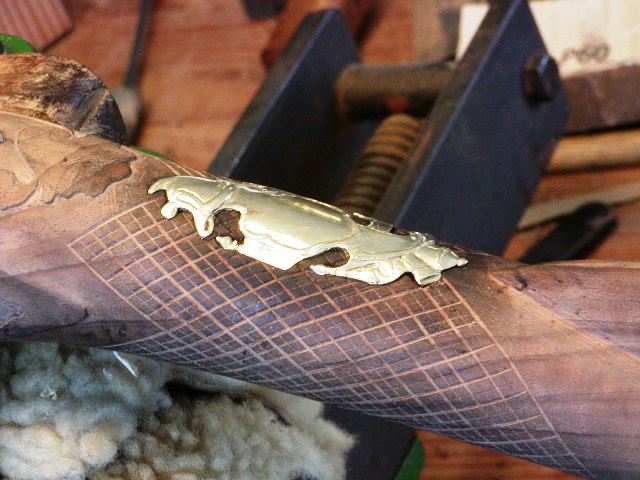
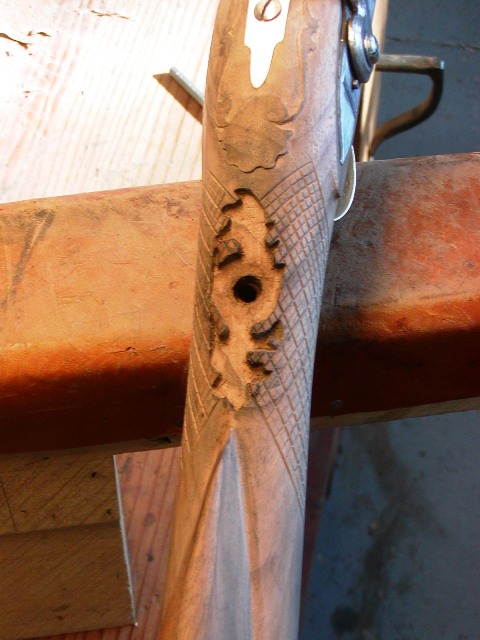
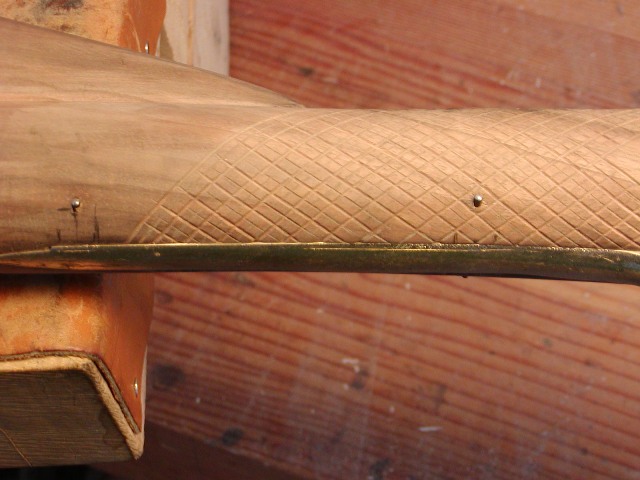
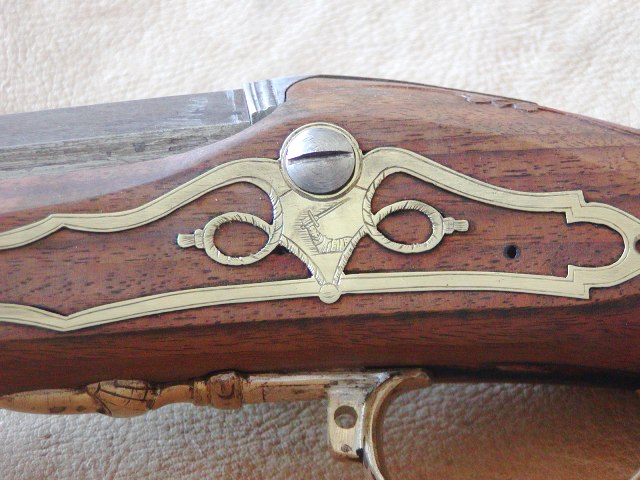
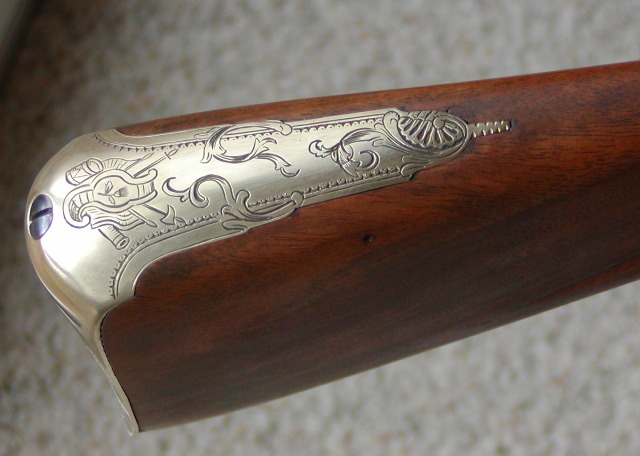
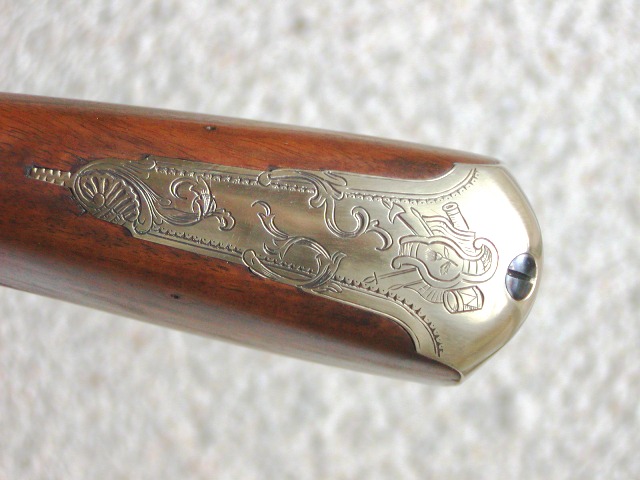
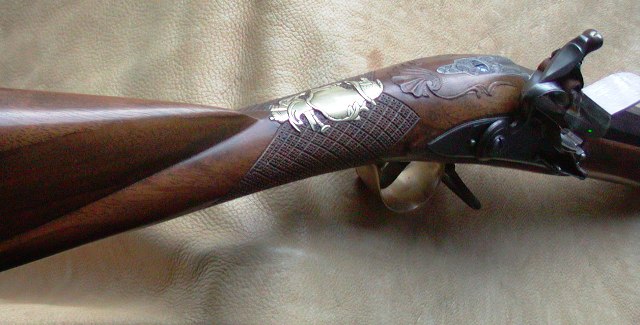
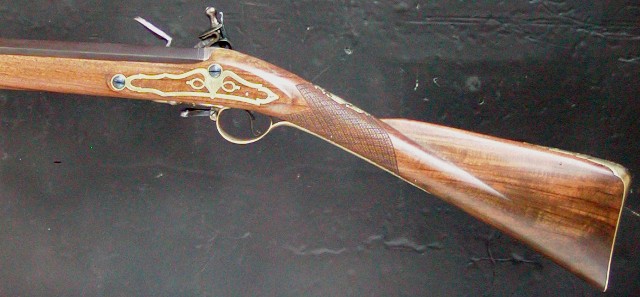
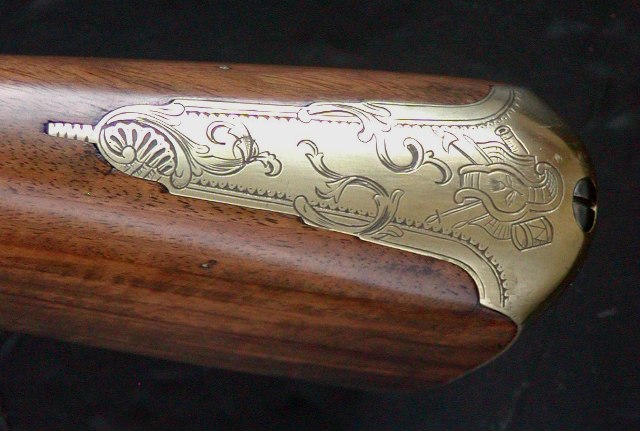
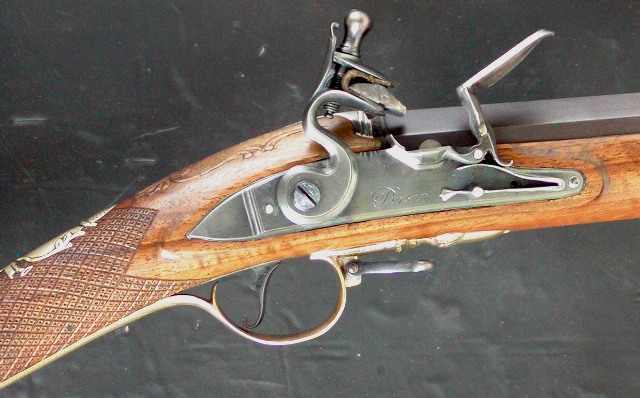
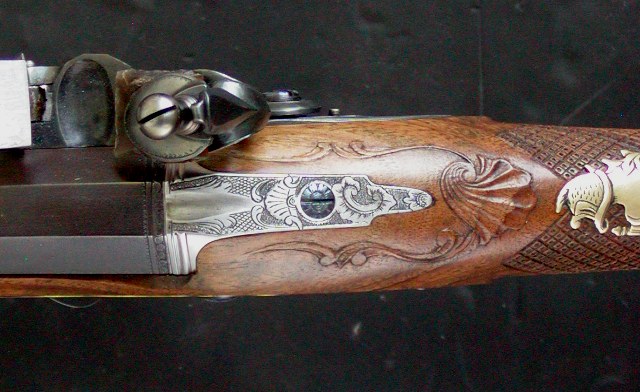
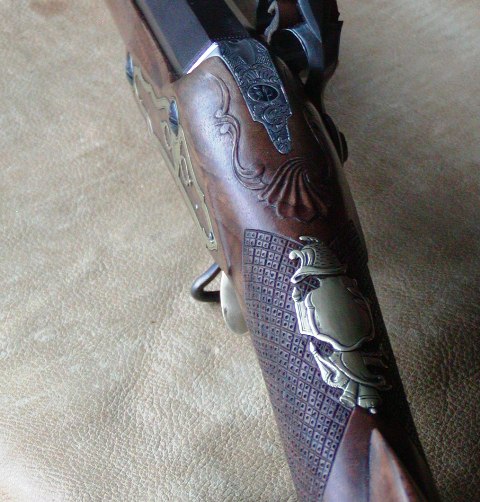
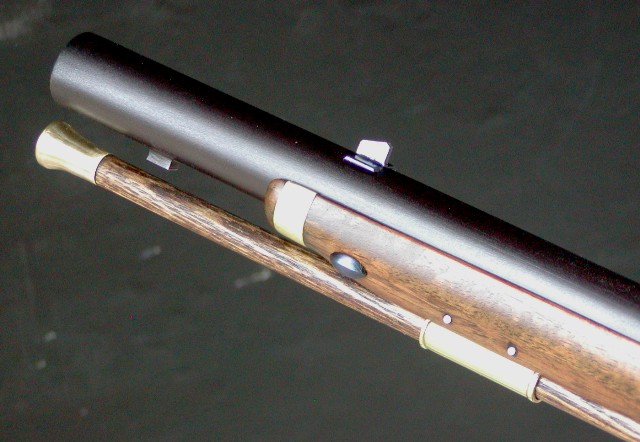
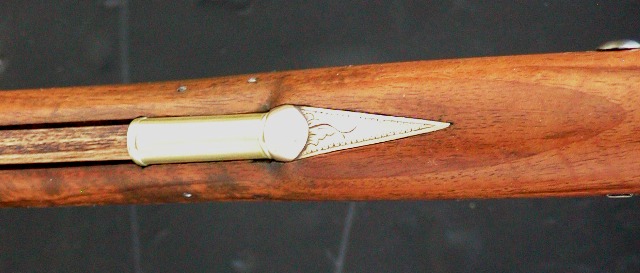
Don't try to do scroll work until you master engraving a line that is even and straight. Practice thin and thick lines that follow a border or another line. Master parallel lines and the thick and thin border. In fact, if you never do anything more than a thick and thin border you will have achieved a lot. That border is often all you need to make an inlay, lock, butt plate, or trigger guard look like a million bucks.

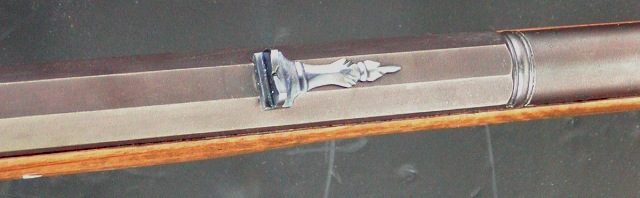
After mastering lines, try scolls, but first learn to draw them smoothly and transfer your designs to the metal. Here is where a problem arises. First, if you cannot draw a smooth curve or good design, you cannot engrave it either. Second, you need a precise image of your design on the metal. Many buy layout white or Chinese white, coat the metal and draw the design on with a pencil. Probably most of you are not steady enough to draw a smooth clean design without "sketching" it with the pencil. Sketching results in fuzzy imprecise lines that are difficult to follow accurately with the graver because the width of the sketched pencil mark is several times the width of the engraved line. The imprecision of the line is often enough to make your engraved results look rough. If you draw directly on the metal, use a very sharp pencil for a thin line and practice drawing smooth shapes without resorting to "sketching" them. I suggest that you use a mechanical pencil with 0.3mm leads sharpened to a tiny point using sand paper or a fine file. Better are the transfer solutions available to copy images from transparencies produced by inkjet or laserjet printers. Keep in mind, that after having a sharp graver and learning to cut a smooth line, nothing improves your engraving more than a good design accurately transferred to the metal.

At first don't worry about fancy cuts, angling the graver for making lines grow thick, removing background and other sophisticated methods and skills. Just learn to cut smooth lines of even thickness. If you master that and can draw designs well you will produce engraving equal to or probably better than the vast majority of work found on original long rifles. Finally, there are many technical details and methods to eventually absorb, but the few things I mentioned are the key things that I found really mattered as I learned and continue to learn. "

dave
 
Back
Top