• This community needs YOUR help today. We rely 100% on Supporting Memberships to fund our efforts. With the ever increasing fees of everything, we need help. We need more Supporting Members, today. Please invest back into this community. I will ship a few decals too in addition to all the account perks you get.


    Sign up here: https://www.muzzleloadingforum.com/account/upgrades
  • Friends, our 2nd Amendment rights are always under attack and the NRA has been a constant for decades in helping fight that fight.

    We have partnered with the NRA to offer you a discount on membership and Muzzleloading Forum gets a small percentage too of each membership, so you are supporting both the NRA and us.

    Use this link to sign up please; https://membership.nra.org/recruiters/join/XR045103

I Now Have A Brown Bess - What Do I Do Next?

Muzzleloading Forum

Help Support Muzzleloading Forum:

This site may earn a commission from merchant affiliate links, including eBay, Amazon, and others.
Stumpkiller

I found a place within an hour’s drive of me that sells Goex black powder. I had to go close to that store today so I purchased one pound of 2Fg and one pound of 3Fg. I plan on using 2Fg in both the pan and barrel, but I thought while I was at the store, I would purchase some 3Fg to give in a try in the pan. I have ordered some .715 round lead balls to use with a patch and some .735 to use in paper cartridges. Is the 76 Pattern book a good source to see how they make paper cartridges?

When a flint gets chipped or worn on the edge, what do you use and how do you go about reshaping the flint?

Starman
 
I get about a dozen shots, dress the edge and flip the flint, then repeat this for maybe 100 shots if it is a good flint. Besses have mongo huge springs and may beat the snot out of a flint so you may have less life (but good sparks).

FIRST, always, make sure the gun is unloaded. Better even remove the lock and set it on a piece of pine board.

Several ways to freshen a flint. My favorite is with a tool that is made from drill stock that has a shoulder on the tip.

HPIM2457.jpg


Lay the smaller portion against the flint so the shoulder rests on the leading edge. Then eigher press down with hand pressure or tap the wood handle with the flat of a knife. Move the tool across the flint - nibbling the edge as you go across. Hense the name of the tool: "Flint Nibbler"

HPIM2456.jpg


Another tool I use is a Colt 1911 issue tool ($2 at gun shows) with a nick in the corner (Dremel tool & cut-off wheel).

HPIM2459.jpg


HPIM2458.jpg


It can also be laid across the edge of the flint and tapped with a knife spine or screwdriver handle and spall a bit more of the edge.

Finally - not recommended for regular use - is a method called "hammering the flint". Set the cock fully forward, lay the frizzen down (full forward) and then pull the flint back until it is just touching the very bottom edge of the frizzen face and then press down hard with the heel of your hand. This works great on a hunt but can be hard on the frizzen screw and will loosen it if you make a habit of it. (Note - some claim not - but I am cautious with unbridled frizzens, though I use it myself with mine often enough).

HPIM2469.jpg
 
Stumpkiller

Is the "Flint Nibbler" you use a tool you made or did you purchase it somewhere?
 
I have never taken a Bess lock apart. What are the correct steps in taking a lock apart? I don’t want to mess things up by not knowing something I should.

Good question. Since earlier posts were talking about cleaning, I'll mention that the BB lock does not have to be "taken apart" to clean. It just has to be removed. Do that by removing the screws on the oppsite side of the stock. Whatch which is which, there is a front and rear, they must go back into same holes. But, to take your lock apart, the first, and most important, step is to buy yourself a mainspring vise. Do not attempt to remove the mainspring with standard tools (pliers, vise grips, etc.) you will probably ruin the spring. Once you have the mainspring vice the rest of the job is just common sense. Take out the mainspring and dissassemble the lock. File and stone all rubbing surfaces then reassemble. To get the smoothness you want it may require several dissassembles/reassembles to get it right. Do not attempt to modify the spring or sear notch. Get experience help for those tasks the first time. Or, if you are determined to do it, order a new spring and tumbler before you go screwing with the original ones. Good luck.
 
Stumpkillers flint chipping advice is right on. But, for me, on the BB, I just kinda whack on the flint edge with anything handy until there are some sharp spots. Really, the BB lock is such a reliable sparker it is not fussy about the flints. That is why it was a military mainstay for so long. It went off when the trigger was pulled. Of course, this advice does not apply to most flintlock rifles. Those can be so finicky and fussy :cursing: that someone actually went and invented the percussion cap to get away from them. :surrender:
 
starman said:
Stumpkiller

Is the "Flint Nibbler" you use a tool you made or did you purchase it somewhere?

Mine was a gift at a shoot from Prior Mt. Bill (not a member here - I doubt he owns a home computer ;-) ). Dixie used to have a similar version. The secret is hard steel and a small (1/16" max) shoulder. If you have a steady hand any drift punch will work - just place it with a tiny amount laying on the flint and press down. I have used the spine of a knife many times and it works very well. The benefit of the nibbler is that it removes very little flint and you can keep the edge straight.

Yeah, Dixie still sells them - $4.95 (but the shoulder looks a little large). Theirs works as a top jaw screw wrench for a holed bolt.
http://www.dixiegunworks.com/product_info.php?products_id=7702

MT0811.JPG
 
Last edited by a moderator:
Sounds to me like taking the lock off the musket to clean is just fine, but I don't want to take it apart unless I have to. Sounds like a good way to go. Thanks!
 
In "the good ol days" the sergeants were issued a screwdriver and they were in charge of musket maintenance beyond cleaning. If a lowly soldier removed the lock on his musket without supervision he was apt to be flogged.

You can do a pretty good job of cleaning a lock with wood toothpicks, the edges of pieces of paper or thin cardboard to clear crud and wipe oil in the crevaces and a bit of cotton cloth to wipe it well afterwards. It doesn't take much oil, either. I don't oil the faces of my frizzens, but that might be a bit eccentric.
 
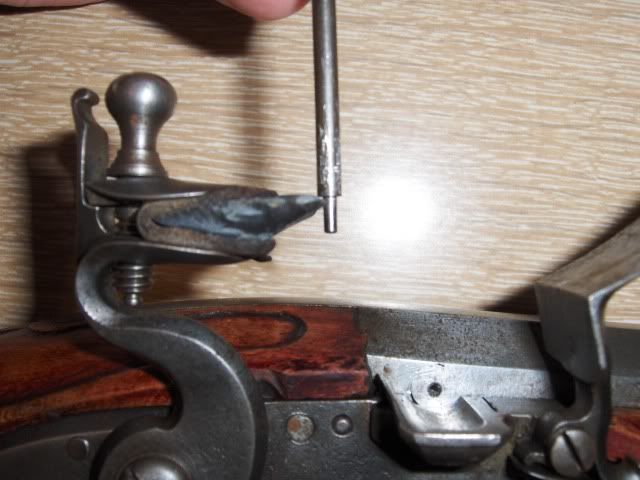
Starman: YOu can knapp your flint in the Lock, by simply cradling the UNLOADED, UNPRIMED gun in your left arm, then use your Left Thumb's Inside edge next to the thumbnail, to hold the frizzen open just enough, that when you lower the cock, the edge of the flint will strike the Heel of the frizzen- The junction between the horizontal and Vertical parts of the frizzen( or where the Face that is struck to creat sparks meets the top of the frizzen that covers the pan.) Now, hole that frizzen open, making sure that NO Part of your thumb extends past the heel of the frizzen, cock the hammer back to "full-cock", and pull the trigger.

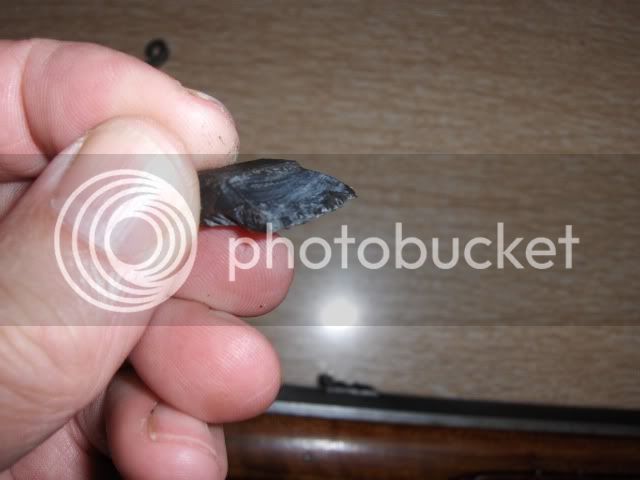
The flint will strike at a steep angle to the heel of the frizzen, and knock off a flake at a severe angle from the UNDERSIDE( bottom ) of the edge of the flint. That will give you a new, Sharp edge to cut steel. The edge will be sharp, and even- not jagged-- across the width of the face of the frizzen. That, in turn maximizes your opportunities to cut steel the next time you pull the trigger.

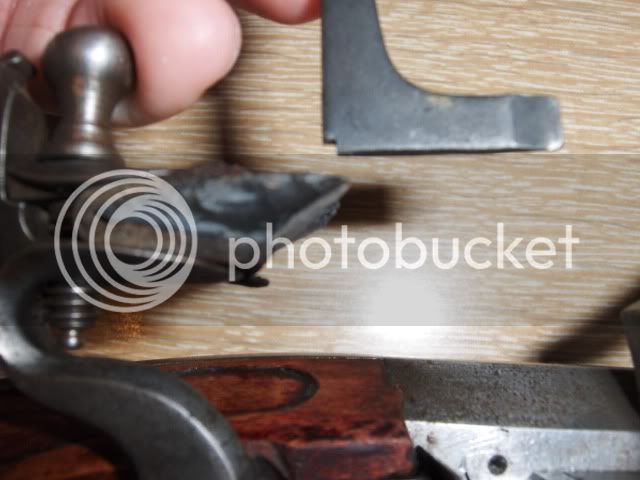
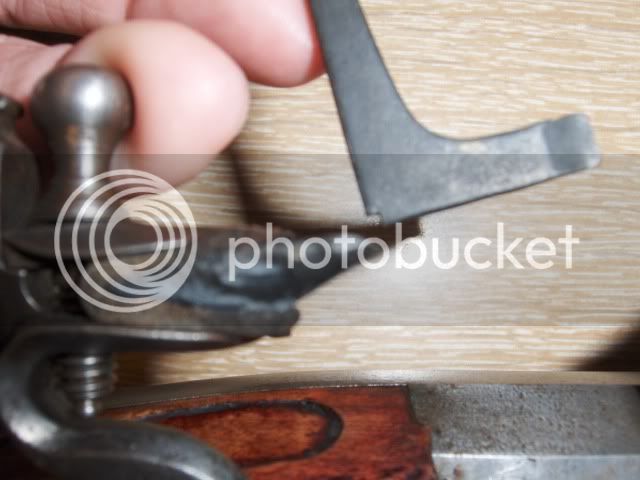
I do this every time I mount a new flint, and Every time I have to shift a flint forward in the jaws to get more use out of a worn down flint- about every 25 shots in my rifle. How fast the edge wears back(down) depends on the size of the lock, and the strength(weight) of the spring tension that throws the flint into the frizzen. The angle of Impact of any flint to the frizzen also controls how face a flint is destroyed. Optimum angle of Impact is 60-66 degrees. Otimum place of impact is 2/3 up from the bottom of the vertical face.

If the lock is designed properly, the flint will cut steel about 1/3 the length of the face, from 2/3 down to 1/3 at which point the frizzen will spring open, allowing the sparks created by the flint cutting steel, to be Thrown- not fall- down into the flash pan to ignite your priming powder. The timing of the lock to do these things makes the difference in how quickly you can get ignition of the main charge in the barrel, and the gun to fire, before your sights move off the target.

I have a "Knapping hammer" I made years ago, from a piece of 3/8 square brass stock, putting a shortened screw driver blade into the brass "Head" to use as both a cock screw turner, and a flint knapping hammer. I ate up a lot of expensive Flint edge with that tool, and found that using the method above removed less Flint, and gave me longer flint life.

I am not a fan of any tool that is going to make saw teeth out of the edge of a flint. :nono: :surrender: :thumbsup: It wastes good flint, weakens the edge, and gouges grooves in the face of the frizzen. This then requires more grinding filing and polishing the face to get it to spark worth the effort. :shocked2: :( :thumbsup:
 
" I am not a reenactor but would like for the weapon to be reasonably historically accurate."

did you see this also Laffinigdog? not a request for absolute PC/hC but dfinately suggests an interest.
 
starman said:
Hi Stumpkiller

What is an Irish Charger?

Shot flasks and snakes have two common tips: English and Irish heads. Each has advantages and disadvantages. The Irish head is like a scoop that is removed from the container and a spring loaded gate slides down and allows a pre-determined amount of shot (usually three adjustment) in the scoop. You then pour it in the muzzle and return the head to the container. The English style is a pair of gates, like an airlock, that let an amount of shot (usually two volume choices) in between the gates and when you press the lever it dispenses the shot into the muzzle.

Irish head:
flask-ir-l_1.jpg


English head:
flask-eng-s_1.jpg


I prefer the Irish (I just like to see what's going in and know it's a full load), but either works well.
 
I don't take the lock apart I just spray it out with brake cleaner or gunck about once a year then oil it good.After shooting I just run it under warm water and scrub it with an old toothbrush,let it drip dry and wipe it with a dry cloth, then spray all the water out with WD 40 then oil it good.Ive even heard of boiling the lock in water to clean it but that seems extreme.
I don't think a 735 will fit in a paper cartridge but you can try. If it's to tight to start with your thumb don't bother,Just put a wad of wool cloth or wasp nest over the powder and one over the ball,Smoothbores are pretty forgiving and don't need the tight patch a rifle needs as your not gripping any rifleing.Always make sure its seated all the way down.I fire a pretty loose paper wrapped ball in my Bess and it hits dead on if I do my part.My barrel is what Ive been told a Colerain barrel,so the bore is gonna be different from your Dixie Bess,Ive never miked it but a 735 is loose.I used to use a 715 in my Miriku bess's.
In the words of Troy from Swamp people "Choot It!)
 
Thanks
I just received a new flint and I am going to give this a try tomorrow. I'll let you know how it works for me.
 
Thanks for your information about an Irish Charger. I thought it was for powder but now see it is for shot. This explains a lot!!
 
I have an old "Jap" Bess. It had a lead sheet to hold the flint in place. This lock gets a very long flint life. It is easy to make a lead flint holder by hammering a round ball flat. This gun uses a .735 ball and a .015 patch.
 
I have both. The Irish is excellent for shot.
The English does not work well for shot, I use for powder. However, the actuating spring on these repro English chargers have a tendancy to break. Dixie does not carry replacements and I don't know of another source. So, now, my English is relegated to being a useless (expensive) display item.
 
...I've read the members excellent advice... However, I suggest you consider shipping it to me for a few months to test fire and take hunting... I promise to feed and clean it properly as well as share my favorite hunting spots... :grin:
 
Back
Top