• This community needs YOUR help today. We rely 100% on Supporting Memberships to fund our efforts. With the ever increasing fees of everything, we need help. We need more Supporting Members, today. Please invest back into this community. I will ship a few decals too in addition to all the account perks you get.


    Sign up here: https://www.muzzleloadingforum.com/account/upgrades
  • Friends, our 2nd Amendment rights are always under attack and the NRA has been a constant for decades in helping fight that fight.

    We have partnered with the NRA to offer you a discount on membership and Muzzleloading Forum gets a small percentage too of each membership, so you are supporting both the NRA and us.

    Use this link to sign up please; https://membership.nra.org/recruiters/join/XR045103

I need help with a TRS Baker Rifle flintlock build

Muzzleloading Forum

Help Support Muzzleloading Forum:

This site may earn a commission from merchant affiliate links, including eBay, Amazon, and others.
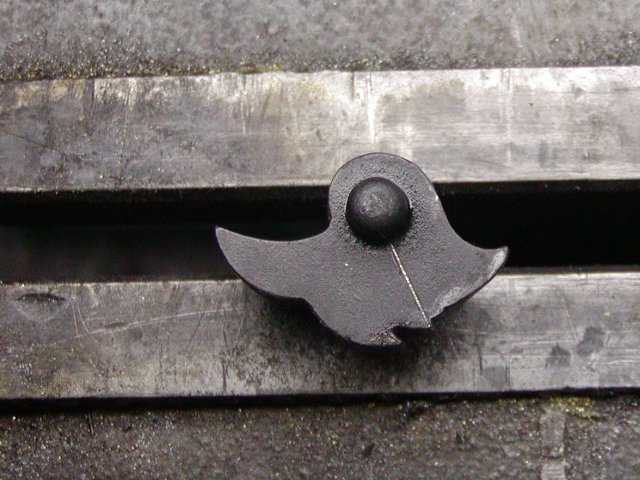
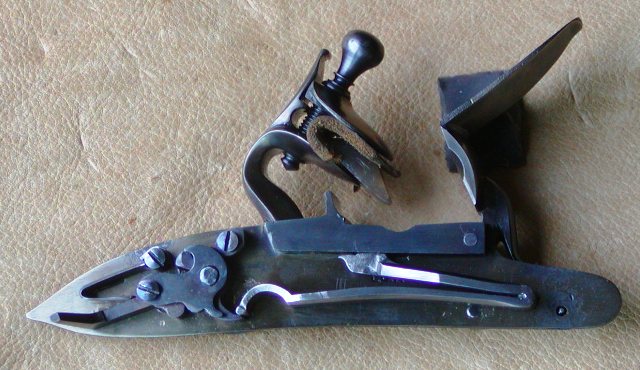
OK, going back to this pic and BEFORE reducing the body of the Fly, here is something that needs corrected first.

1629826463287.png


In this pic the lower or left vertical edge of the cut out for the fly needs to be cleaned up straight and perpendicular to the bottom of the cut out. It should probably be further filed at an angle more to the left so the front bottom of that edge is even with the bottom of the curved surface under the half cock notch. This will give more room for the Fly to move lower/to the left and will give more room for the Fly to be out of the way for the Sear Nose to fully enter the Half Cock notch.

One has to be careful of not messing up the flat portion of the bottom of cut out for the Fly when doing this. As that can cause the fly to not slide smoothly.

It would be best to have a small "Safe Edge" square or rectangular file to do this with so the "Safe Edge" or edge that has the teeth removed is placed on the flat bottom of the relief cut while filing, so the file doesn't cut into the bottom shelf.

Of course the edges need "de-burring" or slightly chamfer relieved once the new forward angled edge is achieved.

Gus
 
Last edited:
OK, going back to this pic:

1629830144222.png


Looking at this pic again, I want to point out there are one large and two smaller curved surfaces forward or to the left of the cut out for the fly. The two closest curved surfaces are kind of hard to see as separate curves because of the way the light shines on the part.

It may not require filing the left side of the cut out (at an angle) all the way to the bottom of the curved surface closest to the half cock, as there seems to be a lot of metal there that can be removed to allow a wide Fly to be used.

Still, this needs addressed first before one begins reducing the width of the Fly.

Edited to add: When opening up the cut out, it should still look like a rounded Top Triangle with the base of the triangle at the bottom of the cut out portion of the Tumbler. The bottom will wind up wider as a result of further clearance. Not sure if I have been clear earlier on that.

Gus
 
Last edited:
Of course for those of us here in America where shipping costs aren't as much as they are to Australia, it might be a good idea to call Track of the Wolf and see if they have a fly with a post that would fit in the post hole and be long enough to use in this lock. Sometimes it is better to buy a well made fly rather than spend too much time trying to correct a cast one.

This would require one to know how big the hole is and how much length one needs from the from the post to the edge. A longer length can be shortened, if necessary, but you can't "grow" metal that isn't there.

Search - Track of the Wolf

Gus

If it were me Gus, I’d probably cheat here and get a new lock plate and an equivalent set of internals from RE Davis or Chambers that were CNC cut. I did that with one of my 1803 locks, I took the Rifle Shoppe Lock plate and used RE Davis 1803 internals, the lock is super smooth and never miss fires. While its not historically accurate at all, nobody would know that if they examined the gun And would additionally appreciate the higher quality.

I’d imagine that the Baker Rifle Lock castings are very similar to the 1803 with the exception of the fly, the 1803 had no fly on the original design but probably could have benefited from one.

While I’m not encouraging one give up on their lock castings, lately my lock kits from the Rifle Shoppe have been Somewhat poor, especially the french musket lock kits.

I have a 1763 lock that had the plate warped with uneven plate surfaces, I had to ask for a plate that was casted a little better.

Their 1766 lock castings are much better quality than the 63 with cleaner surfaces and is pretty much for the most part all even.

The 1754 lock castings are very much like the 63.

The 1774 lock castings I’m waiting on, but I do have a friend with this model and the lock is excellent.

Rifle Shoppe‘s Brown Bess parts are very good, but I do wish they’d cast in 8620.

I've already mentioned the possibility of getting a replacement Tumbler, IF one can be found close to and a little oversize, especially in the arbor diameter that goes through the lock plate.

However, Larks mentioned he preferred to try to see if he could correct the mistakes on this set of lock parts and that's an excellent way to learn.

BTW, I thought about doing something similar to what you did on your 1803 lock, but with a set of castings for a British P1740 Bess lock. I was going to use an original main spring and possibly the Sear Spring from an M1842 Percussion Musket or maybe the long Sear Spring from a Pedersoli Bess, though I just never got around to doing it.

Gus
 
Last edited:
I agree with Gus, I keep referencing back to the fly and for some reason it just doesn’t seem geometrically even on all sides and at the point. On a good note flys are relatively easy to replace. Looking at One of my RE Davis locks, the fly is perfectly integrated with the sear (granted these are machined locks) the sear has a slight chamfer to avoid jamming up.

one thing I can see from your tumbler is that it looks a little rough on its outer edges that the sear engages, you would want to that to be polished up to clean surface for bearing, same with the sear nose.

I don’t think the fly is actually meant to be geometrically even - if I’m understanding which sides you are referring to - I didn’t mess too much with it from its “as cast” other than to remove the sprue and clean up the pin that sits in the tumbler. This photo of the “as cast” fly shows the two sides as being different lengths and I took it that this was as it should be.

IMG_2354.jpg


IMG_2459.jpg


At the moment the sear just catches on the side facing it - at 3.00 in the photo - understanding now that it should slide over that face cleanly I’ll have a much closer look at it on the weekend when I have some clearer time to play with it.

And the back face inhibits the sear from sliding neatly into the half cock slot,

Looking at these two photos now I wonder if it may be that the pin end is pushing the fly further south than it should. I see that it’s not nicely rounded and the bump at about 10.00 on the fly looks like it may be from a dag that I didn’t clean up properly from the casting.

I guess the alternative will be to round, smooth and polish that 3.00 edge better to allow the swear to slide over it cleanly and gently take some meat off of that 5.00-6.00 edge along the same line as it is to open up the half cock notch.
 
If it’s of interest, here’s a closer look at how those parts came as cast, showing the casting marks on the tumbler edges, the sprues and the bridle with no hole for the tumbler axle and no clear indication of where it was to go, other than the sprue being in its position.:

IMG_2351.JPG
 
I've already mentioned the possibility of getting a replacement Tumbler, IF one can be found close to and a little oversize, especially in the arbor diameter that goes through the lock plate.

However, Larks mentioned he preferred to try to see if he could correct the mistakes on this set of lock parts and that's an excellent way to learn.

BTW, I thought about doing something similar to what you did on your 1803 lock, but with a set of castings for a British P1740 Bess lock. I was going to use an original main spring and possibly the Sear Spring from an M1842 Percussion Musket or maybe the long Sear Spring from a Pedersoli Bess, though I just never got around to doing it.

Gus

I would indeed like to try and recover my mess, if I haven’t already trashed it all beyond recovery, but as you say Gus, what I have learned here in the last couple of days has been priceless and I am so very grateful for your generous advice and time.

I realised that I hadn’t actually posted my letter to TRS (left in my car during a covid lockdown here so never taken to the post office) so I have re-written my letter feeling somewhat more enlightened and have asked them again to supply a completed lock as initially ordered, at my expense of course, but have also asked them to supply a replacement tumbler, bridle, fly and the missing screw. I’d still like to get this lock right one way or another.

Meanwhile I’ve also sent a message to Track of the Wolf to see if they can supply the tumbler, bridle, fly and screw and will follow up with a phone call sometime over the next few days.
 
OK, going back to this pic:


Looking at this pic again, I want to point out there are one large and two smaller curved surfaces forward or to the left of the cut out for the fly. The two closest curved surfaces are kind of hard to see as separate curves because of the way the light shines on the part.

It may not require filing the left side of the cut out (at an angle) all the way to the bottom of the curved surface closest to the half cock, as there seems to be a lot of metal there that can be removed to allow a wide Fly to be used.

Still, this needs addressed first before one begins reducing the width of the Fly.

Edited to add: When opening up the cut out, it should still look like a rounded Top Triangle with the base of the triangle at the bottom of the cut out portion of the Tumbler. The bottom will wind up wider as a result of further clearance. Not sure if I have been clear earlier on that.

Gus

This might be a clearer picture Gus (aren’t iPhones amazing?) are you talking about taking the fly cutout to the point where it would line up with the step down in the curved face above the half cock notch?

IMG_2468.jpg
 
If it’s of interest, here’s a closer look at how those parts came as cast, showing the casting marks on the tumbler edges, the sprues and the bridle with no hole for the tumbler axle and no clear indication of where it was to go, other than the sprue being in its position.:

View attachment 91423

When I drilled the bridals on my locks I always started with first getting the bridal on the plate and then centering where the tumbler sets in. For drilling the tumbler arbor hole in the bridal, once the bridal was drilled and tapped I attached it on the reverse side of the plate to get two centering points. I also use a lathe centering tool to mark and punch.

I think its also important to note that these locks from Rifle Shoppe are copies of all hand made hand fitted parts. Therefore I wouldn’t be suprised if things don’t line up perfectly (unlike a factory gun that is perfect). for example the Bridal Pin on my 1803 is bent slightly as is one on an original bridal that I have.

I’ve personally lowered my expectations on lock castings lately, as many just come with flaws that you cant fix.

For example on my 1763 lock has the pan casted to the plate, this is completely this is incorrect of course and can be corrected Almost like a reconversion.

With the 1817 common rifle the mainspring I have is not actually a flint mainspring, its a conversion mainspring which started to eat up the tumbler.
 
Last edited:
Hi Larks,
It is challenging to build a lock without some machine work. I don't use much but I need the drill press and my lathe, which is a simple wood turning one on which I mount a drill chuck. On all TRS part sets, you first have to flatten and true the plate. Then the next task is to true up the tumbler with its axle. I put the tumbler post in the chuck on the lathe and true up the spindle and tumbler face with fine files and then stones dipped in paraffin oil. I use a tool rest to steady the files and keep them away from getting caught by the spinning tumbler foot. Then I turn it around and true the tumbler post and side. Your tumbler needs truing badly and the surface on which the sear slides needs clean up and polishing. Moreover, the face of your full cock notch appears to be at the wrong angle. Scribe a line from the center of the tumbler spindle to the lip of the full cock notch. The face of the notch should be filed flush with that line. Here is a Pedersoli Brown Bess tumbler with the line scribed but the full cock notch face is not flush with it yet.
cAi9C4F.jpg


Here is how your lock internals should look when done, clean, polished, and crisp edges.

Ddher6R.jpg

Y7pTsFe.jpg

xEIu1Q9.jpg

62aeNxa.jpg


dave
 
This might be a clearer picture Gus (aren’t iPhones amazing?) are you talking about taking the fly cutout to the point where it would line up with the step down in the curved face above the half cock notch?

View attachment 91424

Yes, that's exactly what I'm talking about. Actually, I believe the original was done that way. This would give more room to keep the Fly as wide as possible, but still leave as much clearance as possible for the Fly to get out of the way so the Sear Nose can fully engage the Half Cock notch. Even when you get this done, I'm fairly certain you will need to reduce the width of the Fly, though. This means you will probably will file the left or upper side of the fly more to get that clearance, though you may eventually file a little on the right side. Also, remember to consider the center of the post on the bottom of the fly as the center of body of the top lower part of the fly.

This work is sort of "study it a bit," then file some, then study then file, etc., etc. and is not going to go fast, especially as it is the first time you will have done this. The second and third time you fit a fly will go faster as you gain experience fitting Fly's to Tumblers.

Gus
 
When I drilled the bridals on my locks I always started with first getting the bridal on the plate and then centering where the tumbler sets in. For drilling the tumbler arbor hole in the bridal, once the bridal was drilled and tapped I attached it on the reverse side of the plate to get two centering points. I also use a lathe centering tool to mark and punch.

I think its also important to note that these locks from Rifle Shoppe are copies of all hand made hand fitted parts. Therefore I wouldn’t be suprised if things don’t line up perfectly (unlike a factory gun that is perfect). for example the Bridal Pin on my 1803 is bent slightly as is one on an original bridal that I have.

I’ve personally lowered my expectations on lock castings lately, as many just come with flaws that you cant fix.

For example on my 1763 lock has the pan casted to the plate, this is completely this is incorrect of course and can be corrected Almost like a reconversion.

With the 1817 common rifle the mainspring I have is not actually a flint mainspring, its a conversion mainspring which started to eat up the tumbler.

Thanks Nick. Foolishly I think that most of my problems with this come from part of me thinking that the original parts probably weren’t perfect anyway so I could get away with a few “errors" - instead of realising that those few errors would amplify any pre-existing issues.
 
Thanks Nick. Foolishly I think that most of my problems with this come from part of me thinking that the original parts probably weren’t perfect anyway so I could get away with a few “errors" - instead of realising that those few errors would amplify any pre-existing issues.

With respect, it is all part of the learning curve. So press on McDuff!

Gus
 
Hi Larks,
It is challenging to build a lock without some machine work. I don't use much but I need the drill press and my lathe, which is a simple wood turning one on which I mount a drill chuck. On all TRS part sets, you first have to flatten and true the plate. Then the next task is to true up the tumbler with its axle. I put the tumbler post in the chuck on the lathe and true up the spindle and tumbler face with fine files and then stones dipped in paraffin oil. I use a tool rest to steady the files and keep them away from getting caught by the spinning tumbler foot. Then I turn it around and true the tumbler post and side. Your tumbler needs truing badly and the surface on which the sear slides needs clean up and polishing. Moreover, the face of your full cock notch appears to be at the wrong angle. Scribe a line from the center of the tumbler spindle to the lip of the full cock notch. The face of the notch should be filed flush with that line. Here is a Pedersoli Brown Bess tumbler with the line scribed but the full cock notch face is not flush with it yet.
cAi9C4F.jpg


Here is how your lock internals should look when done, clean, polished, and crisp edges.

Ddher6R.jpg

Y7pTsFe.jpg

xEIu1Q9.jpg

62aeNxa.jpg


dave

Thankyou Dave, that is a terrific help.

I am delighted to advise that I have had a response from Ethan at Track of the Wolf overnight and he has a Tumbler, bridle and fly in stock for my lock so I’m going to buy those from him and will start from scratch with those parts following the terrific advice that I’ve received here from yourself, Gus, Nick and co. I’ll have no excuses for not getting them right this time.

But I will still press on with having a go at fixing my mess on these parts that I already have, knowing the replacement parts are coming I can have a bit more confidence that if I completely ruin them I won’t be left with a useless pile of rifle parts.
 
With respect, it is all part of the learning curve. So press on McDuff!

Gus

It is indeed Gus, and one that I am enjoying - especially due to the level of support that I’ve found here to aid in that learning. Thankyou again for all of your kind advice mate, I really do appreciate it.
 
It is indeed Gus, and one that I am enjoying - especially due to the level of support that I’ve found here to aid in that learning. Thankyou again for all of your kind advice mate, I really do appreciate it.

You are most welcome, Mate.

Do call on us again, as you need.

G'Day,
Gus
 
Thankyou again all. I won’t claim for a moment that it’s by any means perfect now and it still needs more work, but I do believe that you guys have fixed my lock for me - at least as well as it can be with what I have on hand and without having to find a machinist.

I lined the tumbler square (or as square as humanly possible) in the drill press held by the lock plate axle, set up a sturdy support and filed the face of the tumbler down as even as was possible with a fine file and rounded off the small axle. I then flipped it to hold it by the small bridle axle and did the same to the lock plate side of the tumbler and lock plate axle.

I trimmed the front and back faces of the fly in small increments, cleaned up the half cock and full cock notches as advised (though the full cock notch could cope with a little more fine more work - it’s not yet completely or perfectly in line with the axle centre) and I took the end of the mainspring (where it lands on the tumbler) down very very slightly and rounded it off better than it was. The sear needs a little work before I attack the tumbler notches any more but what I’ve done so far shows that you’ve put me on the right path to get it completely right.

I also flattened the face of the lock plate - though without re-annealing it first - using my belt grinder (which has a perfectly flat platen for knife making) and a well used fine belt so that it took it down slowly and in a more controlled manner. It worked very well but still needs a little more polishing before I’m finished with it. As does everything else - need more polishing before it’s finished.

Interestingly, with everything in place and tightened down (other than the frizzen spring which is missing a screw) there is no slop at all in the cock and it appears to ride smoothly and crisply both ways.

IMG_2473.JPG


showing where the high spots were:

IMG_2476.JPG


IMG_2479.JPG


very close


IMG_2480.JPG
 
Last edited:
But the proof is in the pudding:

I haven’t done anything with the bridle, other than mark it to find centre if I fill the existing axle hole, but I’ll leave it now that I have it working and will replace it with the new one that Track of the Wolf are sending me.
 
But the proof is in the pudding:

I haven’t done anything with the bridle, other than mark it to find centre if I fill the existing axle hole, but I’ll leave it now that I have it working and will replace it with the new one that Track of the Wolf are sending me.
View attachment 91841

Nicely done! At full cock and while holding the cock the entire time, can you lift up on the tail of the sear and the sear will now go smoothly into the half cock? (To test the half cock safety feature?)

Gus
 
Back
Top