• This community needs YOUR help today. We rely 100% on Supporting Memberships to fund our efforts. With the ever increasing fees of everything, we need help. We need more Supporting Members, today. Please invest back into this community. I will ship a few decals too in addition to all the account perks you get.


    Sign up here: https://www.muzzleloadingforum.com/account/upgrades
  • Friends, our 2nd Amendment rights are always under attack and the NRA has been a constant for decades in helping fight that fight.

    We have partnered with the NRA to offer you a discount on membership and Muzzleloading Forum gets a small percentage too of each membership, so you are supporting both the NRA and us.

    Use this link to sign up please; https://membership.nra.org/recruiters/join/XR045103

How to age the finish?

Muzzleloading Forum

Help Support Muzzleloading Forum:

This site may earn a commission from merchant affiliate links, including eBay, Amazon, and others.
Joined
Feb 3, 2011
Messages
4,156
Reaction score
2,130
Location
Ohio, the land of the Shawnee
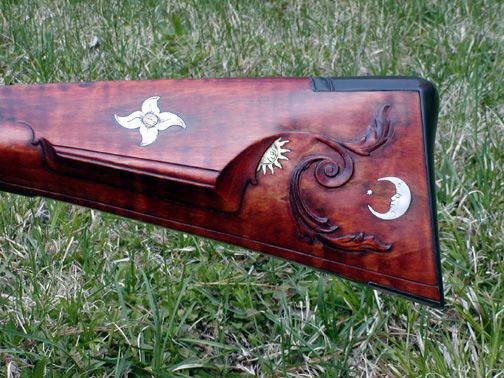
With the help of a friend I am building my first flintlock rifle and am approaching the final stages of the build...anyhow I want a darker look in the recessed area of the rifle. I've read that this accomplished by using black spray paint, using steel wool to remove the excess paint. So can someone give me the exact process? Thanks!
 
I wouldn't use full strength paint out of the can. If you're going the paint route, use it (oil-based is better than water-based) thinned down to a very dilute state and rub it in, and then off very quickly, over many coats, and letting it dry a day or so in between. That way you can sort of sneak up on the final color.
 
there's a guitar maker on here who used that process in finishin' his hawken build. maybe with a bit of searchin' you can find his posts on the subject.
 
Mike Brooks' tutorial is what most likely gave the OP the idea, but not the detailed methodology. Here's what works for me. First, make sure you've adequately sealed the wood with linseed oil or whatever you use for finish coating; the last thing you want is the paint to permeate the wood. The paint is relatively easy to rub back provided the wood is sealed well. Once you've sealed the grain, hit the stock with flat black spray paint. Make sure it is FLAT black; the $1.00 Home Depot rattle cans work fine. In addition to being the right choice for the look, flat black is very forgiving as it doesn't have a tendency to run and covers easily. One coat will do, but ensure the whole stock is covered. Let the stock dry for at least 2-3 hours. Flat colors also dry quickly, so you can work with the paint in relatively short order. You can let it sit as long as you want (after the 2-3 hours), btw, it won't make the paint harder to remove. When you're ready, take some 0000 steel wool and start rubbing back the paint with a gentle but firm circular motion (you don't want to cut through your finish to your stain) Start in the middle of an area and work towards the crevices, carvings and inlays. As you get closer to an area where the black is to be concentrated, lighten up on the presssure to feather the black along the perimeter of that area. You can rub right over dings and dents as the black will settle in those spots nicely. Once you're satisfied with your work, finish the wood with coats of linseed oil or whatever you use. This is a wonderful trick that imparts a look similar to real patina. You'll no doubt be quite proud of your efforts.

Smollett
 
paint method
Finish with dye in the sealer method
Finish with soot in the sealer method
Finish and use leather dyes method

:hmm:
Marc n tomtom
 
To some, an "aging" w/ flat, black paint looks like flat, black paint, although judging from some pics, it doesn't look bad at all. At least it's doing something w/ the stock instead of just aging the metal. To do a complete aging job, the chains should be brought out to really "age" both the stock and metal.

Just kidding because I just couldn't even give one of my builds a "black paint job", let alone whacking it w/ chains.

Some like an artificially aged gun and hopefully it'll give the impression of being an "old gun"......Fred
 
Hi,
You don't have to "age" a stock to make details pop out. On the rifle below, the carving and cheek piece really stand out because I simply rubbed back the stain without trying to reach into the corners. I also let finish build up a little (just a little)in the corners and that was all it took. I believe Jim Kibler used glazing on at least some of his guns to darken the nooks and crannies but not really age the gun.

dave
Baichtalsrifle12_zpsa6592f59.jpg
 
The title asked about "aging" the finish. What I'm going to relate might not be to your taste. But it does give a very aged look to guns. When I had my ml shop in Indiana I picked up a few extra dollars by selling derringer kits I assembled myself. Forget who I bought from (Dixie, CVA, dunno :idunno: ). But they were cheap. Gave the wood a cursory sanding and then applied my 'secret' :wink: finish. It was nothing more than dark brown Kiwi shoe polish. I priced to make a profit and they were good sellers. (and, no, I wasn't passing off as originals) I also did this on a short 'kentucky' flint rifle from an H&A kit and added some brass tacks. Later sold it to a friend. He sold at a gun show. Buyer would not believe it was recent made. Today it hangs in a very large country-western bar and dance hall in Wisconsin where the owner proudly claims it was made by an old guy in the Arkansas Ozarks. Oh well. Try the Kiwi on some scrap wood, you might like it.
 
This is a Carolina Gun. Since we do the Redstick War of 1813 1814 this gun would have been at least 30 years old so it needed the edge taken off a little.


It was simply black spray paint on top of existing finish. I wait till it's dry to touch then I rub back with fine steel wool after that I apply a good wax. The bottom of this gun had some dents and scratches, I really like the look and how it accents that natural wear.
I do realize this is not for everyone but it serves our purposes well.
 
bubba.50 said:
there's a guitar maker on here who used that process in finishin' his hawken build. maybe with a bit of searchin' you can find his posts on the subject.
I know EXACTLY who your referring to...thanks for reminding me that Herb does this trick as well!
Thanks everyone!!!! I am going to try a few of those methods on scrap wood and will post pics of the build when done.
 
Here is a good example (not done by me) of the method described above (a picture is worth 1,000 words, as is said):

Forearm_zps0c9b921c.jpg
[/URL][/img]
 
It's a brave man that can point a can of black spray paint at their stock. I've never had the huevos to do it.

I do mix up a dark pigmented slurry, tho, to wipe on and wipe off, repeatedly, leaving slight layers of color in the desired areas.
Lately I've been using bone black in addition to the powdered pigments shown in the picture. The pigments can be added to sealer or oil finish or both.
I think it's best to do this early in the finishing process; if I wait till later, I end up rubbing off most of the color off with the next coat.
/mike

 
Use a little boiled linseed oil and soot. Wipe a thin coat of this onto the stock and then wipe down well with a paper towel. Do this each time you clean the rifle and you will soon start to have the used but not abused look.

Do not forget to dispose of the paper towel properly. This combination can and will cause spontaneous combustion.
 

Latest posts

Back
Top