• This community needs YOUR help today. We rely 100% on Supporting Memberships to fund our efforts. With the ever increasing fees of everything, we need help. We need more Supporting Members, today. Please invest back into this community. I will ship a few decals too in addition to all the account perks you get.


    Sign up here: https://www.muzzleloadingforum.com/account/upgrades
  • Friends, our 2nd Amendment rights are always under attack and the NRA has been a constant for decades in helping fight that fight.

    We have partnered with the NRA to offer you a discount on membership and Muzzleloading Forum gets a small percentage too of each membership, so you are supporting both the NRA and us.

    Use this link to sign up please; https://membership.nra.org/recruiters/join/XR045103

Filling Scrimshaw Work On Horns

Muzzleloading Forum

Help Support Muzzleloading Forum:

This site may earn a commission from merchant affiliate links, including eBay, Amazon, and others.

BJamesBeck

32 Cal.
Joined
Nov 17, 2011
Messages
563
Reaction score
549
Location
Illinois
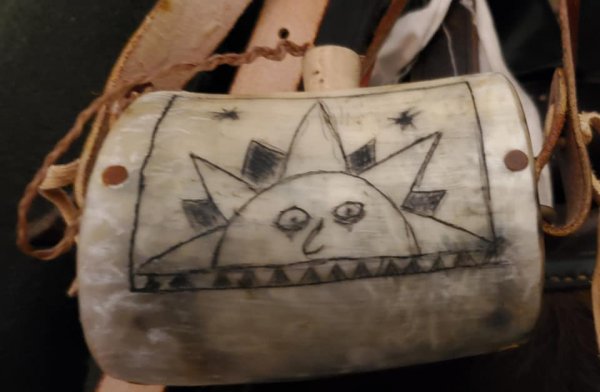
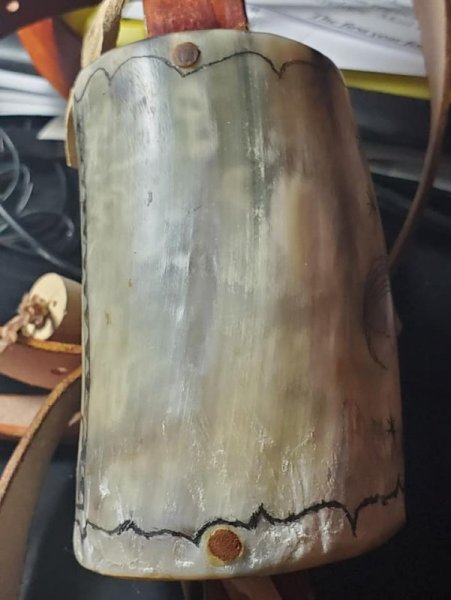
I'm sure some discussion on this has to exist on the forum here somewhere but after searching I can't find much. Basically, I have done some carving on my horn and plan to add more but am looking for the best option for dark fill down in the carving to make it show up well. So far I have just used a charcoal pencil which needs to be constantly sharpened to get down in the small grooves and is not very permanent. I am looking for an option that will maybe be a bit darker in the grooves and possibly easier to apply. I had thoughts of maybe wiping down the whole horn with a little bone black mixed with some tried & true and then rubbing it back, but I don't know if that's a ridiculous idea or not. Let me know what you guys use, here is a picture of the horn as it stands now.
20210411_174054.jpg
 
You can fill your cuts with all manner of things, tea, coffee, india ink, graphite; you name it. Permanent markers work well. The excess color can be easily removed with fine sanding pads (WOODCRAFT stocks them), and, the finest steel wool
works well.
 
Okay that makes sense. I guess before I was maybe a bit too concerned about getting the "fill" down in the grooves. I'm wondering if the bone black might help give the rest of the horn a bit of a more "used" appearance as well if I didn't rub back all of the black from the surface. Or perhaps black shoe polish? I guess I have some options to try! Thanks guys!
 
If you obtain a rough/junk horn & scrape it down enough to run some scrim test lines on it, you can try several different ways until you find what floats your boat for use on good scrim....
 
I have sprayed the horn with flat lacquer, then pencil my design, carve the design, fill with India ink, let dry, then sand everything until it looks good. Lacquer not traditional but it keeps ink from bleeding into tiny imperfections in the horn. You could also coat with shellac, which I guess is more traditional if that’s important to you.
 
I have sprayed the horn with flat lacquer, then pencil my design, carve the design, fill with India ink, let dry, then sand everything until it looks good. Lacquer not traditional but it keeps ink from bleeding into tiny imperfections in the horn. You could also coat with shellac, which I guess is more traditional if that’s important to you.

That's a good idea too. I may try that.
 
Scrimshaw... well, that is a matter of definition. Basically the artwork on cow's horn isn't scrimshaw, though is similar. I've got some horns with beautiful scratching and maps including one I just rehabbed from the dog getting it when she was a pup. I added to the original scratching. (photos) Now looking for ideas to fill in the one blank space able to be seen when the horn is tipped to drink. Horn carving is entirely different. It is actual taking away of material from the horn surface like you would with wood. It is not scratching or scrimshaw.

To answer your question, I hear artists using all sorts of things to use to color in the lines. (some horns had color as well as black line) I personally just use a sharpie permanent marker and a rough old washcloth to wipe away the excess off the surface. I do that for the colors now too. It helps to get the lines deep. Thanks to a friend making me as scriber with a thicker handle, I can do that now.
Biggest thing is to Have Fun doing it. Don't let yourself get frustrated.

Horn after repair before new scratching:
134283458_10214640250399923_2445660234967291179_n.jpg

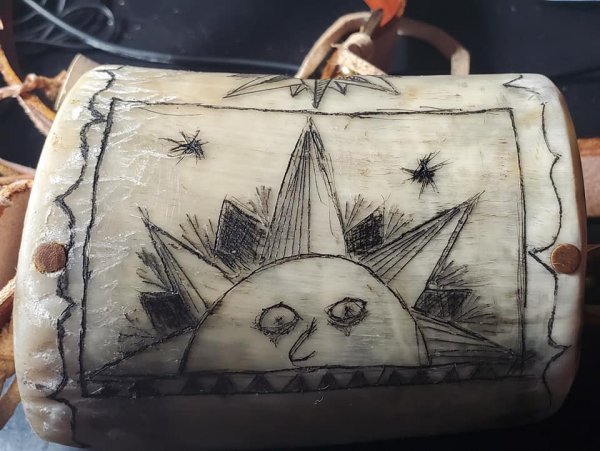
Horn after new additions. Note the puppy tooth marks still visible
134610913_10214641940802182_4116341664089491584_n.jpg


Top. added shading and a few 'rays'
133663153_10214640250999938_6012610392331405264_n.jpg

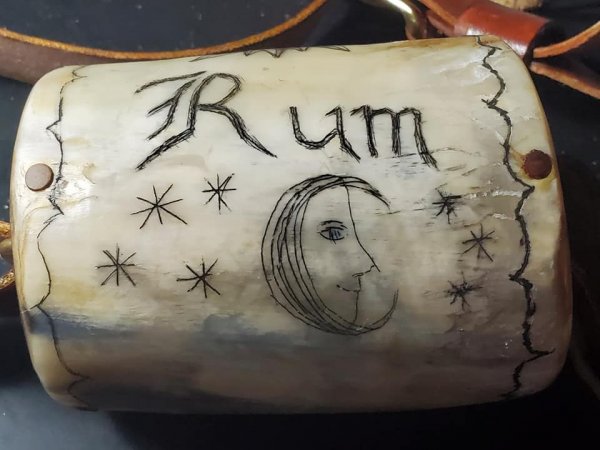
Added to the basic moon, corrected the nose and added stars then addd the 'trip' around both sides. corrected best I could, the Lettering. the U lookedlike a V and the M an N with a short tail. I may add a 3rd vertical line at the front of the R to make it more 'attached' to the letter.

134219237_10214641941082189_8402166964418981936_n.jpg


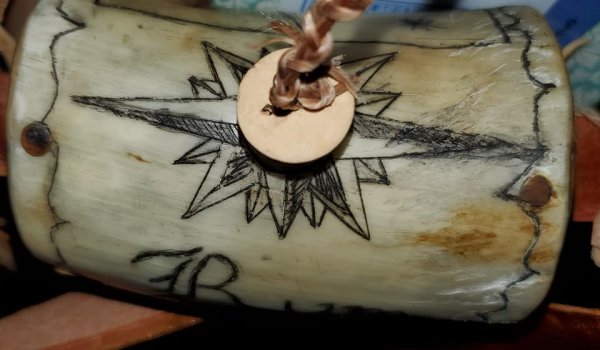
Blank placeoposite sipping opening. ... undecided what to put here.

134092815_10214641941322195_9118902267994978414_n.jpg

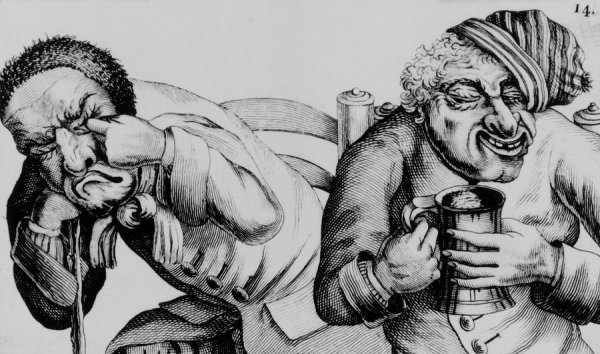
there is an etching of mental heath and shows two drunks. I may do something like it.
Drawing is from an 18th-century-engraving-of-alcoholics-national-library-of-medicinescience-photo-library
a characture of the one on the Right might be what I do.
18th-century-engraving-of-alcoholics-national-library-of-medicinescience-photo-library.jpg
 

Attachments

  • 134092815_10214641941322195_9118902267994978414_n.jpg
    134092815_10214641941322195_9118902267994978414_n.jpg
    61.4 KB · Views: 48
  • 134219237_10214641941082189_8402166964418981936_n.jpg
    134219237_10214641941082189_8402166964418981936_n.jpg
    52.7 KB · Views: 51
  • 134610913_10214641940802182_4116341664089491584_n.jpg
    134610913_10214641940802182_4116341664089491584_n.jpg
    78.9 KB · Views: 49
  • 133663153_10214640250999938_6012610392331405264_n.jpg
    133663153_10214640250999938_6012610392331405264_n.jpg
    48.3 KB · Views: 49
  • 134283458_10214640250399923_2445660234967291179_n.jpg
    134283458_10214640250399923_2445660234967291179_n.jpg
    37.4 KB · Views: 52
  • 18th-century-engraving-of-alcoholics-national-library-of-medicinescience-photo-library.jpg
    18th-century-engraving-of-alcoholics-national-library-of-medicinescience-photo-library.jpg
    174.9 KB · Views: 50
Scrimshaw... well, that is a matter of definition. Basically the artwork on cow's horn isn't scrimshaw, though is similar. I've got some horns with beautiful scratching and maps including one I just rehabbed from the dog getting it when she was a pup. I added to the original scratching. (photos) Now looking for ideas to fill in the one blank space able to be seen when the horn is tipped to drink. Horn carving is entirely different. It is actual taking away of material from the horn surface like you would with wood. It is not scratching or scrimshaw.

To answer your question, I hear artists using all sorts of things to use to color in the lines. (some horns had color as well as black line) I personally just use a sharpie permanent marker and a rough old washcloth to wipe away the excess off the surface. I do that for the colors now too. It helps to get the lines deep. Thanks to a friend making me as scriber with a thicker handle, I can do that now.
Biggest thing is to Have Fun doing it. Don't let yourself get frustrated.

Horn after repair before new scratching:
134283458_10214640250399923_2445660234967291179_n.jpg

Horn after new additions. Note the puppy tooth marks still visible
134610913_10214641940802182_4116341664089491584_n.jpg


Top. added shading and a few 'rays'
133663153_10214640250999938_6012610392331405264_n.jpg

Added to the basic moon, corrected the nose and added stars then addd the 'trip' around both sides. corrected best I could, the Lettering. the U lookedlike a V and the M an N with a short tail. I may add a 3rd vertical line at the front of the R to make it more 'attached' to the letter.

134219237_10214641941082189_8402166964418981936_n.jpg


Blank placeoposite sipping opening. ... undecided what to put here.

134092815_10214641941322195_9118902267994978414_n.jpg

there is an etching of mental heath and shows two drunks. I may do something like it.
Drawing is from an 18th-century-engraving-of-alcoholics-national-library-of-medicinescience-photo-library
a characture of the one on the Right might be what I do.
18th-century-engraving-of-alcoholics-national-library-of-medicinescience-photo-library.jpg

Great looking horn there! I've definitely already been enjoying it. I'll try the sharpie, I really like how dark your lines are!
 
The darker you want the line, the deeper it needs to be. Make sure your scriber is very sharp. It makes the job a lot easier.
 
I use pencil or charcoal to check the design, because they come off easily. When I’m happy with what I’ve done on the horn, I use India ink, applied to the incised lines with a toothpick, a quill, or a small brush. Do a small section, and wipe the excess quickly with a rag and some spit. Repeat on each section until the horn is done, then buff the whole thing to remove any excess ink.
Jay
 
Scrimshaw... well, that is a matter of definition. Basically the artwork on cow's horn isn't scrimshaw, though is similar. I've got some horns with beautiful scratching and maps including one I just rehabbed from the dog getting it when she was a pup. I added to the original scratching. (photos) Now looking for ideas to fill in the one blank space able to be seen when the horn is tipped to drink. Horn carving is entirely different. It is actual taking away of material from the horn surface like you would with wood. It is not scratching or scrimshaw.

To answer your question, I hear artists using all sorts of things to use to color in the lines. (some horns had color as well as black line) I personally just use a sharpie permanent marker and a rough old washcloth to wipe away the excess off the surface. I do that for the colors now too. It helps to get the lines deep. Thanks to a friend making me as scriber with a thicker handle, I can do that now.
Biggest thing is to Have Fun doing it. Don't let yourself get frustrated.

Horn after repair before new scratching:
134283458_10214640250399923_2445660234967291179_n.jpg

Horn after new additions. Note the puppy tooth marks still visible
134610913_10214641940802182_4116341664089491584_n.jpg


Top. added shading and a few 'rays'
133663153_10214640250999938_6012610392331405264_n.jpg

Added to the basic moon, corrected the nose and added stars then addd the 'trip' around both sides. corrected best I could, the Lettering. the U lookedlike a V and the M an N with a short tail. I may add a 3rd vertical line at the front of the R to make it more 'attached' to the letter.

134219237_10214641941082189_8402166964418981936_n.jpg


Blank placeoposite sipping opening. ... undecided what to put here.

134092815_10214641941322195_9118902267994978414_n.jpg

there is an etching of mental heath and shows two drunks. I may do something like it.
Drawing is from an 18th-century-engraving-of-alcoholics-national-library-of-medicinescience-photo-library
a characture of the one on the Right might be what I do.
18th-century-engraving-of-alcoholics-national-library-of-medicinescience-photo-library.jpg
now I know where that the saying I'd rather poke my finger in my eye!!!
 
I take the horn down to a 220 to 320 finish, this is smooth but will take a pencil drawing and show it up nice, i use a #2 pencil and draw in my design, lettering and whatever, when I'm sure everything is the way I want it, I do use up more erasers than pencils, I scratch in the pencil lines with my skim tools. With a watercolor brush and india ink I fill the scratchings and let the whole thing dry out. With 0000 steel wool I clean the body of the horn, this also smooths out the horn where the scratching has raised it. Look it over, touch it up, add new inspirations, ink it up again and steel wool it again. When I'm satisfied I boil the finished horn in Tea, this gives it a nice parchment look, softens it up for the buttcap installation, and does not affect the ink imbedded in the scratchings. You can do the same thing with a finished horn, and ship the boiling.
Good luck!!!
Robby
 
looks like that your puppy is on his way to doin scrimshaw on horns?
......
have you tried 4000 steel wool in the teach marks?

You should have seen it before I used the scrapers etc. I don't have a before photo, but the entire end was chewed out and there were quite severe marks. What remains is an attempt to restore the horn without removing the artwork from the original artist seen in the first photo. Wish I could remember who made it. The artist did not mark with sign or initials.

I may go with a character of Sir Barleycorn. In the blank space.
 
Back
Top