• This community needs YOUR help today. We rely 100% on Supporting Memberships to fund our efforts. With the ever increasing fees of everything, we need help. We need more Supporting Members, today. Please invest back into this community. I will ship a few decals too in addition to all the account perks you get.


    Sign up here: https://www.muzzleloadingforum.com/account/upgrades
  • Friends, our 2nd Amendment rights are always under attack and the NRA has been a constant for decades in helping fight that fight.

    We have partnered with the NRA to offer you a discount on membership and Muzzleloading Forum gets a small percentage too of each membership, so you are supporting both the NRA and us.

    Use this link to sign up please; https://membership.nra.org/recruiters/join/XR045103

charcoal pack case hardening

Muzzleloading Forum

Help Support Muzzleloading Forum:

This site may earn a commission from merchant affiliate links, including eBay, Amazon, and others.
Joined
Dec 25, 2011
Messages
8,777
Reaction score
3,761
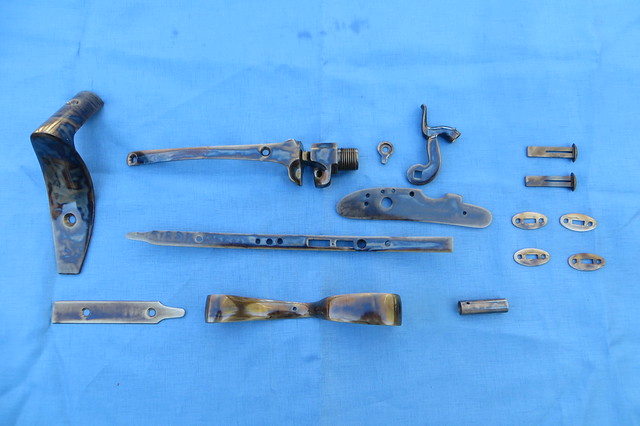
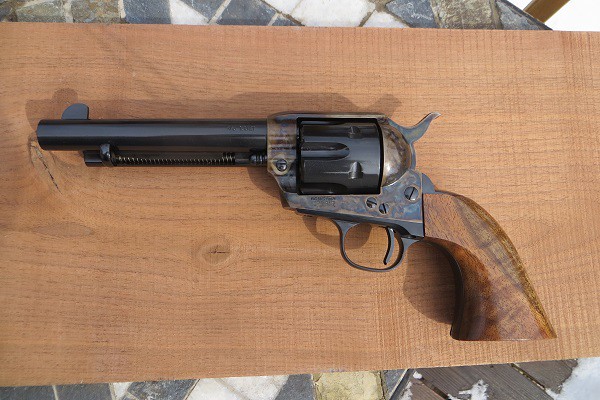
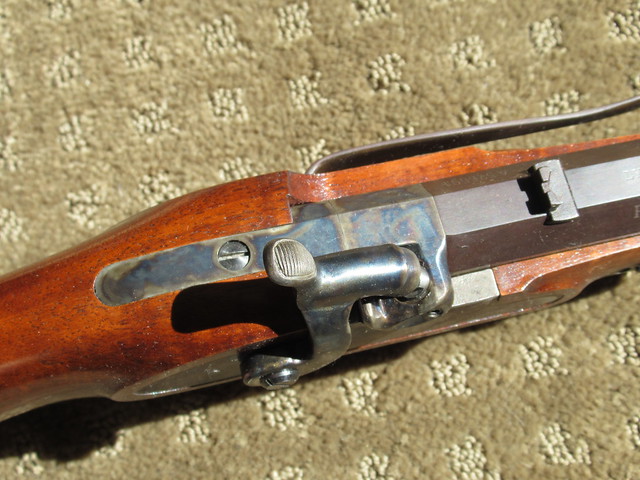
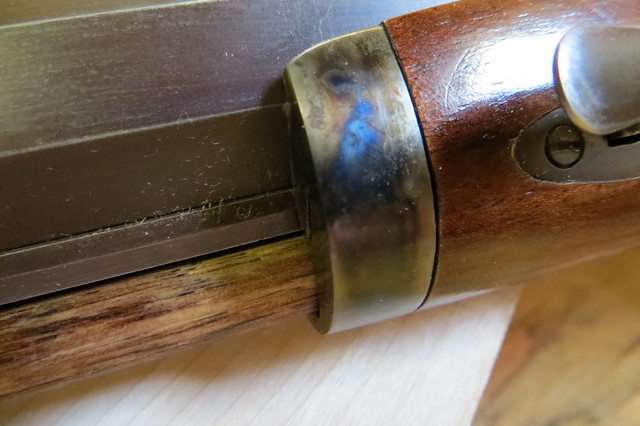
I'd like to hear from some of you folks that do this as I am always interested in hearing of new means and methods to improve results.
I've been doing it for about 15 years now after reading all I could find on the subject from Oscar Gaddy who has gone over the great divide but was very knowledgeable of the process and published quite a bit of information on it.
Any aspect of the subject would be welcome from charcoal,crucibles,temperatures , blocking, quench, time in oven and etc.
 
I have wrote about the process of color case hardening both here and on several other forums. It is not that difficult a process (I often have 100 level students doing it in my college classes) if you have a good furnace that you can accurately control. I developed an inverted crucible design that makes the transfer of the crucible contents to the quench with minimal air exposure possible. I generally keep my temps at 1450. Much higher and parts get too dark, lower temps (under critical) give more vibrant colors but do not produce optimal hardening. I also use high quality charcoal from places like Brownells, Berger Brothers, and Ebonex. I have done this now for over 15 years and much of that time has been with the assistance of university laboratory facilities. I can tell you that seeing this stuff under an SEM like Gaddy did is an experience and you can learn a lot from it.
 
Thank you, I'll do some searching for your earlier posts on it.

Back in the 18th century, it seems all but the higher/highest grade locks were made completely from Iron - with the exception of the springs and sometimes/more often the "Steels" or what we call the Frizzen today. So even the lock plates had to be casehardened back then, while today lock plates are made of tougher steel and are often not case hardened or hardened and annealed.

Since in the 18th century many/most Tumblers and Sears were made of the very same Iron the other parts were made from; I have often wondered if both parts then case hardened to the same Rockwell Hardness OR if the Tumbler with more mass of Iron did not harden as much as the Sears?

Of course it would seem they would have wanted the Tumbler to be as hard, if not a little harder than the Sear? That way the Sear being the cheaper part to fashion, would wear faster and would be replaced sooner than the Tumbler?

With that in mind, I wonder how modern steel parts, that will sometimes be made from different steels, will caseharden when put in the oven for the same length of time?

Of course since I retired from the Marine corps, I no longer have easy access to a Rockwell Hardness testing machine, so I have no way of testing the hardness of each part compared to the other.

Gus
 
Casehardened parts can be tricky to test hardness because the thin shell will be pressed into the softer core. I use a micro Vickers hardness tester when I need this info.

Other than the colors there is really not much that is new here. Lots of articles and books have been written on the subect of carburization and the answers you are looking for are readily available. Keep in mind that more modern compounds for this process are considerably more efficient than simple charcoal and the employ much better energizers than the bone charcoal that we use. Temperatures are also much higher which gives faster and deeper case thicknesses, though with the disadvantage of increased grain size.
 
What can be added to bone and wood charcoal to get brighter colors? I have tried leather but don't see much if any difference. I also tried adding Bone meal once without much success. It might need oven curing before used as an additive.
Wonder what Turnbull is using in his pack color case hardening?
I've got some good casing information from Browns English double guns of England that is quite excellent. They only use bone charcoal for the most part. Colors are mostly brown,tans and creams according to the article.
Personally I like the blues and reds with tan and cream mixed in.
 
Potassium nitrate added to the quench will bring out more of the blue colors. Potassium Cyanide will bring out reds though I wouldn't mess with it. I have tried it and do not like the added risks associated with it, though I think it was probably used along with charcoal in some formulas in the 19th and early 20th century. I have had no trouble getting good vibrant colors with nothing more sophisticated than regular wood and bone charcoal mixes. I don't think anything else added to the mix would be needed to recreate 18th and early 19th century work.

If you do want to try something different try wrapping your parts in soft iron wire before putting them in the pack. You will find that this definitely does improvd the colors. I think this is partly due to the disruption caused during the quench and also the fact that the charcoal stays in contact with the parts longer during the quench--basically like what happens in areas around blocking where the charcoal cannot fall free.
 
Gaddy was a big believer in blocking and shielding the parts. He said one wants to let the water in to the parts laterally rather then diving down through the water column. The shielding was as you have described with the wire wrap, to hold the charcoal onto the surface contact for a longer time. I think the packing helps aid this process as well.
I notice he liked entering his parts end wise into the quench. I've experimented and made crucibles for both end and lateral entry. It seems to me that the later works better for color but has more warp potential.
And blocked or not all case hardened steel is subject to some amount of warp every time which is the reason gun manufactures had both soft and hard fitters working on guns to completion.
 
The most beautiful case hardening coloring I have ever seen was on Jaegers made by John Braxton. He lived out east somewhere and camped next to us at Friendship. Wonder if he is still with us.
 
These parts were wired together to form a column of sorts. The goal was to have them enter the water length wise. No attempt at shielding other then the fact that it was one loose mass. Plain wood and bone charcoal was in the crucible and the water I use is city tap water. It's about 50 degree water and the barrel had some used charcoal in it. After doing the critical temp I lower the furnace temp before quench. Warping is minimal. I've been fiddling at this color case hardening for about 25 years and feel it's a fairly simple process with lots of little details. :hmm:
IMG_1099 by Oliver Sudden, on Flickr
 
I do a quite a bit of case coloring of whole gun action receivers and you will always find warping of breech block mortises no matter how well blocked or sheilded. These are very tight tolerances and often stoning is required to get them to fit and operate properly.
Nice color, especially on the butt hook.
An action receiver used for making cap lock muzzle loaders occasionally.


I sand blast then bead blast to get these flat colors that knocks down some of the Gawdyness that makes some guns look like and electric guitar made in Juarez Mexico. :rotf:
 
Nice job.What are you coating them with when competed.
Do you draw the temper after removing from the quench?
I only showed the action and not completed gun as I had no lock plates, hammers or trigger bows from any muzzle loading projects I could show and figured I'd still be within the rules with gun parts.
When I was in the service and stationed at White Sands I kept hearing of a fella near El Paso that made some nice percussion guns using Old Rolling Block actions that could be had very cheaply then.
Never could find him to make a purchase but thought he had a very good idea and wanted to see some of his work.
How often do you change the quench water and do you aerate?
 
I only lightly oil the parts after drawing them at 375* for at least an hour. Quench water is generally mostly fresh water that is aerated for a couple of hours and the bubbler is removed just before the parts are dumped. These parts are shiny due to the polish, most things I do are polished to 320 grit.
IMG_0256 by Oliver Sudden, on Flickr
 
Phil, do you give the crucible any rest after leaving the oven before quenching? I read to let it set a full 2 minutes after leaving the oven before the quench,this from Browns Double Guns of England a forth generation high end double shot gun builder and now use it regularly.
I have no idea how much it lowers the internal temp but it does seem to yield better color.
I doubt the temperature drops much below 1375 F. or so in 2 minutes internally but that is just a guess as the charcoal and ash seems like a pretty good insulator.
They (person writing the Browns Double article) didn't say so but I think the rest has to do with the critical change in steel when the carbon is locked in the metal to give the case, the temperature actually rises without external heat source. The quench needs to happen before the carbon can change back to pearlite as the temperature drops. The trick is to quench while the temperature is still high enough to make a good case and low enough to yield good color from what I can gather in all these writings on the subject.
I've been experimenting with dual temperatures as high as 1525 for 1.5 hours then the oven is set to drop to 1400-1450 for 1.5 hours then the quench after a 2 minute rest. The idea is to drive in the carbon as much as possible with the higher heat then let the reduced head allow for better color at the quench. I got the idea from the double heat treat used on Springfield rifles to keep then from blowing up after WWII. I don't see much difference in color but it should make the case deeper.
Gaddy used temperatures in the 1500 F range and quenched right from there. Lots of variance in times and temperatures written about in this endeavor.
 
Case color hardening need not be complex or costly for small and non critical parts. This piece I did in a camp fire while cooking meat and having a sip of whiskey. A length of pipe with one end welded shut and a plate of steel as a cap was filled with charcoal mix, the part in the center, and heated red. After a couple of hours it was dumped in agitated water. Both color and hardness is good.
IMG_0581 by Oliver Sudden, on Flickr
 
Back
Top