• This community needs YOUR help today. We rely 100% on Supporting Memberships to fund our efforts. With the ever increasing fees of everything, we need help. We need more Supporting Members, today. Please invest back into this community. I will ship a few decals too in addition to all the account perks you get.


    Sign up here: https://www.muzzleloadingforum.com/account/upgrades
  • Friends, our 2nd Amendment rights are always under attack and the NRA has been a constant for decades in helping fight that fight.

    We have partnered with the NRA to offer you a discount on membership and Muzzleloading Forum gets a small percentage too of each membership, so you are supporting both the NRA and us.

    Use this link to sign up please; https://membership.nra.org/recruiters/join/XR045103

Building a Chambers Isaac Haines rifle kit

Muzzleloading Forum

Help Support Muzzleloading Forum:

This site may earn a commission from merchant affiliate links, including eBay, Amazon, and others.
Hi,

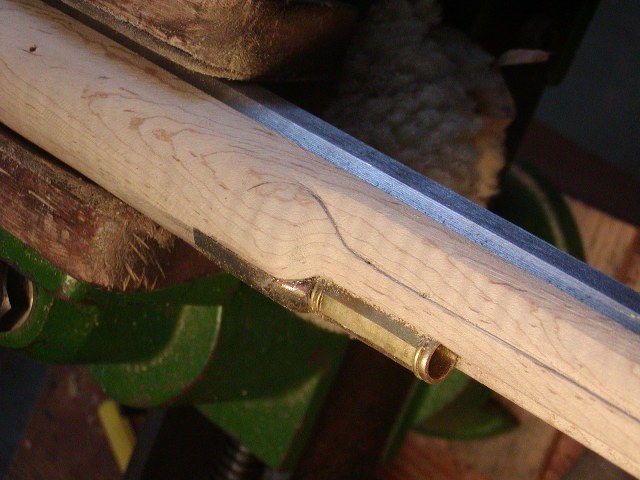
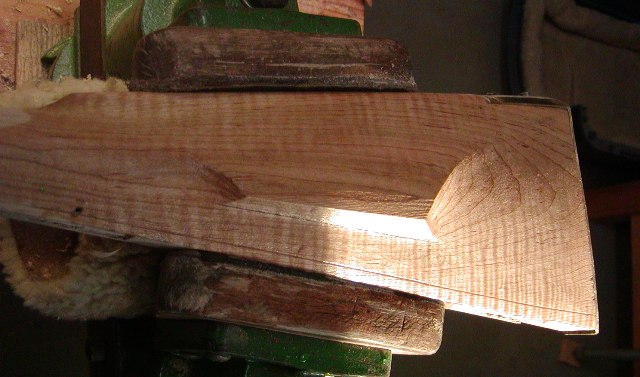
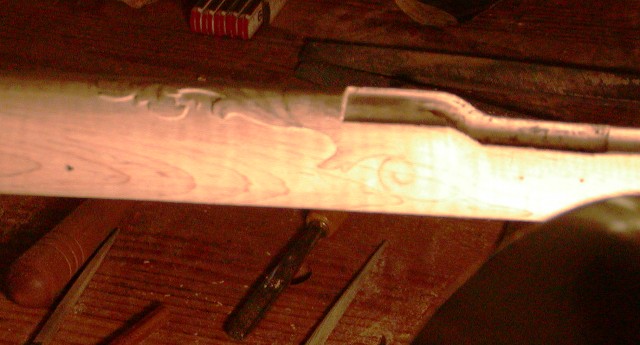
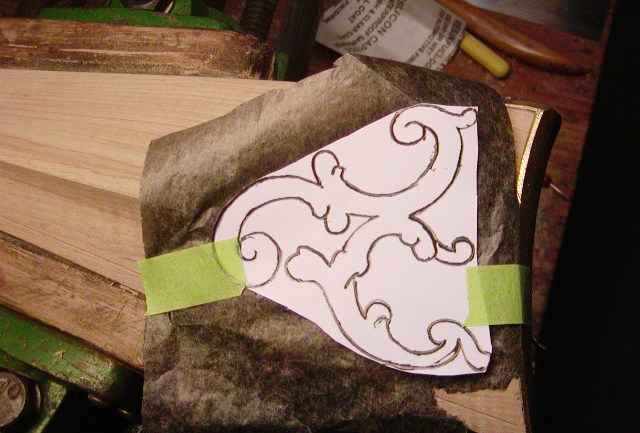
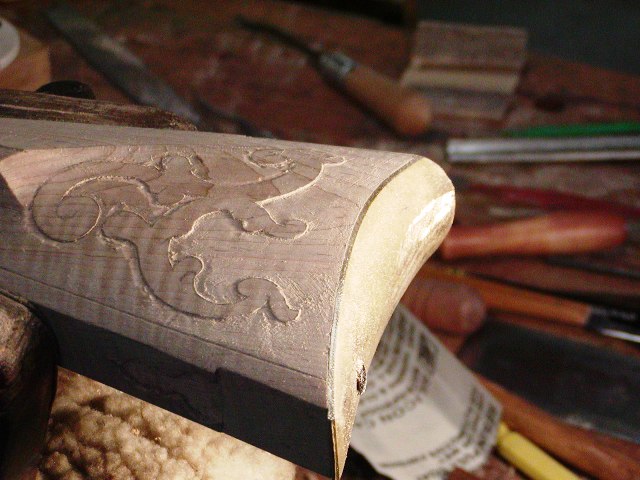
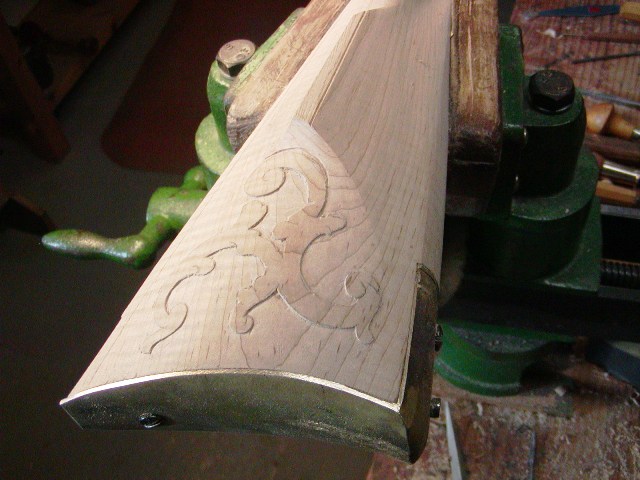
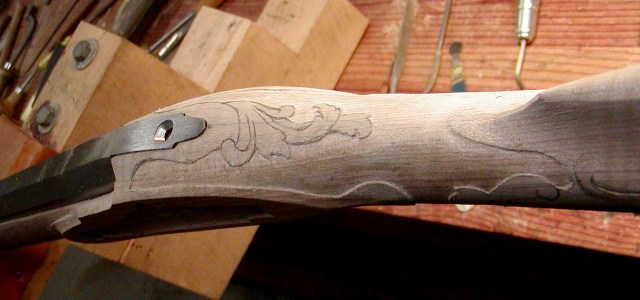
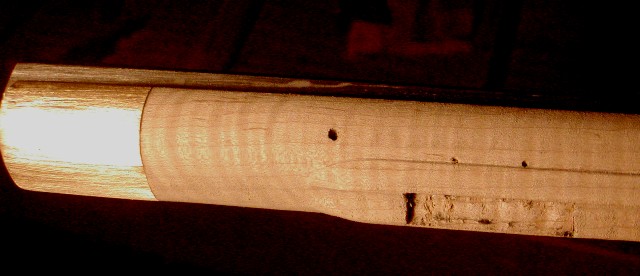
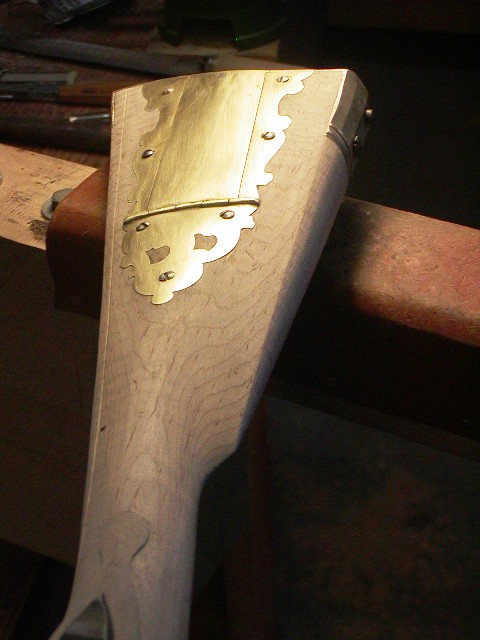
I got some shaping done in preparation for carving. I essentially bring the gun almost to a condition ready for stain before carving. I wanted to show how I handle the breech area of the stock. As far as I can tell, Haines shaped that area the same way. The stock should be flush or almost flush with the barrel flats at the breech so there is no significant step down from the surface of the wood at the breech to the barrel. There are plenty of original long rifles by less skilled old-time makers who did not do that but they were not of the same caliber as Isaac Haines. I use a coarse half round file to shape the wood into a slight concave surface that brings the edge of the wood very close to barrel flats.
C7pivod.jpg

284Y7ff.jpg

rE7NTvp.jpg

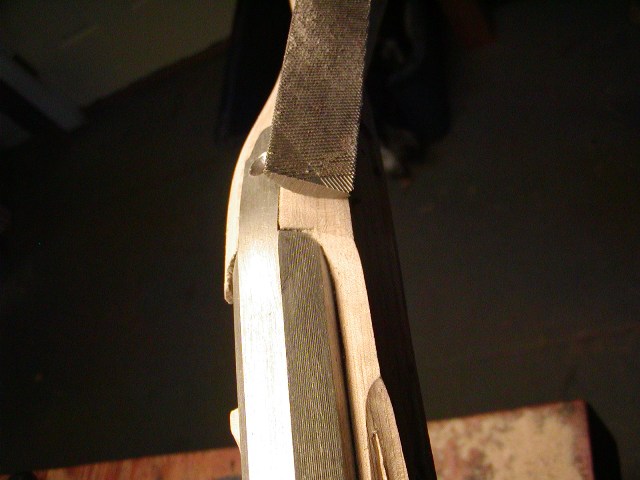
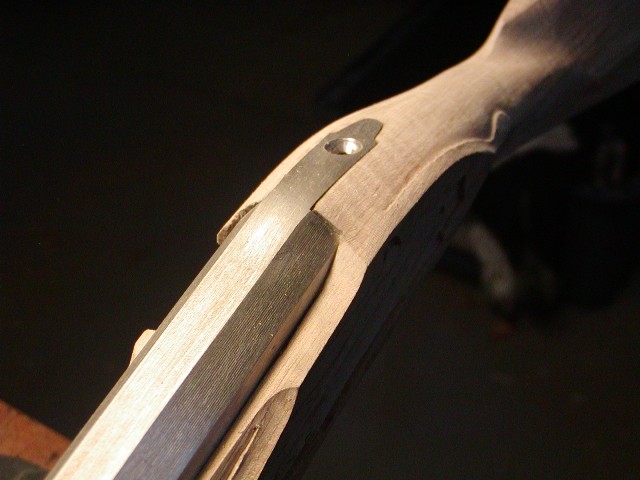
I do it equally on both sides of the barrel tang.
e8qQo81.jpg

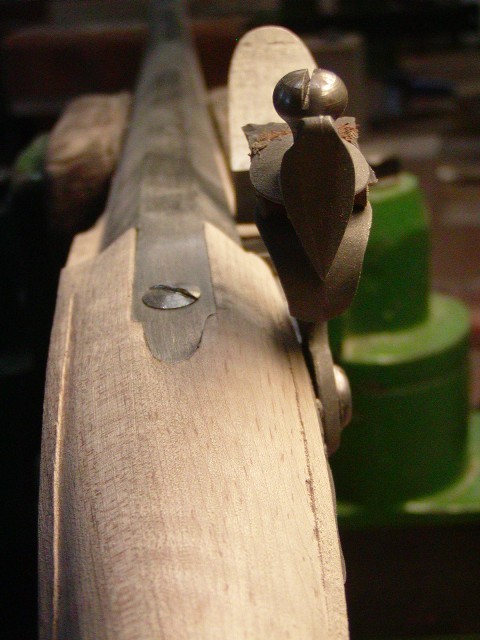
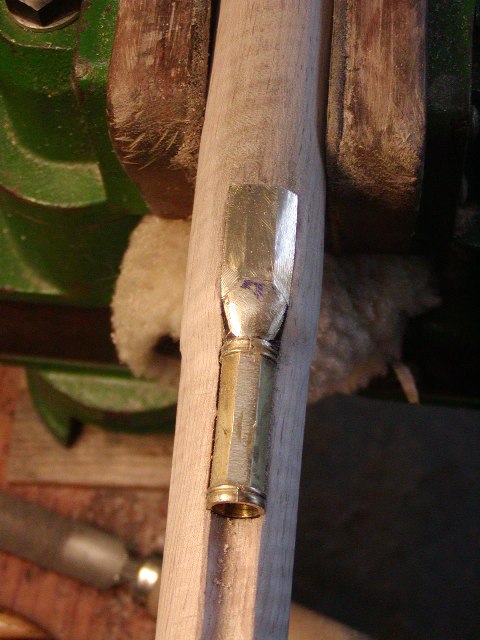
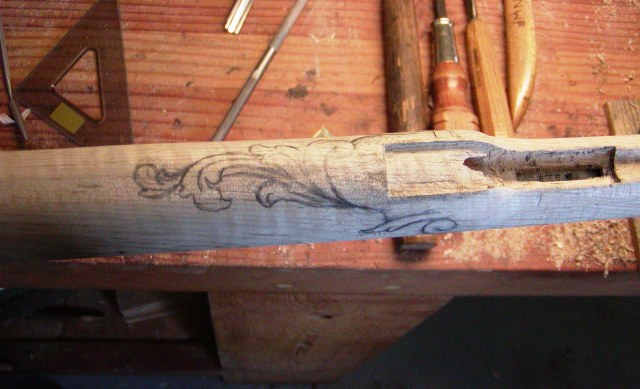
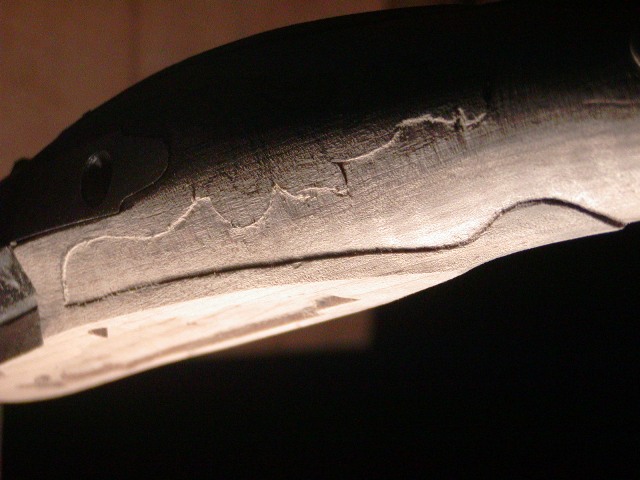
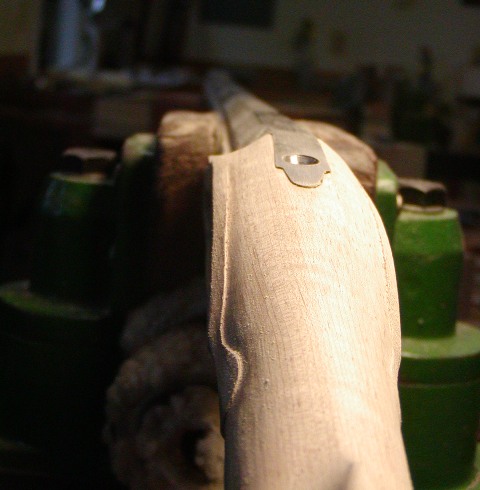
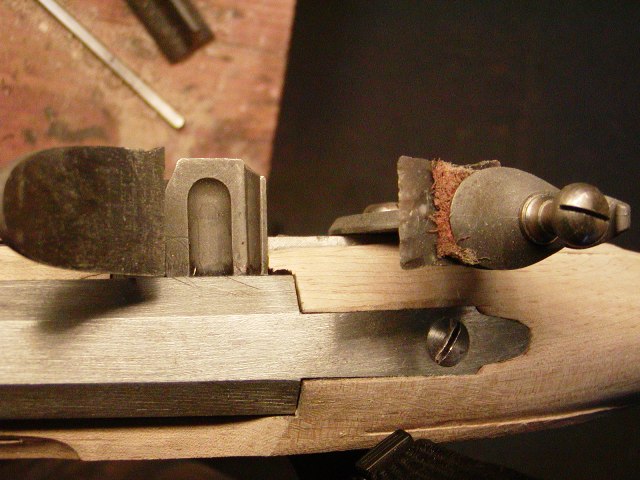
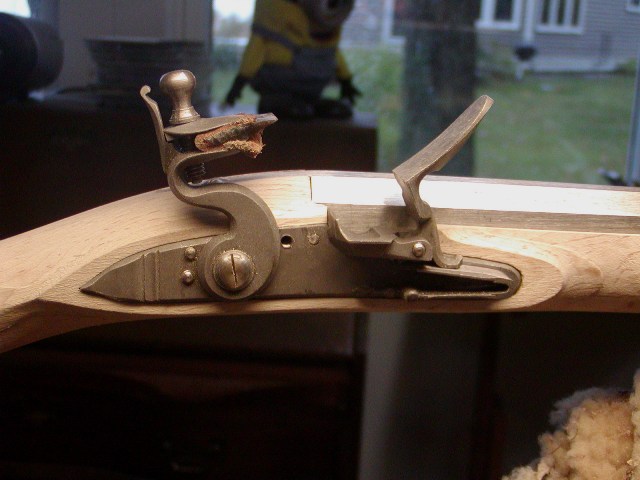
Doing that on the lock side also allows you to avoid the ugly notch so many guys file in the wood to clear the shoulder on the flint cock. Those notches are always blemishes and Haines saw no need for them and neither do I. By making the stock concave or at least flat but flush with the barrel, the flat molding around the lock will, by default, be very thin behind the pan. That thinness combined with tapering the edge of the lock mortice inward to expose more of the lock plate bolster where the flint cock rests eliminates the need for a notch. It is a neat way to make room for the flint cock and it looks so much better than a notch. It is also the way Haines handled the problem.
5iRXddK.jpg

A5CsJmU.jpg

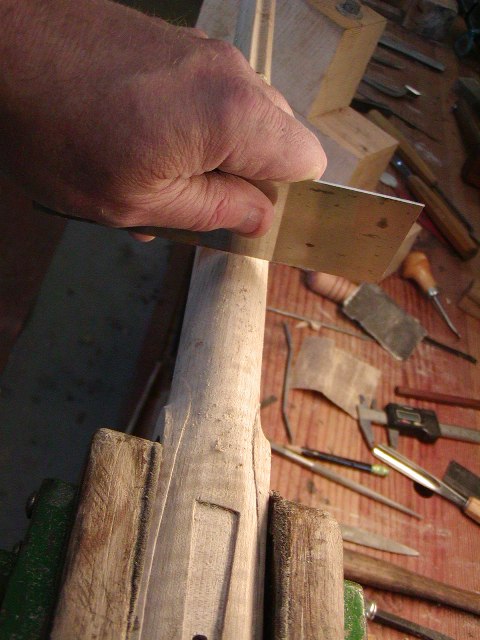
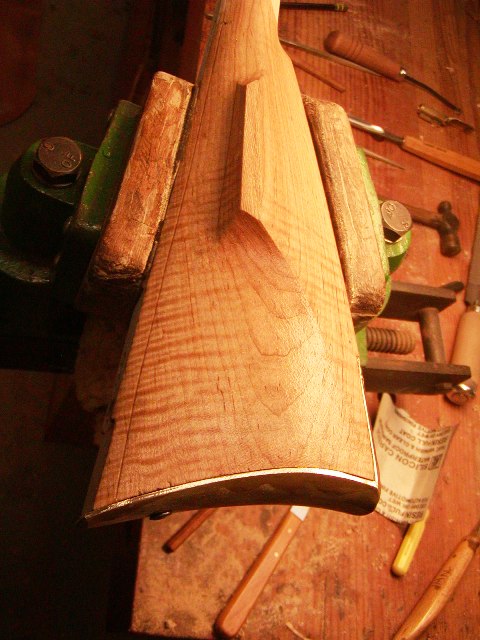
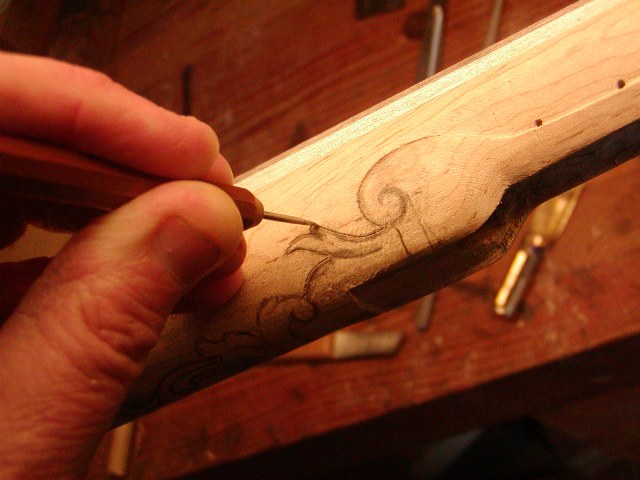
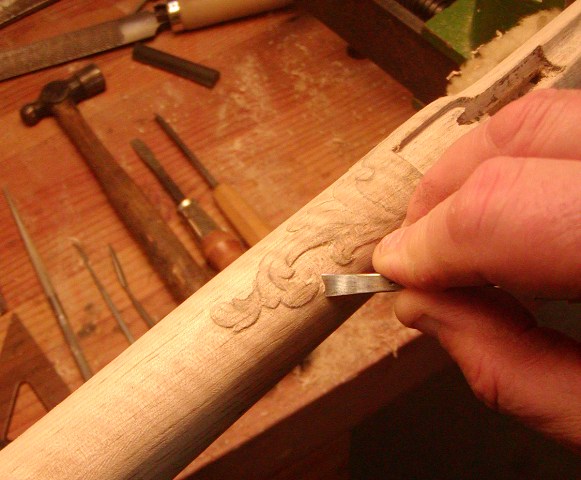
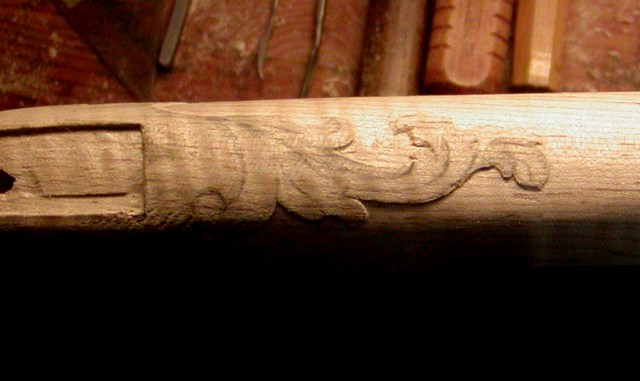
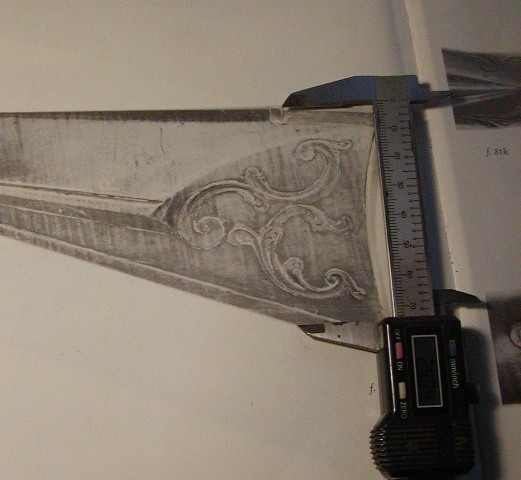
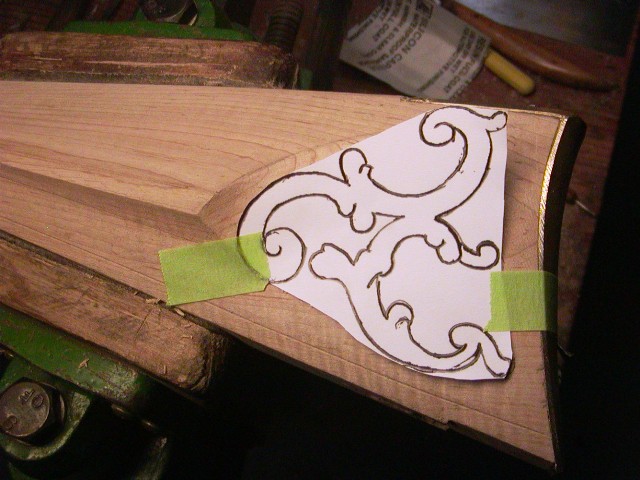
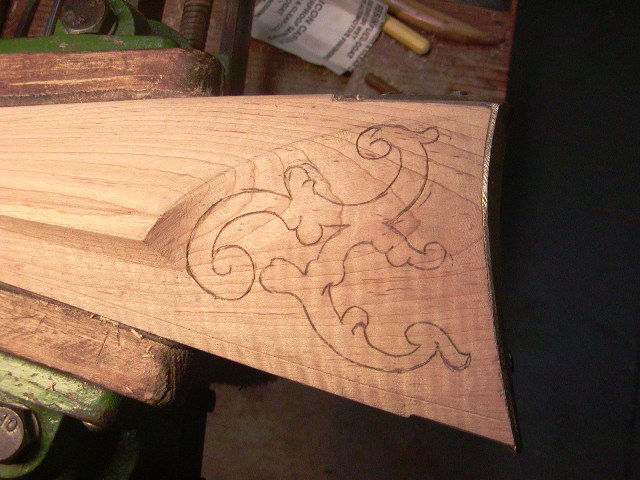
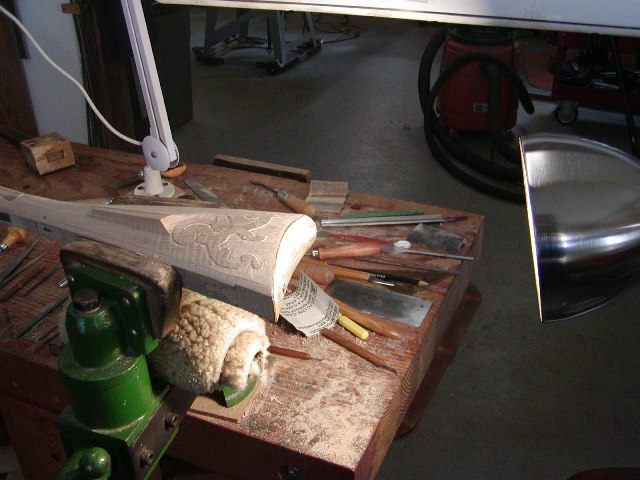
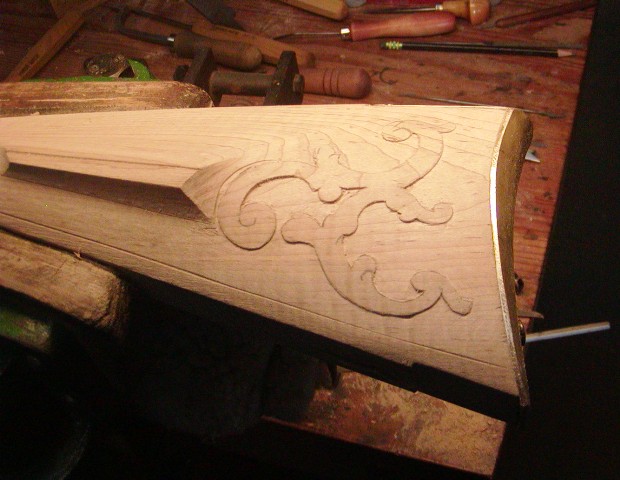
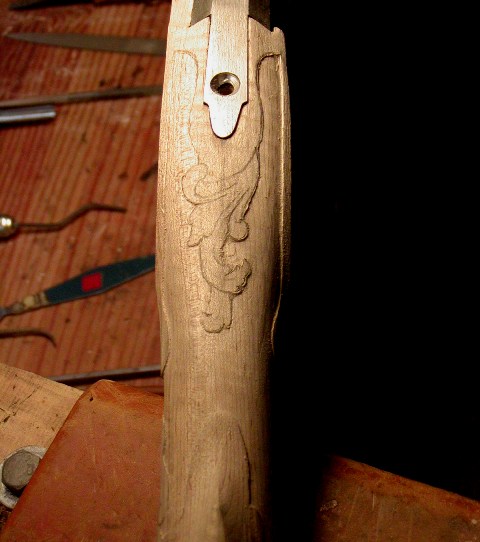
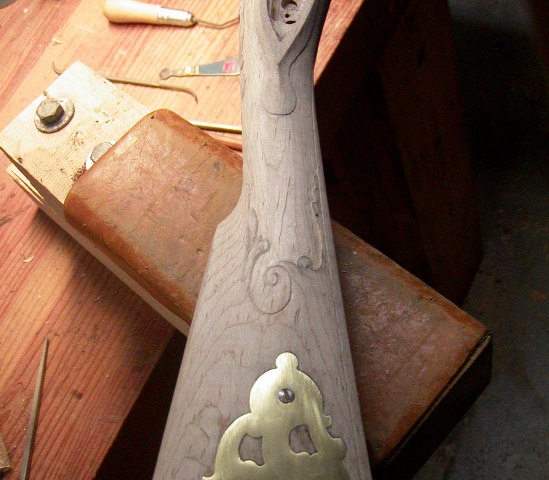
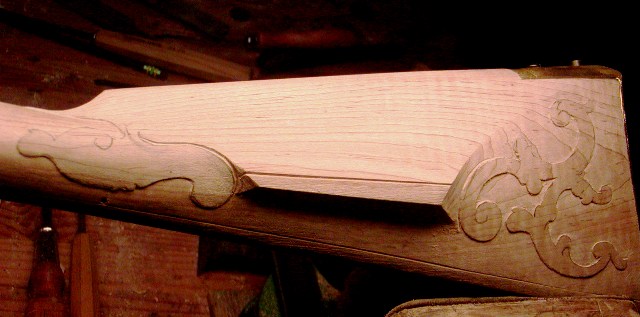
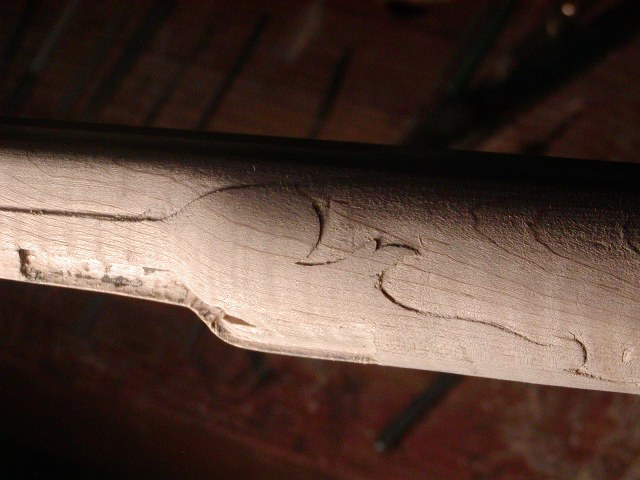
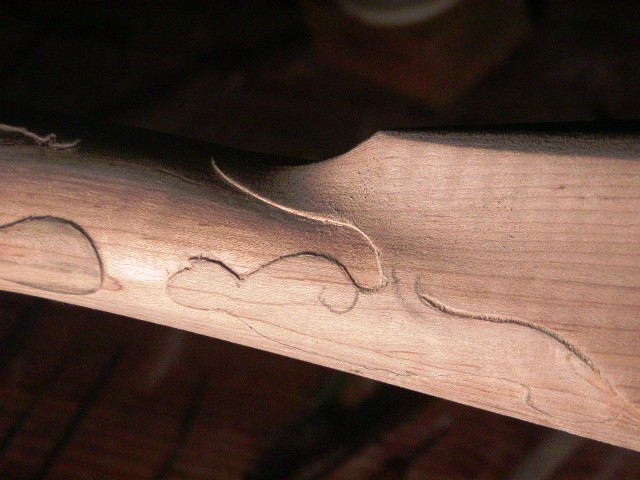
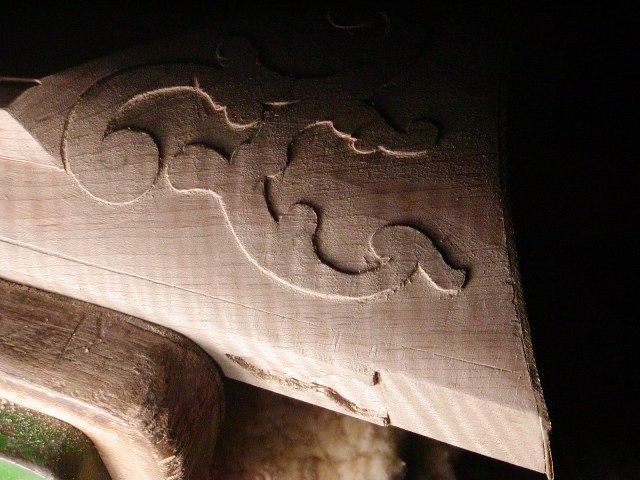
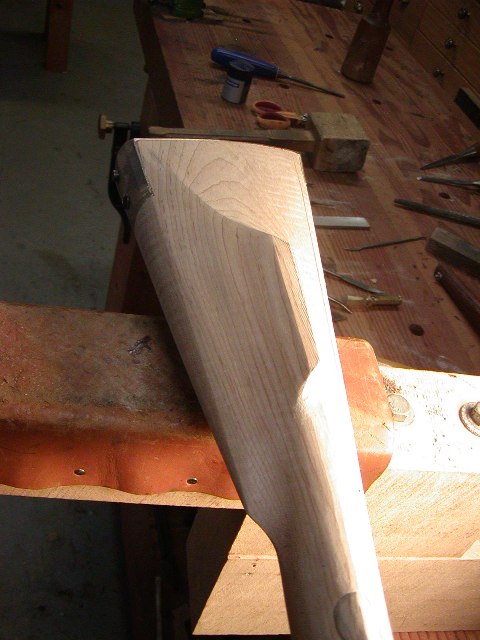
Isaac Haines was a very great American gun maker. He was great because he maintained crisp beautiful architecture in his guns and was a superb stock decorator. It is a shame that we don't know more about him. Like Isaac Berlin, Haines demonstrated architectural and decorative sophistication well above most of his contemporary gun makers in 18th century America. To presume to make a gun labeled an "Isaac Haines" means you accept the challenge of matching his design and artistic genius. To do that, I have to recreate that architecture and crisp style, which establishes the background for the carved decoration. In addition, it results in a rifle that fits and handles really well for shooting. Using files and scrapers I shaped the butt stock in preparation for carving. Note the crisp angles, facets and edges. That is how the original rifle was done and the result is a gun that is efficient, functional, and beautiful. Those lines and facets also serve as the borders for the carving. Haines was a very great artist.
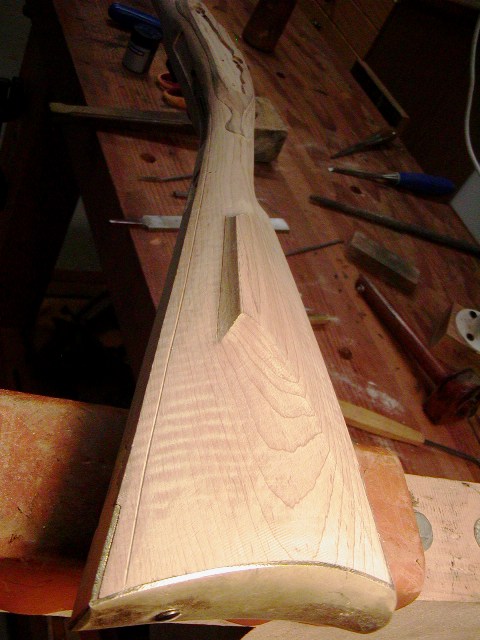
Mxlf02S.jpg

WUVCfHB.jpg

u8VIF8f.jpg

PpPF8UZ.jpg


dave
 
My "poor kid, in the expensive candy store," feeling is rising.

I appreciate not only the beauty of the product, but your clear explanation and reasoning that even this simpleton non-builder can follow.

Thank you.
 
Hi and thanks for looking and commenting,
Just a short update today. Tomorrow I should start carving. I wanted to include some images of the fore stock and rear ramrod pipe area that show some of the architectural details associated with this rifle. This is the fun stuff for me. I enjoy inletting all the parts and rough shaping stocks but those tasks are more chores than fun. The final shaping, carving, and engraving are fun and diving into the details of a particular maker's style is even better. The photo below shows the profile of the fore stock. The low angle light shows the "V" shape nicely. The edge or ridge will be rounded over somewhat and the top edge along the barrel channel feathered into the barrel but that final shaping will happen later.
BtqJCxD.jpg

These photos show the step at the rear ramrod pipe. The dark areas on the edges of the pipe is left over Dykem blue. Haines gave the step a slight bulging appearance, which blended nicely with his carving. I've captured that feature here. Tomorrow, I will cut the outline of the tang carving.
kklCTzC.jpg

BqZCVME.jpg

During shaping and finishing, I use scrapers a lot. Here I am scraping the bottom of the fore stock with a carpenter's card scraper getting rid of a slight belly in the profile caused by the excess wood of the squared portion left by Chambers. Very effective as scrapers are the cheap carpet scraper blades available from any hardware store. They come in packages of 5 and can be sharpened over and over on a stone.
b6hRQCA.jpg

More later,


dave
 
As someone else already commented, we appreciate your explanations! Instead of just merely saying do this - which is ‘instruction’ ... when you add WHY one should do it - that is ‘education’.

Thank you for that!
 
Might as well just fess up. Dave is building this beautiful rifle for me.

I had this Haine's kit sitting in the gun safe for several years. As I thought about it, I decided I wanted that one to be something special. While I can do a basic build and have it turn out looking fairly nice for a plain gun, I would never pretend to have the knowledge and skills to do what Dave does. From everything I've seen, and in my communications with him, Dave is truly a MASTER gunbuilder and clearly is passionate about accuracy and quality.

While I have several really nice rifles that are representative of 'the times,' I don't have one that would be representative of a specific rifle built by a Master of the 18th century. After reviewing a number of reference materials, the Haines #81 in Rifles of Colonial America Vol 1 really spoke to me and Dave agreed to do it for me (even though he doesn't like kits....thank you Dave!) As Dave has mentioned, the barrel on the kit is several inches shorter than the original as most Haines kits come with 38" barrels, and we agreed to modify the beaver tails to be like the RCA Haines #78 instead since neither of us liked the ones on #81. But other than that, it will be as close as the kit allows for Dave to recreate #81. He had to hand create the gorgeous patchbox lid (can't wait to see it engraved) because this kit comes with a dovetailed wood lid instead of brass.

As far as kits go, this Haines kit from Jim Chambers was pretty good. I ordered it with a high-grade maple stock (it was marked "M7") and it will not disappoint! The curl is even and tight, pretty much exactly what one sees when reviewing the pictures of #81, which for a gun of probably 230+ years of age is in remarkable condition.

This gun won't be just sitting inside on display. I fully intend to use it, as it should be. It should turn out to be a relatively light weight rifle to carry in the deer woods and at .54 caliber will be a quite capable big game gun.

Lastly, my thanks to Dave for the work he does for ALL of us to document his builds in such details and with the WHY of the actions he is taking. This takes a lot of Dave's valuable time and is a "give back" to a pastime he clearly loves. As has already been said, Dave is providing EDUCATION, not just merely a step-by-step building guide. Even though most of us will never be building something like this, Dave's education heightens our awareness and improves our insight into these beautiful guns of the past. Very, very much appreciated, Dave. Thank you.
 
Hi and thanks everyone for your interest and comments,
I started outlining the carving after my first stock whiskering. I whisker stocks as part of my final shaping process. Each time I scrape or sand after the whiskering the stock is closer to final shape. I do a first whiskering before cutting the carving outlines (no carving details). Then I whisker again after cutting the outlines. Usually that is enough and I can cut the carving details but if I need another whiskering, I do it before detailing the carving. Finally, I cut the details and try to make the knife, chisel, and scraper cuts the final finish in the carving. I don't always succeed in that and have to resort to rifflers to shape some details, but I usually scrape those surfaces again with tiny scrapers as a final finish surface. The first photos shows the butt stock dampened during the first whiskering. You can see grain and rough patches. It also shows up the fabulous curl in this stock.
guxQAHR.jpg

t6U8RQf.jpg

After scraping and sanding that first whiskering, I cut the outlines of the carving. On this rifle there is a lot of very high quality carving. I start with the carving around the rear ramrod pipe. I do that for a very good reason. I am trying to learn Isaac Haines carving and the rear pipe gives me a place to do it first on the gun (after practice on scrap wood) in a place where few people would notice any mistakes. I am serious. I always start there for that reason. It gives me a one more chance to understand the wood of the stock with respect to carving before I commit to carving areas that are much more obvious. Every stock is different and every effort to carve a stock has a probability of failure no matter how good you are. I try to minimize my risk of failure. Look at original long rifles. The worst carving on the gun is usually around the rear ramrod pipe. Wonder why? Of course it might be that by the time the old master got to carving the rear pipe, he was tired of carving the gun but I like to think he started there.

Here is the design drawn on the wood.
Jedmdwo.jpg

It is as close to an exact copy of RCA #81 as I can make. It will be repeated in almost exact same detail around the barrel tang as per Isaac Haines. After drawing it on the wood, I stab the design in with a little flat chisel.
exCCJDE.jpg

This is important. You could also outline carving using a "V" chisel, which is usually much faster. The photos I have of RCA #81 are black and white and do not show those details. Instead, I had to look at other Haines rifles pictured on the Kentucky Rifle Association CDs. You can blow those color images up very large and the guns shown have many carving details identical to RCA #81. Based on my close examination of those examples, I believe Haines stabbed in his carving but later cut some edges with "V' chisels to highlight the carving. That is because the "V" groove stains dark and accumulates finish making the edge of the carving pop out. However, the crisp, vertical edges of much of the carving suggests they were initially stabbed in. So my strategy is to stab in the designs and then use a "V" chisel later to highlight and create depth in the edges. We will see how that works out.

I back cut the stabbed borders and then relieve the wood background and smooth it. Keep in mind, carving is very low relief so the edge is not high. When smoothing a background, low angle light is essential because it illuminates the dips and gouges. Turn off all other ambient light and just illuminate the stock with a single light at low angle. I smooth backgrounds with scrapers, flat chisels, and flat riffler files.
ttgz18n.jpg

uEwJ67E.jpg

DELhJxC.jpg

More to come


dave
 
Hi,
I am going to show you how I scale and transfer a design on to the stock for carving. Keep in mind, I am copying from the original rifle. That is my objective. If I was making my own art I might use this method from my drawings or free hand draw the design on the wood. However, Mike wanted me to copy Haines as best I can. I am not sure there were many posts on this and other forums about how to do this so I am showing you how I do it. I trace the original carving from my book "Rifles in Colonial America Vol 1" in ink on inkjet transparency sheet.
PZXcjva.jpg

Then I measure some dimensions from that photograph to determine a scaling multiplier. In this case, I measured the width of the butt stock at the end of the butt plate return and the distance from rear edge of the cheek piece to the outside edge of the butt plate.
tsDGEdz.jpg

DpSZe09.jpg

Then I measure those same dimensions on my stock giving me a larger values into which the photo dimensions are divided. That calculates a scale multiplier and I average the two scalers so I have a single value. I scan my tracing and insert the image into a PowerPoint slide and increase its size using the scaler. I print out the scaled tracing and tape it to the stock.
Ccxi8E5.jpg

Then I insert graphite paper under it and trace the outline on the stock. Now I have an exact copy of the outline of the carving on my stock.
ByOqfcl.jpg

K3wvPNx.jpg

I stab in the outline and then remove the background.
iMLq6l3.jpg

cEWkKoJ.jpg

When cleaning up the background, I illuminate the work with a single low angle light, which highlights the rough areas.
KAEsfjl.jpg

dBNClY4.jpg

Those are smoothed with scrapers, files, rifflers, and chisels. The last photos show the carved outline with cleaned background.
hNyaGwR.jpg

rc5yp87.jpg

I won't go further until after the last whiskering. Instead I'll move on to carve the outlines of all the other carving on the gun. Then I return and cut the details.

More to come.

dave
 
Looking sharp, Dave. Is the scaling multiplier a program or a table, or...? Have you tried a LED light for raking light during carving? I find an old incandescent light works better.
 
Hi Wayne,
I use LEDs now. They work fine and there is no heat, which I really hate during summer. The scaler is just arithmetic. For example, the distance from the cheek piece to butt plate from the photo was 2.6" and the same measurement on the actual stock was 3.9". 3.9/2.6 = 1.5, which is one multiplier and the same calculation from the width of the butt stock was about 1.4. Averaged, (1.5+1.4)/2 = 1.45, which is the multiplier (scalar) I used. Then you scan the tracing and insert the image in a PowerPoint slide. Using the "format picture" functions, I select "size" and replace 100% with 145%. That enlarges the tracing to the proper dimension and I just print it out. I could just draw the carving directly on the stock, but this gives me an exact copy of the original scaled to the stock.

dave
 
Hi,

Well, I cut all of the carving outlines and backgrounds but first, "peak color" is here and I thought you might like to see my little house and shop during the best season of the year.
IKTER4D.jpg

vup7Qbr.jpg

G3joZh4.jpg

Owvfepg.jpg

7pdw0YJ.jpg

zV1KqRz.jpg

8p9PVaJ.jpg

tRsP9Ln.jpg

VaBfYdk.jpg

9Wcx44L.jpg

Nkfu9IB.jpg

P3fptd5.jpg

Haines was a great carver and as I worked on these outlines, I could not help admire him. They are all going to work together really well and until you see them in 3D you don't fully appreciate the artistry. I am ready to do a final whiskering, then I'll do a final clean up of the major architectural features and borders. After that, I cut the detail in the carving and am ready for stain.
saWC9C7.jpg

GPmlYFW.jpg

QwIGmVB.jpg

vJJ8WlB.jpg

More to come,


dave
 
I don't know what I like better. The scenery, the dog, or the rifle.

Put all three together and you can't beat it!

Dave, you really have a piece of heaven there. Just gorgeous. In a couple of years when I retire, one of the first really extended trips my wife and I will make in our motorhome is going to be to the NE in the fall to cover Maine, New Hampshire, and Vermont.

I really appreciate all the guidance on your pattern transfer method and carving steps. I have a set of DVD's on carving and I only wish they had done half the job you did in these posts at clearly explaining and showing a step-by-step process. I never felt very confident in tackling some carving even after watching those DVD's several times, but your explanations and methods are so clear, it should inspire those of us that have been perhaps a bit timid about giving it a whirl to try it. I have a pistol build that has been on the bench on and off for a couple of years now. The basic build part is pretty much done and I've been thinking of trying some carving and might finally have the courage to give it a try (after some scrap practice, of course!)

Mike
 
Hi,

I had to slow down a bit because I had to work on getting my home and land buttoned up for winter. I also had some gun repair work to do on a swivel breech rifle for a friend visiting from Alaska. I did the final whiskering of the stock and am cleaning it up to get ready for final carving. For me, carving and getting a stock ready for stain and finish around carving are the two longest tasks on a gun. I measure all other individual tasks required to build a gun in hours but those carving and stock clean up tasks in days and sometimes weeks. The muzzle loading gun maker community often engages in long discussions concerning historically consistent "workman-like" quality versus modern perfectionism when it comes to finishing contemporary muzzleloaders. Often, when you examine original long rifles in the hand, you see tool marks, file marks, rough carving, crude engraving, etc. Despite that, the gun overall looks great and even the less than perfect workmanship is very effective and attractive. The old makers were working in a trade, not a hobby and time was money. They usually did just enough to look good but did not fuss over perfection. However, the Haines rifle I am using as my model seems to be an exception. The detail in the carving and finish is extremely high quality and above that on some other Haines guns. On this gun, it seems that a modern standard of perfection applies more than almost any other original long rifle. It makes me wonder who the customer was? Anyway, I will be fussing over the finish of this rifle and preparing it for stain and finish will take time. I included some photos showing dtails of the stock after the last whiskering. You can see how low angle, single source lighting shows the rough areas needing attention. Notice the nice graceful beginning of the ramrod molding near the muzzle of the gun and the sharp end to the comb. In coming days I will document the carving of details.
De8nNH7.jpg

rfuYV9r.jpg

BAB4z78.jpg

MdXAFm3.jpg

E5UMMZs.jpg

Notice that I almost wiped out the lower butt stock molding under the cheek piece carving . That is OK and I will redefine it later.

I have a question for Spikebuck and any others who have George Shumway's "Rifles in Colonial America Vol 1". Look at the photo below from the book and what is your opinion about the rear corner of the cheek piece? Look closely. It appears that Haines cut or filed a concave step there but it could be just a chip of wood lost over time. It does not match the forward corner of the cheek piece and is not seen on any other Haines rifles for which I have photos. What do you think?
PZXcjva.jpg

Also note the forward ramrod pipe as well as the other 2 piped are anchored with 2 pins. Haines was a quality maker.
dave
 
Last edited:

Latest posts

Back
Top