Beautifully done on that cheek piece!
-
This community needs YOUR help today. We rely 100% on Supporting Memberships to fund our efforts. With the ever increasing fees of everything, we need help. We need more Supporting Members, today. Please invest back into this community. I will ship a few decals too in addition to all the account perks you get.

Sign up here: https://www.muzzleloadingforum.com/account/upgrades -
Friends, our 2nd Amendment rights are always under attack and the NRA has been a constant for decades in helping fight that fight.
We have partnered with the NRA to offer you a discount on membership and Muzzleloading Forum gets a small percentage too of each membership, so you are supporting both the NRA and us.
Use this link to sign up please; https://membership.nra.org/recruiters/join/XR045103
You are using an out of date browser. It may not display this or other websites correctly.
You should upgrade or use an alternative browser.
You should upgrade or use an alternative browser.
An Early Vermont Rifle
- Thread starter dave_person
- Start date


Help Support Muzzleloading Forum:
This site may earn a commission from merchant affiliate
links, including eBay, Amazon, and others.
Birddog1911
40 Cal
- Joined
- Sep 8, 2021
- Messages
- 434
- Reaction score
- 499
Hi Dave,
Forgive the question from the neophyte. But, is there any French influence to the stock? The profile makes me think of a Fusil, somewhat.
No matter what, as always, beautiful work, and I can't wait to see the finished product.
Forgive the question from the neophyte. But, is there any French influence to the stock? The profile makes me think of a Fusil, somewhat.
No matter what, as always, beautiful work, and I can't wait to see the finished product.
- Joined
- Nov 26, 2005
- Messages
- 5,017
- Reaction score
- 9,961
Hi,
First let me thank you all for your interest and comments. I appreciate them and I hope you find this thread useful. New England made rifles from the 18th century are extremely rare and most rifles attributed or documented to that period are nothing like the 19th century rifles commonly made in NE and identified as such. It is a story that needs telling but the data are very sparse.
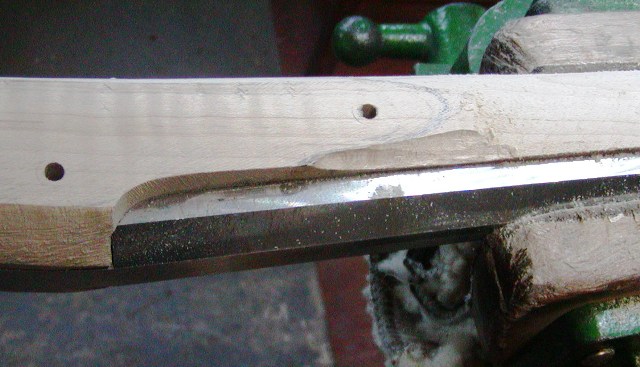
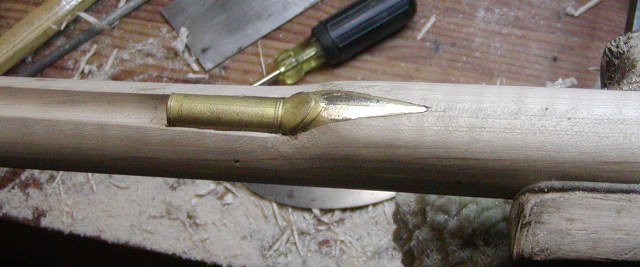
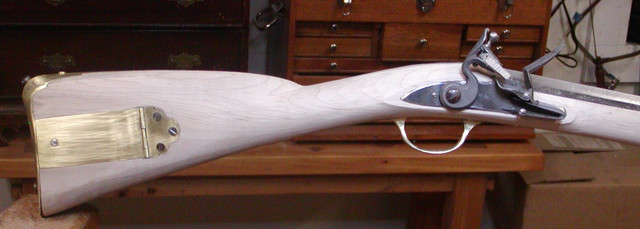
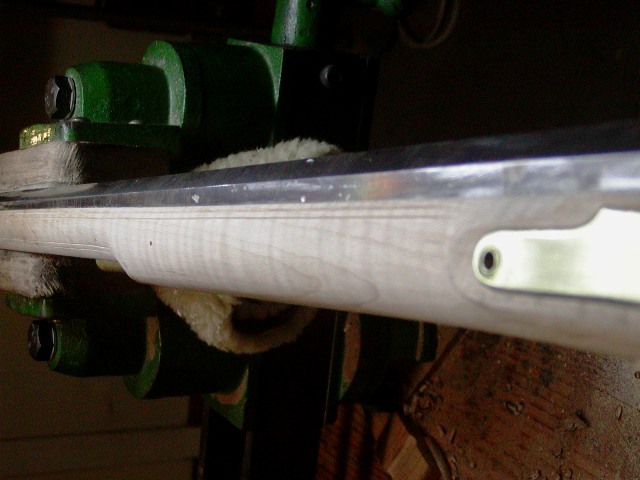
Got a lot of shaping done. I've posted several threads over the years about shaping lock panels, breech area, and wrist. I also taught that process at Dixons and now at the Kempton gunmaker's fair. I'll just say here that I do not use gouges or chisels to shape those areas except for the very nose of the lock panel. This is a task that most new builders get very wrong and if done badly, ruins the entire project. Anyway, I shape the lock area and wrist with pattern makers rasps and the lock and side plate panels form naturally as I round the squared up stock. Here you can see how the panels are formed without any recourse to chisels.
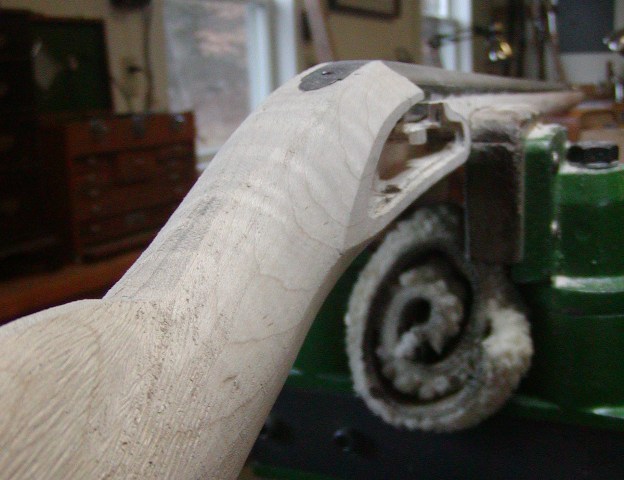
Just use the rasps flat and convex sides to shape the stock. I do use gouges to shape the nose of the lock and sideplate panels. However, I want to describe to you some of the nuance pertaining to that task. I don't believe you will find this in any video or book. First, let define my rules for lock panels based on experience with original guns and making aesthetically pleasing recreations. Please do not assume I mean these to be the ONLY way. There may be other combinations that fly but these are my candid observations and guidelines for my work.
1. Limit the use of chisels and gouges to shape lock and side plate panels to the final stages of the process and for details.
2. Keep the flats around round-faced lock plates vanishingly small and allow flats around any lock to expand only as you progress toward the 19th century. This always has exceptions but those exceptions are usually associated with poorly trained rural gun makers.
3. Flats around locks do not need to be even. When they are even the result is often awkward and clumsy looking. This is because the lock itself does not look even around its borders. I has greater mass on top and less below. Making the flats wider below and narrower on top enhances balance in the appearance. Moreover, extending the flats forward at the nose and rearward at the tails also improves the image.
4. The lock panel and side plate panel do not need to be identical. If you look down on the stock from the top, I believe it best that the panels start and end looking even and the points of beginning and ending should be at the same vertical positions the sides of the stock. Beyond that, all bets are off. Particularly in English work, I tailor the panels to fit the lock and the sideplate separately.
5. There is almost never a need for an ugly notch to clear the flintcock if you know what you are doing.
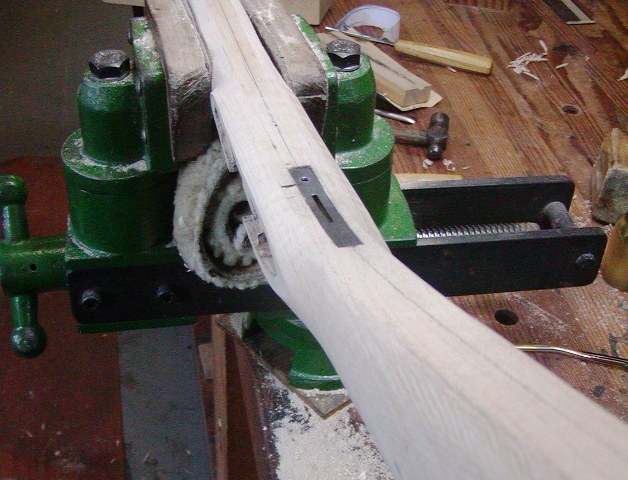
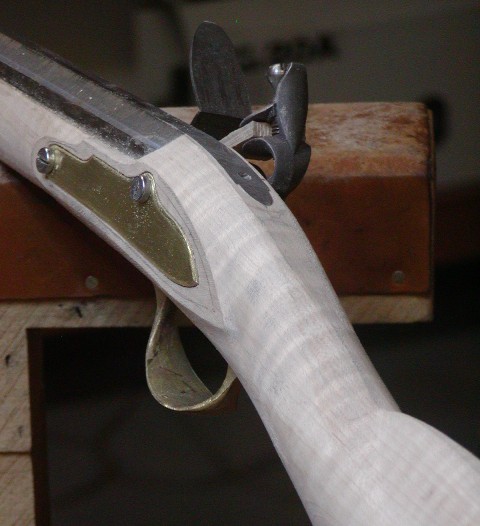
John Hills' lock panels are simple and some are finely shaped and others not . Moreover, they vary a lot between his guns so this gives me some latitude. As I wrote before, I don't use gouges much except around the nose of the panels. Even the use of gouges has nuance and I am going to describe some details that I do not think anyone has provided before. I am focusing on the lock panel shaping extending from the lock pan down to the nose of the lock. So many inexperienced builders make that area look clumsy and awkward. Sometimes they punt and don't even try to shape it just cutting it off as part of the "flat" and leaving a big ugly flat blob. Others try to cut tightly concave edges that follow the lock evenly to the pan. Those are more skillful but they usually look very clumsy. Here is how I do this on most guns and particularly my British guns but also many long rifles and New England guns.
I want both panels to be close to symmetrical on the Hills gun so I shape the lock side, then do a rubbing of the panel on paper and transfer it to the other side of the stock. That provides the guidelines to work from.
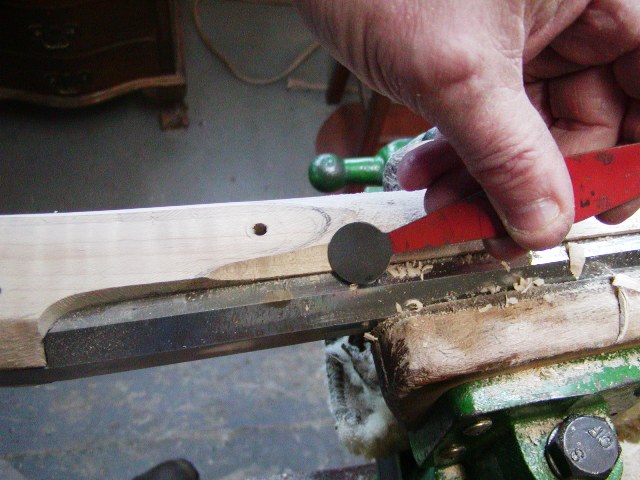
Then I use a wide shallow sweep gouge to cut the area from the lock pan to the nose of the side panel. I do not use a small diameter gouge. I want the concave surface to be shallow and broad. IMO, this looks immensely better than a deep tight radiused depression at this position. It is also he way British guns were done.
Then I smooth the cuts with a wide Fisher round scraper I bought from Brownells 40 years ago.
Next, I use a smaller gouge to cut the curve around the front of the panel.
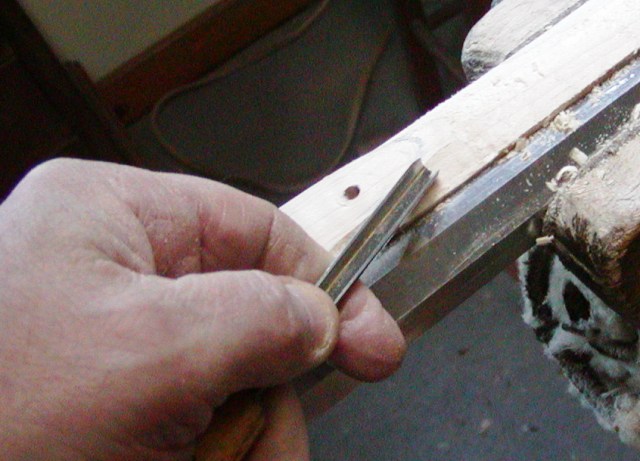
And then clean up the panel with a round file.

Here is the finished work.
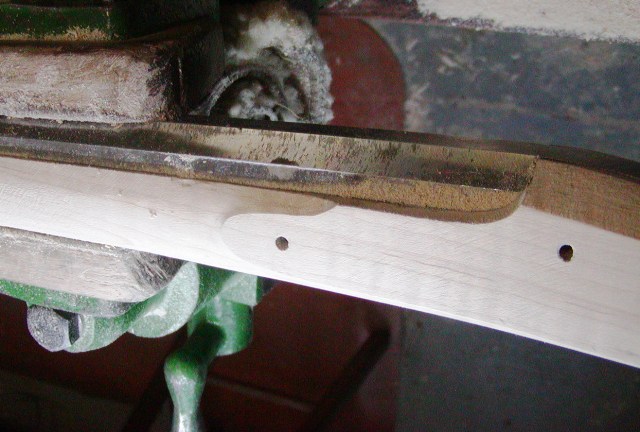

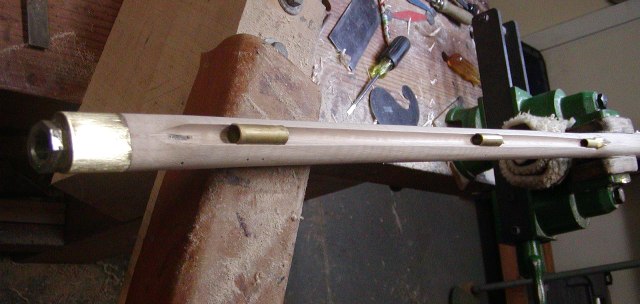
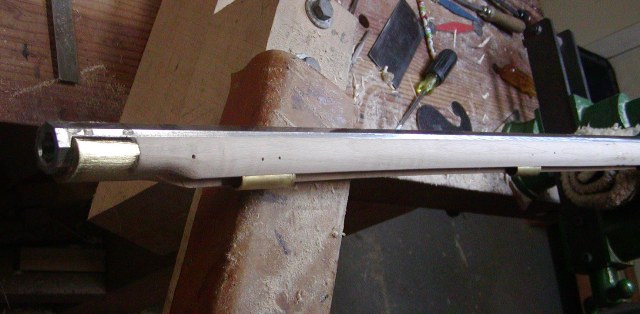
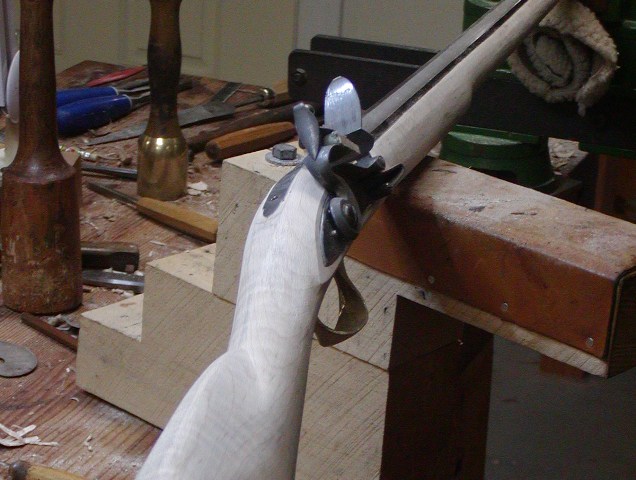
I also did a lot of shaping of the stock. Here is where I am.
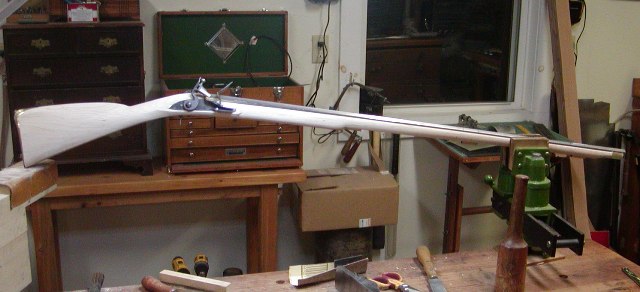
dave
First let me thank you all for your interest and comments. I appreciate them and I hope you find this thread useful. New England made rifles from the 18th century are extremely rare and most rifles attributed or documented to that period are nothing like the 19th century rifles commonly made in NE and identified as such. It is a story that needs telling but the data are very sparse.
Got a lot of shaping done. I've posted several threads over the years about shaping lock panels, breech area, and wrist. I also taught that process at Dixons and now at the Kempton gunmaker's fair. I'll just say here that I do not use gouges or chisels to shape those areas except for the very nose of the lock panel. This is a task that most new builders get very wrong and if done badly, ruins the entire project. Anyway, I shape the lock area and wrist with pattern makers rasps and the lock and side plate panels form naturally as I round the squared up stock. Here you can see how the panels are formed without any recourse to chisels.
Just use the rasps flat and convex sides to shape the stock. I do use gouges to shape the nose of the lock and sideplate panels. However, I want to describe to you some of the nuance pertaining to that task. I don't believe you will find this in any video or book. First, let define my rules for lock panels based on experience with original guns and making aesthetically pleasing recreations. Please do not assume I mean these to be the ONLY way. There may be other combinations that fly but these are my candid observations and guidelines for my work.
1. Limit the use of chisels and gouges to shape lock and side plate panels to the final stages of the process and for details.
2. Keep the flats around round-faced lock plates vanishingly small and allow flats around any lock to expand only as you progress toward the 19th century. This always has exceptions but those exceptions are usually associated with poorly trained rural gun makers.
3. Flats around locks do not need to be even. When they are even the result is often awkward and clumsy looking. This is because the lock itself does not look even around its borders. I has greater mass on top and less below. Making the flats wider below and narrower on top enhances balance in the appearance. Moreover, extending the flats forward at the nose and rearward at the tails also improves the image.
4. The lock panel and side plate panel do not need to be identical. If you look down on the stock from the top, I believe it best that the panels start and end looking even and the points of beginning and ending should be at the same vertical positions the sides of the stock. Beyond that, all bets are off. Particularly in English work, I tailor the panels to fit the lock and the sideplate separately.
5. There is almost never a need for an ugly notch to clear the flintcock if you know what you are doing.
John Hills' lock panels are simple and some are finely shaped and others not . Moreover, they vary a lot between his guns so this gives me some latitude. As I wrote before, I don't use gouges much except around the nose of the panels. Even the use of gouges has nuance and I am going to describe some details that I do not think anyone has provided before. I am focusing on the lock panel shaping extending from the lock pan down to the nose of the lock. So many inexperienced builders make that area look clumsy and awkward. Sometimes they punt and don't even try to shape it just cutting it off as part of the "flat" and leaving a big ugly flat blob. Others try to cut tightly concave edges that follow the lock evenly to the pan. Those are more skillful but they usually look very clumsy. Here is how I do this on most guns and particularly my British guns but also many long rifles and New England guns.
I want both panels to be close to symmetrical on the Hills gun so I shape the lock side, then do a rubbing of the panel on paper and transfer it to the other side of the stock. That provides the guidelines to work from.
Then I use a wide shallow sweep gouge to cut the area from the lock pan to the nose of the side panel. I do not use a small diameter gouge. I want the concave surface to be shallow and broad. IMO, this looks immensely better than a deep tight radiused depression at this position. It is also he way British guns were done.
Then I smooth the cuts with a wide Fisher round scraper I bought from Brownells 40 years ago.
Next, I use a smaller gouge to cut the curve around the front of the panel.
And then clean up the panel with a round file.
Here is the finished work.
I also did a lot of shaping of the stock. Here is where I am.
dave
Brokennock
Cannon
I might have missed it in, or forgotten it from, an early post of yours,,,, and if so I apologize for the question.New England made rifles from the 18th century are extremely rare and most rifles attributed or documented to that period are nothing like the 19th century rifles commonly made in NE
For those of us who don't have the book that includes the original Hills gun you are basing this on,,,, approximately what year was the original gun built?
I've also had no luck with Google searches trying to find images of Hills guns. I get some of the fowling piece you recreated previously, and a lot of hits to your posts and pics here and on the ALR. None of Hills rifles.
Thank you very much for all that you share with us.
- Joined
- Nov 26, 2005
- Messages
- 5,017
- Reaction score
- 9,961
Hi Brokennock,
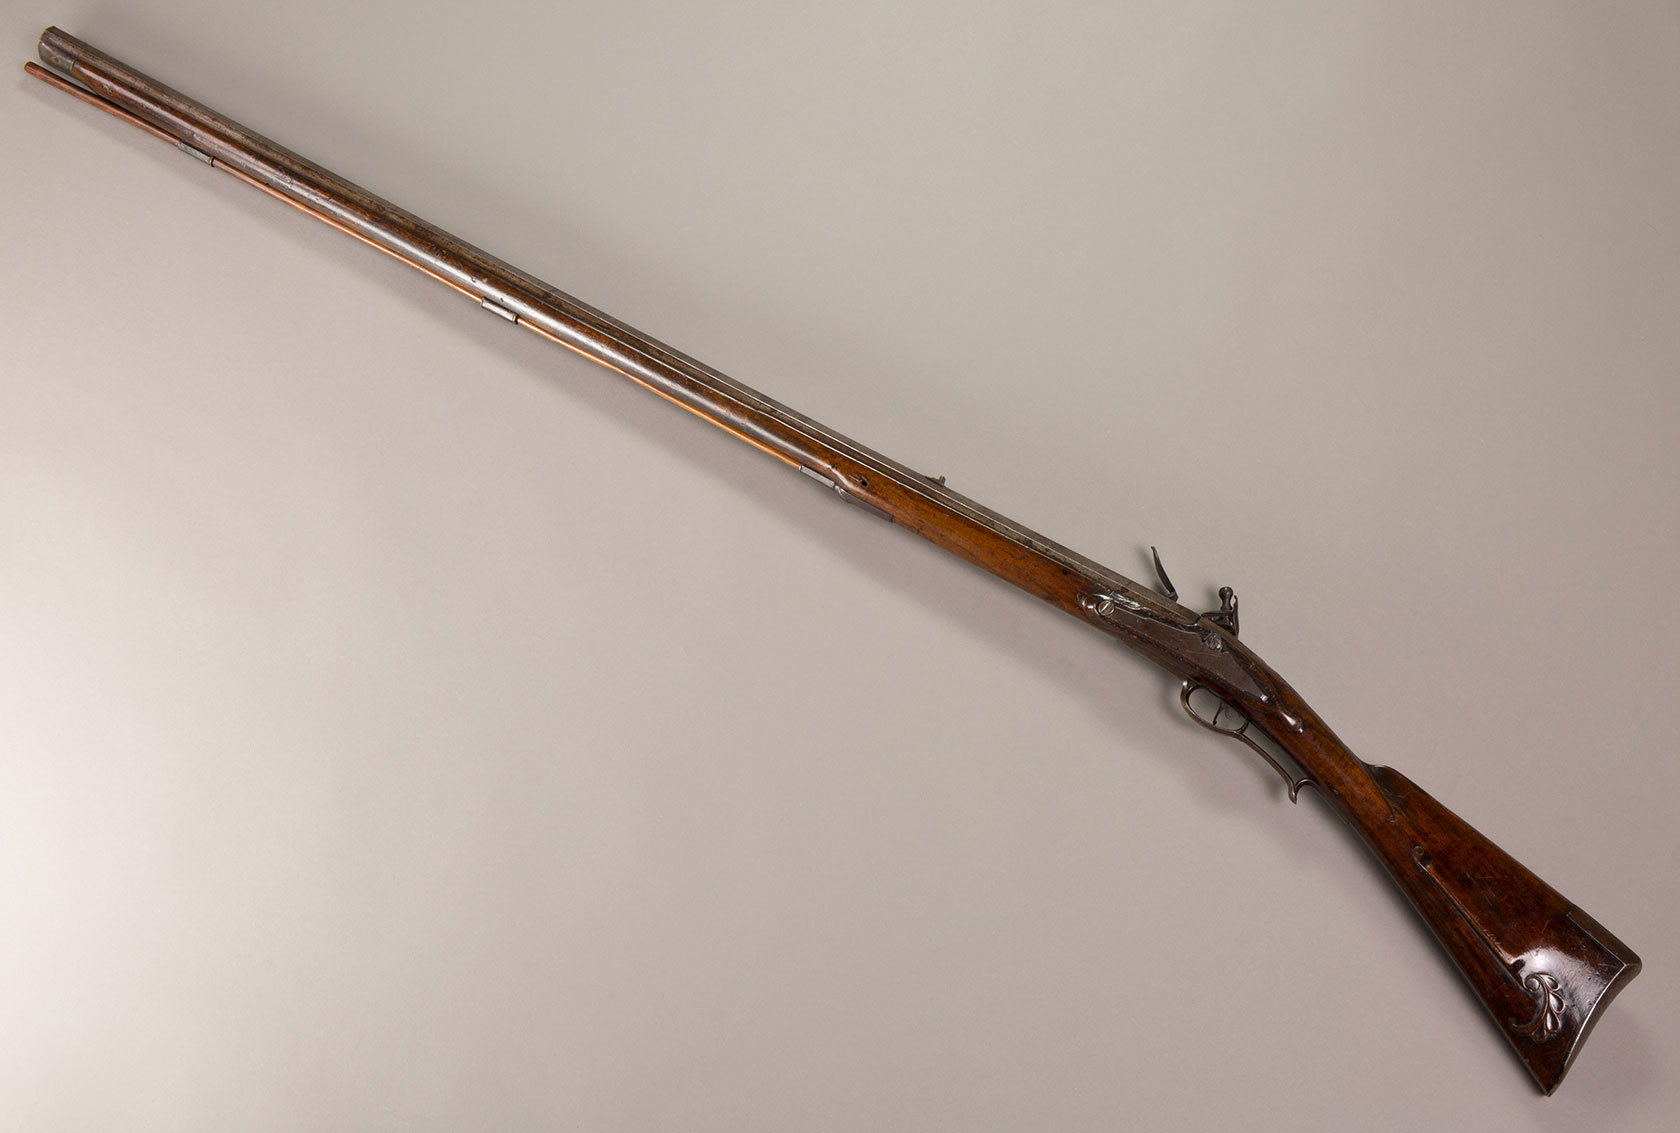
Thanks for your note and questions. There are 2 John Hills rifles that I am aware of. Both were made in the 1790s while he was living in Charlotte, VT. You won't find any photos of his rifles on the internet. The only ones I know are those published by Shumway years ago. I won't post them because of copyright restrictions. I have no idea who owns those rifles now. However, there is a good example of John Hills' work published by Merrill's auctions. Here is a link.
https://www.liveauctioneers.com/item/51526667_very-rare-1793-john-hills-charlotte-vt-51-calIt will give you some idea of some of the details, although the rifles have slightly different architecture..
dave
Last edited:
Brokennock
Cannon
Thanks. That auction house gun us the only one I found. Thank you for the rough date.Hi Brokennock,
Thanks for your note and questions. There are 2 John Hills rifles that I am aware of. Both were made in the 1790s while he was living in Charlotte, VT. You won't find any photos of his rifles on the internet. The only ones I know are those published by Shumway years ago. I won't post them because of copyright restrictions. I have no idea who owns those rifles now. However, there is a good example of John Hills' work published by Merrill's auctions. Here is a link.
https://www.liveauctioneers.com/item/51526667_very-rare-1793-john-hills-charlotte-vt-51-calIt will give you some idea of some of the details, although the rifles have slightly different architecture..
dave
Are you aware of anyone else building rifles in New England at that time,,, or earlier?
I know Hills' lineage connects to Goshen, CT near me, I am unaware of any rifles being built there at that time or earlier.
Thanks for sharing, I really enjoyed all of the pictures and info.
- Joined
- Nov 26, 2005
- Messages
- 5,017
- Reaction score
- 9,961
Hi,
There is the famous Tileston rifle made in MA and dated 1773. It is the second oldest signed and dated long rifle known. The stock is cherry and the PA longrifle style hardware is iron. The trigger guard is the finest forged iron guard I've ever seen and looks very like the cast brass guards. This is the only photo of it I have but it was published in Muzzleblasts some years ago and is included in the new book about the long rifle exhibition at Rock Ford Plantation .
There are some who think it a southern gun and there is a Tileston in SC. However, there was a Thomas Tileston working near Boston during the 1770s and the carving on the gun is identical to that on a NE fowler from that time by Hollbrook who also worked near Boston. There are several very early (pre Rev-war) rifles likely from upstate NY that show strong Dutch influence. There is also a club butt gun from NE that is rifled. I think Shumway shows it inn his "Longrifles of Note". I don't have any pictures.
dave
Brokennock
Cannon
Thank you.Hi,
There is the famous Tileston rifle made in MA and dated 1773. It is the second oldest signed and dated long rifle known. The stock is cherry and the PA longrifle style hardware is iron. The trigger guard is the finest forged iron guard I've ever seen and looks very like the cast brass guards. This is the only photo of it I have but it was published in Muzzleblasts some years ago and is included in the new book about the long rifle exhibition at Rock Ford Plantation .
There are some who think it a southern gun and there is a Tileston in SC. However, there was a Thomas Tileston working near Boston during the 1770s and the carving on the gun is identical to that on a NE fowler from that time by Hollbrook who also worked near Boston. There are several very early (pre Rev-war) rifles likely from upstate NY that show strong Dutch influence. There is also a club butt gun from NE that is rifled. I think Shumway shows it inn his "Longrifles of Note". I don't have any pictures.
dave
Capt. Jas.
58 Cal.
- Joined
- Aug 19, 2005
- Messages
- 3,005
- Reaction score
- 1,249
The Tileston is a very pleasing rifle in many aspects. Dave do you think that Heylin lock on the it is original to the initial build? Regardless, it still had to come off a Heylin piece originally.
Brokennock
Cannon
Do you have a pic of it from the lock side? Mayne it could be posted elsewhere so as not to further muddy the water in this topic?The Tileston is a very pleasing rifle in many aspects. Dave do you think that Heylin lock on the it is original to the initial build? Regardless, it still had to come off a Heylin piece originally.
- Joined
- Nov 26, 2005
- Messages
- 5,017
- Reaction score
- 9,961
Hi,
Thanks for the kind comments. I do hope this thread is useful. Well, another challenge for the project is nobody makes a triggerguard even close to those made by Hills. So I bought this one from TOW.
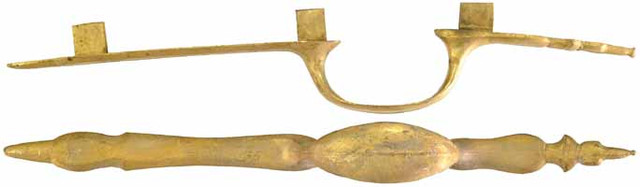
Then I modified it a lot. I cut off the front extension and filed the rear into a simple even width extension. I made a front finial from a piece cut from an old wax cast butt plate. I did that rather than simply use sheet brass because of the color match. Then I drilled and threaded a hole into the front of the bow, made the front extension and drilled a hole through it, and made a tab with threaded lug so it could anchor the assembly together and form the tab for the forward cross pin.
I assembled it and then silver soldered the front extension, tab, and trigger guard together.
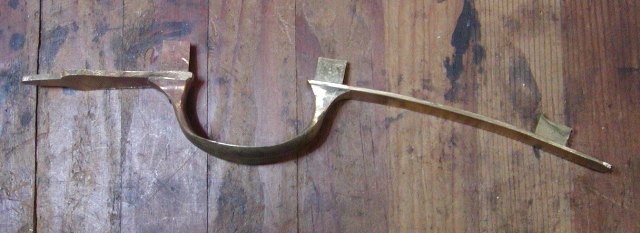
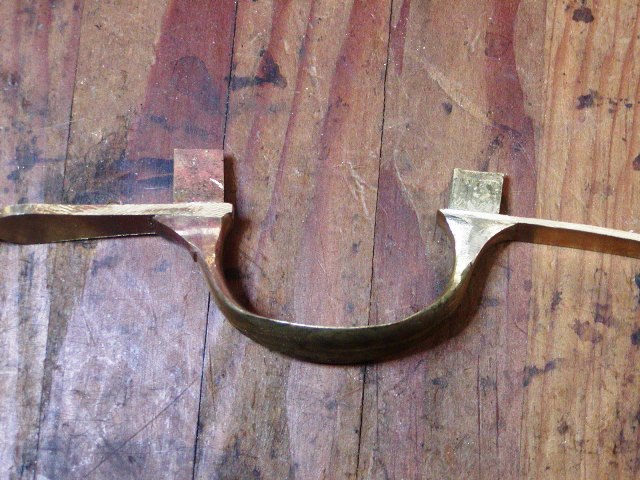
It is not a perfect match to guards by Hills but is close.
dave
Thanks for the kind comments. I do hope this thread is useful. Well, another challenge for the project is nobody makes a triggerguard even close to those made by Hills. So I bought this one from TOW.
Then I modified it a lot. I cut off the front extension and filed the rear into a simple even width extension. I made a front finial from a piece cut from an old wax cast butt plate. I did that rather than simply use sheet brass because of the color match. Then I drilled and threaded a hole into the front of the bow, made the front extension and drilled a hole through it, and made a tab with threaded lug so it could anchor the assembly together and form the tab for the forward cross pin.
I assembled it and then silver soldered the front extension, tab, and trigger guard together.
It is not a perfect match to guards by Hills but is close.
dave
Brokennock
Cannon
That seems like a lot of work for that trigger guard, but probably second nature and no sweat to you.
How common were rifled guns with no grip rail on the trigger guard like this? I can think of one other (Shumway RCA vol2 #118), but that may be because I don't have all the expensive books on the subject.
How common were rifled guns with no grip rail on the trigger guard like this? I can think of one other (Shumway RCA vol2 #118), but that may be because I don't have all the expensive books on the subject.
- Joined
- Nov 26, 2005
- Messages
- 5,017
- Reaction score
- 9,961
Hi Brokennock,
Only a few have survived that have no hand rails. Hills apparently merged his fowler design with some traditional Germanic (or maybe Dutch) rifle features. His hardware likely was derived from the Dutch Hudson River Valley styles. He grew up in CT but near the NY border. His stocks are similar to other NE fowler designs that show strong French influence.
dave
- Joined
- Nov 26, 2005
- Messages
- 5,017
- Reaction score
- 9,961
Hi,
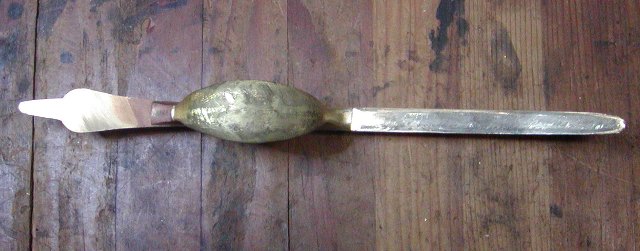
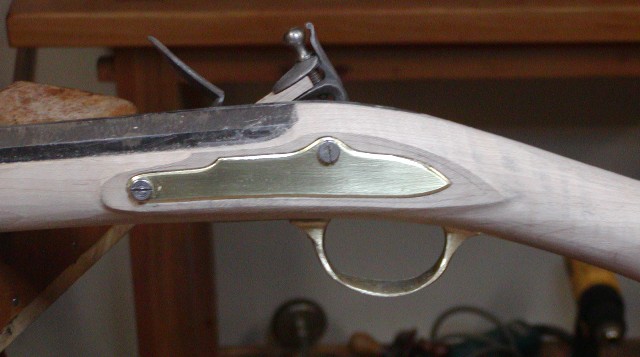
I inlet the trigger guard today and did more final shaping of the stock. The trigger plate is a commercial cast steel one from TOW and so is the trigger. They were perfect for this gun but the plate is long and the French-style guard has a middle tab for a pin that overlaps the plate. I had no worries because I just filed the tab into a hook and cut a slot for it in the trigger plate. This was done many times on British guns eliminating the need for one or more cross pins. It worked great. You position the hooked tab into the slot, then push down and slide it back to hook on the plate. At the same time the forward extension pops into the mortise and is pinned, and you push the rear extension in place to receive its pin. You just have to make sure the mortises for the front and rear lugs can accommodate the movement of the guard.
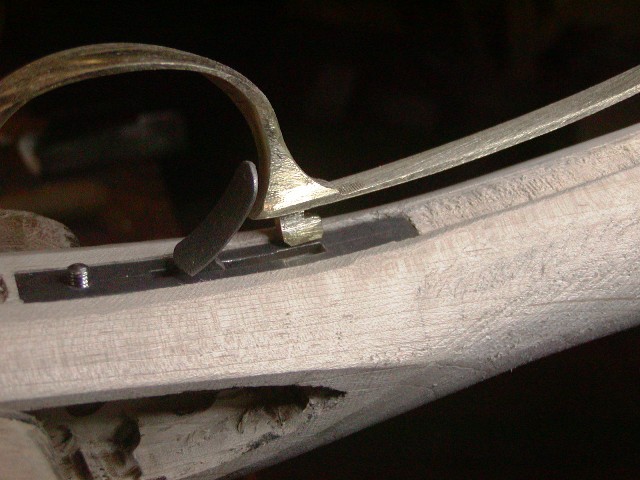
When inletting these long fowler-like guards, inlet the front extension first and either clamp or pin it.
Then inlet the rear extension working gradually backward. As the guard is set in the mortise, the rear will migrate forward. If you cut the mortise for the entire rear extension at once, you will end up with a gap forming at the rear. You also need to make sure the lug mortises have space toward the trigger so the guard can move forward as it is set in place.
No need for wood filer if you just pay attention and do it right.
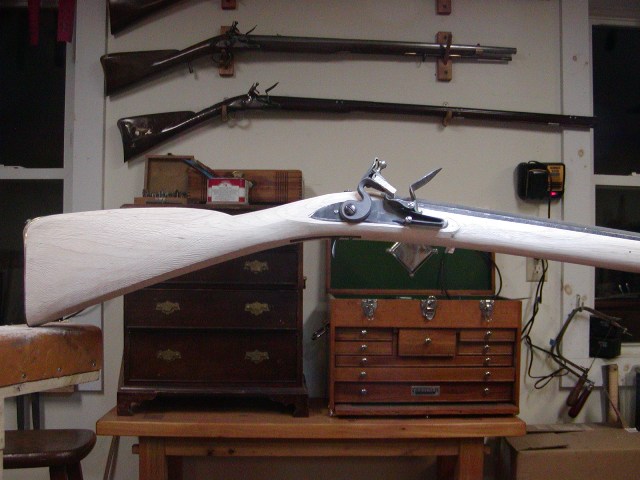
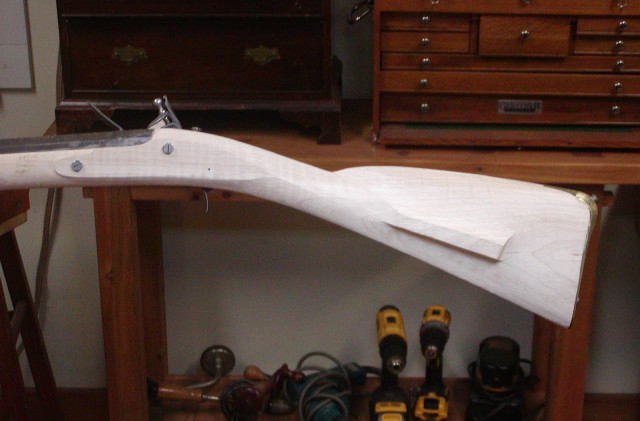
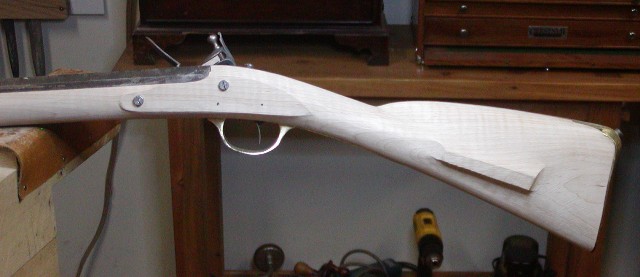
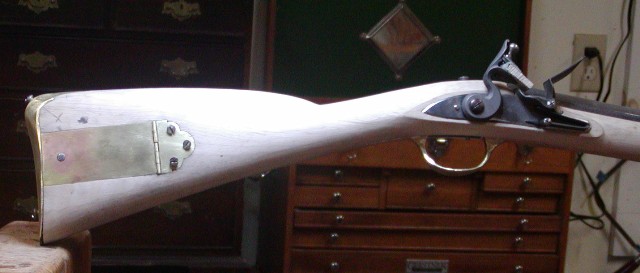
Got a lot more final shaping done. It is looking sleek.

dave
I inlet the trigger guard today and did more final shaping of the stock. The trigger plate is a commercial cast steel one from TOW and so is the trigger. They were perfect for this gun but the plate is long and the French-style guard has a middle tab for a pin that overlaps the plate. I had no worries because I just filed the tab into a hook and cut a slot for it in the trigger plate. This was done many times on British guns eliminating the need for one or more cross pins. It worked great. You position the hooked tab into the slot, then push down and slide it back to hook on the plate. At the same time the forward extension pops into the mortise and is pinned, and you push the rear extension in place to receive its pin. You just have to make sure the mortises for the front and rear lugs can accommodate the movement of the guard.
When inletting these long fowler-like guards, inlet the front extension first and either clamp or pin it.
Then inlet the rear extension working gradually backward. As the guard is set in the mortise, the rear will migrate forward. If you cut the mortise for the entire rear extension at once, you will end up with a gap forming at the rear. You also need to make sure the lug mortises have space toward the trigger so the guard can move forward as it is set in place.
No need for wood filer if you just pay attention and do it right.
Got a lot more final shaping done. It is looking sleek.
dave
- Joined
- Nov 26, 2005
- Messages
- 5,017
- Reaction score
- 9,961
Hi,
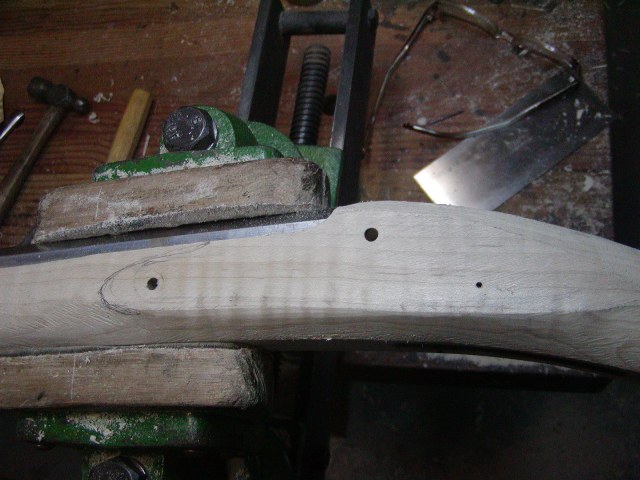
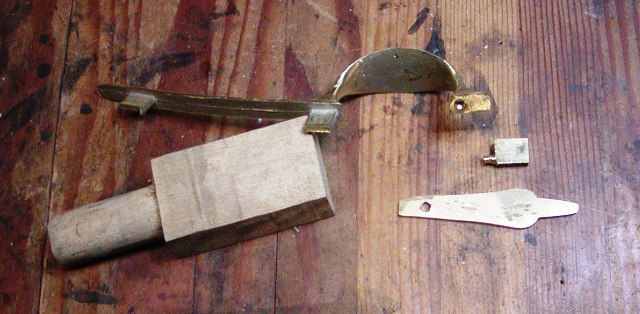
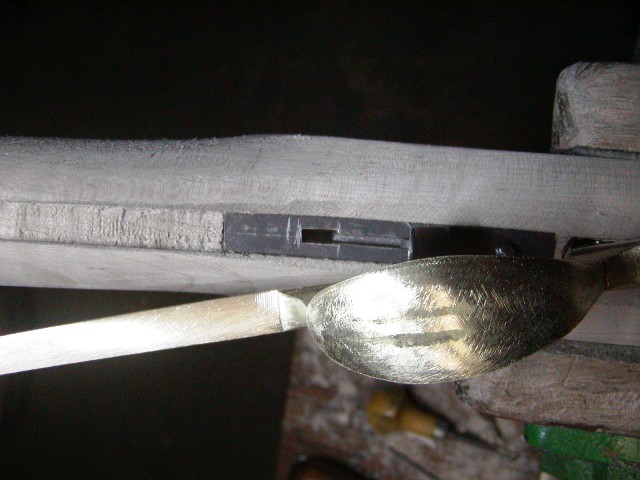
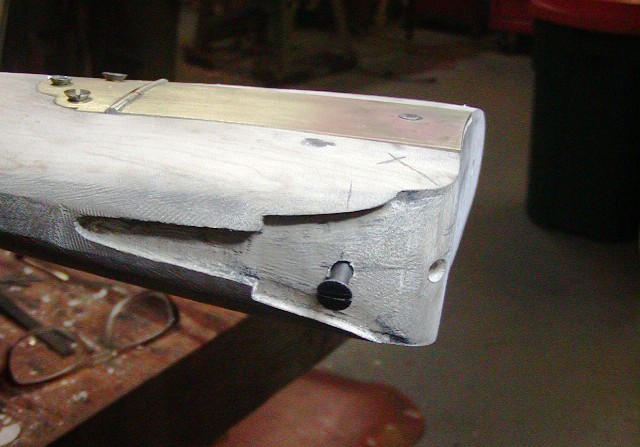
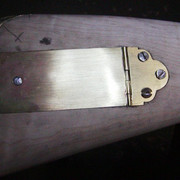
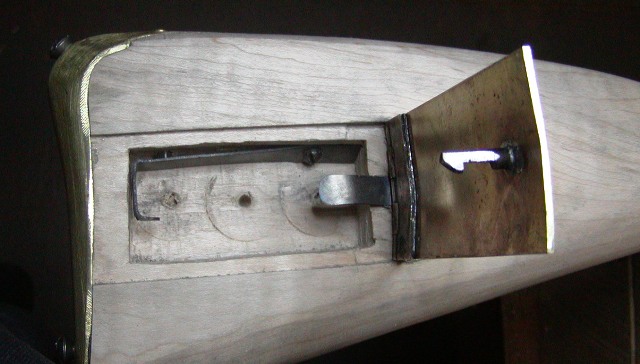
The Hills' rifles have brass patch boxes. They are wide, fairly short, and oddly inlet. The style is attracive but the dimensions are not that pleasing and the position on the butt stock is high off center and perpendicular to the face of the butt plate. I decided to make a more attractive box using the same style and install it in a less funky position. However, I did not want to lose all of Hills' style so I made what I think is a pretty good compromise. The screws are temporary. I keep a collection of old screws with worn heads to use as temp screws that get turned in and out many times when a part is fitted. Then I replace them with clean finished screws at the end of the project.
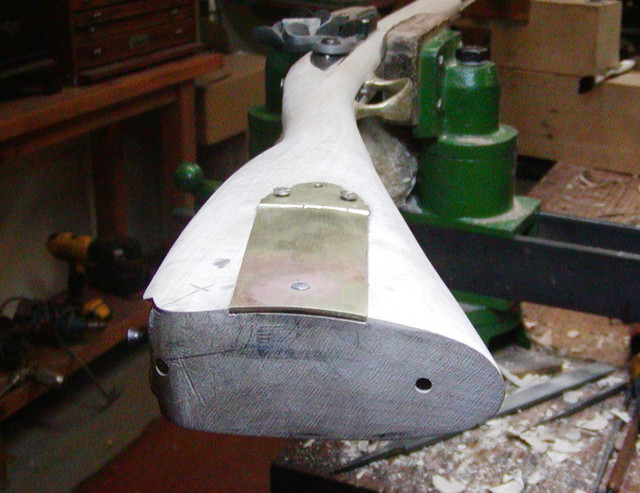
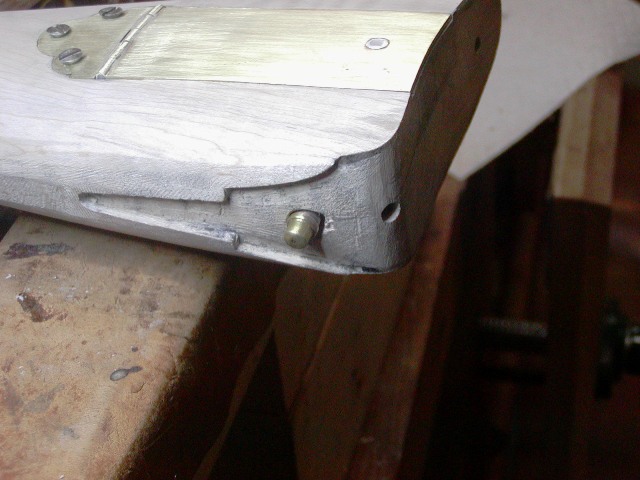
Another odd feature is the rear of the lid ends short of the butt plate with a strip of wood in between. That strip must have been very fragile and it is cracked, crumbled, and chipped on both original rifles. I was curious why he did that until I started making my own box for the gun. The butt plate has a screw in the heel and to avoid that, Hills had to position his release rod located in the return of the butt plate, far enough forward to clear the screw. That puts the catch on the lid quite a ways forward as well and obstructing a significant portion of the interior space of the box. So I believe Hills just moved the patch box forward from the butt plate. I was not going to do that so I had to devise a work around for the heel screw. I used a thin bar of spring steel, bent it to wrap around the top and back of the mortise and then turn bach into the mortise to form a hook for the lid catch. So the release spring and hook are all one piece of 1075 steel. I gave the screw end of the spring a little twist so I could access the head of the screw with a turn screw.
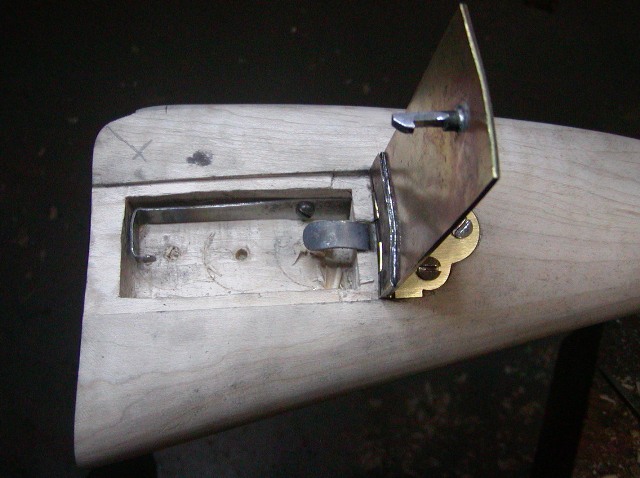
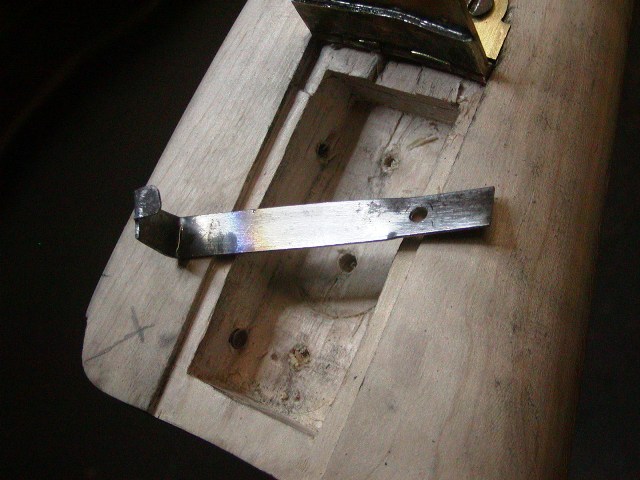
Then I drilled for the release bar and button, which pushes the spring and releases the hook. It works really well. The catch is strong and positive but release doesn't take much pressure on the button. In the final version, I may use slightly thicker spring steel. Now I have to drill butt plate return for the button, and fit it.
dave
The Hills' rifles have brass patch boxes. They are wide, fairly short, and oddly inlet. The style is attracive but the dimensions are not that pleasing and the position on the butt stock is high off center and perpendicular to the face of the butt plate. I decided to make a more attractive box using the same style and install it in a less funky position. However, I did not want to lose all of Hills' style so I made what I think is a pretty good compromise. The screws are temporary. I keep a collection of old screws with worn heads to use as temp screws that get turned in and out many times when a part is fitted. Then I replace them with clean finished screws at the end of the project.
Another odd feature is the rear of the lid ends short of the butt plate with a strip of wood in between. That strip must have been very fragile and it is cracked, crumbled, and chipped on both original rifles. I was curious why he did that until I started making my own box for the gun. The butt plate has a screw in the heel and to avoid that, Hills had to position his release rod located in the return of the butt plate, far enough forward to clear the screw. That puts the catch on the lid quite a ways forward as well and obstructing a significant portion of the interior space of the box. So I believe Hills just moved the patch box forward from the butt plate. I was not going to do that so I had to devise a work around for the heel screw. I used a thin bar of spring steel, bent it to wrap around the top and back of the mortise and then turn bach into the mortise to form a hook for the lid catch. So the release spring and hook are all one piece of 1075 steel. I gave the screw end of the spring a little twist so I could access the head of the screw with a turn screw.
Then I drilled for the release bar and button, which pushes the spring and releases the hook. It works really well. The catch is strong and positive but release doesn't take much pressure on the button. In the final version, I may use slightly thicker spring steel. Now I have to drill butt plate return for the button, and fit it.
dave
- Joined
- Nov 26, 2005
- Messages
- 5,017
- Reaction score
- 9,961
Hi,
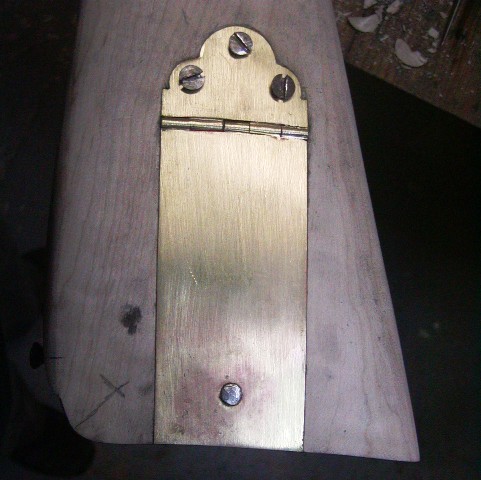
I forgot to mention that I made the patch box with the hinge made separately from the lid and finial. I learned that method from Dave Crisalli. The hinge is soldered to the finial and lid and makes for a nice clean look when polished up. On one of the original Hills rifles, he made the lid and its hinge loops from one piece of thin brass double the length of the lid. The excess brass from forming the hinge loops then extends under the lid all the way to the end so the lid has a double thickness of brass for strength. The brass is then riveted together with 13 (copper, brass, iron?) rivets. In deference to John Hills, I am going to add 3 copper rivets to reinforce the attachment of the hinge to the lid.
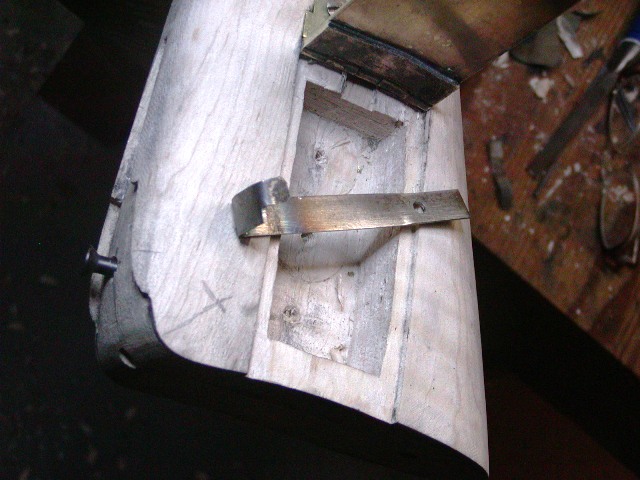
I got the release button done. I am really happy with this catch mechanism. It is very positive, simple, and almost fool proof. When the lid catches, you get an audible "click" and the push button mechanism works smoothly and very positively. It seems much better than the mechanisms sold by TOW and others with the "V" spring catch mechanism that can be finicky, not very positive and still work, and subject to a lot of adjustments. My only concern is that tools or stuff placed in the patchbox mortise could interfere with the spring catch. We will see. I made the push rod release from a bolt blank and turned a little brass "top hat" button. The rod is bent to accommodate the angle of the hole in the stock. Most of that hole is slightly larger than the diameter of the rod but the top portion is drilled wider to allow for movement of the button.
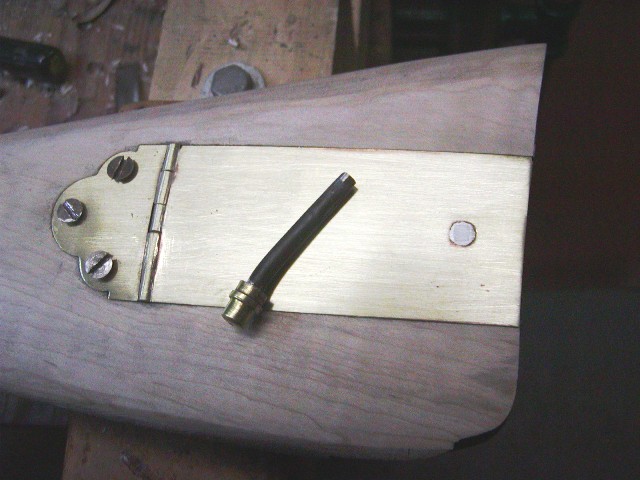
It needed a little adjustment for length but fit well and works great. I hardened and tempered the springs and am done with it.
The catch is sturdy and positive with an audible "click" when engaged.
dave
I forgot to mention that I made the patch box with the hinge made separately from the lid and finial. I learned that method from Dave Crisalli. The hinge is soldered to the finial and lid and makes for a nice clean look when polished up. On one of the original Hills rifles, he made the lid and its hinge loops from one piece of thin brass double the length of the lid. The excess brass from forming the hinge loops then extends under the lid all the way to the end so the lid has a double thickness of brass for strength. The brass is then riveted together with 13 (copper, brass, iron?) rivets. In deference to John Hills, I am going to add 3 copper rivets to reinforce the attachment of the hinge to the lid.
I got the release button done. I am really happy with this catch mechanism. It is very positive, simple, and almost fool proof. When the lid catches, you get an audible "click" and the push button mechanism works smoothly and very positively. It seems much better than the mechanisms sold by TOW and others with the "V" spring catch mechanism that can be finicky, not very positive and still work, and subject to a lot of adjustments. My only concern is that tools or stuff placed in the patchbox mortise could interfere with the spring catch. We will see. I made the push rod release from a bolt blank and turned a little brass "top hat" button. The rod is bent to accommodate the angle of the hole in the stock. Most of that hole is slightly larger than the diameter of the rod but the top portion is drilled wider to allow for movement of the button.
It needed a little adjustment for length but fit well and works great. I hardened and tempered the springs and am done with it.
The catch is sturdy and positive with an audible "click" when engaged.
dave
Last edited:
- Joined
- Nov 26, 2005
- Messages
- 5,017
- Reaction score
- 9,961
Hi Richard, Jim, and Bob,
Thank you for your comments. I appreciate them a lot. Bob, as you know from the "other" forum, I try to highlight details that often are not discussed, if at all, and even hard to find in the "how to" books. Just sort of filling in some gaps in details that I think are important.
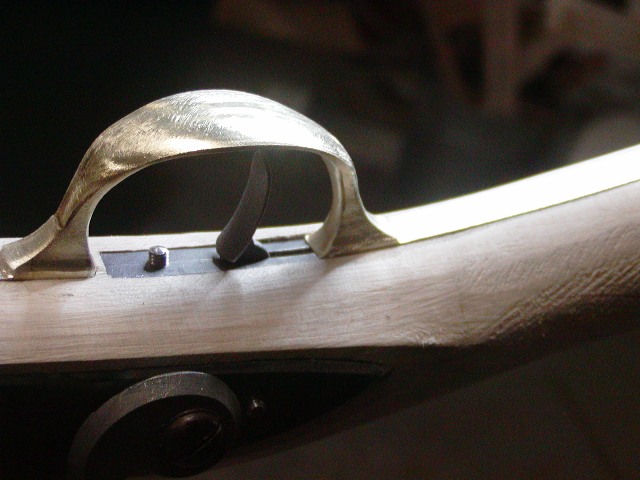
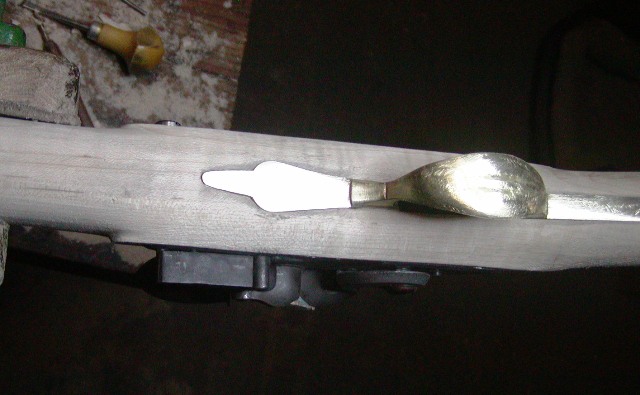
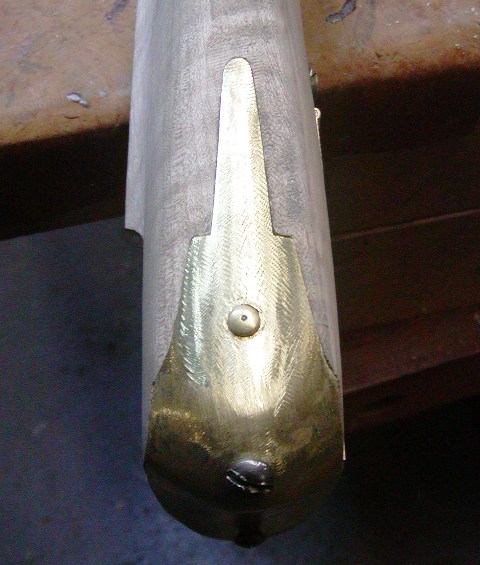
I made the side plate today. Hills seemed to use 2 types. The rear lock bolt areas and tails of his types are the same but the forward section has either 1 step on top or steps top and bottom. Here is an example of the latter.

Here is my version of the former made from 1/8" thick brass sheet.
It is a style the entire Hills family used from the mid 1700s. Mine will eventually be engraved in John Hills' style.
After inletting the side plate, I refined the lock and wrist area. Hills was not terribly fussy about those features. On some guns they have precise edges and shapes, and on others not so much. Width of lock panel flats varied from very thin to medium wide and the tails rather indifferently defined. On this one, the flats will be thin and shaped with a bit more care.

dave
Thank you for your comments. I appreciate them a lot. Bob, as you know from the "other" forum, I try to highlight details that often are not discussed, if at all, and even hard to find in the "how to" books. Just sort of filling in some gaps in details that I think are important.
I made the side plate today. Hills seemed to use 2 types. The rear lock bolt areas and tails of his types are the same but the forward section has either 1 step on top or steps top and bottom. Here is an example of the latter.
Here is my version of the former made from 1/8" thick brass sheet.
It is a style the entire Hills family used from the mid 1700s. Mine will eventually be engraved in John Hills' style.
After inletting the side plate, I refined the lock and wrist area. Hills was not terribly fussy about those features. On some guns they have precise edges and shapes, and on others not so much. Width of lock panel flats varied from very thin to medium wide and the tails rather indifferently defined. On this one, the flats will be thin and shaped with a bit more care.
dave
- Joined
- Nov 26, 2005
- Messages
- 5,017
- Reaction score
- 9,961
Hi,
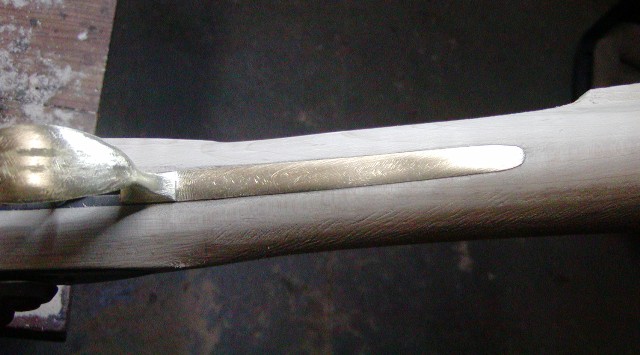
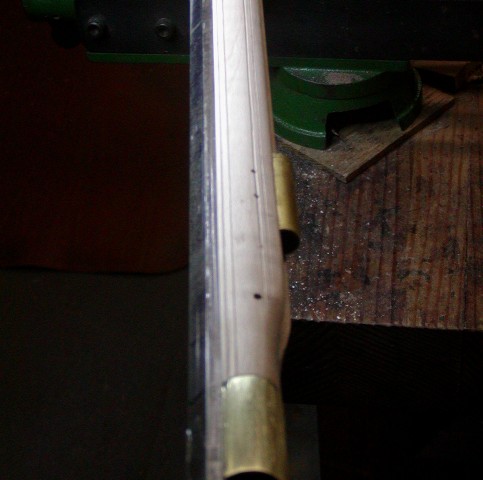
Fun day working on this rifle. The grunt stuff is done and now the fun stuff, albeit not a lot of it. Some John Hills guns and many New England guns have double line borders along the barrel channel and ramrod groove. I think the inspiration was from better quality French guns. Sometimes the border is a pair of raised beads as on this New England fowler.
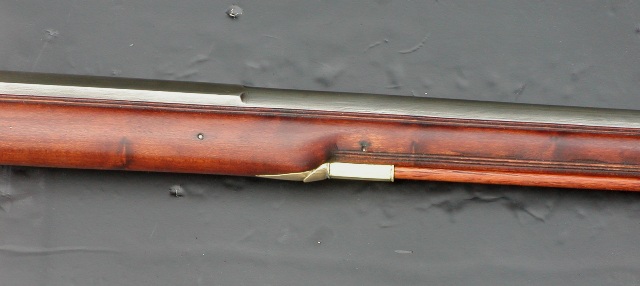
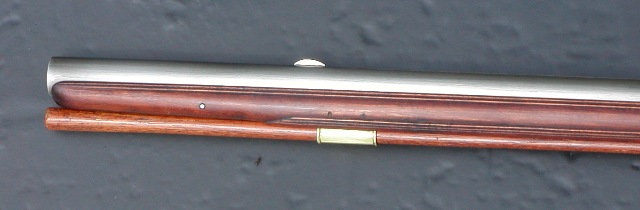
Hills just cut incised lines. I cannot tell if he did this on his rifles but the famous "Rufus Greene" fowler made during the same time period has them. I decided to use the decorative device on this rifle. The shaping of the fore stock must be finished first and the surface as even and true as possible, otherwise the lines will look rough, wobbly, and uneven. I use an old marking gauge I inherited that was my great great great grandfather's. His name was E. E. Muschlitz and he grew up and was trained as a carpenter and joiner in Nazareth, PA. He moved to Brooklyn, NY and built many of the famous "Brooklyn Brownstone" homes in the late 1800s. Anyway, I deeply scribe the main line.
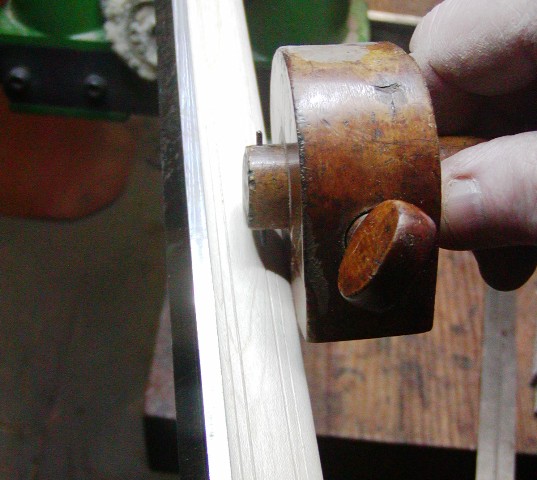
Then I deepen the line using a long single line checkering tool made in England.
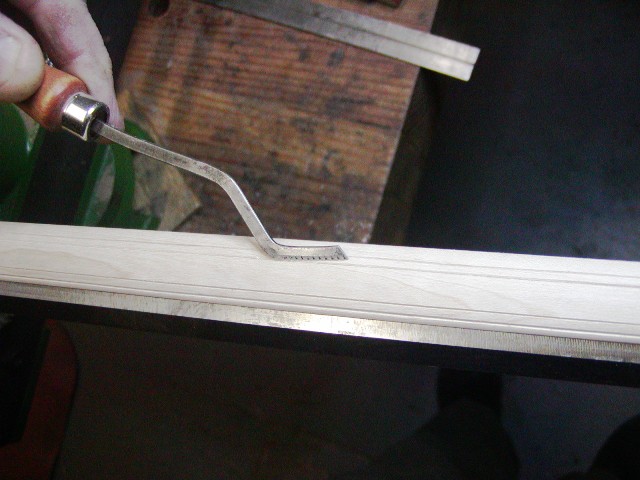
Then I use a 60 degree skip line checkering tool (16 lines/inch spacing) to cut the parallel lines.
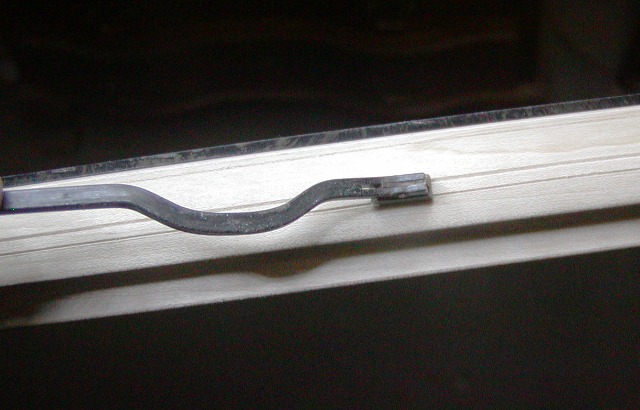
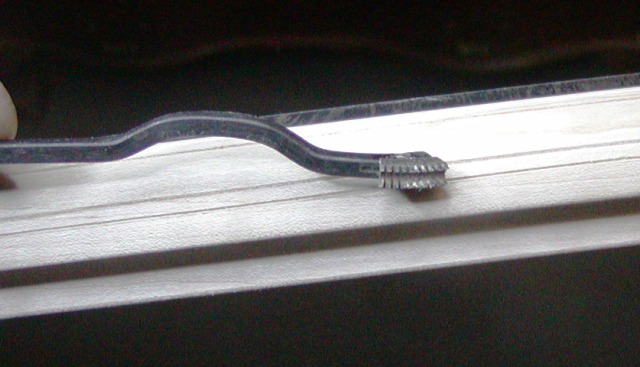
The result is very pleasing. I go over the top lines of each pair with a 90 degree cutter so the end result when stained will be a "thick and thin" decorative border.
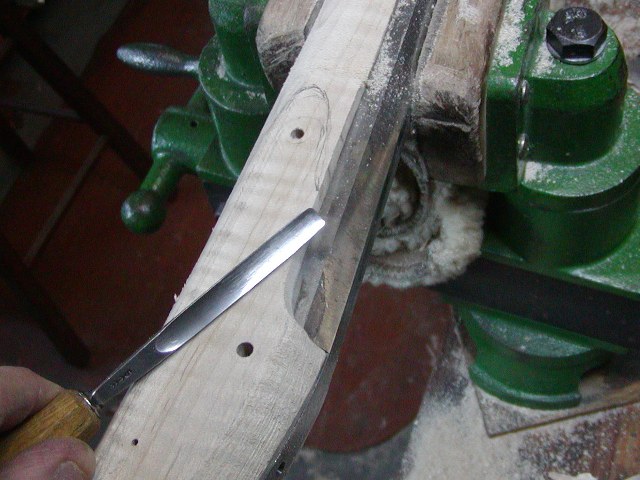
Next up is outlining carving around the barrel tang and removing the background. Hills usually carved a simple shape that sometimes looks like a shell and other times a round fan. It is sometimes hard to determine what he meant it to be. I created a design that mimics Hills' work but is a little more refined and unambiguous.
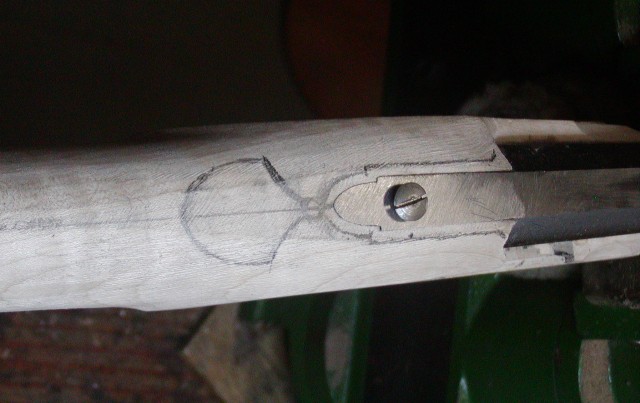
I stab the edges in with small flat chisels.
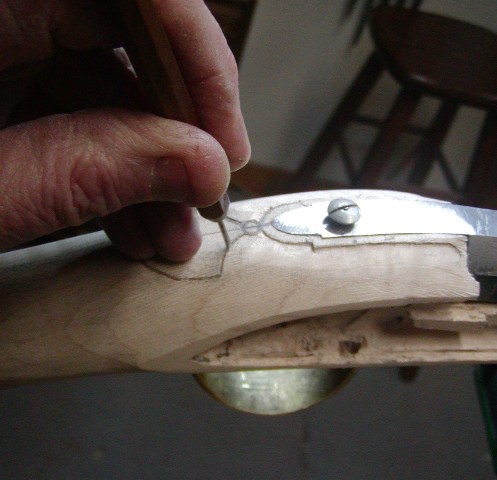
Then use small skew chisels and riffler files to remove and smooth the background and clean up the edges.
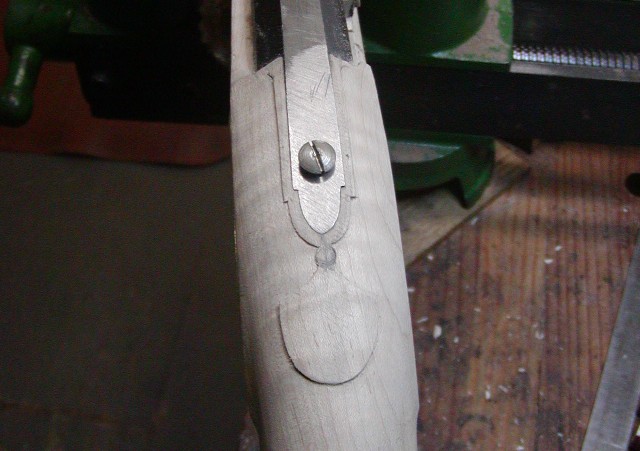
I leave it here until after I have whiskered the stock in preparation for final finish and staining. After whiskering, I will cut in the details in the carving. This kind of design is found on so many New England guns. I call it the "potted plant on a pedestal" design. Some leafy or radiant shape at the end of straight austere borders along the barrel tang. It is not very imaginative but it is effective decoration. Next up, the wrist plate and finishing the stock.
dave
Fun day working on this rifle. The grunt stuff is done and now the fun stuff, albeit not a lot of it. Some John Hills guns and many New England guns have double line borders along the barrel channel and ramrod groove. I think the inspiration was from better quality French guns. Sometimes the border is a pair of raised beads as on this New England fowler.
Hills just cut incised lines. I cannot tell if he did this on his rifles but the famous "Rufus Greene" fowler made during the same time period has them. I decided to use the decorative device on this rifle. The shaping of the fore stock must be finished first and the surface as even and true as possible, otherwise the lines will look rough, wobbly, and uneven. I use an old marking gauge I inherited that was my great great great grandfather's. His name was E. E. Muschlitz and he grew up and was trained as a carpenter and joiner in Nazareth, PA. He moved to Brooklyn, NY and built many of the famous "Brooklyn Brownstone" homes in the late 1800s. Anyway, I deeply scribe the main line.
Then I deepen the line using a long single line checkering tool made in England.
Then I use a 60 degree skip line checkering tool (16 lines/inch spacing) to cut the parallel lines.
The result is very pleasing. I go over the top lines of each pair with a 90 degree cutter so the end result when stained will be a "thick and thin" decorative border.
Next up is outlining carving around the barrel tang and removing the background. Hills usually carved a simple shape that sometimes looks like a shell and other times a round fan. It is sometimes hard to determine what he meant it to be. I created a design that mimics Hills' work but is a little more refined and unambiguous.
I stab the edges in with small flat chisels.
Then use small skew chisels and riffler files to remove and smooth the background and clean up the edges.
I leave it here until after I have whiskered the stock in preparation for final finish and staining. After whiskering, I will cut in the details in the carving. This kind of design is found on so many New England guns. I call it the "potted plant on a pedestal" design. Some leafy or radiant shape at the end of straight austere borders along the barrel tang. It is not very imaginative but it is effective decoration. Next up, the wrist plate and finishing the stock.
dave
Thanks again for this tutorial. It is great that your still using your great great great grampaw’s scribe. I am not really an Anamist, but do sometimes wonder if the spirit of those who have gone ahead of us live on in the things they made and used.
Similar threads
- Locked
- Replies
- 10
- Views
- 589
- Replies
- 8
- Views
- 409
